How To Frame A Door Opening In A New Wall
Apr 08, 2024Hey everyone, okay, today I'm going to
frame
thiswall
for you and just show you that I have a couple of obstacles. I guess one isn't an obstacle, but I'm going to put adoor
right here and then the obstacle is the filled work above us, so I'm going to show you how to do all that. It's actually a lot simpler than you imagine, so let's get it right so that when we're framing adoor
. Obviously, we're going to want to consider not only the width of the door, but also a little bit more that way to allow for theframe
and then a little bit more for the shims so that you can set the door properly plumb, straight and square, so this is correct. here is an existing door at the bottom of the stairs here is a 32 inch wide door that is the door slab, but the approximateopening
that you can see is exactly 34 inches, so we have two inches of play and that allows , like I said the frame and then a little bit more to fit, so on this door here that we're going to frame today it's going to be a little bit bigger door, it's a 36 inch door, um, that's just because it's going to the part unfinished part of our basement, which is where our storage is, can, that way, fit like patio furniture in there in the winter and all that, so we're going to open up a 36 inch door right here, so let me show you how to do it all.
Well, ideally you want a piece of wood to go through all of this is a little bit longer than what I have on hand, so to compensate with this little piece of scrap here while I build this whole
wall
. I'm going to connect those pieces with a couple of screws just temporarily and then just cut out where the dooropening
is later, so for this door I just have that sill going all the way through later, I'll come with a saw. and just trim it right to start getting the length I need for this wall, I really want to plan ahead a little bit and know where I want this wall to land as well, so for that I have My laser shot line crosses where I want the next one to land wall and we can see it's at the 101 mark, but I'm going to want to extend it another three and a half inches for another stud that way I can put in a stud. on the end like this and then I can tie the next wall to this wall, so 101 inches plus three and a half I'm at the 104 and a half inch mark, so I'm going to cut this to 104 and a half inches and then like this I'll do that for the sill plate along the bottom, then I'll need some of that length along the top, so now I cut the top and bottom plate to size and we can start laying out the spacing between the studs, so let's start. in this corner here, okay, just spread the tape out a little bit and we know that a stud is an inch and a half and I want a double stud in the corner, so I'm going to make a mark at an inch and a half. and I'll make another mark at three inches, so that's our double plate on the side or in this corner and we know we have a 36 inch door, so plus two inches and 38 inches, that's our approximate opening from this stud to the following. stud over here, so take your tape measure, push it in until it lines up with the end of this last stud that you marked and then go down here, find that 38 inch mark that's right here, so that's that stud and then we're .
More Interesting Facts About,
how to frame a door opening in a new wall...
We're going to want another double stud, so we have 38 inches plus an inch and a half, 39 and a half, that's where our next stud will be, so it's important to note that your stud will be on this side and on this side here. so let me grab a square for that, really just for illustrative purposes, you don't have to mark this, but you can mark the other side of that stud, so these are two stud locations right there, there and then. Back in this corner where we started, we'll put a stud at the end, but then we'll mark there and there, so that's two stud locations here, so we have 38 inches between this mark and this mark, right now.

We know where the door will be, we locate it, we have double posts on either side of the door opening, now we can start placing our usual 16 center posts as we normally would, so take the tape measure and hook it on the end again , okay, it's at the end on the first stud mark that you're going to mark, actually it's going to be 15 and a quarter, let's mark 15 and a quarter, okay and then let's mark ahead, so x on that side is where the studs will sit. Okay, because we're going to have a stud on the end and then we're going to come out here.

The first mark is always 15 and a quarter, then take your tape measure and move the end to that 15 and a quarter mark. so we have the end of the tape measure at 15 and the quarter mark which makes the rest of this test false so now you can start marking your 16 so we have 16 x forward 32 x forward 48 x forward 64 x forward and 80 x forward, okay and then this is where our next wall is going to come in, right on the screen line, so imagine this is kind of the end of the wall, so you can plot where it intersects that green line and then just put an x on this. side because we're going to put a stud here so we're going to have a stud here and then we're going to rotate the next stud so we're going to split it roughly in half and then we're going to put a stud here so those are okay the locations of our studs so I'm going to take a speed square and I'm just going to transfer these markings to this green plate at the top here and now I'm inside the door that opens here, okay, but I still have these two markings here that are marking the 16 in the center locations .
I'm not going to transfer them to the green plate just because I'm obviously not going to have a stud in the door opening, but I will probably have some smaller studs above the door opening. So I'm going to extend these marks that way, that will help you later so that you don't have to go back and re-mark your 16 up the door. Okay, I just noticed a little mistake that I made so when I marked this location here for this stud that's going to be there, I put it on the wrong side actually it's going to be on this back side so I marked the location of your stud on this back side here and then the front of the green tree, so what that means is if I place my green plate it's going to sit right where it is here, I'll have a stud here and then when I go to place the top plate, I'm actually going to take it like this, rotate it 180 and it's going to be on the top here, so if you follow this corner, it's going to be on this back side.
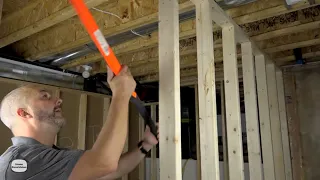
Sorry for the extra noise my heater just activated, but anyway, it's fine. Before we can get the height of the wall we need, we can see that right where the green plate is located, that's where this wall will be, so if we continue up we'll see that there's nothing for it to actually attach to. the top, so what I did was I cut a couple of these spacers and they're going to screw on, obviously they're going to be flat like this and then flush with the bottom of the floor joist, so I'm going to screw them on and that's going to give me something to mount the top of the wall, so here I'm simply stacking the two plates on top of each other and then I'm taking a measurement from the top of the stacked plates to the bottom of the floor joist and that's I'm going to give myself the stud height, same for under the air conditioning system, okay, so the two studs for the door frame, the two interior studs are going to be a little bit shorter than the rest, but I just measured and I need nine and a quarter inch for one two and then three studs and then I can say this one is going to land under the conduit and that was 81 and a quarter so I'm going to need one, two, three, four five of those studs at 81 and a quarter and then I'll come back for these two interior posts, um, but they should be the same as the rest of these door posts, I think they were 81 and a half, yeah, 81 and a half, so I got one, two, three to ninety and a quarter two to eighty. one and a half and five to eighty-one, I think, and here I'm just taking a measurement of where I need to cut the top plate so it falls under the ducts, so now I have my top. and bottom plate are marked and I have all the studs cut to size, so now it's just a matter of lining up those studs on the marks and nailing them into place.
For this, I'm just using a battery operated framing nailer and I'm using two nails on top and two nails on the bottom so I have most of the wall together. I only put one piece in so this is where the wall falls for the air conditioning system to come across and I just cut this piece to fit there so I'm going to have to nail it from the top and then from the side and then I'm going to have to cut a piece that extends from there to there as a header once you have it. So I can make a couple of short studs above the door, so this should be 38 plus 3 inches and so we're at 41 inches, so I'm just going to cut a piece at 41 inches, so I've got two more marks right here here just for the regular 16 that we marked earlier and they're seven inches and you should actually measure from the end because that's what it's going to want to be so I'm going to cut them into seven and one eighth because I think this has a slight slope to it and so In fact, here, instead of using this small piece, I should have cut a piece that extends between the space between the studs and that would have provided a little more rigidity, but in the end.
This worked well and now you can see me struggling to get this wall into place. It was a little tight, but that's what you want and I just used a hammer to tap it into place until it was perfectly aligned with the laser. line and to attach it to the adjacent wall and then on the top plate I just used some two and a half inch screws and then to attach the bottom of the wall to the floor I used a ram gun and this is basically a nail. and one charge and the charge shoots the nail into the ground when you hit the top with a hammer, okay, and all that's left to do is cut the sill plate inside the door opening, so I have my reciprocating saw .
Here I have the blade upside down and then I just cut it off, there we go, so yeah, that's all there is to it. If you enjoyed this video and found it helpful, it would be awesome if you could hit it up. The Like button below helps me grow my channel and also lets YouTube know that this was a decent video and maybe I should pass it on to other people to watch and while you're there, consider hitting the button subscription too. That way you'll receive a notification every time I post a new video. Thank you all for watching and until next time.
If you have any copyright issue, please Contact