How To Edge Plywood - You've been doing it WRONG !
Jun 06, 2021Hello, I'm Rob because and welcome to my store. In this video I am going to cover how to
edge
plywood
. How I do it. I'vebeen
doing
this for a long time. Plywood is a great material, it has advantages and disadvantages. you can learn to work with them. I'm going to show you how I am Rob Cosman and welcome to my store. Our job is to help you take your woodworking to the next level if you're new and haven't subscribed. do it, hit the notification bell to get alerts when we post a new video and every time we use a special tool we will always leave a description below, okay let's get to work, if you are new to woodworking you can not be that familiar withplywood
, in fact, there are many negative things about plywood, but actually used in the right place, it is a great product, it is very stable, that is its biggest advantage, that is, it will not increase in width or in length over time.
The downside to the lifespan of whatever you're building is that it has
edge
s that can't be left alone, it's not very pretty to see multiple layers or this is the meaning of mdf core instead of using what's called mdf core. sheet metal nearby. The core is several layers of thin wood and they are glued together. The grain is placed this way on one, the first piece in the opposite direction, the second piece always has an odd number of pieces and then the outside is its finish, in this case it is red oak, so there is a very thin slice red oak on each side.
More Interesting Facts About,
how to edge plywood you ve been doing it wrong...
This one uses mdf, which is actually my favorite and the reason is that it's even more stable, there are no gaps lurking beneath the surface of the veneer and what I mean by that is that sometimes you. There's going to be a knot or a void in one of these veneer layers, especially near the top and the veneer, the finished veneer goes over the top and all of a sudden right underneath you have a hollow spot. I've had that. This happened before too, sometimes the thickness is not consistent. Try to fit it into a three-quarter inch slot.

It may be tight here, loose here, tight here. You don't find that with the veneer with the MDF core it is a very stable product. more than the veneer core, heavier either way, both have their applications, but you have to be able to deal with that advantage, that's what I'm going to go through, I won't show you a ton of options. to show you what I use, what I think is the best, it's the fastest, it has worked and has lasted a long time, so the first question that always comes up when talking about veneer or, sorry, putting edges on a piece of veneer or plywood is what What should I do to get a strong bond?

Well, I will tell you that you don't need anything, you just need two flat, smooth surfaces, however, you have to observe some of the limitations that we know that if you glue something together. on the end of a piece of wood, in other words, take that piece of oak, this is the front grain, this is a piece of pine, this is the end grain, if you glue it together like this, you're not going to get a very strong joint because the glue doesn't stick to the end of the wood like it does to the glued edge so that glue joint becomes stronger than the glued wood itself so it could break quite easily with my hands if we look at a piece of veneer core, well, it What you're seeing is long grain here, end grain here, long grain here, end grain here and then grain here, a little bit of long grain right here on the oak piece and a little bit of long grain out here. so you'll have about half of this thickness, which is three-quarters, is long grain, so when you glue your piece of wood here instead of gluing it to a three-quarter inch piece of material, you're actually gluing about three- eighths of an inch now that it says it will still be pretty strong now on the mdf, some people worry even more about that, but I did tests several years ago when I was
doing
a project and found that the solid wood was stuck to that.The mdf edge would be more than strong, more than the strength required. I was actually surprised at how strong it was and yes you do get some long grain wood here along with the veneer but again it's too small to count but that solid wood. glued to that mdf would be extremely strong, it wouldn't be a problem at all, that's why I don't bother with any kind of indexing or any kind of tongue and groove, some people will go to the trouble of coming here and cutting a make a notch there and then a Sometimes they use a floating tab, which means they would cut a corresponding notch in this piece to see if I can make this pencil work and then they would have a hardwood slot, maybe even a hardboard slot, but they would.
Put it in the slot and they will glue the two pieces together and yes, it increases the surface area of the glue, but I was going to tell you that it is unnecessary, what it does is help index the two pieces, so what I'm going to do is almost unfair because I'm working with a couple of pieces that are 12 inches long when you start trying to put edge banding on something that's four five six seven feet then it gets a little more complicated in that application sometimes it's nice to have a tongue like that because you just put it together and start holding it and everything centers for you.
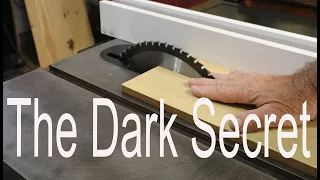
What you don't want to happen is glue this down and have the edge band move so that the bare plywood sticks out from the top of the edge band so you can I have to be able to keep that centered, that's an area where It's not a bad idea to have some kind of indexing, but in terms of strength, it's not necessary at all, in my opinion, okay, let's cover all the bases you want. a nice flat smooth surface here and here, but I'm going to cover this one first, so if I have a good table saw blade and in this case I'm using a cross cut, which means it has a lot of teeth and if you have If you have one problem with this, get what is called a zero clearance throat insert, which means where the blade goes through the throat there is no excess clearance on either side, so what I'm going to do, I'm going I'm going to come in here and I'm just going to clean that up as much as possible.
I'm not going to cut too hard. I'm going to do it nice and slow, so if we look at the back, it's nice and clean, no rips. I can still see some saw marks there, but it has given me a pretty smooth surface to work on. I'm going to get over it. I'm going to do a light pass with my plane and I'm actually only going to do one or two passes, that was enough to get one ready to glue and then this will be the edge band. Now I'll tell you a little about this if you try to use an edge band. that's very thin, you're going to have to have a lot more clamps now I have a friend in southern california whose name is ahmed and what he likes to do and I haven't done this enough to talk about it other than to show you.
I say, but he swears I'm just using masking tape to put it on and keep the edge band eye in place and once the glue dries, it has great results. I've always used clamps, so I'm going to stick with that today, but this may be something you want to experiment with. What I was going to say is that if you're trying to use edge bands that are that thin, you're going to have and are making a great traditional hold. Either you're going to have to add a call, which is another piece of wood like that to help distribute the pressure of the clamps, or you're going to have to put a clamp every three inches in there and that's a lot of clamps and a lot of weight so I'm going to do it my own way. way that is to glue with a thicker piece of wood and if I had a lot of work to do I would have an even wider piece because I would glue this on the big one The wide piece distributes the pressure of the clamp to reduce the number of clamps and then I would check the saw of table and would tear it off with a little extra to spare, clean this piece and use it to attach the next piece and just continue. and so on, but we're just making one just for demonstration purposes, so I have a piece that's a little better than an inch and a quarter wide.
I've already put it together but I want to improve it and I'm going to choose there's a little bit of hardwood there, you can see the brown and this is blonde, which color works best. I'm going to choose the blonde one, so I'm going to go in and clean that up now when I glue it on. That should give me a nice finish. I'm a little thicker than wood. If you're trying to be a wood stingy pun, that's only three quarters and if you're trying to use a three quarter inch piece of solid wood. You're going to have a really hard time keeping that so it's flush on both sides, you're inevitably going to end up with one that's a little low and now to rinse it off you're going to end up having to remove this material and I don't have much to play with so what I suggest is that, depending on your planing skills, you leave enough thickness so that when you feel it with your fingers you can tell that you are proud of the solid wood on both sides. you can come with your plane and we'll show you how to clean it, but that's ready to go together, so let me get a couple of clamps and we'll put this one together now.
My mentor, Dale Finish, once said that. you have the best glue spreader, there are five in each hand, actually four, so what I'm going to do is use my finger to spread the glue and if you can get it in one go, you better go back and make sure you have glue on everywhere you want it, if you don't have it it won't come on its own now I'd rather it not drip down your face so don't use too much. I think you just need, you just need. To glue one side, I'm not going to bother putting glue on the piece of maple.
Now put it in place and I'm just going to hold it for a second until it sticks, making sure I can feel on both sides that I have overlap, I have three clamps and the reason I use three clamps is because they tend to pull on one side, so I need to counteract that, although I really like these because they're a little bit easier to handle. than traditional pipe clamps, you can put them right there in the middle, so it almost negates what I just said about it slipping. Make sure they stick out on both sides.
I prefer not to do this on my good bench, but for filming purposes. It almost has to be, you always want, if you can, you always want the pressure to be applied right in the middle of both pieces when I used to use pipe clamps a lot, what I often did is take a piece of dowel. In fact, I'll show you this. I'm going to put a third one in the middle, this is where it really gets awkward when you're working with a long piece and have to use multiple clamps. Now you want enough pressure so that there is squeezing, but you don't want so much pressure that there is nothing left that can be left out.
I have excess all the way. It's almost silly to do it on something so small, but when it's a big six-foot piece it's a big deal, right? Jake convinced me that we should try a medication approach here on TV and see what happens next. I'm going to go ahead and do the same. I actually set this up the same way on the table saw, but I'm going to go in and do a couple passes with the planer. Now you're planing the long grain end grain, so we're going to have a little bit of tear here, a little bit of tear here.
There is a bit of breakage so be prepared. It's always good to have the board a little longer than you need so you can trim it later, but I want a nice clean surface on the top and bottom, and when I say that I mean this exterior skin. and that didn't break bad now, since we're going to use duct tape, we should be able to get away with a much thinner piece, so I'm going to cut this out, but the first thing I'm going to do what to do while it has some thickness is that I'm going to go in, I'm going to brush that face back, that blade a little bit, a little bit more, still, okay, a good light stroke, it's clean, I'm going to go.
I'm going to the band saw and I'm going to rip it off right there, here we go, get out your glue spreader, by the way, I really like Titebond Three, I don't do commercials, they don't sponsor me, I just eat that glue, it has water resistance and I've Had situations where a piece of furniture was left in a room and had a water line leak and ruined a piece of furniture. If he had used this glue at least he could have
been
saved. it was a folded lamination, so it completely delaminated, so we're going to put this back in place.This is wide enough to overlap or overhang on both sides. Now use regular tape. I'm going to raise it a little so that, as we pull down, the stick is not hard. He already I know it's okay, so I'm just checking to make sure we have ledges on both sides. do it, we'll put it aside. I don't have glue lying around, so we'll see what happens. The first thing I want to do is try the duct tape method. Remove the tape and rinse it. We'll show you a couple of different ways to hide the board. I'm curious to see if this was enough pressure to shut that down.
Now, if you hand plan the two surfaces before gluing them, you should be able to get a decent joint. Actually, I thought I had. all the way, I like to use my thumb to constantly feel where I am in terms of how much material needs to be removed. If possible, you want to keep as much of the plane as possible on the plywood side, so I'm not putting any downward pressure.here and I'm looking through and I want to cut with just the right side of the blade, so I don't worry or minimize the risk of that corner digging into my sheet metal, okay, that's very close, it's close there, so I'll focus a little on the middle.
I'm going to pull that blade a little bit and if you're wondering why I chose a five and a half, you could use a block plane. I happen to like this one. I need a little bit more blade and you can feel inside as well within about a thousandth of an inch with the pad of your thumb so you can get to the point where it's as perfect as you can see, so I'm going to switch and use my plane of block just because the footprint is smaller and I'm going to do this instead of riding the high spots, keep my throat tight, which means loosen the front knob, move the toe plate so there's just a little bit of exposition, forgive me, and what that does is if my sword breaks. cut in the sheet metal, it won't lift it if it ends up going upstream, a little bit of wax, it just reduces the friction now, when turning my plane on its side, like this, I'm lowering it or shortening that footprint if I do this like this then, once plus, I have such a long plane and if there is a dip there, it's not going to go down into the dip, it's going to shift at the two high points at each end if I turn at an angle like this, so I'm just using effectively or a plane that is so long versus so long and it has a better chance of going down in that valley, a little place here, okay, if I run my thumb over there, I don't feel anything, let's flip this. and do the other side, rub it hard here and when I do this so you don't end up, if you pull your sword out too far and put it here and leave, you'll feel a real mark right there.
So what I do with my sword with very little exposure, you put it there and as you do that you gradually start pushing down until it catches and then you don't have any transition marks, okay? I can clearly see that just from the color difference, some of that is due to hand planing versus sanding, which isn't as noticeable here and I would consider that to be completely acceptable in cabinet work on furniture, I wouldn't want to see that so I'm I'm going to show you a way to disguise it by the way I'm going to set up my magnifying glasses.
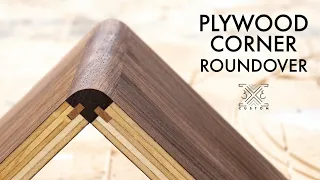
Look at it very closely because I'm quite impressed, so if you look at that very closely and if the camera can get in there. There is absolutely no gap between the solid wood and the plywood, so Ahmed, you're a genius and I'm going to show you a couple of examples of how I would do this now that I have an eight inch router bit here. If you look here, this is a 16-inch radius and I don't like a big radius in most applications, so a 16-inch radius is enough to make it soft to the touch. You can see it's a radius.
It's more accurate than trying. to do it with sandpaper, so I actually ran a 16 inch router bit in there and then probably used, you know, 240 sandpaper, maybe even 320, just to smooth it out a little bit, but what it does is it keeps that full width look if you put more radius in there, this is starting to look a little thin, not at that, but what I'm going to do is cut a chamfer on one side, show you how to do it and then go ahead and we'll process this, we just need to Continue until you get a complete shave, meaning the entire length and width, and then you will know you have the entire surface clean.
Now, if I'm doing this, I actually have what's called. a chamfer plane that is designed to cut a perfect 45 degree chamfer on an edge, but I can also do that with a block plane and what I'm doing with the block plane is using my finger on the bottom to go around that piece of wood to help maintain that angle now it's going in the
wrong
direction, but it's the most convenient way to plan, so I'm going to close that throat even more and I should be able to get a better surface. I have to see a little better.That's still tearing, so I'll do the last two passes the other way around. I'm just watching to make sure I get the joint right. Okay, we'll turn this around. We'll pull the blade a little. We will find the angle. Another pass did it. I don't mean to skip that point now if it's a heavy chamfer. I would remove a little more material from there. In fact, when we get ready to do this side, I'm going to take it and it's going to look a little bit better, but with that chamfer line right in that corner that disguises a little bit might fool a newbie, now we're going to go in there and cut that radius and we need a 16, we need an eighth of an inch left there, so come back to the table. saw and make another pass, now we need to make sure we set up the router so that part of the router bit is flush with the top or flush with the base of the router so that we don't leave our little ridge.
I don't have it plugged in there yet, I'll look at this first and I added an extra fence there just to give it a little more stability, an extra spike base, I should say, ah, now I'm going to grab a sanding block that's red oak, so 150 is all you would need and I'm just going to hit that corner, so if you were building something that could almost be considered furniture grade because the radius, the top of the radius is right at that joint. line and it does a good job of hiding it and it's strong that it will never come off now there's the look of the chamfer side when we cut it a little bit so it's not so heavy and that's decent like Well I wouldn't sand I wouldn't sand that because I wouldn't you want to lose that nice professional sharpness, that nice sharp point that you have on both sides if you're going to use the chamfer that you're looking for. the nice crisp lines, if you're going to use a round radius like that then it's a completely different story.
Now I'm going to do the same. I'm going to process this one too, but having started with a thicker piece, I don't want to have to plan all that material. I'm going to brush it down to about a quarter of an inch, then we'll go in and brush that side and see what it looks like if we leave it like that. Okay, I made that bottom side and I'm still using my block plane. By the way, I'm going to advance that blade, this is a wooden river and what I like about it is that it's always easier to adjust the blade if you can remove the The nice thing about this is that you can lift the lever cap and hold it with your thumb so that it is not too loose, but gives you enough clearance that you can easily make adjustments when advancing the blade without changing the position of the blade.
Take your time with this and just, just, check, simple, check, and you can get to a point where you don't touch that plywood, but leave it perfectly flush. You feel a little good. Well, now I would. I probably would on this. period, back to the quickest way to do this is to go back to the table saw, set it up, set the fence so it's closer than you want, and now that it's going to be perfectly flat on the table, it's going to give you a square edge that you can then simply remove the saw marks.
I'll go ahead and do it on the shooting board, but it's not as convenient if this were too long. Now we'll just cut that one out and show you how I do it if there isn't one. there's a lot to do, I'm just going to use flush molding, now you're using flush molding, it's always designed to cut on one side and it will tell you this side up and because it's only set on one side, it's almost always I'm going to attack you a little bit now, that's a little short, which means you don't have a lot of references, so I'm going to take the five and a half and just that so it's nice and aligned and square now. that would be acceptable when you put a finish on there, it will always show a little bit, but it doesn't.
I'm not trying to fool anyone. This is plywood. I use it for a reason. It's nice and stable. It's hard to handle. The plywood doesn't want to see the edge, so I put a band on the front. The last thing we're going to do is go through and do that test and see how strong that bond really is. Stay tuned, I know. it will break, I don't know where it will break, but one of the things I want to look at is to show you how strong it actually is and then of course the curiosity part is which joints will fail first.
I am trying to make it. Do everything so that it is perfectly uniform. These two pieces of plywood are the same height. The two pieces of wood are exactly the same size. I'm going to place this center piece right in the middle and use my large clamp. below, put pressure right there in the middle and then start rotating, see what happens, so that was already a lot of force, now look which one broke the core of the sheet metal, I said it before. I remember testing this way in the late 1980s and was surprised at how strong the joint was on a piece of mdf, but any of these would have been more than enough for the application and there you have it, the joint. long grain was actually the adhesive joint was stronger than the wood itself because the long grain kept contact and there is actually wood glued there, the end grain portions are not, that's not surprising.
If you like my work, if you like my teaching style, click on any of these videos to help you take your woodworking to the next level. I've always said that the best tools make it much easier. If you click on the icon with the plane on the chisel, it will take you to our website, we will introduce you to all of our tools and we will also talk to you about our tools online and in person. workshops good luck in your carpentry
If you have any copyright issue, please Contact