How to Butcher a Pig | ENTIRE BREAKDOWN | Step by Step by the Bearded Butchers!
Feb 27, 2020Hey guys, I'm Perkins stuff from beer to
butcher
mix seasonings wait for the meats here in Creston Ohio and I'm Scott Perkins. We are picking up where we left off with cleaning and dressing our pork. It's a March day here. the farm Seth and I grew up while we were sure that many of you did it by killing pigs on the farm, now we know that wild game is probably number one, what they are going to harvest out the back door, number two is probably a pig, so today we will show you with just the use of a knife and a hand saw how to take down this pig.
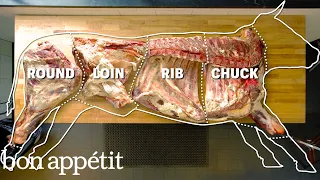
You'll want to stay tuned at the end of the video because we're going to grind and we're going to be stuffing sausages, so none of this pork is going into Commerce. This is for family use, so if you're concerned about the environment we're in or any of the practices, the beer nets are absent on this one because it's for family use, so let's get this pig off the hook and let's start breaking it down for you, let's start right guys, so let's start with this pig, this is the hindquarter, this is the front, this is a shoulder, so we have a ham, we have a shoulder in the middle, we have the loin and belly so I usually start with the ham and we're going to go ahead and start breaking this down so if you remember from the dressing video, that's what we call it. leaf lard, if you're making lard, leaf lard is the purest form, so if you're making it especially for cakes you'll want to save just this portion, you can't make lard and we make lard with she. everything you see, including back fat, but this is the price, a piece of lard here.

More Interesting Facts About,
how to butcher a pig entire breakdown step by step by the bearded butchers...
I like to start here, at the back of this belly, making an incision along the side, right here, I don't want to get into the loin like you do. Look here so it stays right along the spine and then you're going to go ahead and break it up with a saw so you can see the angle of the H bone right here with the angle of the tailbone that we like to stay at a little bit of an angle on the direction of those two bones you don't want to be here, you don't want to be too extreme with your angle, so remember whatever angle the H bones go in the direction of your saw, just make a cut the tail bone, the end of that sirloin and through that femur, I can use my eight-inch Victorinox breaking knife and we can just cut this ham by cutting off that little bit of that bone, so we'll do a little bit more cutting right there. this, but you have a beautiful locally raised non-GMO fed pork ham that can be cured and smoked, so once we've done that, we'll go ahead and continue with the processing.

What I like to do is divide this if you count your ribs one two three four I like to go between the fourth and fifth rib make a small incision there if you want so you can remember which rib you're going to cut between grab your hand saw you want to stay nice and straight no I don't want to get angles, so go ahead and cut between the ribs and through the shoulder bone. Here again. I can use my 8 inch ripping knife, just slicing through the meat. Here is the end of the shoulder blade neck bone. and there you have your pork shoulder.

Now what we're going to do, there are a couple different ways you can do this. If you want to French this tenderloin, you actually have to start at the back and maybe I'll do that. on the second one and then peel this side before cutting the bones, but since we're just going to do some boneless pork chops in this one, I'm going to start here at the top, cut with the knife until you meet. the first rib and then stop, just take your hand saw, place it where you stopped with your knife and about two fingers from the bottom of this vertebra is where you want the hand saw to cut through these ribs until you feel those bones break, then you take your Victorinox 6 inch semi-rigid boning knife and you just cut through there removing that cool side that will turn it into bacon.
As you can see, we have split this half pig on the side of Pam's shoulder. and spine now we're going to go ahead and start breaking down each individual piece starting with the spine first. I like to trim the back fat before cutting the chops, so starting at the end I like to just pull the knife. gently towards yourself as you can see I'm wearing chain mail so this is an area where if your knife slips it can be extremely dangerous so have the proper attire to avoid injury so as As we mentioned earlier, this fat is a little different than a Leaf Lard, it can still be used as a Leaf Lard, but it is not as clean or pure in flavor as a Leaf Lard, but we can certainly save this and make Leaf Lard. pig with her.
Seth, obviously with experience, knows exactly what to take away from this. Trim this out, you know, obviously preference comes into play if you want to leave more fat on your pork chop you can certainly do that, in this case we like to try to get it down to where there's a quarter of an inch or less of fat on each pork chop. pig. That's finely chopped, so now what we're going to do is divide this loin into boneless pork chops, starting here at the end, we're going to peel this pork loin staying as close to the bones as possible. we can take this piece of muscle off of that loin, we're going to trim a little bit more here just to make it look nice, we're going to remove this unwanted fat and cartilage off of this loin, like we mentioned in one of our previous videos.
It's nice if you're working with someone who's working simultaneously to trim the trim so you don't have to go back and do it all on your own, so I'm going to work on these trims while Seth rips up the casing, so now that they've taken the casing off of us tenderloin, we're going to go ahead and work on the tenderloin right here, on this last knuckle of this tenderloin, if you make a cut over here, you can meet right on this knuckle and then just turn that tenderloin over so you can see we made a good separation. clean.
Let's go ahead and remove the sirloin. Now you can leave the bones in this if you want to make a bone-in roast or if you like. I can remove the bones like this, trimming them, taking my 8 inch knife, let's go ahead and cut up some boneless sirloin steaks, you can make pork chops, you can make a stew, make a roast, whatever you want with these. We're going to leave them as a really delicious boneless sirloin steak today, so there's a sirloin. We're going to go ahead and make this boneless tenderloin, so taking your fingers holding the muscle here, slowly run the knife along the back of these ribs.
It's your baby's back right here, so let's go ahead and work on this slowly. You can see that I'm working my way down along these bones once I get to where I feel like I'm hitting these bones. I like to flip it over and then you just take your knife and run it up to the Debray spur and you can peel this loin over there so you can see, we have a really nice boneless pork loin that we're just going to trim. a little bit, so with this piece maybe we'll cut it into a couple of different options.
You could make boneless pork chops. You can make butterfly cutlets. You could make a roast pig. Maybe we'll get out of this extreme. Here we'll do a nice pork roast and then we'll start cutting up some boneless chops, cut them about an inch thick, you can see they have a very nice back fat, very nice, cut evenly, cut some of these up, you could smoke this cure, smoke , turn it into Canadian Bacon now, another thing you could do is cut the boneless chops this way or you can cut one that's about twice as thick as these so it's about twice as thick and then you can flip it over and cut it. through the back of this back fat, but not cutting all the way through, then you can make yourself a nice butterfly chop, so we're going to cut some of the ones here again, cutting through the back, but not all the way to the final, a good butterfly pig. chops, so there you have the tenderloin on one side, we have our tenderloin, we have a roast, we have some really delicious boneless chops, some sirloin steaks and then our butterfly chops, now we're going to go ahead and start with the fresh side, okay , guys.
Let's start with this cool side. I'm going to remove the ribs from here and save this amazing bacon or this fresh side that we turned into bacon. I like to start right on the inside of this muscle, right on the side. On the back of these replacements you can see that you don't want to cut the bones. In fact, you can see the bones here about an inch to an inch and a quarter below those bones. I like to do it just to mark the meat, but without cutting too much. deep, you don't want to cut into the bacon once you've made the cut, you can, there's a little bell bone that you want to get out, you can take the knife holding it flat against these spare parts and you can peel them right away. fresh side, this is where you want to be careful not to cut this meat right here because that's going to be your bacon and you certainly don't want to make a bunch of cuts on it, so there's the rib, there's the baby back.
I'll show you how we peel them. Let's go ahead and square this up by removing some of this exterior fat. The reason we do this. The reason we square it here in our industry. Is really nice. The square bacon goes through our slicer really well and there's minimal waste, so you can see a really nice fresh side that's ready to go into the Cure and then into the smoker, so there's our fresh side. Now let's go ahead and start with the ribs, baby. back, if you go through this membrane right along these vertebrae, you can take the meat hook, you can hook it right under this membrane and you can peel that membrane that you want to remove, which is not really desirable to try to chew and eat, so remove that right there, we're going to take our knife to cut that meat there and then we're just going to take our hand saw and we're going to cut these baby tenderloins to the point where we can remove this portion, it's not very good. rib now what we will do is take our hand saw cutting at the base of those ribs peeling our baby back to get some really nice little ribs these are our spares here again we are going to mark this membrane hooking it with our meat hook we can peel this membrane of those ribs, okay, that's the loin, including all the ribs, now let's go ahead and start with the shoulder, okay, we're ready to start with this pork shoulder, so the dear pork shoulder pulled pork Boston butt picnic this is where everything is so let's go ahead and take this bone out of the neck you guys like bean soup broth make soup broth this neck right here that's good to do it you can smoke this this pork neck, cut it into small pieces, add it to your beans, make an amazing bean soup, so now that we have that pork neck out of there, let's go ahead and remove the dewlap, starting with this picnic, you can cut it up . this jowl now, today's app we're going to go ahead and we're going to trim this into sausage trimmings that you can smoke to make some smoked jowl whatever you want, so now we're going to go ahead and flip it over the shoulder. to remove a little bit of this excess fat from the back of the shoulder for the cuts that we're going to make, we don't want to leave all this fat here, you can do that if you want, it's whatever you want to do. but today we are going to eliminate some of that fat.
Now that we've removed the fat, I'd like to show you right at the front of the shoulder, where the neck would have been a gland, so we'd like to take that gland out. go ahead and take it off and throw it away so now as you can see we have a pork shoulder and on this pork shoulder where the blade is this is the butt part up here on this end this is the arm part for the picnic, so we are. I'm going to go ahead, cut up a couple of roasts first cutting around this leg here, grab my handsaw, make a simple cut through that bone removing the pork hock, you can certainly save this, you can cut it down the half, make it a little, you know, a little more manageable. whatever you want perfect for beans that kind of thing so now that we have that cut there we're going to go ahead and remove the rest of this picnic, it's always easier to cut the meat and then get the saw out so we can Let's go ahead and remove this picnic portion with our saw so we have a picnic pork roast.
You can cut it in half. You can make a smaller roast with it. You can cut it into scraps. You can make sausages. you would like to be able to cut it into fillets if you had a band saw, you could cut it into fillets today. I'll leave it roasted for now, but we'll actually cut it into a sausage shape after a while. A little bit, now that we have our picnic, you can take this bone out of here, you can roll it up, tie it up, make a boneless roast, you can leave thebone in whatever you want, okay, now we're going to take this Boston, but.
We're actually going to take the bone off the blade on this, roll it up, tie it up and make a really nice boneless roast that you could hang on your backyard smoker, put it in your big green egg, put it on your trigger. make some pulled pork and what we like to do, we actually sell them like this in the store, we like to preseason them with our original
butcher
's beer mix seasoning and that way when you go to smoke it, it'll be ready so you can Look, I'm taking out the shoulder blade bone now that it's completely boned out.I'll remove the gland from here. I'm going to take some rope, some butcher's twine and we're going to tie this up and make it look pretty so you can. look I'm working my threads keeping them making them nice and tight and the way they do these threads if you want to do a little bit of tying like this if you do a loose knot as you can see my knots pretty loose there and then they tighten it up once you tighten it up you can go ahead, tie another knot, tighten that down and the ropes won't come loose, so it's a butcher's knot.
I'm going to go ahead and keep putting some strings in here as we move towards the pretty. About putting a net or string on a roast like this, it keeps the cut very nice and even so that when it cooks, it cooks evenly and doesn't fall apart until you're ready to fall apart, which is why we like to use a rope or a net, then you just, once you've cooked it, you can cut them in there and everything will separate nicely. I have some ropes there, take my eight inch knife and square it. A little bit, we're in the retail business, the retail meat business, so everything has to look really nice and presentable, so now you can see we have a really nice roast, you can pre-season it, you can make it, you can smoke it and then you have cabin . bacon, you name it, it's a good roast, we've got a picnic on the shoulder, we've got the falcon and now, for this beauty here, Scott is the master of the ham, white feather meats, he'll take care of this one, it's Time to take care of our ham.
Now we skin the skinless pork, we don't scald our pigs, it's much easier if you're at home, especially if you don't have a scalding tank, you don't have to worry about starting a fire. underneath, so it's going to be skinless ham and what we're going to do is leave it boneless because that's how we prefer to do it here in our store, so the first thing we're going to do is just go ahead and inside this H bone, what we would call a saute steak over meat, peel it and then what I'm going to do is take my thumb from my free hand, I'm just going to grab that muscle and pull it back and then I flip my knife and using a reverse grip I'm going to go around this H bone, just work a little bit on my elbow and once you've done that, you can you can loosen up the H bone, try to move over here where you can see it and you can get that H bone out of that ball joint like this, now that I've done that, we have a line clear right here. where is the muscle that we can follow and we can, in fact, we can get this out of here, so what we're going to do is take, we'll follow this line and get up to here and You see, I'm stuck between the muscle, well, get down here and we're just going to spin our knife and head to the table when I have to call all the way, but we.
We're going to break that joint right there and I'll show you that once we pull, this round knife goes back to the reverse grip and we're left along this femur with just the tip of our knife now and once we've done that, we're going to find what is a natural seam that falls following this sirloin tip here and once we find that seam, we can work it all the way down and we can take it out, so now that I took, I took out what we would call the sirloin tip this makes a roast really good so we'll set that aside we'll get to that in a minute at this point what I'm going to do is take my ham, just square it up a little bit right there and then if I put a little bit of pressure right here, it's going to pull this muscle in line toward where I want.
I'm going to take some of this out of here now for us when we get into the smoker that we want. to take some of this fat limit off our customers, they don't want to buy a lot of fat, as Sess mentioned, we're in the retail business, so again, any time we remove something like this, it applies. in our lard processing, so it's certainly not a waste, so we like to keep that quarter inch of fat on a lot of our cuts so we're not asking the customer to pay for the fat and they can appreciate it, so that once I've made this hand ready for the smoker and what you're going to want to do is put a couple of strings in here because you don't want this hand to move so we're going to lay it on the side for a minute and show you this, the tip of the sirloin.
Now what I'm going to do is I'm just going to use my free hand and lift this work up a little bit, this femur, just outside of here, it's going to have like you would with a larger beef animal, you're going to have a knuckle right there, so we're going to hold it. nice and tight with our free hand, we will square it and be able to peel off a little of this excess fat. Out of here, we have a little advice, Rose, grab my string, go under this ham. Now I'm going to start at the top, smaller end, at the smaller end of the ham, that way when we hold this muscle. it pushes it down a bit towards the larger end, usually when you start that way it keeps things from getting too far out of line.
The reason we do this is just to keep it nice and even in shape and as Seth had mentioned, we want things to cook evenly so that when we go into our smoker everything stays together the way we want. A little trick you can use if you're worried about the rope slipping when it reaches the part of a muscle where it reaches towards the end. You can cut a small slit there just to keep the thread from slipping off the end. A little trick we like to use. There you have it. We have our boneless ham.
We can hang it on the smoker and have a nice little sirloin tip roast. Alright, guys. it's time to start the second half, we're going to make this one a little different, we already have the first half cut and stacked, we made a lot of boneless options, stuff like that, etc., so in this one we're going to make some more bone-in options let's start similar to the first half, start the same way once again, cut along the flank, staying right along the loin which you will use as a high bone to reach about an inch below the H bone, remaining with the same angle to break the sirloin and ham, if you notice that you switched from a Victorinox six inch boning knife to their 8 inch breaking knife, sometimes with those larger primal pieces it's a little easier to cut there, so again between the third and fourth rib. that's going to cut, break the shoulder, so loin and bacon and then the shoulder at the end.
We really just want to emphasize the fact that we are doing this without the use of power tools, the whole manual labor factor was in a barn that was built in the late 19th century, so on this one we want to do things a little different, we cut the spares over here, on the last one I want to show you how to make some long bone chops and Some grills, what we want to do is start here at this end of the tenderloin and end here right after this little portion of the blade right here, so you want to make a mark that doesn't cut into your tenderloin and you want to cross it like this so you can go ahead and cut all the way to the ribs cutting this cool side once you've marked it all the way down I like to take it and go ahead and mark this little piece just like we did in the last one, but you can see yourself doing it quite differently, yes, it's basically the other way around and the reason you're doing this is because you want to make long bone chops, but not at the expense of bacon with a Pork, obviously, bay is one of the best options and that's why you want to peel the bacon off of these ribs.
Now you're going to sacrifice a little of the rib to get the long bone, but that's okay, it's easier to sacrifice the extra. rib than butchering bacon, it's a little more difficult to do it this way, but in the end it's very rewarding once you take this bone out, you can see that we are left with those long bones, there we have our fresh side, being careful. In order not to stick that meat here again, let's move on. Square this cool side for our bacon like this, now we're probably going to get asked the question about smoking the meats.
Yes, we smoke our bacon and our hams, we have a family recipe that we use that we are inclined not to share, so we really have no intention of giving away any trade secrets about our smoking, other than there are many different ways in which the ones you can do it. hams and bacon, including dry cured, etc., etc., but yes, we smoke all our hams and bacon that we take from the pigs here in blank for the meats, so as you can see, we are left with the long bones here at this point. Let's go ahead and remove some of this fat from the back of the tenderloin.
Okay, now that we've trimmed the fat off the back of that tenderloin, we're going to go ahead and start cutting this into some chops and some French. Roast, okay, so what I'm going to do is start right here on this last bone. I'm going to cut through here just like that using my hand saw, make a simple cut, as soon as I had to cut, it's over. we have one two three four five six seven eight nine ten eleven twelve bones the first four here one two three four let's go ahead, cut them like this now that we have this cut, I'm just going to cut next to each of these bones, clean the meat between them, this is where it takes a little more time for something like this, but the end result is definitely worth it, you can be very particular, you know, getting these bones super clean depends.
As for how much time you want to spend on them for the sake of our video, I'll leave them pretty decent but not as clean as I could. I think we're going to go ahead and cut this into three French chops, cutting down the middle. These bones are like this, so if you had a band saw, this would be pretty easy because obviously you'd just be holding them up against a band saw, but that's not the case, so we're doing this with a hand saw so you guys do. know 30 40 dollars whatever you know whatever style of handsaw you want to buy this is what you can make yourself at home with some delicious bone-in French pork chops you have some of them there put the nice bone in them long now with This we're going to move on, basically we're going to do the same thing, but we're going to do a roast.
Instead you can make a crown roast by tying a couple of these together, folding them into a circle and tying some string around them, but today I'm just going to make a pork rack, now what I'm going to do is peel this membrane on the inside of these ribs, taking my meat hook, just pulling this out, okay, now that we have that portion, I've done what I've done. What I'm going to do is take my hand and see that this is going to be a pretty challenging part. Cutting these bones with a hand saw can be done, so just cut here like this, once we remove those bones, we'll go ahead and remove the rest of these in the back this is similar to a French rack of lamb, you can do a venison rack like this, whatever species you're looking for, tomahawk chop on a beef, bison or elk, okay, now that we've done that, I'm going to move on, actually I'm just going to take a little bit more off of this. fat, since I see I left it a little longer, but I didn't want to get into that tenderloin, I remove a little more of that and then what I do.
What I'm going to do is tie this up with some strings, now you can take the strings and go between each bone project, so it may take a little bit longer, it all depends on how long. you want to go through producing, you know, whatever cut you want, like you saw in the first half. I only made the boneless chops and that was much quicker, so it all depends on what style of cut you want to make and how long. you want to spend on it whether you want to do this or not it's up to you I just wanted to show you a couple of different options that you can do there you have just a rolled French tip maybe take your knife and just square those bones get rid of those ribs a little bit French pork now we're going to move on, take the tenderloin and look for that first knuckle again, place the tenderloin outside of here, so the last one we made boneless can be this one that you want to leave the bone on. on it, make a bone-in sirloin roast, what we're left with here are some bone-in chops and here again just cut a nice thick chop, grab your handsaw or you can use a butcher knife if you have one of those.
Look, I'm aiming for that little piece of cartilage in the vertebrae that was actually going to separate, some really nice bone-in pork chops and these have the loin portion right in, go all the way down here. a rib bone there so you can see, stay away from that a little bit, when you make a cut with boneWith a hand saw, you know that some of your cuts won't be as pretty as they would be with a band saw. but if you know you can finish, you know, a really nice, thick bone-in pork chop, now we're going to make the shoulder and the ham, so come back guys, now we're going to make another shoulder and with this one.
Same thing we're going to remove the neck bone here by cutting around this bone, just remember you can save it, cut it up, use it in bean soup, whatever you want, like that, trying to stay as close to the bone as possible. we can keep the meat in the cut, not on the bone, now we're going to remove this dewlap, going all the way, we'll square it like this and remember, this is where we'll find that gland, take the tip of your knife take out that gland just like that , get rid of it now we are going to remove the fat from the back of the shoulder, so if this one thinks we are going to do something a little different than what we did with the first one. half with the first one we did the picnic and then we did the boneless, but with this one what I'm going to do is go ahead and cut this hawk here like this, cutting the meat first because it's easier to cut the meat with a knife and the bone with a saw, so go ahead and cut the meat, take our hand saw, cut that bone, you have your hawk, your shoulder, hawk and with this portion here we're going to move forward. and just leave this whole so you can smoke this whole pork shoulder and if you're going to do it you know, your home smoker, your charcoal, your wood, your big green egg, your trigger, whatever you want to do with whole bone. pork shoulder consisting of the picnic and the butt so there you have it pork shoulder this can also be boned completely and put in the ground sausage so whatever you want there is a different option with pork shoulder and come on.
We will walk through all of these cuts and explain everything to you once it is complete. Ham has become very similar to pork shoulder. We have the second ham here. In this case, I'm not really going to do it. anything with it, just trim off a little bit of the excess fat just because depending on how your pig is dressed, in this case our pig, if you remember that cleaning and dressing video that you haven't seen, you can find it. that on our channel we had a dress that weighed 218 pounds, so a pig that size is going to have a little bit of excess fat, so we're going to go ahead and trim it down and because we're going to leave this ham bone on its it's going to be a little larger than the last ham, so obviously you have to adjust the smoking times as necessary depending on the method you use.
We talk a lot about smokers in the old days of course there was dry curing stuff that was a little more popular in the south and then there were the smokehouses which were kind of houses built on the farm and today you have smokers which are tremendously popular and there are so many different ways you can do it, tons of recipes, whether you want to brine or leave your ham, so in this case we're just going to hang this ham and we have a jar on the ham and a boneless ham, so while you're working with your pig you're obviously going to have cuts that you're not going to make.
You don't have to do anything other than make them your ornaments, so we've covered some of the details in our ornaments video, but I just wanted to go over with you again as you work through your pile of ornaments or if you're doing this simultaneously with another one. part by doing the trimming while you cut, which is what we like to do, we simply take the excess fat glands and bleed the blood vessels that we find in the trimmings before grinding them into our sausage, which just gives it a nice end. a good product for the grinder that we are going to use today.
I like to have pieces that are somewhere around the size of a golf ball. It seems to work better for working on them. We will review them there. details when we set up our grinder, but anything that has glands and bloody neck meat that you want to get rid of, obviously the bones don't belong in the grind either, so something like this hock just wants to stay along the bone using your free hand to pull the muscle as you work it off the bone, the hock being one of the most difficult pieces and also a piece where you will have the cartilage just due to the nature of the anatomy of the animal where that works, as I have indicated in my others videos, we like to remove as much muscle and cartilage from the bone at one time and then just look at what you're trimming and make sure you don't.
If you have any cartilage left, add it to your scraps pile and once we have a good mix, we can move on to making our pork sausage. We don't worry as much about the amount of fat it contains. I eat a decent amount of fat on our pork so when we make our cuts we often trim off the excess fat that covers the fat and that means when we make our cuts we don't really have to trim any more fat off it, just make it cut into a few nice cubes, scoop out any of the nasty bits you wouldn't like in your sausage and start grinding your sausage.
I want to show you what we have on our table here, starting at this end, we have a nice pork loin. some country style ribs these are our boneless chops cut between an inch and a quarter inch thick we have some boneless butterfly chops here we have some sirloin steaks and this is all from a tenderloin we have the bone-in option of the sirloin here is a sirloin , but roasted, you can also cut them into steaks and have the bone-in option instead of the boneless option, it's up to you to move on to the second tenderloin that we made, we have bone-in chops, you can see We have some very nice bone-in pork chops and thick.
They have that loin in them, so remember if you have a processed pork and you want boneless loins, you'll get your loin, but if you choose a bone-in option, you'll get your loin. will be tucked right into that bone-in chop like a porterhouse steak, so those are bone-in chops here we have a bone-in chop with a nice long bone, more tomahawk style, these are the ones that are cut into chops, this one is left roasted for as you can see, we have a very nice French pork roast beef here, moving this way, this is our pork shoulder, this one has the picnic and the butt, you can leave this as a roast. you can cut it into steaks you can put it in your side dishes whatever you want we have a pork hock here you can leave it whole you can cut it in half smoke it add it to your bean soup we have a picnic roast we have a roast sirloin tip from the first ham that Scott made, the boned and the semi-boned.
We have our paddles rolled up and tied. You can use these roasts. You can make cottage ham with bacon and whatever you want with what we have. our fresh sides these will be our bacon we have one on each side so we have two of those we have our pork rib and we have our baby back now remember in that second half that we used we lost our ribs in a way Leave the bones on these cuts right here, so you'll just see a set of spares, a set of baby loins and we also have hanging here, we have a semi boneless ham and we have a bone-in ham, so that's the whole pig cut up and on the table here a beard, a butcher's mix seasoning and we also have what's next and from this pig we have about 25 to 30 pounds of trimmings, we're going to show you how to make a pork sausage.
If you want to increase the amount of sausage trimmings you can simply take any of these items that you don't want as we cut them up, just bone them out and put them in the trimmings will increase your sausage so something to keep in mind, stay tuned. The sausage comes next, okay, so it's in our clippings pile, we're working, it's March here and there's a reason slaughtering was always done in the fall or spring. We are at optimal temperatures. I think today we are 39 degrees. so it's always good to have good cold cuts, we've also worked on this pile and we have everything broken down for the size grinder we're using so we like to have chunks like the ones I mentioned. golf ball, so we're going to start working it here and we're going to grind it right into the lug every time you make sausages.
We would like to make about 25 pound batches at a time, there are many recipes that are formulated per pound or 4 per 25 pound, so today we are going to make a 25 pound batch for the sake of this video, we are just going to demonstrate the grinding , so I don't have any seasoning on this if If you were going to make sausages with this, you would put the seasonings in the trimming before you grind it, that will help it blend in really well if you add the seasonings before you grind it, so one of the things What we know about these grinders is that they don't like to start dry, so when you go to start grinding, go ahead and put something in there that way, when your grinder starts running, it's going to have a little bit of work, we'll turn it on and start. with our grind.
So what you're going to want to do is start placing pieces here, like we mentioned about the size of a golf ball. Now the grinder doesn't always like to stay dry, so we like to put a piece in there and start before we start. even turn it on now you're going to have your plunger what I like to do is just put a bunch here in my hopper start walking and work it if you work these things too fast they like to hit you back so it's a lot smarter to work with small portions at a time.
Try not to let your grinder dry out. Now a question you may be asked is or we may be asked what size grinder plate we should use. This is a number 8 if you don't like the way your grind looks, you can always grind it a second time. Sometimes what you can do is grind first through a coarse plate and then through a fine plate. Obviously, there are many different grinders on the market, as I mentioned. A three-quarter horse brine is definitely one of the best sizes for home butchering and will simplify our pile of trimmings. If you notice that your grinder doesn't seem to be running at the correct speed, definitely check your power source.
Depending on the size of your grinder, it will take quite a bit of juice to run it and if it has a hook attached to an extension cord and has a long travel, your grinder may not even spin because of that. That's right, if you have any problems with your grinder, make sure you check your power source, it probably goes without saying, but you definitely want to keep your fingers out of your grinder or at least you're sticking them, that's what you have. plunger, as you can see as I work this and I've referred to it as the kick the cat method, if you just hit it down on the opening of the grinder, it's going to take it at a certain speed and you won't.
Don't overwhelm the grinder, you won't clog the grinder. I've only used my plunger once or twice since I started about halfway through my stack, there we have it and in just five minutes my Grindr never connected and never hit reset and I have a nice stack of grinds, now we can get on with the filling that surrounds our sausage. Alright guys, we're going to go ahead and start loading up our hand crank stuffer and we're going to show you how to make sausage, here's where it is. Well, if you have a friend, just because he can hold this, we'll use Hand Crank.
This one is more or less commercial in the sense that it is a little larger than the home user models out there, however it is a same principle, yes this is a stuffer made by F Dick, they are available, you can find it on Craigslist eBay and you can pick it up you know you might even find one for a hundred bucks so keep an eye out for one of those now Scott mentioned earlier when he was grinding this sausage which you know it's 39 degrees here in Ohio and while I'm loading it into our stuffer, I can tell you that the temperature of this sausage is still well below 45 degrees.
It's probably closer to, you know, 40 to 43 degrees going into this stuffer, now that our stuff is full, we'll go ahead and load it up and start making sausages. Okay, sausages loaded into the stuffer, time to put our casing in now. We are going to use a collagen casing. These are much easier to use than a natural casing simply because they are fairly self-stable. You can buy them. A lot of different suppliers will have them and the downside to these is that you can't twist them, but you can string them together or you can make coils, depending on your preference, so just a little tip when you start to lower the stuffer, there's an air release valve right here. .
You should periodically push it down to release some of that air. Get out of there because what's going to happen is you're going to fill your guts with more air than sausages, so just give it a little push and let some of that air out. I'm going to roll them up for the sake of In the video, Seth just went ahead and tied the end of this. We didn't have to watch him strap it to the table because of the size of this and the meat in it, we sometimes carry it if you have a hand crank stuffer.
You may have to place it and fix it to the table with a C clamp, as you can see, we are doing a jobpretty short on our sausage, so in this case I'm just going to go ahead and throw it in our lug and run out of room. on the table and there you have it, a nice tub of great looking pork sausage. I'm going to go ahead and pull them in and show you if you're going to link them, where are you what you want to look for in terms of? The length is usually with thumb, cuff and thumb which will give you the correct size you want to match.
This will be approximately four. This will make about four to a pound of a really nice united sausage. so much fun here, you can do a lot of different flavors, you can get high temp cheese if you want to put that in, you want to do about 10% if you do high temp cheese, if you want to get fresh greens, spinach leaves, a little bit of portobello. mushrooms, you can add that stuff at a rate of about 10% and you'll get some beautiful, great tasting pork sausages. One of the things we grew up eating on our farm was the pork sausage that our father and grandfather made and that's why you'll find us doing what we're doing today.
A lot of people mentioned Scott about twisting the ends of these sausages when you fry them or when you grill them, they tighten up. They fit really well inside these collagen casings and as far as twisting them, you know, we found that it's really not necessary because the shape in that that collagen casing holding them there makes a perfect sausage, so now that we've made more dinner-style sausages with thirty-two millimeter collagen. We're going to make some breakfast sausages, which are a 21 millimeter fresh collagen casing. We usually find that when you make dinner type sausages, you may want to do more of your Italian that kind of thing with breakfast, that's where you want to do country style sage, salt and pepper, etc., it's just a matter of which a different size carcass pass through this stuffer and you will get just a little. your sausages feel a little different, same scenario, you stuff them all and you're good to go, you might want to make them a little smaller, the kids will love them, something that fries really good, you can make about eight of these for a pound you gives a pound and you only have an idea of the comparison if you want to make your thirty-two millimeter collagen along with your fresh twenty-one millimeter collagen, now the other thing you can do is leave a little bit of your pork sausage in bulk.
Also, if you want to make sausage in bulk, you want to make sausage gravy and whole biscuits, you know, hand-rolled burgers, that kind of thing, you can go ahead and leave some in bulk. The good thing about this is that you can get it for the family. involved make it a fun day you know this has only been a couple of hours obviously you know this is what we do for a living so we probably make it look a lot easier than it really is to get a good knife visit our site web you can get one of these Fortuner, sorry, the Victorinox six inch boning knife, you can get our steels to sharpen that kind of thing, you can take our beer to the butcher, mix seasonings, you can mix them with your sausages, your brats, if you want, but just make it a family event, you know, pick a nice cool day, go out, get your pork, get your venison, cut meat, your bison elk, whatever and you can really enjoy the benefits of eat something you grew, cut and fed to your Family, thanks for watching this one.
It's been so much fun being here on the farm, just like we grew up as kids. This is something MS likes. She mentioned that they can involve everyone. It is fun. Pigs are much easier to raise. throw it in your backyard so we want to bring you a pork cutting video once again subscribe to stay up to date with the
bearded
butchers
Perkins along with Seth Perkins and we'll see you next time thanks guys.If you have any copyright issue, please Contact