How to build your own 200mph Supercar; at home in your spare time. Part 1
May 31, 2021Alright, today is the day and what you just saw is a rendering of the Aerotate GT
supercar
and in a moment we're going to take a look at the last 18 months of work on that project, but first let me introduce myself. I'm Jade Jarvie and I'm a prototyping engineer when I say most people give me blank stares, but if I just say I make things, logically they only want to know what kind of things, so I thought why not take all this. to social media and show you what you are about to see are the efforts of my first year on youtube now this video is a condensed version of probably seven hours of video on youtube or 1500 hours of work on the project and probably an extra A couple hundred hours beyond that and just designing, planning and thinking about the project, so without further ado, let's take a look.
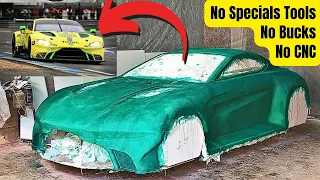
Even though the design of this car is all in my head, I needed to get into the CAD system and get something out. dimensions so we can make an enlargement on the model socket from which we can remove the polka dots, so I started with a smaller scale model and created the shape I wanted. I was also able to add some features and test them on the clay, but the final design on the large version was going to be where all the work and design for finishing would take place. I took a cheap or discarded mold of that small model so I could cut it up and created just a cheap silicone mold and poured a new version in plaster and once that plaster model was set and the mold was removed, what I'm going What to do is take that plaster stud and cut it to scale.

More Interesting Facts About,
how to build your own 200mph supercar at home in your spare time part 1...
So the ribs will be placed about a foot a
part
, so at 16 feet I made 16 cuts of that plaster model, then I took those cuts and transferred them to a sheet of paper and in my case what I did was I scanned those pieces of paper and then I took them into my CAD system and enlarged them and printed them took those prints transferred them to plywood there are some ribs that are heavier plywood to add some rigidity and some locating points but most of the ribs They were created from just some 8 inch plywood and then once all those ribs were cut I assembled them into a frame and just a wooden frame would have worked but I would have this rotisserie and the steel bars allowed me to just drill through. some holes, some three inch holes, slide the ribs over those bars and then you can slide them out every foot, like in this case, I welded a little metal tab that I was able to attach the ribs to and then there was some diagonal bracing that went in to straighten everything up, but at this point it's a little flimsy and flexible, so the system is in this jig.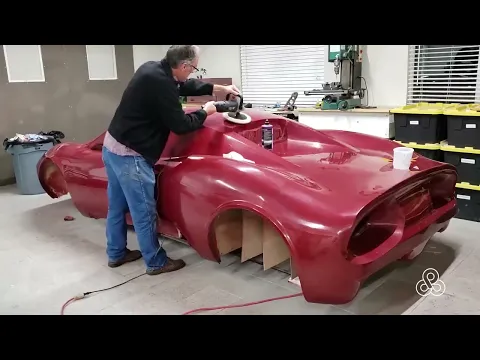
The method is to cover the whole thing with burlap soaked in plaster of Paris, so notice that there are also some ropes between each of the ribs, allowing or holding. the burlap from sagging too much, a little bit of sagging, it's good because we're going to go back and fill in all those low spots with real drywall plaster after this plaster of paris is set up with the drywall plaster that installs with the air. It doesn't need to be mixed and is very easy to sand, so here is the method to create the model: Build it with gypsum sand and, just like working with clay, which is about 10
time
s more expensive, gypsum allows you to add and subtract. a wheel also with plaster, in this case I am using the windshield of an existing vehicle.
I can just grout or inject plaster around the windshield to give it the shape and then it's a matter of just adding something like I said adding plaster subtracting like you would with clay you have to take some
time
to wait for the plaster to dry and that Of course it depends on how thick you put it on and these first few coats make it pretty heavy. This gave me some time to work on the front, let it dry for a few days and then work on the back, when you make it thick it will crack but you'll keepbuild
ing up layers so the idea is to just sand. all the high spots then add plaster again until you have smoothed it out to the final shape you want.I said this is probably about 10 times if more, not more. I must say that it is more but less expensive than working with clay. It also creates a Surface Finish that you can easily work on instead of worrying about denting a clay model, so this is nearing the end of the job, so once you've finished the basic shape it's time to start checking things and make sure everything is symmetrical. and to do that I used a laser system. This rotisserie had some sort of track on top and I can set up my lasers so I have these little red dots showing me the center of the vehicle. to get my perpendicular square measurements correct and then I also use this scale or this pointer that measures the height of the floor so I can put it on one side of the car, measure the height on one side, take it around the opposite side and check it. on that side and once everything is placed where I want it, I have the basic plug ready, I'm going to seal the plaster with the urethane just because I'm going to put a thin layer of fiberglass on it to strengthen it. it's a bit of a hard surface, I don't want the fiberglass to absorb the resin, so it's just a matter of once the urethane is hard, go ahead, some resident fiberglass, apply a nice thin coat, harden the surface now, at this point, I'm done. a new shop and I had to move it to the opposite side of the house, some friends came over and we will just move it to its new
home
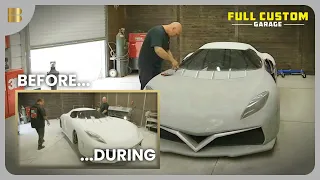
, so now what we have is the basic shape, but the surface finish is not as close as What we need to remove the molds is of course an automotive finish so we have to start applying layer after layer tobuild
and work until we get a perfect surface so that the first layer is just resin with added microspheres or like bondo. the same system and then of course sanding, again hitting small or low spots and then sanding a little bit and once we've finished this surface it's time to go ahead and start adding another layer a little bit harder now this It is resin mixed with a little calcium carbonate. and blended a little thinner so it really flows and settles into the low spots.It also makes the surface much harder to sand, but we can get a slightly harder surface and be able to see our low spots as well. then once we get really close, it's just a matter of going back and finding small imperfections using basic body techniques, filling a pair. I had a little blister here, I just need to fill it up and then we'll get to where. The basic shape is almost perfect, all we have to do now is start working with finer layers of sandpaper to get the finish we want. Once we're there, we have one more layer to get closer to perfection and that is put on a coat of primer, take it to the paint booth, put some primer on and then of course we sand again, but we're getting close and getting to the finish we need, but like I said, always more sanding and more sanding, and once you have it where you need it, it's time to finish it.
I just went out and bought cheap automotive paint, which is really just the paint supply place. I had something that was not picked up or returned. He had some problem, of course. I'm going to finish the car in blue, but I thought I'd put a nice red color on it just to see how it would look in red and of course once you have an automotive finish you have a nice shine. finish work, but even that's not enough, get back to that car paint, now I can start polishing it, waxing it, getting ready to remove the molds, let's take a break from the bodywork and continue looking at some of the other work that's going on. was doing at the same time was
part
of the mechanical side, so one of the things I have to do is take a Toyota 1jz engine and adapt it to a Chevy 4l65e transmission, so I have to make a bellhousing adapter. to fit the transmission to the 1gz bolt pattern i created a printed cad pattern to test it out and see if everything fits and lines up once we have made that pattern and i know it will fit on paper.It's time to send it to the water jet. cutter and cut these plates, so here are the pieces that we're going to use to make that hood adapter. I have this big piece of aluminum tubing that isn't the exact diameter. I couldn't find something exactly, so I'm going to cut it. take it to the router, make sure everything is perpendicular, the edges are parallel on the edges I should say so we can get everything as precise as possible. Now you can see I'm a little spacer to keep that thing at the right diameter. the adapter plates and I also added a couple of extra holes in my CAD drawings to join them together, tube down the middle to line everything up as perfectly as possible and then it's onto the soldering to start putting all the pieces together now once these pieces are soldered each other, we can cut out the center section, which is there to keep everything aligned, finish welding some of the interior seams and there it is on the engine.
I am also converting a single turbo ct15b that came with the jz engine. I'm going to use a dual turbocharger setup for two reasons, one reason of course is that it's less expensive to get these used turbochargers that people get rid of when they upgrade to a larger turbocharger, but I can use the volumetric efficiency of the smaller turbochargers. to keep them spinning faster to reduce turbo lag, but I did a complete rebuild on both turbochargers. This is just one step through that process. On the hot side, I use titanium colored cerakote ceramic coatings to brighten things up and make everything a little bit.
Prettier and cleaner. I'm also timing these turbochargers slightly differently so there is a little pin that does the alignment for the timing of the turbocharger, so now I re-drill them on the cold side powder coated in this blue along with the other parts of the The engine will be in this blue to match our exterior on the final exhaust system as it's a matter of getting the turbochargers in place and lining up the pipes. Now the wastegates on these built-in turbochargers will discharge into the main exhaust housing, so once these manifolds were built. I found out that the original idea that I was going to use for a muffler wasn't going to work, so I ended up having to build my own muffler, so getting ready here with the sheet metal to build that muffler, it's going to be a square. box with the muffle tubes mounted inside, just a small bend I created to go into the hydraulic press makes nice radius bends once they are all attached, another thing is built with pre-bent prefabricated tubes, I have the end plates to this box so these little 180 degree bends fit right through there a nice tight fit slightly undersized I'm actually notching and bending these pipes the exhaust pipes will be inside the muffler and then I'm I'm going to pack them up with stainless steel and fiberglass welding system together.
You can see all my piercings there. Now I'm covering them with this stainless steel. Stainless steel wire. Everything in its place. The stainless steel has very large openings to allow some exhaust. the gases escape quickly and then wrap them with stainless steel tying the fiberglass once these things are wrapped all that sound bending material is tied up tight let's insert it into the box itself the resonator chamber now seems like such a simple thing to come out and buy a muffler for whatever you're building because there are like 10,000 different variations of mufflers, but when you start talking about mid-engine setups and put the muffler behind all of that,
options become a lot smaller, so there's nothing left. for me.
your
options become a lot smaller, so there's nothing left. for me.What I have to do, but go ahead and build my own problem is, in the end we'll see what kind of sound we get and it flows. I think the flow will be just great. The sound will be what we get. We do not have the capacity to do any type. from uh tune up here once that baffling is all wrapped up nicely, like I said, insert it into the case, it's actually a matter of soldering everything, test fit closed, tack, everything in place, bring it back to the bench and put all final welds there again, cerakote. ceramic coating, then goes back to the subframe and holds this in place.
I also made this um completely capable of being taken apart with multiple joints so that you wouldn't have to remove most of the car to get to it if we had to go out and do any maintenance on it, it will be easy to take out once it's in the car. Now you've seen me assembling the muffler onto the subframe, but now let's back up a bit and look at some of that subframe. I'll cut it. of chrome-molybdenum steel tubes without using bends in this, but using all straight tubes, this makes it very easy to do all the geometry attack, weld it with the mig, bring it in and start doing all the final welds with the tig welder and once I had that subframe built at least thatIt's the basics of the subframe, we have a lot of things coming up adding all the pickup points, mounting points for all kinds of components, but once that basic shape of the subframe was created, we brought the engine to the shop used. the lift to hold it because I had to get some pretty precise alignments, like jumping back, aren't we here?
This is the block. We've rebuilt the engine and part of the fun of it is being able to try it. new stuff and im new to this world of electronics but building our own ecu and transmission controllers comes from a kit that creates our own wiring setup so to match the wiring diagram of these ecus a list is created of cuts and then there is a question of measuring the length of each wire according to the cut list, once those measurements are created, we can go to the bench and start cutting wires and designing our wiring harness, a long and tedious process, but rewarding and enjoyable to just sit on the bench and work on it.
Do
best to try to make the evening nice and orderly. I went with a system that uses all the same color wires, of course a couple of the wires are a different color because they come with some of the sensors, but I just used a single color wiring system and then just put printed labels on the end of each wire to make it easy to track which wire is from the sensor to the control board. Now the control board has these connectors that will allow me to have the ecu and transmission controller in the cabin of the car connected through military bulkhead connectors all the electrons are mounted on this board that will connect to the firewall; it can be a central unit for all the fuses, ground relays, so here it's connected That panel is just kind of a test fit to see where those wires are going to go now when you build a car from scratch it's always a question of components from other vehicles if you want to save some expenses and the brake system of our wheels. all created from different things, these brakes from a porsche, of course we don't want to say porsche, we wanted to have our name on it and powder coated this nice beautiful orange, our color scheme will be cobalt blue and orange, here is the dust. coating for, as you saw earlier on the turbo valve covers, now we move on to some of the suspension components, this is the front upper control arm, all the control arms are constructed from jet cut plate of water and steel tubes, these cut with a water jet. the parts make alignment very nice, the accuracy in waterjet cutting is pretty high when it comes to components like this and then using off the shelf urethane bushings we now move on to our rear upper control arm , this control arm is also the rocker arm for the inboard mounted shocks and as we move forward of course all components have been polished powder coated and again to the same, off the shelf urethane bushings, ball joints pressed into place some control arms completed now with some mechanical stuff we're building the body here the active rear spoiler the first mold probably the simplest now I have an extruder that I've built to make these little walls that will create our lines of separation into the finished molds, press those clay walls into place and then finish the edges so I have a nice sharp edge on the mold line.
your
best to try to make the evening nice and orderly. I went with a system that uses all the same color wires, of course a couple of the wires are a different color because they come with some of the sensors, but I just used a single color wiring system and then just put printed labels on the end of each wire to make it easy to track which wire is from the sensor to the control board. Now the control board has these connectors that will allow me to have the ecu and transmission controller in the cabin of the car connected through military bulkhead connectors all the electrons are mounted on this board that will connect to the firewall; it can be a central unit for all the fuses, ground relays, so here it's connected That panel is just kind of a test fit to see where those wires are going to go now when you build a car from scratch it's always a question of components from other vehicles if you want to save some expenses and the brake system of our wheels. all created from different things, these brakes from a porsche, of course we don't want to say porsche, we wanted to have our name on it and powder coated this nice beautiful orange, our color scheme will be cobalt blue and orange, here is the dust. coating for, as you saw earlier on the turbo valve covers, now we move on to some of the suspension components, this is the front upper control arm, all the control arms are constructed from jet cut plate of water and steel tubes, these cut with a water jet. the parts make alignment very nice, the accuracy in waterjet cutting is pretty high when it comes to components like this and then using off the shelf urethane bushings we now move on to our rear upper control arm , this control arm is also the rocker arm for the inboard mounted shocks and as we move forward of course all components have been polished powder coated and again to the same, off the shelf urethane bushings, ball joints pressed into place some control arms completed now with some mechanical stuff we're building the body here the active rear spoiler the first mold probably the simplest now I have an extruder that I've built to make these little walls that will create our lines of separation into the finished molds, press those clay walls into place and then finish the edges so I have a nice sharp edge on the mold line.Another parting line being built is of course the tailgate engine cover using this clay as our parting line walls make it convenient for them to be pressed and molded into position as is usually the case. the case in the past. The metal flashing used cut a notch, but the flashing used it in a couple of places on the car, but with these compound curves, the clay was much easier to make our shape and once all the dividing lines were created with those walls and put some mold release agent on our gel coat and then we started placing our molds now we're working on the doors it just wasn't convenient to go back to the spray gun requires a little more work a couple more coats to brush on a coat of gel Then each of my molds starts with just fiberglass fabric and then builds up to a mat and reinforcements around all those bridle lines.
Once all the molds are ready, trim all the jagged edges and you can start removing the molds from the plug, there's our first one. Remove the mold now a little bit more stickiness on a big part like this, so work all the way around the edges, just go around and around until you get that separation. There, take another mold out of the plug and in total there are 11 pieces in this. Connect 11 molds, some of them small, there they are all in complete pieces, ready to start making pieces now, of course, always starting with the smallest to learn the technique.
This is the lower front quarter panel, now the retreat of that parting line. Those clay walls made for our parting line put flashing over that to turn the mold over so we can create a flange that goes to the inside of the piece, we start placing our fiberglass against the piece and against those metal flashings and just keep building layers until we get the strength and stiffness we want. I'm using some nomex honeycomb as cores to stiffen and strengthen the panels once they are cured, some soft shims and we start separating the pieces and there we go with our first part.
Out of the mold now the largest and most complex part is the bathtub, the monocoque bathtub, so we assemble some of the mold sections here, the doors go back into that main center section and then the flashing instead of being a clip on the outside edge or some of them will be on the outside edge, but these connected pieces, the flashings are inserted between them and then when I build the pieces against that flashing, which is like a 26 gauge metal that will create our gap, now this is a job in the windshield area. or the windows and that flashing has to create a little setback that will hold our gutters for those windows.
The bottom edge of that door, the flashing hooked onto another piece of mold, the engine cover, screwing it into place, same thing, you know, screw it on. into place and then insert some flashing so our parting line is perfect and before those bowls are actually screwed on like I said those flashing are inserted between the two pieces once the flashing is in place tighten all the bolts and you're done , start doing it. The lamination of the parts themselves here we are doing the roof between the two doors and once we have our first layers again back to the Nomex honeycomb to reinforce the center section, the dash is integrated into the monocoque tub working on the underside of the board.
Here we remove all the excess reinforcing resin against the flashing or backings with some fiberglass tapes. Now all of this lamination is just a matter of getting the basic shape of this tub because we're going to go back and do a ton of reinforcements as is. the main structure of the whole car is through this monocoque tub, but we are making these designs to get the basic shape built and keep the solid shape, but of course, this is just the basic exterior shape, so we will have to continue. and create bulkheads and footwells under the dash, all those pieces that are not part of the original socket that we removed the molds from, you have to create them from foam sheets and of course the main one will be the rear firewall bulkhead behind.
The driver and passenger seats use some templates to create the shape you brought, make it on these foam sheets, cut them out once they were joined in place, the same type of foam sheets that were used to create the floor boards and each of these foams stuck together. with foam simply expanded and then trimmed, it's a matter of going back and starting putting fiberglass over them to create the strength. There are also places where there are bolts or attachment points where we don't want foam between them, so let's cut the foam so that we have fiberglass on one side, fiberglass, the other side of the foam is attached and create an area where there is only fiberglass so that we don't have any compression of the foam between them and once we have enough fiberglass over all of these foam components creating our bulkheads in the front, rear and the floor and one of the wheel wells creates a little bit there, we have enough rigidity in the part to get it out of the mold, so you've seen the engine cover just came off.
I removed the doors now I'm just trying to free the mold part. There's the center section monocoque cockpit, so now it's a matter of starting to build all the other parts as well. Once the door is out, place it on the bench. Lay down a few more layers. Now we have a door skin front subframe, like I said these subframes were put together earlier just the basics and now it's time to start adding components to it, a couple of pick up points, attachment places for our front differential, this is where There is the steering rack. Let's put the subframe back on, now we know we also need to run the stainless steel tubing through the monocoque tub, which will be our coolant lines going back and forth, then let's try our subframe again at the start of our monocoque tub Well, there it is.
Go to a condensed version of the hermetic
supercar
project up to this point. I hope you enjoyed that video and if you did, you're probably an oil fanatic like many who stopped by and if you are, I hope you subscribe to the channel. please go ahead and scroll down, subscribe, bring up the little bell icon so we can notify you when the other videos come out to complete this project and whatnot, but anyway, thanks for stopping by, hope we see you again.If you have any copyright issue, please Contact