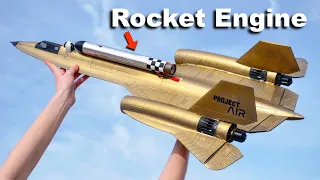
How To Build A Rocket (From Scratch)
Jun 06, 2021For this project, I will show you how to
build
arocket
fromscratch
. These homemade "Randomizer"rocket
s launch over 1000 feet in the air and eject a small parachute to bring them back to the ground safely. They are rechargeable and relaunchable. And you could evenbuild
one with things you have around the house. For this project you will need a bottle of gas relief pills and a plastic champagne glass, like those found at dollar stores. By pushing the bottle into the glass, you will be able to see that they fit perfectly and you will understand why it is important in just a few minutes.
Now, plastic champagne glasses usually come in packs of two for a dollar, but they don't always look like this one. Some have slightly different textures or additional decorations for special occasions. But with a little ingenuity, you can probably make any variation work. As you may have already guessed, this will be the tip of the rocket. And we don't need the base, so let's go ahead and cut it out now, with something like a hacksaw. Make sure you leave about a half inch at the tip, then find a sheet of sandpaper so you can begin carefully sanding the piece of plastic until it follows the contour of the glass.

More Interesting Facts About,
how to build a rocket from scratch...
I'm using 150 grit sandpaper and after a couple of minutes you can already see the nose starting to take shape and looking much more streamlined. Now, if you go a step further and sand everything with 400 grit, it will help the paint adhere better. But either way, before painting the nose cone, it's a good idea to rough up the inside wall, near the top. Roughing it out now will save you a step when we connect it to the rocket later. Alright, it's time to paint and I chose this bright yellow spray paint because it's made to adhere to plastics and dries in 15 minutes or less.

I recommend going outside and holding it with something like a foam noodle when you spray it, because this way you don't make much of a mess. Okay, now that the nose cone is dry, let's move on to modifying the plastic pill bottle. You can find these bottles at your local supermarket, for around 88 cents. And if you pull the label slowly and carefully, you should be able to remove it without leaving any sticky residue. Now we're just looking for the empty bottle, so unless you have a gas problem, go ahead and dispose of the pills however you think is safe.

Next, you will need to carefully cut the bottom of the bottle, and for that I am using an X-acto knife. A utility knife or scissors will also work. But whatever you use, the goal here is to cut the edge as straight and clean as possible. Now you also have to loosen the threads on the neck of the bottle, and I found a good tool to remove them is a flat metal file. Place the bottle on a flat surface and grind the threads until they are flat. But try to keep the lower ridge intact. And while you're here, go ahead and sand a rough bit on the inside wall of the bottle, like you did with the tapered nose, then use 150 grit to scrape down the sides of the bottle as well.
Alright, let's move on to building the screw lock motor mount next. You will only need a 3/4” PVC coupling, which you can find at any hardware store. And it is important to get the one with the threads, inside. Use sandpaper to scuff the outside of the housing, then cut 1/2” off the tip of the threaded end. This piece will become the “quick connect” adapter that our sugar engines will bolt onto when we are preparing the rocket for launch. Now the body tube of the “Randomizer” rocket is made from a plastic golf club protector, which you can find at any sporting goods store.
And while you're running errands, stop by the dollar store to pick up a roll of wrapping paper, too. Although you don't really need the paper. Only 4 inches of the brown paper tube inside. And one roll will give you nine of them. Alright, next we need the fin cutting template, which was designed and donated by my friends at SonicDad.com. And I've put a link in the description where you can get it for free. Go ahead and cut out the "Fin Location" template as well, wrap it around the shaft of the golf club, then tape it so that both ends meet perfectly.
Now measure 20” from the end of the tube and use the edge of the paper template as a cutting guide to make a clean cut. Your body tube should be 20” long, and if it is, scuff the inside walls, from both ends, with 40-grit sandpaper. Now prepare your 2-part epoxy, because it's time to cement it. Before applying epoxy to anything, it's always a good idea to do a test run to see how everything will fit. So, first slide the 4” brown tube into the rocket body, followed by the PVC motor mount. As you can see, it's actually a little wide.
But look at this. You can stretch the bottom of the pipe using the tip of the cone and your PVC coupling fits perfectly. Ok, let's go ahead and mix up a generous amount of epoxy, but be prepared to work fast, because you really only have about 5 minutes before it hardens. I tried using a popsicle stick to apply a liberal coat to the outside of the brown paper tube first and then added a coat to the outside edge of the motor mount. The paper tube goes inside the body of the rocket, up to about 1/2” from the end.
And after adding a layer of epoxy just below, next you will need to push in the PVC threaded coupling. You probably noticed that I am using a 3/4” PVC riser to guide the motor mount into the tube. It is a good tool because you will have a lot more influence in making sure the engine runs straight. Clean the epoxy with a paper towel, but before it hardens, it is very important to place the rocket tube on a flat surface and rotate it back and forth. Look at the PVC elevator and make small adjustments to keep it straight, because that will help ensure that the thrust is aligned with the center of the rocket. 5 minutes later, you can go ahead and attach the parachute container to the other end.
Now, to accommodate the mouth of the pill bottle, you'll need to spend a little time pulling this other end over the plastic cone a bit to stretch it so it fits. Put the pieces together to check that they actually fit and if they do, go ahead and add some epoxy and put the two together. Twist the bottle a little for better adhesion, then go ahead and wipe up any spills with a new, clean paper towel. With the epoxy starting to set, let's prepare the bottle for painting, and all I'm using to protect mine is a piece of paper and some masking tape.
Spray the bottle with black paint, to match the body of the rocket, then place it in a safe place where it can sit for about 20 minutes, undisturbed. Ok, with the paint drying on the bottle, we can get to work and make the rocket fins next. You'll need a large piece of medium-weight sign paper from the dollar store and a black coroplast sign, which I found at a local sign supply company, for $1.88. If you want to save a couple of dollars, you can always reuse those plastic signs that seem to be everywhere after a local election. It is a good idea to tape the “Fin Cutout” template and “Shock Cable” templates to a sheet of poster paper before cutting them out.
And while you're here, you might as well cut a strip of poster paper, 4" wide by 15-1/2" long, because we'll need it later. The rocket fins are made from the sign and for best results I recommend using a black marker, an X-acto knife, and an old saw blade. Place the template on the sign so that the leading edge lines up exactly with one of the corrugated lines. Then make sure it doesn't move. Carefully trace the template with a fine-tip marker, making sure to make the small notch in the side as you do so. Now, if you use the back of your hacksaw blade as a “straight edge,” it will help guide your knife blade and give you the straightest, cleanest cuts possible.
Do the same 3 more times, so you will end up with 4 fins. And take the time to do it right, because quality counts. Alright, now that you have the 4 basic fins cut out, it's time to add some additional features. Carefully cut the corrugated rib on the leading edge, sliding the blade along the inside edges. When you remove it, you should be left with an extra deep channel, at the top of the fin. Now try folding the leading edge by sliding your thumbnail up along the top edge of the plastic. And as you do this, you should see the tip bend inward slightly.
When you've done the same on the other side, your rocket fin will have a nice "knife edge" tip. Now, to make these fins look even more impressive, let's try adding some stickers to give them some color. I printed these custom decals on a sheet of label paper and sprayed them with a weatherproof clear coat. And when they are folded over the leading edge and pressed down on both sides, they are finished. You can see how adding decals will give your fins a really clean and professional look, while also keeping the edges sharp and streamlined at the same time.
Ok, with all the fins finished, there are just a couple of things left to do to get our rocket ready to fly. Cut a piece of scrap sign, the same width as your hacksaw blade, then scoop out the guts of a disposable plastic pen and cut them all into 1-inch pieces. You'll need two of each, so put them somewhere safe and then bring in the body tube, because this is the part where everything comes together. Roll up the 15-1/2 inch piece of poster paper you made earlier and push it into the tube. Make sure it overlaps slightly and snaps into position, just below the edge of the pill bottle.
Now, if you still have your "Fin Location Template" on the tube, slide it down so that it is about an inch above the engine mount, then use your marker to mark the top and bottom of each line. Remove the template and use your saw blade to carefully cut straight lines into the plastic, in line with the marks you just made. And while you're here, it's a good idea to scrape two more slots, 1 inch and 12 inches from the bottom, exactly aligned with each other and perfectly centered between 2 fins. Just for fun, I tried heating up a screwdriver and making holes in the plastic where the fins connect.
This simple modification will attach the rocket body to the fins, ensuring they don't break off without a fight. Alright, now is the time to grab a hot glue gun and glue it all together. Look closely at your fins to see the small mark you made when you traced them and line them up exactly with the bottom of the rocket tube. Add a splash of hot glue, from the mark on the fin to the tip. Then add another drop of glue, along the line you scraped, onto the body of the rocket. Now double check that the fin mark is on the back of the tube, carefully press the base of the fin into place and hold it firmly for 20 to 30 seconds.
Do the same with the other 3 fins, then look from behind to see if they are straight and aligned with each other. If so, go ahead and attach the launch lugs next. I first glued the 1” pen pieces to the remains of the sign, then glued the makeshift lugs to the other two marks,
scratch
ed on the body tube earlier. Before the glue hardens, make sure the pen tubes are perfectly aligned with each other by simply looking over one end and checking for symmetry. At this point you can add the body tube stickers, which I like to center, next to the top launch lug.The last sticker goes around the base of the rocket, just above the fins, and with that, you're almost done. All that's left to do is attach the parachute and nose cone. I got some 1/4” braided elastic cord from the craft section of a super store, and I tied an overhand knot on the end so it formed a loop. Now, the tighter you can tighten the knot, the better it will hold. And to clean it up a little, just use scissors to trim the excess. Measure and cut the other end to 8”, then go ahead and place a dot of hot glue in the center of one of the “cardboard reinforced” shock cord supports.
The open end of the elastic cord should be pressed into the glue so that it extends across two of the squares. And it's helpful to put two more drops of glue on each side of the cord so you can fold the end piece toward the center, trapping the cord and gluing the inside. Fold it again so it's a single square, then press it firmly to finish it. This 8” bead is the one that attaches to the nose cone. So add a liberal amount of hot glue to the back of the pad, then press it against the rough area on the inside wallof the nose cone, until the glue cools.
Do the exact same thing with the other shock cord holder, but this time, use a 16” piece of cord and mount it to the inside wall of the plastic pill bottle. The last step is to add one of the parachutes, I showed you how to do this in a previous project. These "Simple Chutes" are made from dollar store tablecloths and not only work for the "Randomizer" rocket, but can also be used to make "Sky Balls." I made eight of them for $1 and I'm sure you can too. So look for how to make “Simple Chutes” and “Sky Balls” in other videos in the project.
The parachute is now attached to the rocket with two rotating clips, for redundancy. Therefore, you will have to pass the loops of the rocket body and the nose cone over the two hooks and then close them. With the ropes tied and checked twice, go ahead and fold the parachute up, grabbing it in the center and expelling all the air first. I folded mine in half, then rolled it up to the ropes and held the pack together by simply wrapping the ropes around the outside of the parachute. But before you push the parachute into the rocket, be sure to use 6 to 8 pieces of rocket batting first.
This will help protect your parachute from the blast of hot gases that are fired during the ejection charge. And of course there is an easy and inexpensive way to make your own arugula wadding with paper towels and baking soda, which I'll show you how to do in a separate project video. With the parachute safely tucked inside, simply gather up the excess cord and push it into the cone. Then gently slide the cone into position, on top of the rocket. With that, you're done! You just built your own homemade rocket, from scratch. So let's see what it can do.
Their “Randomizer” rocket is designed to work with the “Screw-Lock Sugar Motors” made in a previous project. However, a safer and more reliable method is to use commercially available rocket motors, such as an Estes D12-3 or an E9-6. Commercial rocket motors are much more expensive, but are probably the best option for hobby rocketry. Especially if you're just starting out. And remember that your rocket will shoot over 1000 feet high and may take up to 5 minutes to float back to the ground. So be sure to use common sense when and where you launch, because any project you try is at your own risk.
Well, now you know how to turn a plastic champagne glass and a handful of other random materials into a powerful "Randomizer" rocket. And if you try to make a bunch at once, you'll be surprised to find that they only cost about $5 each. Well, that's all for now. If you like this project you might like some of my others. Check them out at www.thekingofrandom.com
If you have any copyright issue, please Contact