Functional Use For Scrap Wood! – Studio Sound Diffusion Panels
Apr 06, 2024Do you hear that? Listen, listen, I'll do it again. You hear that too, like I'm not just crazy. This room is very poorly treated for
sound
recording and thesound
you are hearing, I mean, outside of the initial collapse, is reverb. Today I'm going to show you how you can turn all yourscrap
wood
intofunctional
wall art that will dramatically reduce the amount of reverb you get in the room. This sounds fun, okay, cool, let's go to the show if you want. If you're like me, you probably have a place like this. This is the corner of the store where I store all the leftover materials at the end of construction and in addition to that, I also have these shelves up here that are also full of excess materials and if that wasn't enough, I also have these little bins of storage full of very small offcuts, so as you can see, I have a lot of leftoverscrap
in the workshop, so before I even think about buyingwood
for In this build, I'm going to start cutting all of these leftover pieces, not only am I going to create something fun for my home, but I'll also clean up the shop while I'm at it, two birds with one stone before I start cutting. this wood, although I should tell you about the sponsors for today's video, that's right, we have two sponsors for this build, so the first one will be minwax.
I am going to use one of their finishes to seal and protect this wood for a long time. term, I've been using minwax stuff for years so I'm really excited to have them on board on this build and then the second one will be purdy brushes. Now I have been using purdy brushes in the construction world for about a decade now I consider them the best brushes you can get so when it comes time to apply that minwax finish I will use a purdy brush to apply it. Okay, let's put this wood together and see what we're working with.

More Interesting Facts About,
functional use for scrap wood studio sound diffusion panels...
It is fun. memories here like take this piece for example this is a cut from my desk build these red oak pieces here left over from the shoshuki bond desk these maple pieces here I'm pretty sure left over from my pixelated coffee table it's nice that all these little pieces, all these little parts of old projects, are going to live in a new life and in a new construction, anyway, it's already a trip to the past, let's start with some sound
diffusion
panels
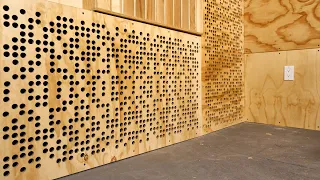
, the first step from this. building will probably be the step that will take the most time, what I have to do is take each of the individual pieces of wood that you see here in front of me and cut them into a nice, uniform size of three quarters of an inch by three quarters of an inch.
I'm probably going to spend the next two or three hours here at the table saw doing that thing that I really don't feel like doing, but don't worry, in the edit I'll make it look nice and snappy and fun if you've done it. I've never seen a wooden sound diffuser before, don't worry, they're pretty rare outside of recording
studio
s, but they're basically just a grid of wooden blocks placed at different heights, so to start this build I start by tearing them all off. my wood scraps in long pieces. square wooden rods and from the beginning, yes, I am aware that I look ridiculous with that big face shield, but I couldn't find my normal safety glasses anywhere and everyone knows if you are going to make a YouTube video and do something even if it's a little unsafe.
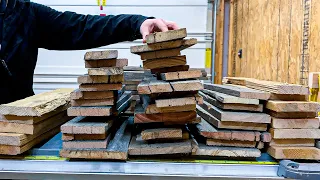
Everyone's going to give you grief in the comments so the face shield was fine so it took a little longer than I thought but this big pile of wood here should be enough to get the job done and in case Let it not be like that, I have a couple of pieces. of oak there cut in reserve, but I wanted to divide it evenly between the different colors of wood so that we can have a nice, uniform gradient between our pieces and you know what my biggest disappointment about this is? I actually thought this was going to eliminate some of the clutter here in the store, but as you can see, these bins here might be fuller than when we originally started.
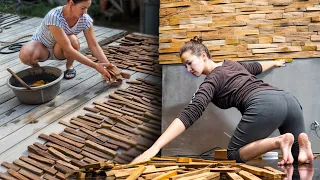
However, the show must go on, so as you can see in many of these pieces, there is some burning. Honestly, I think it's time to buy a new table saw blade, so I'm going to run these guys through the drum sander and sand that in another video, it means another chance to talk about how much I love my drums. Being able to run large amounts of sand like this through the sander was a huge time saver. I couldn't imagine trying to do this with a pawn sander or, worse yet, with my hands. All it took was a few passes of 80 grit to remove most of the sand.
Burn marks though, since the sander removes a little bit of material with each pass, I had to make sure to sand two adjacent faces on each piece to keep them all perfectly square. This will be an important detail later in the build. I'll see below, it was time to start cutting all my wooden rods into smaller blocks of wood that would form the body of my sound diffuser. When I started, I had big ambitions to be super organized and cut all my blocks into specific sizes, so I marked some nice round numbers and tape on the miter saw fence, but to be honest, after a few minutes I was basically cutting pieces of random lengths and then threw them into a big pile when I was done I had cut over 1000 individual blocks. all of which were between half an inch long and four inches long, okay, I think that's enough blocks before we start arranging them in any kind of pattern, let's cut the sheets of plywood that we are going to use as a backing board for the standard. fusion
panels
I've heard it said that all great art requires an equally great canvas, so I thought that for my little art project, some 5 8 raw plywood would be a very appropriate canvas.I ripped two 12 inch wide pieces from a full canvas. blade and then cut each one into three pieces on the miter saw. I set the first three aside as packing boards and the other three pieces I broke in half at a 45 degree angle so I could use them as large French cleats to eventually mount the panels in my office as a final prep piece to keep organized. the thousands of wooden blocks he was about to glue together. I marked the horizontal and vertical centers of each backing board and to make sure the first couple of rows went in perfectly straight, I clamped a square steel tube in place to act as a physical guide, so we're almost ready to start glue these blocks in place.
I have my glue here, I have some quick setting Ca glue and then I also have some regular wood carpet glue, I'm not sure which one I'll like better so I'll try both before I start although there is one thing about The one I want to talk about is actually something I've been thinking about a lot lately. I'm under a lot of pressure to make these videos as snappy and watchable as possible, so I often end up condensing things into very short video clips - something that takes three hours in real life often turns into a small three-second video clip and I There are concerns that that will create an unrealistic expectation about how long these projects will take, so what I would like to do today is include a little timer in the corner of the screen that shows in real time how long this has taken me and I suspect it will take a while you'll see behind me here I have my laptop set up and that's because I'm going to be watching some movies while I do this yeah I think this is going to take five six maybe even seven hours to do I just wanted to inject a little bit of realism to these videos, but with that being said, let's get to work and so it began, finally it was time to start putting together my panels and boy, I had my job. cut out for me remember we are talking about over a thousand individual pieces here let's start by talking about the pattern I was looking for.
I wanted this diffuser to look like a big rolling wave, so I started in the middle of the panel with my tallest pieces and then worked my way outward from there, slowly tapering down to two channels on either side and then finally working my way up again to the outer edges. . Well, you were right, it took me a long time to do this, but the good news is that I'm crushing some. old Star Trek episodes this is fun let's move on other than that I just tried to maximize the variation between individual blocks and avoid having two blocks of similar size next to each other my theory was that this would look better and also help with performance, many Acoustic sound traps work by absorbing sound waves with soft materials like foam wood sound diffusers, on the other hand, they work by breaking up the sound waves and then reflecting them in all sorts of different directions, so I figured the more variation I had between individual blocks, The more the panels as a whole will be able to break up the sound waves.
Well, it's the beginning of the second day. I just counted and so far I've made 420 blocks and I probably have another 420 left. I got my iced coffee here so I have some energy for the day and let's move on. Another thing I had to watch out for was misshapen and imperfect blocks. A repeating pattern like this is very sensitive to small discrepancies. If one of my blocks was even a sixteenth too big or too small, it had the potential to misalign the entire pattern. Now, realistically, when you're working on a project with a thousand individual blocks, chances are some weirdos will get in there, but I did. everything possible to minimize its impact, okay, that's a big guy, put it aside now we can make the smaller ones, oh, and if you hadn't already guessed from this video, ca glue was the clear and obvious winner in glue competition. the fast setting time made it a real advantage in this build, okay, that's it, we're done and if I never see another of these wooden blocks again it'll be because I'm sick and tired of these wooden blocks, oh, that was very tedious, but now we are ready to move on to the next step, as much as I would love to start finishing at this point.
I think we need to take a little time and sand this all down. Let me show you why I did my best to make sure that all of these blocks were exactly the same size, but unfortunately there were some small discrepancies between the pieces and when you have so many rows and columns when you get to the last row, those discrepancies add up. some pretty significant variations and there are little bumps along this outer edge, so I'm going to use some coarse grit sandpaper to smooth out all the outer edges and then maybe clean up some of these rough edges here as well.
This is a great example of something being removed from videos because it's too boring to watch all the sanding, it probably took me about an hour to do in total but at the time of the YouTube video it took me this long. Don't you love the magic of movies and you know what before us? let's put on the finish, let's put on these french cleats now that we've got all that stuff out of the way, we can finally start applying our finish, which is from today's video sponsor, minwax, today I'm going to use their polycrylic finish.
I've never used this one before, but I wanted to try it for a while for a couple of reasons, one of which is advertised as extremely fast drying, which is always nice when you're working in the shop. It means you can apply multiple layers to a project much faster and then two. Water-based and water-based finishes are inherently easier to work with. It just makes cleaning up at the end of the day so much easier, which is especially important to me. on this build because I'm going to be applying it with a product from the second sponsor of this video, Purdy Brushes, and I'm an absolute stickler for keeping my brushes clean at the end of the job.
This is the thing about brushes, people treat them often. As if they were disposable, they buy the cheap ones, use them for a while and then throw them away at the end of the job and what happens with the cheap brushes is that they don't apply the finish as well, which is why I have always been a big fan of Purdy brushes, no. Not only do they apply the finish very well, but they are also extremely durable and that means at the end of the job you can take them away, rinse them and put them away for another day, so I end up trying.
Brushes are more of an investment in tools. I know I will be keeping these brushes for many years, so I don't mind getting the high quality ones in the store today. I'm going to use your XL Dale brush. the one inch variant, I'm pretty sure this is the smallest brush that Purdy makes in their entire line, but it's going to be perfect for getting into all these hard to reach corners, all these little tight results in the pattern, right? I have a feeling this is going to take a while, as will gluing all of these blocks to the board, so let's start applying the finish while we watch this.
I'm sure many of you are wondering whywhat didn't I just spray this. finish and to tell you the truth for a trusty sprayer that might have been the way to go but I'm not a trusty sprayer. I am much better and much more confident with a brush in my hand. I didn't want to risk ruining a project. That said, I had already put so many hours into it, although applying this finish with the brushes was an absolute pleasure, it obviously took a while due to all the nooks and crannies it had created for me, but it continued with minimal brush strokes. which quickly leveled out leaving a perfectly uniform finish.
I was also surprised by how little color there was. This is a great finish to preserve the natural tones and character of the wood you are working on. The wood took on a richer, deeper look. Very little color shift and the Dale brushes themselves were great. Anyone who has used a Purdy brush knows exactly what I mean. They're easy to control thanks to their long handles and balanced design, the nylon-polyester hybrid bristles are durable and predictable and work with virtually every stain and paint finish on the market, so you can store one type of brush for about 99% of your finishing work and again these brushes are well built and durable so after I was done I rinsed them with warm water and set them aside ready for the next job which actually came quite a quick because between the second and third coat of the polycrylic finish I also painted these trim pieces and matte black in preparation for a later step, okay I think, and that's it for the finish, now it's done, let's tackle this little gap that runs through all the way when mounted on the wall.
I don't want to see these two layers of plywood serving as a base and French cleat, so my solution is very simple. I went to the hardware store. I bought the simplest molding they had. I painted it black and now we're going to mount it on the side. Here, install this black trim. It was actually very simple - I simply cut the pieces to size with the miter saw, glued the mitered corners with more ca glue, and then nailed them into place with my 18 gauge cordless trim nailer, these moldings will not only hide the ugly plywood backing boards, but it will also work as a frame that will outline these diffusers and draw attention to their secondary function as pretty wall art.
Well, I think that's all. Now we're ready to take these guys home and set them up off camera. I touched up all those nails. holes, but like I was saying before, some things just aren't that interesting to see in videos, but what will be interesting is how we set them up in my office, so we're going to take care of this big one being heavy when mounting it on the wall is going to be a lot of fun, so here's the problem: I live in a condo and this is an interior dividing wall, so there's a 99 chance it's framed with steel studs, which will make mounting something this heavy a pain. little complicated, fortunately it is so heavy.
The piece is nice and wide, so I should be able to distribute its weight between at least a couple of posts to ensure my sound
diffusion
panels don't end up crooked. I set up my laser level and use it as a guide to Install the French cleats and then from there I used a combination of painter's tape and my sharp detective skills to locate some studs to support the weight of the large, heavy panel to help distribute the weight. I used these metal drywall anchors for each screw, not only the screws that went into the drywall, but also the screws that landed in the steel studs, as well as with the battens in place, there was nothing left do more than put the new sound diffusion panels in place, stand back and enjoy the view, okay, so it's time to The real proof is that these panels completely eliminated all reverb in this room.Well, probably not, but they should help and I also think they look pretty cool and in fact, you know you guys will probably be the best judges of whether these panels worked or not. because I will be recording all the voiceovers for this video here in the office with the panel set up, so let me know in the comments if this video sounds better than any of my previous videos, frankly, even if they were just wall art. I'd still be happy with the way they turned out, but the way I see it, they're part of a much bigger solution.
In fact, I have another compilation coming up where I'm going to do more soundtracks for this room, so you might want to subscribe so you don't miss that and maybe my favorite part about these panels is the fact that they've given me a new angle on camera to work. I used to always avoid shooting this wall because wow, that's just a big white wall that was so boring to look at, but now it seems a little more interesting, so at the end of the day I chose a new camera angle to working with some sound diffusion and some cool wall art, not bad considering I made it all with a bunch of scrap wood I had at the store and that seems like a good place to end this video.
Thank you very much for watching if you like this video and would like to support the channel. Hit the like button, leave a comment, and subscribe if you're not already. I really appreciate it. Plus, there are all kinds of links in the video description, all of which help the channel in some way. Big thanks to purdy and mimwax for sponsoring this video and An especially big thank you to all my Patreon supporters, you guys sponsor everything I do and I really appreciate it, that's it for me and I'll see you in the next video peace.
If you have any copyright issue, please Contact

![Making parametric design wall [art wall]](https://i.ytimg.com/vi_webp/1T2x2X9yBOw/mqdefault.webp)