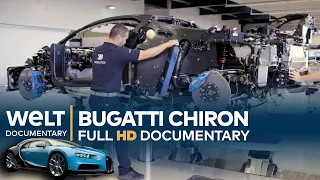
Full 2 years in 2 hours. Vintage car + Bugatti. Timelapse. Homemade.
Mar 07, 2024Hi guys, this is our crazy project in which we decided to integrate an old car from the 50s with the new Bugatti Chiron. As a result, we will get a wonderful, enjoy the show, so after we realized that we needed a new dining room, we spent a lot of time looking. looking for the right fit and then a couple of months later this ad appeared BMW E63 with a 4.4 L engine at the time of purchase the condition of the car was unknown, we only knew that the price was five times lower than the price average of the market, so I took a quick look at it and decided to take it.

We popped into the head, if you can call it that, and picked up a bunch of permanent pieces. Yes, it's obviously a leap, but if you've done this type of repair, you know it's often very difficult. we found some small things like fasteners and some of that scrap can be useful, we can always throw it away later, we ended up putting the car on a tow doll and returning home 150m away, meanwhile 4
hours
later we arrived healthy and safe a We are at the shop and we are carefull
y unloading the car a couple of days later, the car ends up stopped with inflated tires.
More Interesting Facts About,
full 2 years in 2 hours vintage car bugatti timelapse homemade...
Everyone is
full
of energy and ready for action. We don't realize it yet, but we're in it and we know how much effort, time and money it will take. restore it, we have the car, we are going to put it in the Rex now we lift it up high so we can take it apart safely and comfortably, we remove the engine hood covers, all that so we can check everything for defects and then replace it . things that are dead to make the car run before registering it, the first thing we need to do is clean all the space under the hood and take care of the body work, only then we will see if the engine and everything else is worth it or if You should scrap the car as it's not that simple.
The entire underside of the hood, including the PA frame, is made of aluminum and is not the easiest material to repair. By then the guys had to remove the engine, although to be honest it wasn't actually installed most of the bracket shattered upon impact, the first thing we need to do is assess the damage to the bodywork, so We move the engine out of the way, take the bottom off and move on, remove the fender sealing plates from the exhaust system, basically anything that gets in the way. Unfortunately, to get to the bare body, the interior will also have to be completely dismantled, as we need access to the engine panel on both sides.

Actually, it didn't take much time to do it, just a day, but as practice shows, it doesn't take much time or wi to disassemble it, but to put it back together, besides, after a couple of months, this is actually quite a challenge and Not everyone can handle it. This is where many projects come to an end and then appear on bulletin boards saying that it's all over. done just needs to be assembled I hope that's not our case, now it's time to check the most interesting part with hidden internal damage. This is the most obvious thing that everyone probably expects.
This is the biggest flaw in the factory area that BMW has. a factory crash area here in a crash the impact energy is discharged and it falls apart here we also have a drop here a drop there there is a drop here and here but it's actually okay it's not great by any means but no there is nothing I criticize him because the person who works at the car bank came and said he could fix everything if we had a spare section of a car and he could take it all out, tighten it, fix it, bring it all back. to the factory geometry to get the car to the body shop we need to get a replacement section by happy coincidence literally on the next street there was the same body in a junkyard that's where we went with a cyber saw and a ball cutter. with us we decided to cut with a large margin because it does not affect the cost in any way and at the moment it is not clear what the Craftsman will need after
hours
we have this part that we stop at the trailer and we return to the base ah no, not yet, at the In the end Nick decided to grab a piece of the left Spar since the salesman didn't have change, now all we have to do is wait our turn at the car bench, which ended up taking a little over a month, but in the meantime, he had something to do, that is, the engine, as they say, the further you go, the worse it gets, of course, even initially, at the primary inspection it became clear that it was inconvenient and impractical to carry out such a restoration, it is much easier buy a running car yes that's true and we knew it but there are a few other things to consider, firstly the budget doesn't allow us to spend $15,000 on a Donner on a Donner in decent condition, secondly we don't need perfect. condition because once we put the car on the cash register we won't need most of the flower pots, we're going to cut the car into pieces again and here it's up to us to decide what to invest in and restore well and what to just do. to tick the box and the wall the things that are bad for ordinary people are content for YouTubers, so we film it for you the further away the goals are dismantled, the mer surprises await us along the way not only the vain ones are damaged, We saw them right when we bought them. there was a broken cap, the valve cap, this is the cheap whistle, it needs to be replaced this vanas has a cheap price, it is not clear if it will affect anything, but it is not very nice either, we take the hat off the block to repair this brake here same.We're missing pieces, we thought we'll solder it up, take it to the grinder and it'll be a pretty good hat, especially since it's pretty intact inside, you can't change the cam shift, it's pretty cool, but when we took it apart, I saw this Groves broken or what is properly called a crack in the cam shift, this causes damage to the retaining clip, the combination of these factors will probably lead us to a complete replacement of the block head before taking the car to the body shop. be running nominally, that is, on all four wheels, we washed and cleaned the subframe and then the steering rack, we screwed the subframe to the side member in One Piece, we placed the rail so that the car would not put on wheels, it was easier to load it. the crane on this side, of course, we lost it a little with the BS, the spar is in a slightly different plane and that's it, it is in Wells, mobile, manageable, steerable, here they replaced a part of the frame and this part of the frame was almost completely replaced. it's all in one piece, where is the jar, there should be no problems with registration, as the scene says, we will never know until we try, but before everything can be put back together, the car had to be disassembled even further .
The first thing we did was remove the suspension and brought an aluminum welder yes of course it would have to be done at the body shop so they deliver the car with seams and spots welded but then we could have waited in line for another month in the best case scenario, so we asked to be fed. in the smallest slot available on the condition that we take care of the subsequent welding and assembly work. Once the welding was completed, there was a final touch to paint the engine compartment. The first thing was to wash everything well, dry degrease and paint black.
So this is the final look of the head. Drew prepped everything, painted it, applied ceant where needed. Everything is painted in one color. It looks good like a new car. New car. New car. The Sims were DEA to us. by Alex, reinforced them, made them wider so that we wouldn't have any problems to deal with later, so that the linum wouldn't explode anywhere nearby after the power structure is restored, we started putting the car back together , the next step is to connect the gearbox to the new motor, which means it must be disconnected from the old motor.
We took it off and immediately, to make it nice and easy to work with, gave it a good wash and in the end we have all the pieces we need. Now all that's left is to put this puzzle together correctly during the building process. We often cook food outdoors. I know a lot of people enjoy watching this format, so we decided to make the other channel where we will post cooking videos. Anyone interested in this format be sure to subscribe to our new channel. The link will be in the description for the motor to be in position.
Taking a test run, we decided to finish the rest of the puzzle. The next step is to connect all the wiring, this is not the easiest task, some cables are simply broken, some are missing, many of the connectors are so damaged that it is difficult to identify them for replacement and even if you manage to order a replacement, the following happens Well, here's the deal. ABS connector is ruined after the accident absolutely, I mean, scattered in pieces, we ordered this connector only it was not from E63 but from X3, I think what we have to do now is re-pin our pins, here is our set of pins of peanuts, let's start, finished.
It took us half a day to do the final assembly and wiring, then we put the air filter in, put it in the oil, prayed and prepared for the first lunch. Bingo, it's a success. BMW has been resurrected and we move on. buy a Bugatti Chiron yes, the same Bugatti Chiron in a 3D model cost us only $25 and this is what it looks like, we will make a body based on it, I mean the part of the body that we need for the project, so to speak , non-production waste in the 3D model we cut the body into parts and then cut the panel into thinner parts, each panel should not exceed a thickness of 4 mm.
Here, of course, the question arises about the plausibility of such a model, since it is not so. an official 3D model of Bugatti, but a project of an independent artist and we can only rely on his good faith, of course, before implementing this model, we test its resemblance to the real car, specifically we take official information on all dimensions of a real car and I checked these dimensions on the 3D model and I will tell you that we were pleasantly surprised everything is like factory which means we can cut it, so why do we divide all the parts into 4 inch thick panels?
This is due to the length of the car. spinel stroke, etc., based on these technical characteristics, we come to the conclusion that it is easier to cut many panels with a thickness of 4 inches and then glue them into a single body, in addition, there is an expanded polyethylene strip on sale 4 inches. which makes life so much easier, how does it work? We place a polystyrene sheet on the CNC. The blade size is almost 47 to 24 and from the given program we start B relief cutting for many ARS after few days of sharp milling. and samples, we move on to the next step, first of all, we free the blanks from the shit, at first glance you might think that there is a lot of waste and you could cut one more body from some smart guy, yes, one body from a smart it would fit here without problems but Bugatti elements don't believe me if it were possible to fix the pieces more cheaply we would do it given the cost of materials recently so we cut everything neat with a knife and an hour later we have such a pile of adult Lego pieces , at first glance it seems unrealistic to separate these cows, but believe me, if you spend a couple of days in front of the computer thinking about how to cut the body correctly and in which parts you will know. each part by name and determine it even with your eyes closed everything will be assembled with polyurethane glue it looks like a mountain but unlike this the glue does not increase in volume to avoid waiting until the glue adheres to the previous layer and for better fixing we screw all the elements with a safety tap and screws pot after pot hour after hour after 2 days of work we have three main elements separated, a roof and two sides, all that remains is to connect them and obtain a solid structure here is how it looks we adjust the joints with a grinder with a circle of petals we apply the same glue and then we screw them with tap and screws the next day when the glue has dried we have a one piece body and now we can clearly see the parts that need to be improved, we fill those holes with the same shine, we'll wait until it dries, cut the shaft and move on, now we can finish the form, which is what Andrew is doing.
Flexible planner, several SLs, a couple of days of work and 10
years
of experience will make the CLA shape ideal as long as it is possible to make it with expanded tip, the next step is to prime and split the shape to make it small later, most of the time this operation is replaced. when passing with metallic tape and Matrix is made with it we use a slightly different technology rather it is a matter of habit but it is easier for us the first primer in our case is a simple water-based paint yes, the one used for painting walls and this is important like any other resin or solvent based material, except expanded corrosion, here is a goodexample.Imagine, let's say he made a car body by cutting it, gluing it, finishing it for a couple of months and finally, the long-awaited final primer. We primed it and after 15 minutes the body was gone, that is why at this stage we used water based materials, plus they are much cheaper than the professional two component material and are perfect for these purposes after applying the first coat to all these parts. that needs to be partisan appeared the putty used is also one-component water-based yes, the one used to putty walls the next step is to develop the layer most often the base paint of a dark color is used it is applied around the perimeter then when polishing all CRS chips rough nicks and scratches The scratches of some papers are clearly visible along the body.
There are longitudinal lines. There are also around ARs to keep them sharp, slim and sleek. We need to line them properly. Adhesive tape is glued along the line and starting from The planes are lined, the main thing here is to stick the tape correctly and evenly, otherwise you could line something, something that was not well planned, then a few days of polishing and a couple of pounds of powder when all the planes are lined, the backs of expanded polyserine. In some places apply another final coat of Primal. The first thing we did was determine the place where the mattresses would join and separate from each other, that is where we made the border, that is, the entire structure will consist of many rigid elements that will be assembled into a large integral array with the help of bols, This will be the connection point, it is made of plastic piece by piece, we adjust it to the shape of the body and apply it with hot M glue, the Bugatti has a mul in the center. from the roof it will be very difficult to fit it into the Matrix, it is much easier to do it separately, so at this stage we will remove it and then make the flange.
Now it is clear how it works and into what elements we divide the body in order to be able to remove the fiberglass W part of the Matrix without any problems in the future. The first layer is the release agent dyed blue so that you can clearly see where and how much is applied this is a release agent based on white glit it is considered single use unlike similar jobs but in our case it works better because we do not plan to make a body production line for Bugatti and in terms of time this release agent is much faster than applying walks in several coats of polish. and so on, for a single cup it is easier to use this type of single-use release agent.
We apply the release agent to elements that are not adjacent to each other and this was done for a reason, a little later you will understand why we did it that way, then we glue the adjacent elements with a film so as not to spoil them with the compounds that will be applied in the blue areas. The next layer after the release agent is gelcoat, in the white compound we add a little of the same but black, then we add the activator and we obtain a layer of gray gel that is applied evenly with the brush.
We made it gray so that it is visible where and how much it is applied. Plus, the difference in the two colors lets you see how. Mix the compound well and evenly. This is very important, so it has to be mixed well. Basically this is the first layer, which will be the front layer after we finish the work, the release agent will be removed into a theme film, the next step is to apply. fiberglass mat covering it with polyester resin. We do this when the gel coat has already hardened. You cannot press it with your fingernail but it is still sticky like adhesive tape.
This is when we have to apply polyester resin so that all the layers are well united. and they stick, it's pretty much the same story here with polyester resin. Poter resin is a two-component compound, so mix a plus b well and apply the first layer with the roller, then layer by layer we spread the fiberglass mat, use the material with density of 150, 300, 450 and 600 are G per square meter, but we use a 150 density fiberglass mat only in the most difficult delicate places where it is difficult to distribute the thick material evenly, so basically the job started with a density of 300 and then everything becomes clear as Sin. one layer of fiberglass po resin and a Rolla, but you can spread a couple of layers at a time depending on the technology, you can spread the next layer the next day since the po resin heats strongly during polymerization and if you make a thick layer of this compound would warp when heated and can easily warp the structure we apply it on and of course polyester resin shrinks as it dries, if you apply it layer by layer it's no big deal and it's not possible, so we did it this way. layer by layer day after day and in the end it took Andrew almost 2 weeks to do this job each layer is well coated with resin and rolled with the roller at the end we use this metal roller with needles to remove all the air that remains under the mat of fiberglass to apply the next layer we pass a COR and paper over the entire area to eliminate the obvious roughness and needles of the fiberglass mat at the end to create a more or less rigid matrix form we place two layers of Mat number 300, three layers of 450 mat and two layers of 600 mat, it took 132 lb of polaster resin, 9 lb of Co gel and many days of work and then comes many layers of glass mat impregnated with resin in exactly the same way as we.
I did the previous Matrix, so let's go back to the Matrix, so why did we tape and zone the Aras? As you remember, we have plastic edges at the joints. We have already put a fiberglass mat on them from one side. Now it's time to As a result, remove the plastic instead of a plastic edge flame, we have a rigid edge that is an integral part of the main element. Now all that remains is to place a fiberglass mat on this side as well and we will get the correct design, but once again a surprise awaited us in some places the resin found its way out in a previous video.
I showed what happens to the expanded polyanus if it is exposed to such compositions. Here look, fortunately in our case that is not a big deal and it is easy. to fix we remove the top layer of gelcoat, clean and separate at the points where the resin has eaten into the workpiece, the rest we did in the same way, a few days we covered it with the fiberglass layer by layer and now we are done the matx which must be taken off and then we will evaluate the result. The first thing we need to do is cut the sharp edge with a grinder, the next step is to drill holes around the perimeter later in the process.
We will insert balls into the passages and it will be possible to squeeze all the parts of the Matrix together and finally we begin to dismantle the construction as you see the edge has been lubricated with a release agent now it has a transparent B that fits perfectly to each other the second Edge was applied in a liquid state and it took a perfect shape basically that's what you see on the screen in the end we didn't manage to keep the white expanded poyene intact although no one really tried because after gluing it we realized that it is impossible to get it out of this room there is only two small doors well if we fold the body of the expanded poian in the trash can it passes perfectly through the door as you can see the construction was large, complex and rigid so we disassembled it by all available methods in the end Matrix is ready, it is the best that can be obtained, we had to dismantle Matrix and assemble everything in another room, we have a wide look there, then we turn it and secure the width with this board just in case. the path works as an encapsulation agent, so after placing all the layers we can easily take out this big and complex shape from Matrix and now we have to use the method of blowing up five layers of paths, we have to polish the path properly.
The first layer is gelcoat, generally speaking, it is a special primer that will be the front layer of the body when we take it out of the Matrix and by the way, a filming to demonstrate how solid this material is and then when we screw 50 balls and Coming to be packed, you can clearly see why the body was divided into several pieces and isolated in this way. In the end, this solid, complex shape comes apart easily and we have a finished body, we just need to get it from another shop 6 miles away. but before that we cut off all the excess and the rest of the glass mat after that we polish the sharpest places we are doing now because we want to carry this body with our bare hands from one place to another if you cut your finger with or have a sliver of glass mat once you know exactly why, overall I think fiberglass body work is a pretty decent technology and one of the main advantages is that this body will never rot or rust due to the way they experiment with plastic bodies. was made in the 1950s and the first production car was a fiberglass body, a Chevrolet Corvette in 1953, imagine 70
years
ago, but this material has disadvantages of course, but that is a topic for another video and In this sense, this is obviously and simply the right choice.The next step we went in search of vulga 21. I found a good option in a neighboring town. After we have obtained a suitable deer, we remove the necessary panels that will have to be extensively modified. In fact, the square arc is off the table. At this point, because we have to lift it up to highlight it, now our wheels don't go into the arch, so we're going to do this another time, yeah, and I think they fit perfectly and you can see in the picture that this Edge is just below the edge bottom of the arch and this is what we have done, show us on your phone, it is the same, yes, like in the picture, basically, it will look like this, the edge is higher, yes, I think it starts to look very good, really like this picture, the grades are right, it's going great, so let's show me a little more.
When we installed the arch, we realized that it doesn't fit as perfectly as we thought. We have to think of something, add some pieces. after a few hours of work we can see the shape more clearly, we installed the arch using slats, it doesn't really fit, that's why I made holes. Here and now, the vulga fender is going to bend to keep the arch here, yeah, and again we go. To make this round edge, to do this we need to draw a line and like I said before, we need to press it here to bend it here and here and then it just falls into place, we take out the temporary screws and we put the Peron touch on it. the tempered fender since these metal parts of the body will be covered with a kilo of plaster, we will perfect it and create a matrix and then we will create all these elements from fiberglass, in the end we will obtain thin and light panels that fit perfectly to our tasks, but it is just a theory, in practice we are going to redo them several times after all the previous paint and the part that greases the surface has been removed and through kilogram after kilogram of part, so what is done? because the fact is that the bodybuilder the vulga even left the factory not entirely smooth, not to mention the traces of 60 years of service and in addition we have significantly changed the shape even though the dashboard will eventually reach its ideal state.
This will not work because all technologies are violated here and this amount of party will definitely be revealed, that is why we will make these elements from us in the same way as we did with the back of the Bugatti. Here is how many kilos of potty. Do you think a backsplash was needed? When sharpening the backsplash, we do not forget to periodically estimate what kind of hinged elements there are. A lot of attention must be paid to make them fit, by the way, it is convenient to divide the right one in the place we stick the lighthouse with adhesive tape and separate the right one on it, then we will immediately have a guide to the bacon how many potties we need to put on the sculpture, How are you going to get the lighthouse out of there?
Well, yes, I didn't think about that, as we said before, we will pile kilograms of poy on the old vulga panels to give them the ideal shape, in the future we will remove the mattresses from them and, as a result, we will make new fiberglass pots. we will get light, strong and beautiful body panels with the correct geometry, but not everything is simple and fast and this work took more than a month andry, by the way, a very cool party with a color indicator initially it is blue and then during the reaction, it changes color and it's great that it's clear that you shouldn't start grinding the urinal.
One coat of paint is always not enough, it will wear off immediately upon encountering some paper, so the agent eroded off one side now without tearing off the old tape, the second side and then long days of sanding and mounting panels the body, when the hood is prepared from there, we make the mounting space, that is, the feet to the wings, with a grinder, we remove everything extra, we remove the wings. and then exactly the same process as with the headkilos of primer kilos of paper s Andre day after day Andre and cold as a result we have an ideal shape w and we return to the 3D Bugatti model to deal with the strange pot bumpers the lights and decorative elements to do this we decompose the model into parts and starting from the size and our processing capabilities we cut the bumper into those layers so we can cut it further from the foam, remove the matx and roll it out. fiberglass, but let's start from the beginning, after we have correctly cut this sandwich, we go to the CNC and start the machine, as you can see, all these parts are made of polystyrene foam, this is a light and flexible material, that's why we use it when creating a Master Model the machine continues destroying sheet after sheet simultaneously filling the bags with foam chips as a result this work took several days and six sheets of 10 cm of insulation after the CNC the part looks like a great constructor that must first be take out of yourself cells and only then assemble in fact it is Lego for adults the next step we can assemble the puzzle everything is simple here a good screwdriver longer screws and glue and then everything becomes clear without further ado after assembling the base we wait until The glue dries and can be sanded.
All adjustments will be made directly on the body of the car. Fiberglass EDH elements are most often made with a margin, which makes it much more convenient to work with the mold. Now we need to remove this margin at a good angle. grind a cotton wo 120 from Andre's day and that's it, now the bumper fits perfectly, we fixed it roughly with self-tapping screws and examined it and found out what we need to touch up, we noticed that he removed the bumper and started the work which took a little longer. It took Valera more than 20 hours to polish the entire piece, but in the end the workpiece was smooth and we can continue to the next step, so we took an ordinary water-based wall paint, mixed it well and applied it to the Workpiece.
Why did we do it? Do this, the next step is to putty the bumper with a water based wall putty and this putty adheres very poly directly to the foam but adheres firmly to the paint. Yes, these are construction materials, at this stage we use them because they are water and solvent based. Materials based on dissolving the material in this way at this stage we just need to give it the perfect shape, take a mold and make it out of fiber glass so that the characteristics and properties of the poy are not important now, by the way, the urinal for the walls is much easier and faster to work with the PTI of the car, in addition, it is five times cheaper in the end, an hour more Later, the bumper is printed and placed on the body, it remains to work on the wing, we also use a 3D model, we cut it out of plastic foam. and we connect the two parts, we carefully prepare the ends so that they stick safely, we glue the ends with adhesive tape and with the help of the mold we join the two parts, we press them with self-tapping screws and we let it dry, later the same work was done with this part, after the primer dried, the wing was placed in place and secured with the same adhesive, all that was left was to cut the shaft, so at this point we have a finished body or rather its final contours, now all that is left to do is to take a look at it and finally approve it first we smooth out the ples and remove traces of Glu at this stage it is important to bring two elements in a single plane, the main body and the bumper, as you can see there is a lot The work to be done here is done in the following way: first with the help of a sanding block the adjacent pieces are polished then another measurements with a spatula and hours of sanding again after adjusting the elements to each other we proceed to P on this now There is the final thermal layer at this stage we use a simple water-based wall part precisely because it is water-based because of the way the P car interacts with the foam and, as you understand, we are not particularly satisfied with it, but Of course, also water-based poach.
It has many drawbacks, firstly, it cannot be applied in a thick layer and by the way, we had that task and secondly, it dries slowly, which is why it took more than 10 days to bring the bump to perfection layer by layer, day by day. we have to remove Matrix from it and make a full bumper in the future, everything is simple here and we have shown this process more than once, briefly, first the foam bumper is completely lubricated with rides, the next step is to make a layer of gel. It is the composition for the first layer, something like Foundation.
We mix the position of the black and white comp to see how well everything is mixed and when everything is well mixed, we apply it with a brush to the model. The next layer is glass wool impregnated with resin. polyester and so layer by layer this is what the preliminary stage of our bumper looks like, it seems that it will be only the Matrix that will allow us to make a final bumper in the future we use I don't know how much glass W but resin I. I will say with confidence that here 20 liters of resin have been used.
I will say that this is quite a lot. Three layers of glass will be enough, therefore I think three layers will be enough, but that is not the point, it is different how to remove this Matrix. now when the resin hardens It hugs so let's say It narrows in size and squeezes the plastic foam that we have there under the glass I don't know how it will look, in short, most likely it will have to be broken in general. Look, witness, and as a result I have to suffer tears and suffering after five hours. We have this pile of junk in this form to get the highest quality part.
Matrix of the highest quality is required. We bring it in all possible ways. drammel plasticine sculptural py and prayers by the way only this work took four days of eight FL RS each when Matrix is ready we can put materials in it and prepare the bumper so finally we fill our bumper let's run and pl separation walks for the blank space that's right what the final feel looks like, but that's not all, we have to break it all down now and I'll tell you it's not that easy, as you understand, making a bumper in such a complex shape is half the battle after that. necessary to extract it from the Matrix in some way Valera assures us that it is not that easy and looking at these shots in which I believe after a couple of hours it became clear that it was impossible to do without toning we took a Bosch surgical instrument and in this simple way we released the pot after two hours worth the surgery is completed and the patient looks like this on the original Bugatti there is a wing that opens and changes its angle according to its shape we adjust the bumper we cut the entire axle and attach it to the main body in fact we don't even it is a bumper it is part of the body since Bugatti has a one-piece design we did it separately because it is easy to make a part that way well now it remains to combine it here I decided not to bother too much and just screw it on and for greater reliability glue it with Duct tape, which is what you can see, of course, is a joke.
These are only temporary positioning brackets and tape is needed so the resin does not leak. of the joints, since we will connect these two parts with glass wool, the original Bugatti has this spoiler that changed its position depending on the situation initially we created the basic shape of the body and this spoiler was hidden to make this spoiler extend and switch to. position we need to make it as a separate solid element that is exactly what Hander is doing to make this Pooler hard and thick we are going to use a heating pad this is a foam like material that can be soaked in resin how does it work first?
We put a layer of glass mat, soak it with poas resin, then put the heating pad and most importantly cover it with glass mat. Let me explain, the bottom layer is wet and made of glass mat. Here is the dry layer of heating pad that is perforated. Hols we cover it with a wet layer of glass bat the shaded part is wet the resin glues the top top and bottom L together and we have a light and solid structure we have the front was already part of the body now we cut it Get out and continue, like You can see, we're going to soak it all in resin, this time it's polyester resin, we put it in, we mix it and we start the process that Handy showed us in detail on the whiteboard, the resin, the glass mat, the resin again. the heating pad the resin over and over again while this sandwich dries we are working on the platform where we will install the spoiler let's make an alov where we are going to put the spoiler we are going to make a bed I guess here On a cardboard template it will look like this: come on to use 5mm thick PVC phone plastic.
I like working with it because it's solid in the right way, you can shape it and make it round, bend it. The process here is similar to prevent the glass mat from falling, we stick a piece of plastic on the alov. This is not a reinforcing element, it is just a place where the glass mat will be placed while the resin is dry, which is why we use hot glue here. layer by layer pound after pound with resin P next we need to make the trunk the hood the inspection hatch cut this window to have access to the back of the car but in the end we are going to ruin ourselves we will lose the rigidity now I'm going to drill a hole along along the control points this way I'm going to transfer the outline to the other side where I'm going to cut first we're going to stick a PVC strip on the back that we're going to use to cover the colar, we're going to apply the release agent and make another color and to transfer this pattern to the other side, I'm going to drill holes here are our corridors, we connect them and now we have an outline of the hatch next we are going to glue the flch here we are making the reinforcing rib and the main pot applying the ENT rose and working on the other side we divide the hatch on the bar and now we get a rigid structure first of all we cut strips of PVC plastic formed by the way this material is really useful and flexible, but only for similar purposes and then, Based on the h that we made on the front side, we draw a line along which we glue the strips. the line, the next step is to apply a glass mat on this side and after it dries, we are going to put Steen the Peron inside, after the resin dries, we turn the body over and, according to the same holes, we cut the Future trunk at the end, after a couple of 100 days, we have this.
We just have to remove the one that is out of site and move on to the permanent one. The next stitch is to make a new PVC side. We apply a large amount of glass mat. Again we're doing it to get the right outline. In the end we just need to make the drain holes install the rubber seal and we can basically call it factory made, but before you call it that, you usually have to spend a couple of days adjusting the preparation. and grind, that's what you are seeing right now, we decided to redesign the lid on the original buetti, the motor is installed in the rear and is partially integrated into the lid, where a vatti is made and the motor will be installed in the back front and we I don't want to emulate the rear engine because of the way it looks, so we're going to redesign it and make it a lot easier.
That's what this innovation is. You can ask. I just cut out this part that was just a makeshift glazing. We decided to redesign it. eliminate the buzzing, make it smooth and sink the window deeper into the interior, put it back in so to speak, so we cut it out and now I need to work on this frame behind the rear window and then about 100 days later, to fit all the pieces. and surfaces it's time to continue our work on the rare retractable spoiler the first thing we do is cut these pieces of 4mm thin plywood on a laser machine for this purpose we will use skin activators that will act as the L spoiler where it will be placed and It will slide out we made this bracket to hold the activator to the P spoiler for now it is temporary while our main parts are cut on the laser machine.
We also order swivel joints for the linear actuators. We will unscrew this original. Mount from here there will be a swivel joint that will allow the spoiler to be rigidly attached to the liner. We will have everything finalized, tested and adjusted. We specifically ordered two different lens actuators for the spoiler to change its angle of attack at the end of its lift. Now I've put together a rough schematic of how everything will be installed on the car. I'll show you what I meant. I think the operating principle is clear now we just need to do a little more.
We need to install the mechanism on the body and in such a way that it remains functional, that's what we are doing, first we cut the slots, first we drill and then use an angle grinder to cut the desired shape, 5 minutes and done this, we study the design of these actuators and we came to the conclusion that we are not satisfied with this aspect. This rod itself is very thin, made of aluminum and in our opinion isquite fragile, so we made the same rods but from stainless steel. These rods are much stronger, the wall is much thicker.
I think the durability is more than enough and since they are made of stainless steel, it was decided to polish them as well, which will also give us a slightly more aesthetic appearance. In fact, Nick did the polishing after 20 minutes we had this beauty, we ended up replacing the rods with stronger ones putting in swivel joints and it really started to look like a really cool mechanism that just needed to be integrated into the body. The first thing we do is slide our units into the prepared holes. We insert them carefully and take measurements. Since the body is made of fiberglass, it was decided to fix the mechanism in the same way.
The first thing we do is assemble an enclosure with reinforcing straps and reinforcing ribs first we make it from cardboard after the image is clear, we transfer the cardboard blanks to the fiberglass, we will cut the main panels from a sheet of fiberglass and then we will connect them to each other and to the body being treated , we take it out, we cut it and We go to Nar again now in every possible way we have to assemble the structure before rolling it with a fiberglass mat, that's when a glue gun comes in handy element by element and we get this thing which is well reinforced with a fiberglass mat.
The next step is to create a rigid support for the actuators in the body, since the fiberglass mat is a very flexible material, we took advantage of it by simply rolling the H and after the resin dried, we have a fiber holder of perfectly fitted glass that works and looks like this we ended up cutting out the same design in stainless steel that we had originally assembled in plywood now we just have to give it a good sanding and remove the cotton marks the next step is to build these elements directly on the spoiler, which will rise and change the angle of inclination depending on the situation, to do this we cut the holes, place it on the body and start making the holes with the newly cut cut, this is done for precise positioning at this point the spoiler It's sitting exactly where it will be when closed, as are the metal pads, so they solidify into place and we're pretty sure everything will come together later, as a result we have one of the taps rolled into the body of the spoiler. and the other will be placed at the bottom of the spoiler, thus creating the safest strong sandwich possible, of course this sandwich needs a place to hide in a position close to the POS, that is what we are doing initially, we simply cut the holes which now need to be repainted.
In the end after a few days we have these covers now we only need to make the holes where the activators will enter and exit but it is not as simple as you can see one of the holes has a simple round shape the second is more like an ellipse, the idea is that one of the activators has to change its position for the spoiler to change angle, that's where it became complicated, of course, we could have left the oval hole, but we decided to make the connection with the rubber sills. glands to protect the mechanism from possible moisture inside, which was the maindifficulty but in the end all the complications here are solved, we can move on to the next, let's start assembling our spoiler to recap, we glue rolled metal plates with threads that will be screwed to the brackets, the brackets were welded and polished by a unique method but it's only temporary so we'll make it perfect this one here this one here the spoiler ended up being fiberglass with metal tabs it's more hollow at night which means that It is very light and strong the next step is to prepare for installation as you remember There are four activators in our design, the two furthest away are rigidly attached to the body, while the other pair are movable, they are connected to each other with this bar for added rigidity .
We are putting together our entire design when we install the liner guides. Here we have everything in sealed glass here are the sliders, so here we have drains for the water accumulated on the top, we will put the spoiler through the SJ ball joints, the ball bearing goes in here like this and it's all balled up. I am well aware that I have a large audience watching and they have all had experience with fiberglass lators and sjs and of course many people do not understand how reliable and functional it is so this is for you 3 2 1 take off I think that the safety margin is undeniable and then we have a ready-made Bugatti pot, a Vulga front pot and a BMW base like derer.
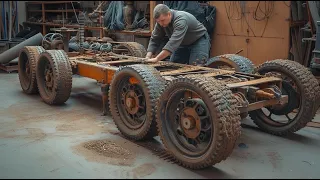
Now we just have to put it all together but for the Donner to become a Doner it will have to be well chopped, come on let's continue with the dismantling of the BMW the next step is to cut the rare windows to do this we will remove the moldings we have never done professional glass cutting we do not have a tool but it is not a big deal we will improvise We lost the rope in the garage, we can use a normal rope from the hardware store to help us. We got a wire out of there because of the way it cuts really well and we'll also need a sharp knife with a slit like this.
This is an ordinary knife that has an edge made with an angle grinder so that the cable can be secure so it breaks and the glue can be punctured, there is always an elastic band around the perimeter of the glass and to preserve it we use wide gaiters we make gently pry under the rubber we insert the knife at the end after 10 years of experience and 15 minutes of work the glass is carefully dismantled and even intact it is already clear that the standard BMW exhaust is not suitable for us, therefore we can do it for sure remove it and in the future we will make a custom one and now we have to put all the panels and see if things fit, they are not like for the race, it's pretty good, it fits, but we need to remove this amplifier and all these plastics.
The shutters and these rivets don't interfere with the technical part, so we'll remove them to put the hood on and see what we can do next because the radiator is very deep here and we probably won't need all of these. Plastic Parts Yes, these elements don't really fit our design in any way and have no particular function, so we can remove them and store them safely. We will make the reinforcement layer according to the design of the body of the vulgan we remove the front reinforcement and the gills to test on the vulga face as for the fenders it is a little ether with the fenders the wheel is in the arch it is just the shape we want it is missing a little bit here and interestingly, this machine here matches the BMW Swan has more or less similar rounding, which makes me very happy.
It is about maintaining this water line so that the face does not protrude forward. Overall, on the front end, things are going very well, now it's time to get to work adjusting the rare end, the first step. is to widen the rare fender to preserve the power structure as much as possible, it is relatively simple and easy to see, we cut the top panel around the perimeter, remove it and do the same on both sides, remove the part that gets in the way and then We use a saber saw to cut the back and move on.
We remove the panoramic roof. We may need it for other projects. Then we mark a new line and cut it again. All this is accompanied by dozens of adjustments and adjustments. that remain behind the scenes, that is why many actions may seem illogical to you, but in reality it is easier for us to cut the B several times than to solder some parts and layers. We finished by calculating what size the windshield needs to be to get the shape. to match the roof, then we cut the top of the psts, which means now we need to make a new top of the glass frame, that's what Alex is doing using the tube bender, we shape the tube with the desired shape, we try it on this. adjust it again and so on many times eventually we will still have the native psts but slightly shortened which means the shape of the windshield inside the windows will be original but slightly shortened which is much easier than making glass from scratch.
We will also keep the Native Rubber Sealing Board and a bunch of related parts that will simplify our work in the future and consequently speed up the completion of this project. In the end, it only took Alex half a day to make a new frame that would fit perfectly with the old but shortened glass. We place it, adjust it and mark the line with the future glass that must end. We will do the same with the side windows. We trimmed the roof to match the original posts well. We put the center post back in place and W.
If so, which means we have the stepped seam, next we will put the original BMW door and window seals, our doors are frameless, we want to keep everything original, we will finish the edge, we will connect the PST of the windshield with the central one and it looks like. To finally make it work pretty well, after we got the fenders and all the other elements lined up correctly, we came up with a great idea: we decided to make a small portion of the original BMW fender and get a fiberglass replica of the tail of that fender, but not just a piece of the panel, but the part where the original bracket is located, what is the idea here, yes, the thing is that this fender and the back line of the dashboard match perfectly with our vulga fender, but There was a 3. -in wide gap between our fender and the BMW door after the bonding process and this panel will allow us to extend the fender so we can mount a factory fender to the body which will again greatly simplify our job further. move forward with the help of these mattresses.
We made the missing elements now we can move on, it fits perfectly here there in the future we will cut this piece from BMW and fuse it to the vulga fender we cut the plastic cover we cut the blank also we fix it with the rivets we put it with putty and those They are going to be Matrix blanks to make fiberglass fans without putty now it is just a matter of doing the little things that we mark the future joint. We place it correctly and begin the operation with the help of an angle grinder as you can see. most of the panels are ready, there are very few left, so let's start making the thresholds so we can properly cut the door.
We need to understand what the door opening and seal should look like. We've already dealt with the first one, but we still have the seal. In the shaped version, we will do it exactly the same way we did with the body on the bumper. You have already seen this more than once, so, in a nutshell, we prepare the mold, then we separate it and bring the shape to perfection after a couple of days the result suits us and we can take the mold out of this mold we apply a Release agent, this is an alcohol release agent, it creates a thin film thanks to which the mold can be easily removed from the master mold, that is, first from the fo stamp. of everything, we dilute the gelcoat, this is a type of primer that is applied to the release agent, in our case it is a PV release agent, as you can see, it is blue and it is already applied, the next step is to place a fiber mat glass in the gray gelcoat which is impregnated with polyas resin we put several layers and as a result the next day we have a rigid mold we dismantle the foam model and all that remains is to remove this plastic foam and shape a new windowsill but made of fiberglass strong As you can see, something went wrong.
The problem is that this time we used an untested release due to supply issues and it doesn't release at all, it's like gluing the model to the mold even more at the end, the operation that should have taken a couple of minutes lasts two days complete Android, but it is what is more five to experience in less than 2 days of life. The next step is to call these molds with a well tested walk, then we do the same gelcoat, resin and fiberglass routine. It was put together layer by layer to get the sills ready now all Rems is to get all the body panels in the proper shape, we mixed a few pounds of liquid urinal and applied it evenly to the body.
This compound is designed to finish large surfaces for a very smooth appearance. smooth body panel we can use a knife to spread a uniform layer all over the body but it is very easy when you see an airbrush then using a huge pad or a block we polish it and in the end we will have smooth sides roof and skirts S without defects this compound dries pretty quickly a day later we were able to move on it's time to work on the divider or whatever you call it we didn't do them directly in Matrix so it wouldn't be too complex We have to do them in separate parts so we decided to do them later.
We just made these plates. Now we are going to paste them where they belong. Much later we will do them withcarbon, but that's for the next video. In the end we glued this thought into the pre-designed slots we reinforced them with fiberglass we expanded the surface they located and we went to the paint shop again as you may remember recently we applied yellow and brown liquid putty about 100 days of polishing were off screen in In the end, the body has perfect performance or that, Andre states that the next point is to apply Primal, this time we will apply two layers.
The first coat is gray, it is a standard gray primer. In the meantime, we are dealing with other elements that require more. detailed processing and precision in the original Bugatti was too light, first we must repeat it we decided to make it of wood to remove the matx and make it of EP in box shape in the future and here it is also very simple in this design. There are quite fine lines and details, so it was decided to use pure wood for the front. Yes, it is not easy to get it and it is not a cheap material if it is not of the right quality, but as I said before, carpentry is initially our thing and we always had the necessary material in stock, so we did not dare to make everything light was a solid structure because the cost of error would be great, therefore we cut the model into pieces and with the help of a relief cutter b we cut out.
The constructor was made according to the same principle as the plastic bumper, but Already from a spring, from a deeper detail, it is the ideal spring for this purpose because it is a dense and stable material and therefore does not have large fibers. it doesn't crack, it doesn't chip, actually that's what you see on the screen, it will only be necessary to prime and refine a little with some paper, as I said, all the front details are made of pure, but the bottom layer is only needs to give what is necessary. volume we decided to cut Maple and thus save the Pier available because we still have many projects ahead of us, as a result after a day of work we have a mountain of blank spaces that also need to be removed from the moles and glued together three The main elements are two lights and a thin red strip that will combine everything into one beautiful element.
All that remains is to glue all the details and prime the lights. We use the same technology, a CNC machine and wood with which we made the unitary pots. We'll need them later to create the counterpart and make a complicated Matrix, but for now we've spent a few hours gluing, finishing and polishing the next edge, when all the elements are ready we'll prime them and then rub them to the bathroom. Take it out and repeat it a few times after a few days. We have these perfect blanks, but so far they are made of wood, but we need them to be transparent and made of plastic.
To make them, we need silicone mattresses, that's why we made these boxes and now. we apply silicone to them and leaf them, we are going to place the silicon in these boxes, this is where we are going to launch into the lights and now we are going to prepare these blanks for molding, we need to sand and polish the Poly Primer and then apply the walk of release with this Poly Primer. We will try to sand all the sugar nuances and other defects, as usual, we will use defect detection powder, polish it and send it to you.
I already shaved the Sharon with 320 grit and paper, then I use a soft 600 grit sponge and sand it carefully with my palm breaking the taps, then we sand it with an even finer grit, in this case I'm going to stop at 1,000 grit and then I'm going to wax it we're going to use the flaw detector powder again the next step is to apply the ride separator to help the mold separate in this case we're going to use solid ride we polish the piece with it after the piece is properly waxed we need to place it on the foam work but in such a way that it does not touch the walls for this we glue it to the wooden plugs and put it in the fire we do this with all the pieces the reason This is to distribute the silicon throughout the volume uniformly and in the end, after defining the solid, we will have a solid and reliable matrix.
Finally we move on to the silicon itself. This is a two-component compound designed specifically for creating molds at this point. We have a mold for the external part of the light but of course the casing has to be hollow so we put the formwork back together and finish the internal part that must fit into the silicon mold but it is not that simple either now we have to make the same elements but out of silicon to do this we created a silicon mold to create another silicon mold I don't even know how To explain it, I'll let Ander figure it out himself.
Silicon is solid. Let's unpack it. I am always very nervous and excited when unpacking because something could go wrong, something could ruin the piece, but we can only find out after unpacking and removing. Take the blank Matrix out of the matx because it is just an intermediate stitch. Next, we're going to push the silicon in to make this piece, but out of the silicon to insert the silicon piece into this Matrix to mold a solid transparent colored piece, so it's pretty. complicated, we are going to cast this silicone thing in this mold, we are going to hang this piece here and there is a space between them and then we are going to pour colored resin there to finally create the light and be happy.
I came up with this structure to suspend The Matrix and The Matrix. I use hot glue to prevent it from coming to the surface because the base is made of wood and the silicon will try to push it to the surface and through the holes to make it a uniform solid piece. we put it in a thin stream aiming at one place, let's apply the release agent. I guess the silicon solidified and it's time to open it up to see what happened. I'm very excited to unpack it, so I'd like to remind you of our long way that we've gone through to create just one light, we made a wooden blank to counter that within three mattresses The Matrix The Matrix Reloaded and The Matrix Revolutions that They will be inside here and we are going to put colored resin in a box shape here and that is how we are going to make the strange light after all this long and complicated work that even the sisters you would sympathize with we can finally get to the fountain container we apply the release agent to the silicon and we use epoxy resin we prepare the resin for casting the lights this time we decided to turn them off we have built this simplest vacuum unit from scratch this is a compressor from a refrigerator we have made a trapped resin with plastic boxes if the process it gets out of control it will trap the resin and prevent it from going to the compressor and ruining it here and here is the container where the gazin one will be placed we put the resin in the bucket leaving a little space for the foam the bubbles we put it in the container we close it with a transparent lid and turn the unit on we are making a support for the piece to make the work easier we made these blocks we fixed them with Hot Melt glue here we go we will do it the easy way we are not going to have any foam worker anymore that we are going to have a used part, a single use Matrix, this will save us some time, we apply at least five coats of solid roads, then we polish it with a soft cloth, we polish the road with a soft cloth and start applying . gel coat let me remind you that this gel requires proper agitation, if you don't you may have a defect in the matx like crocodile skin, when you apply polyester resin, it will break and you will have this ugly defect that we will have to fix by sanding or encapsulating so let's store the gel properly.
I remind you that to apply gelcoat it is better to use an old brush that has all the excess hair filling that is already molded so that it does not leave the hair as a piece for an hour and it should be as soft as possible to avoid scratches on the gelcoat layer. release to prevent damage. our next step to shape the glass mat, we need to work on this little EDS and creases, since the glass mat will not be applied here. properly it will have bubbles so we need to equalize them somehow how are we going to solve this problem?
We can break the glass mat into these thin lines and place it on this problem. Magical places to even out the shape, but it takes a lot of time and effort, so we're going to use this furry potty, we're going to apply the fiberglass potty all over it to even out all the edges. There's an outside edge that we're also going to match with Harry Potty. This will make my work with the matx much easier I'm about to start mixing our secret for this is glass fied or as I call it Harry poti to make it stronger we can add some polaster resin here we go this way we are killing two birds with one stone first of all the Pat will be thinner and will be easier to apply but it will be much stronger do not forget to add the Harden, you have to add 2% the perfect proportion is to finish a kind of part and a tube of hardener at the same time now we are going to party in our Grove the best party knife is your finger here we go oh well now it's time to do the unboxing as you can see I reinforced it a little, you might think it just represents the Matrix but it's not all the pieces U shaped when the resin dries they shrink and bend so these side walls stretch and to prevent this I installed these plywood brackets that will prevent this wall from collapsing and bending now we are going to remove the diamond from the Matrix and predict that we are going to break it because this shape is complex, it has this groove in the middle, it will be fun, come on, this is the main difference between the soft silicon mold and the solid fiberglass mold, but as you remember we changed the rules of the game and this time we need this solid mold with the top loading and at this point the self-fulfilling prophecy came true and our w Master glute model broke but it's okay because we managed to make a matrix. from there even two so we're going to put charcoal there we cut it by hand we're going to use three types this is 8 oz trimmed this is 40 or trimmed and this one is different I forgot what's okay so we're going to use polyester resin, no epoxy yes we are going against the rules we apply polyester resin and carefully insert the charcoal and then to remove all the bubbles we will use this handmade in 15 minutes. come out of a 3mm electrode and ships, we'll use it throughout the piece, of course, I'm going to do this without any visual guidance because I can see the front.
I will do it by touching the air. Come on, I think you can see the process quite clearly depending on your sense of taste or the life of it. Andrew cuts Caron piece by piece mixing different sizes, of course we can use such a big cut on a piece that it won't look good. Why did I break it into small pieces to cover your lip shape? I then applied black Co gel to make it less transparent since the piece is very thin and actually lets light through. I have an idea to cover it with a layer of black gel. and I have a feeling it finally worked, let's get it out before we get it out of the Matrix, we can use a flap disc to cut the AIS and then it will be almost done when we get it out, so I can't wait. to unpack it look what's inside well at first glance it's just black because it's matte we're going to soak it with the Degreaser we had to make three pieces to get a more or less decent result the next stat will be to make this central part with lights there it has to be a red strip with lights that will basically be the rear lights.
We tried what we cut in the center part to install the glass directly into the piece, so to speak, so that it is seamless. Yes, it is not so easy to make the glass, we need to make it matte to hide the LED strip, that is, themselves. Now we will try to make the idea a reality. We need to mix Aerosil with Caston resin and color it. Aerosil is a thicker resin with glass micro chips, basically powder and use. If we are going to get the result we need, the custom resin will be the base, in a ratio of secer, 2% red diet, okay, let's check the color so that our eggnog is ready, now we need to apply this magic compound.
I think it's thick. about 0.1 inch, if I manage to do it correctly, apply it manually evenly when it solidifies. I want to believe that we are going to have translucent glass. I think many of you will be wondering if this is the right solution for the taillight, yes it looks good. weird, but the thing is that the original looks the same here, look at this where the non-transparent mat on the set is clearly visible against the background of the red light on both sides jumping forward a little. I must say that we did precisely that and the result is identical to the original.
We should also know that this is a test sample to discover all the nuances and then make additional mattresses and create the final piece. It's finally time to find out if we managed to make a shell for our life initially. I didn't think much about this first pyramid of experts as we are used to initial errors and mistakes. This is an experimental piece to see if we are moving in the right direction and if we should change the technology and we were pleasantly surprised because our test sample turned out to be quite good. We are very happy with the result.
Later we are going to project these slides considering some nuances and we will surely obtain perfect pieces and to show you theassembled image I promised. we polish the lights and prepare to apply the gloss varnish we do the same with the carbon part we polish it as quickly as we can and eliminate minor defects and then we apply varnish to all the parts the next difficult element is the nozzle for the exhaust system Of course, after cutting half of the body, we also cut half of the Lo support structure, now we need to make a reliable safety cage structure, that's what we are doing, so what is it and why is it? necessary?
Enough, the main purpose of the roll cage is safety and its job is to preserve the living space inside even in the worst of accidents so that the deformed parts of the car do not resist people. There are two varieties of these designs, prefabricated or with a spherical structure and all welded. Let's do the second, let's focus on the fact that we should not say that such frames are predominantly used in motor sports, where the risks and loads are much higher than in civilian cars. After installing them on sports cars, the frame remains the main element of the interior of our In this case, however, it will have to be sealed and hidden in the future anyway, the diameter of the pipes for these frames is strictly regulated.
In the end we decided to use the smallest diameter allowed since we have a little space inside, but still it is not that simple cold rolled tubes are used for safety frames, their main difference is their resistance to external forces, including the risers, but as you can see, Alex has risers very well on a more serious note, these types of tubes really behave differently at this point, Alex had almost finished assembling and welding the frame and have compiled a good base theory to understand it. I suggest taking a look at how this framework works in reality.
I think there is no need to comment here and finally the finish and feel of the frame. main frame we first make a simple cardboard template for it, mark it and cut it out with scissors, try it on, adjust it again and mark the future hole, this precise drawing must now be transferred to the metal, we will place it and mark it. and then we cut it out and it took another hour of fitting and adjusting when the general shape is ready we punch two holes using a drill base using a makeshift press in the shape of a sled hammer we give them a more elegant look than with the help of a bender improvised sheets in the shape of Alex's hands we give the workpiece the desired shape and finally place it in its rightful place of course this element has no particular use these braces were originally used to distribute the loads more evenly and adding rigidity to what we already have in abundance, it's more of a 30 Cent approach.
At this point it became clear that we would not need the partition that separates the interior of the chunk. Looking at the assembly frame, its roll as reinforcement is ridiculous, so we removed it. Ash and we moved on, in the end we decided to add two more connection points between the body and the frame, since there were not enough on rare occasions, the essential and place are the shock absorber cups, that's what we based it on, we were left with The p add by welding metal plates and tying the body to the frame, the Vulga 21 had problems with the factory gaps, we are not in favor of making an exact replica.
Factory execution just because it is factory, if something can be improved and our opinion is made. We did it more interestingly as in this case, in the end we had to change the size and shape of the hood to make the spaces. Norma we will later recreate it with the classic method, since it is in good condition, although not yet perfect, after preparing the main obvious elements. like the Fanderson hood, let's go to the less obvious ones, in this case it's the windshield pillar. You think there's nothing wrong with it, but as they say, the Dil is not in the details and specifically this particular piece is a little off.
To make the car look complete we still have to make many adjustments that no one will notice in the future, but if we don't make them we will feel that something is wrong and we want it to be right. Um, the next step is to finish attaching the frame of the Bugatti to the main body. Here we cut a small piece of the edge and prepare the surface to continue working. The next step is to place the frame on the body and mold the shape into place. With this approach it is impossible to miss and the piece will definitely blend into the body once the base is formed.
We drop the fiberglass body and reinforce the shape from the inside and then test it again and as many times simultaneously. We prepare the entire body for painting because at the end of the series we will assemble the main elements of the body and the car will look like a car and we will see an alternative color jump for the future, we are very happy with this decision and I would like to read your opinions in the comments, finally, the final adjustment and now it is clear how this element will look like. Next up is the rare Fender, basically most of this panel will be hidden under a layer of fiberglass, the main one.
The task here is to weld everything securely and remove the extra kilos of PTY, that's what we did on the rare occasions when we smooth transition to the seal we did many episodes ago now all we have to do is fit it into the new body a couple of movements of the bul car and that's it, all the elements are installed and we prepare to paint by placing the standing surface. Well, of course, this is not the final paint job, it's basically just a primer, but the primer can be colored in any shade to see how this or that color scheme will look in real life, which is why we decided not to waste this opportunity and implement this color. combination, it ended up taking another week to finish potting, molding and flattening after a week we finally dried and degreased the body work at this stage of the main works, we just have to do the doors, they will have to be a little narrow, it is say. trimmed at the bottom otherwise the door will heat the seal and then of course we put the vulga door handles on.
We also have them in excellent condition so we decided to rec Chrome all the pieces 15 minutes later, everything is very well graded now you just need to cover what is not going to be painted or needs to be painted a different color, tape, paper, 20 minutes and that's it, the first step is to paint the safety cage first with primer and then with black paint and since the paint gun is full of that paint we immediately go to the fiberglass casing and paint it the next step is to paint a second beige color having previously covered everything that is painted black the next day the primer dried and finally we started with the expected L Its yes of course this is far from the final version but in general we overcome all the obstacles and we will be able to appreciate the proportions, the shape and most of the fine details, all that is left is to assemble all the puzzle pieces, later we will feed the covers, grills and other small ones. things to perfection after which we will work from it the problem with the glass and the wheel RS is also being solved at the moment of course the old headlights are of no use we are definitely looking for alternative optics the vulgus factor FedEd with 7 inch headlights this is a very popular standard size it is made from a lemon we will get it with the help of a leg our subscriber and a cool craftsman we have made a replica of Po tyene tested it adjusted it packed it and shipped it to 3000 Mi de distance from us the package finally arrived at the seat apparently he didn't think too much about the name of his workshop it's called Lego customs that's funny in general well aluminum is not an easy task but fortunately for us Al leg specialized in welding exhaust systems well stainless steel and titanium.
He also welds our aluminum and Titan intake systems. Makes custom pieces from almost any material. In our case, it is a decorative fuzzle on the original car, it is made in the same way as the The piece is installed on the bumper just for decoration, the exhaust passes through it without connection after installing the correct type of exhaust pipe. exhaust, the project will look much better, but more on this point. When finishing the aluminum piece, we made a cut in our Styrofoam model. and in the end he sent it to us after a fast delivery from a leg the pieces are starting to come together while the varnish dries we will prepare the final piece of the puzzle at this point many of you may have a question why the GD is so Flat in 2D .
To be honest, I have the same question, but the fact is that the original looks the same. Some parts, such as the bumper, have only been nominally attached for now, as we are still in the process of manufacturing the seats and fasteners, but overall, the image becomes as clear as possible and we like it a lot. We haven't decided on the color scheme yet and we need your help. At the end there is some sad news, as you may have noticed, and this project is happening. enthusiasm to delight you with our videos at this moment we have very little left to finish it, but the project is currently frozen because we are stuck with expensive items like custom suspension wheels and car registration, please support our project, we will appreciate it. every dollar thetion links are in the description write a comment like and subscribe of course thanks for watching and catching the positive attacks of the X oh oh
If you have any copyright issue, please Contact