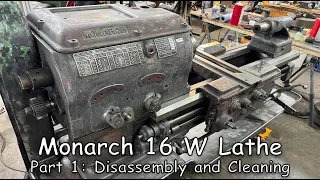
From Crud to Stud, Restoring the South Bend Heavy 10 Lathe
Apr 15, 2024I recently purchased several hundred pounds of dirt and grease and imagine my surprise when I discovered there was a
lathe
underneath it all. I have several pieces waiting to be cleaned for the most part, everything is very complete, I don't think so. I'm missing a lot and if anything is missing, I'm pretty sure it will be easy to replace them. The beds are covered in some dirt but for the most part they look pretty clean and undamaged which is good, that anchor stamp means this winch was originally owned by the US Navy. I like how it has double whammy I think that adds some character.
It also amuses me to think that someone came and was hungover that day. If you've seen my other videos, you may recognize this as the piece that tried it. to give me a hernia and then he pulled me down the stairs, say hello, murder, peace. I'll take you with me as I put this back together and hopefully you'll share the laughs and I'll do all the crying. For both, the first step in putting the
lathe
back together is to clean the pedestal and restore this pulley a bit. I have a little rust on the outside of this three step pulley cone, so I'm going to remove it.
More Interesting Facts About,
from crud to stud restoring the south bend heavy 10 lathe...
Now I know I make it look really easy, but I'm definitely going to have to find a way to put a motor on it which I won't. I'm not going to make him clean it that way. See how well it fits. You won't believe it. I think I just used up all my good luck for the year. Okay, we're starting with a full battery, let's see where we get to, oh my god, it's scary. It's making scarier noises now, oh my god, keep going. the horror, it was definitely wise of me not to put a screw in, that was just a press fit that, uh, decompressed very quickly, look some of that was unnecessary, but most of it was fun.

I spun this again off camera and, uh, well. You can see, damn, this is not an endorsement for Milwaukee, but I'm pretty impressed by those balls on your blue court. I added a makeshift counterweight to keep it hanging level. My pride saw me setting up that pulley system and I said boo, but. My column was encouraging, a basic cleaning has left this pretty clean so far, which is good to see if you're thinking about buying a used lathe, let me show you a quick tip to see how that lathe might have been used during its life. look for this part on the bed, the splinters and Gunk don't magically float against gravity and get stuck here.

If you find splinters up here, it's not magic, it was compressed air. Compressed air is generally considered a No-No for the health of your machine. yes, remove the splinters. Yes, I absolutely do it at work, but those splinters will often find their way to places you didn't want them to. There are other places to look, but this is definitely the easiest to see without taking it apart and if you find it nice and clean here, that's a good sign. I can tell from here that this thing is dying to spin on me the moment I pick it up, so I already have my anti-wall-bashing protocols in place.
I knew he was going to do that since I was taking him apart, he was able to stand up on his own after I took the legs off this side, which I thought was amazing. I hope I don't sound like a broken record, but Needless to say, that thing is
heavy
, okay, there's nothing like that feeling when the bolt finally engages, that was more trouble than I thought it was going to be, look how far I got this thing off the mark, this is a pretty good twist. point to see where the lathe starts to look like a lathe in a desperate attempt to take weight off this piece when I was carrying it I took off one of these and then stopped when I started to take the other one off thinking like Look if these aren't going to make a difference, I have no chance of them weighing around half a pound.I guess I'll never know if they made a difference now I have to put them back in and plug them into the chip tray. I think I'll have to loosen the bolts I just tightened on the legs to make this happen or maybe the engineers did a fantastic job and I'll be able to fix this without having to do anything. Let's look at an interesting design feature I found on these is that they have these three reliefs that form an elevated surface. These three points describe a plane to keep it nice and tight to whatever it's attached to and the height of this top relief is just a little bit. above the centerline of these two bolt holes, so it will look forced into whatever substrate it's screwed to, that's cool.
I think I'll steal it and use it in my own designs abroad. I swear this scratch was not my doing. These reliefs are now. It makes a lot of sense to me. Before I said that they are used to attach to a plane and they probably could do it, but this is not a plane, it is a curved surface and to get a good purchase they need those contact points that are very, very intelligent. I hope the ratchet is as interesting as I think it probably isn't, although this is the first washer I found in the whole machine, by the way, let's see if it fits, no, oh look how much it costs.
I guess I'm loosening those other screws. The old wisdom that Rings is true is to avoid tightening all the screws until you have them all in, even if it interferes with the flow of your filming shot 9 16 that same 3 8 thread 9 16 nut no 11 16. Damn non-standardized capacitors , maybe the ratchet is as interesting as I thought when something goes wrong, yeah, whatever it is, this is the motor I bought with the lathe, not necessarily the original motor that came with the lathe. It's the wire I found coming out of it, it's not often used for 115 volt service, that one right there says this is a 115 volt motor, what I'm sure happened is that the original motor died and whoever put this motor in, whoever found this motor and put it Says it's a perfectly good cable.
I'm not going to throw it away, so here I am, but let's leave this case and take a look before I rush to judge, maybe something is going on there and I don't know what's going on. eh, okay, I think it goes without saying that this type of behavior is a No-No. It just fell into the engine. I just looked very carefully at the pictures I just took and saw that it did not, in fact, fall into the engine. hidden here under this red wire, I could still fall there, although oh God, oh, relax, oh my God.
I just started those threads off camera because I lose all motor skills when recording, apparently it's fine, I'm glad it's over, that's how it's supposed to be after it's done. Some tests with this old piece of cable. I've decided the engine is fine and I'm going to move on. I have a new piece of cable that is a little longer. The Home Depot guy was too lazy to use it. They measure the reel when they sell it by the foot, so he just pulled it in his arms a couple of times and said it's about eight feet.
I measured, it's more like nine. I have terminals on these ends. I left the ground terminal a little long, so if there was a strange event where this thing came off the engine. The last thing to be removed would be the ground wire. That will never happen, but it still feels good to do it. This is a good opportunity to explain the use of these cables. so the ground goes to one place, the heat goes to another place, ideally away from the ground and these two remaining wires will alternate turns and be used in conjunction with the heat.
This is a dual speed motor, so this orientation has high speed, this orientation has low speed and this orientation has flaming light motor capabilities, I'm actually not sure what would happen if you actually did that, but no. I'm ready to find out that seeing four conductors inside this cable is what made me think this was a mismatch. cable at first now that I know it's a two speed motor it makes a lot of sense but for most common AC motors that plug into the wall this is what you'll see when you plug them in and that's my excuse.
Because I was wrong earlier, this is the armature that screws to the back of the lathe and eventually holds a switch. What we have is a hot wire that has gone up from the motor wire and down through the arm, a white wire and a red wire from the motor wire. It doesn't look like it, but hey, actually that's a little more convincing. . These wires came out of the motor and this white wire was the neutral from the wall, so what we had there was low speed, high speed and this green. cable I'm not going to call it ground because that's not what I was doing.
It's hard to call it ground accurately when it was connected to the heat when I plugged it in, it will be the ground. I'm going to physically secure this. The green wire isn't important how I do it, I'm just going to make sure it doesn't go anywhere when I start ripping out the other strange wires. In fact, I ended up pulling it from the other side. I thought I was going to get it out of him he said no. Upon successfully pulling it, I didn't realize that those wires weren't going to come out in the direction I thought, so I shifted gears so this black wire is the one I secured, here's the end of that black wire and here's the other.
The end that I tied like that when I was pulling things out this way would not be absorbed and would become unreachable from this side. This is my way of threading a new cable or at least some tool to pull the external cable. Now is the time to take it out. this motor which is not light placed on this mounting plate. I realize that my planning here is not entirely perfect. I probably should have restarted that engine when I could still turn this thing sideways, but I'm not going to stop doing something. just because it's the wrong thing I'm going to keep doing it until it's right this is actually being easier than I thought this is not a compelling drama maybe I spoke too soon oh ah turns out to move my whole body so you can see okay shame, okay that's good, the struggle to take this lathe apart is what inspired me to go out and get these ratchet wrenches, they're just Harbor Freight crap, but I'll take the right one.
Harbor Freight tool over the wrong school of Snap-on any day of the week the belt I found with this engine is a very common V-belt this is the right pulley for it this one, on the other hand, is completely flat and not No I'm sorry I have a crown. Something tells me this might not be original. When I found the lathe, it had chips on it that tell me it was working at some point. I don't know if it was necessarily running on this engine. and configuration maybe those chips were old, take it from me, this thing was covered in a lot of chips and stuff, but you know, here's the power of illusions.
Wow, it actually works pretty well, great. I have the cover that covers this opening, but I have something wrong with it, maybe one day when I have access to a sandblaster or have more motivation I will restore it. For now, I'm just going to run the lathe out of place and OSHA can do that. Hopefully, if any of you aren't convinced that I have the restraint not to put my hand in that belt, I thought it would be fun to clean these pins using the lathe that this new lathe will replace the foreign one. I know stores like This isn't the most exciting thing in the world, but I swear if there's even one guy in a cabin somewhere in Iceland who finds them entertaining, I'll keep making them.
Here's to you Bjorn, this is a fun time because now I can Reattach one of these cool looking machine doors, that's what these pins are for, if that abrupt edit above didn't make any sense that's fine, just ignore that I'm ready to put in this other rack. I think this is probably the most attractive one. on the machine I don't know if this is original or not but how I found this was with just one bolt and no washer. This may sound strange, but I'm a big fan of it. I can't explain why, but I hate washers.
Also, the head of this screw is completely painted, no strong feelings about it, just a comment. I think all flat head screws should be thrown in the trash anyway, this is definitely a job for a socket, but I think this is more fun, the head is in very good condition. I think all it needs is a little disassembly and cleaning. The rear gears go in and out nice and smooth. There is a little rust here, but it is easy to remove. These gears are used to change the direction of input to the gearbox. The head. It has a gear coming out of the end that will engage with one of these depending on the position that this drum is in.
Very happy. These are nice and smooth with all the details on this lathe. I think this is my favorite, this little squeeze handle. Take out this pin so you can move it to the different positions. I think it's really cool. I feel like a lot of this segment is going to be me saying oh that's cool and how this cover goes on is no exception, this little set screw. here you have a sharp point that goes into a slit there and this snaps into a corresponding slit and they did a really clever job, they're saving themselves having to line up a drilled hole through here, pretty clever South
bend
engineers, two tips if I'm trying to undo a nut that is attached to a gear.Something gets stuck in the traingears that is as smooth as this shop towel and if you experience a lot of force when trying to loosen the nut stop, this one wasn't too bad. I want to make it clear. access to clean this face, so now with extreme caution I will disassemble this support bearing assembly again, there is something to look forward to on this one, that shim right there, don't lose that good plan B that is not going anywhere, I will solve It is employee of the month right here, this cleaned up nicely. I like how it looks.
I had a lot of fun getting up close and personal with all of these mechanical elements. It's a really cool window into history looking at these things these pieces are over 80 years old and still work great. I have one last cleaning task that is quite interesting these spacers that look like shoulder bolts hold some idler gears could use a quick polish but they talked They are supposed to have a smooth running sliding adjustment with these gears. I already cleaned this one, as you can see, there is an oil port that goes down into this chamber which then supplies oil to the inside of the gear when I discovered that there was This hard substance that was trapped in there is very solid and resists the pliers when I go to touch it.
I'm not sure if it's an old oil wick or just oil that has solidified over the years, either way it has to come. I'll figure it out and figure out what to do with it later. Foreign. This is a hardened steel piece. This is a very low quality drill bit that would not leave any scratches even if it failed and hit the edge. Very rare reason to use. a low quality, nasty bit, yes, that has some tensile strength, which is definitely a chunk of oil. Wick that has degraded over the years. I'm going to put it back together slightly now so I don't lose the pieces, but I'm going to order some of this and make sure you replace it.
These gears are not the same size, so I will be able to know for sure which direction they go. Let's see if I can hit the first shot. I think you're the little foreigner. that one isn't supposed to fit, no I was right, I shouldn't have doubted myself, that's the lesson here, don't doubt yourself, even if you have some critical machine parts, just put them together until they fit, doubt It's for quitters, finger type, that's for now just To be clear, this is not gear oil. I'm going to use this oil just to coat these pieces when I assemble them like that.
If in another 80 years someone wants, hopefully, not me, someone wants to take this thing apart, there's less of a chance this is full of rust for a split second I didn't know how to time this I realized there's a key it's like would have failed an IQ test for a monkey or is it the need to hit it with a hammer, don't do it This is the first convenient thing I found. Let's test this pretty well. Make sure you have these mating faces as clean as possible before reattaching them. I don't know how well the audio came through, but that was a satisfying clicking sound, a little shout out to my great-grandson if you're taking this apart.
The reason you didn't have to remove it with a hammer is because I put a little oil under it and you're welcome, and so was your great-grandmother. The headboard is held in place by a V-groove that registers with the bed. It has slats on both sides that hold it back and forth and a peg to help hold it in place. There are also two screw clamps that force it down onto the bed. and getting it to register with all those features, removing those screw clamps was kind of a test I've been thinking about how to tell the story for a while, but here's a good way to start this off on the back, it was pretty easy If I get it, I'm going to leave that finger tight until I get the other one on this absolute bastard, on the other hand, this clamp comes from the right side of the frame because I had to slide it in from the end of the bed, oh, what on are you getting stuck now?
Well, apparently I need to let the bolt fall out and then maybe I can slide it around trying to get this bolt into place. I completely understand why they used to hire children to thread looms that little hands can reach. here where oh I can't, yes I am, I am officially supporting Industrial Revolution era child labor, what are you going to do about it? Oh my gosh, I think I need to take the whole head off and redo this with a different approach. All these bastards continue To bother me already, plan B is if there is anyone who worked in the factory and made a living from this, please like it in the comments or if this is how they did it, it would be very funny, without matter how you feel. a low man on the totem pole kind of job, oh come on, absolutely fine, plan C, what's hanging on what and what's going to try to break my finger when it falls off, okay, I try really hard not to criticize other engineers , this, this deal right here sub. -optimum.
I just went and reinstalled the one on the back. It took me about eight seconds, which is heartbreaking. I brought my standard toolbox when I went to take this apart and that included a wrench that was about that length when I started while trying it. To remove this clamp I discovered that there was absolutely no wrench placement combination that could achieve a caveman hold. I even stuck my hand in there with some of these and all it did was damage the head of the fastener if I was even able to grab it. So finally the only course of action was to cut this key in half, but my problem was that I didn't bring a angle grinder.
The house I was getting it out of once belonged to a welder, his tools were still in his garage, the owner of the house was very kind and also wanted to get this lathe out of her basement, so she was happy to let me use some of those tools. When I got to the garage, I found a bench grinder like this one and I had it in my head. I was going to reduce this very painstakingly and slowly until I could take it in half and then knock down the edges. Two things ruined that plan, the first is that when I turn on the grinder it's, uh, good. let me simulate what happened and two, it wouldn't have made much difference anyway because I'm pretty sure from the smell that it was in a puddle of gasoline, so Grinder was disqualified.
I thought he was done until I realized that, uh, he. He actually had an angle grinder very similar to this one, except it wasn't like that at all. I have a four and a half inch cut wheel here. His grinder, on the other hand, had a wheel whose thickness was about the thickness of my wrench and whose diameter was more like this. I also had access to a welding bench and one of these pliers and it was at least that thin. I didn't bring safety glasses for this job, so all I had were safety goggles. I held the angle grinder like this and I fully extended my body as far as I could and when I pulled the trigger on that angle grinder, it almost slipped out of my hands, went into the wrench and threw up a Sparks rooster tail about eight feet long to a pile of sawdust and dry.
Tinder and gas cans, overall it was a very humiliating 30 seconds, sounds like something we've all experienced. I'm not ashamed to admit it was pretty scary. I soon had two pieces of wrench and once the ends stopped melting, I went and found a belt sander and cleaned off all the burrs and nasty stuff. I promise that before I left I made sure the place where I threw flames at Sparks was clear when I finished packing up what I could for the day. I also made another trip to the garage to make sure and came out the next day to finish the job and the garage was still standing, not the smartest move I've ever made but probably one of the 100 funniest at least in my life.
Opinion: I have put the spindle back into its bearings, these are impressively smooth and precise. I'm going to start reassembling this side of the spindle bearing. The shaft collar that controls the axial play of the spindle was moved back to give some clearance. to work with the felt cloths that are in these slots, they have been soaking them in a little bit of alcohol, nothing special, just a little bit of Smirnoff, just a little bit of isopropyl alcohol, didn't seem to work much, not too worried though so they are pretty easy to access if they need to be replaced, this is a great time, I hope it goes well with no noticeable hiccups so far, which makes me suspicious, it spins but makes a bit of a scary noise, oh ok it seems that it's over. pretty well, inside this axle housing, I found these shims, but they're made of paper, so from the start my confidence is pretty low in them, this hasn't been helped by the fact that I definitely dropped this pair of times and I'm not sure where he came back from.
I'm going to improvise and see what we get. Come on, get in there. A piece of these started out white when they were first put into the machine 80 years ago. So much, uh, for what the isopropyl alcohol did. probably because it's not the right thing to do, so what is the right thing to do? Probably just new parts. Those paper shims aren't ideal, but they seem to be working fine for now. I have mixed feelings about this chuck, it appears to be rusty. pretty good, it's probably stuck pretty hard on this spindle, what I like is this All things considered, I think this makes it worth the effort, there are many ways to get a stuck chuck off the spindle, you shouldn't do most of them , but leave it.
I start with some of the least harmful ones. I have a short piece of dilligaf rope here that looks like paracord but I assure you it is much stronger. I'm going to use it to try to stop the shaft from rotating, that's nice and tight and as I turn it this way it will get tighter and it might work. I think the funniest moment in television history is when Hank Hill tries to open his full-size can of WD-40 and pulls out a small can of WD. -40 from a sleeve you spray it onto the lid of the can and then release it.
I don't have any hex stock or else I'd be using that and then I'd try your handy dandy bolt rounder, okay she's there, okay yeah. motherfucker I like to tell myself this helps. I won't lie to you. I managed to release this off camera, but I'll do a dramatic recreation for you. Okay, ready. Oh wow, it's free if I had to guess what actually broke. it's free although I think all other methods would fail so the WD-40 would have more time to work yes split washers split washers are stupid this is what I'm trying to do to remove that backplate From there, he is kind.
It's hard to explain so I won't tell, I hope it's getting stuck but I think I'll refuse to learn my lesson and persevere. I can't believe I got away with it. It's still stuck there. Thank you, Delrin replacement part. I promise. will make you into some cool foreign thing, oh thank goodness, I just discovered this is loose the moment I saw these screws, I thought I had another hammer and crowbar fest on my hands, if I shake it I bet it's nailed in on these and these are nailed with this I never thought I'd be happy to see a flat head screw.
I still wish it was hexagonal but that's about what I can get, yeah that confirms my theory. First I have to take out all these gears. The screwdriver is a little too thick. Actually. I don't think I have a flat head that is narrow enough to do this foreign. A flat head that is narrow enough to do this well. That's cool, it was blue there. What an incredible piece of engineering this piece of equipment is. I have placed the pieces of the Chuck. on top of some towels in a rather transparent attempt to look organized. I need to completely clean these threads after that.
I think it's pretty much ready to be put back together. This is a graphite lubricant. He came out of the can looking like spray paint and scared the hell out of me. I'm living hell, boy, am I making a big mess? Most of the fasteners on this lathe are flat head screws, so it's pretty good to find a socket head screw here, removing the chair apron is going to do a lot of good when it comes to lifting this thing up, the taper attachment It is also a low-hanging fruit for weight reduction, it is removed with a bolt here more or less.
I thought it looks like there's a Gib I can loosen here, maybe that will free it up. I gave the apron a good whack. cleaning the camera I'm pleasantly surprised to find that there are no mechanical problems with this thing, at least that's what I can find just to keep it interesting. I'll show you some interesting features here, most of the gear train is lubricated by a single oil from the oiler is added here and it fills this reservoir. These oil wicks transmit the oil to the various gears that need them. The half nut is also greased in an interesting way.
The oil comes in through this port and fills this little basin here where it comes out through this hole. and this hole here that you can't see and then the water comes down and fills these two ports, this one goes directly to the lead screw, I'm not really sure where it goes, putting the apron back on has thepossibility of being exciting. I say that. because there's a good chance I'll drop it when the
heavy
meets the demand for coordination that's when all hell can break loose what am I doing come on use simple tools like the primate you are oh boy I hate spinning threads and not knowing if Will they engage or not when the threads engage, oh that's cause for celebration, it's so much easier to work on the gearbox when you remove this and I hate using adjustable wrenches but I don't have giant sized wrenches around all the time in the foreigner costs three cents, losing that slot costs a little more.I don't know if you can see it, but there's paint on this long gear and it makes me want to slap someone who makes such a thin hex cap. I'm going to keep spraying it with WD-40, give it some time and hope I don't have to hit it with a hammer like an idiot. I'm going to be very careful not to let him come into contact with this team. Here I don't want to hit them together, but I'll hit it back and forth a little bit, okay, it's loosening up. Hey, it's a miracle. The gears are so cool.
I think I figured out what the problem was with this gearbox. This is the right location. this gear had degrees of freedom that allowed it to go like this in the past, this lathe was allowed to run like this for some time, you can see that the tips of this nut are actually damaged by the teeth of the gear, furthermore, this gear The transfer gear was capable of running too far to the left and there was a clash between the gear teeth right here that should not have been allowed when this gear slides to the right, one of its positions is intended to mesh with this half gear and the damage on these teeth prevent it from running smoothly with this one what I have to do is clean the edges of these teeth clean the edges of these teeth and check the placement of this gear and everything should be fine with a quick touch on the edges of these gear teeth with that Dremel and they're running like new, except for that, excuse me for a minute, it's better, now I need to unfreeze this area.
I can't get this gear to slide back anymore. I just mounted this piece on my other lathe and I swear I would, man, I swear this was not set up. I'm going to fit this into this section of the shaft and that's going to keep this gear from sliding back, let me push this in. out of the way for a second here's a sample shaft that has the same diameter and this is what's going to happen here's a help tool to push that in there I guess technically it works but I completely lost it and got it stuck in the corner , I mean no, no, I can't leave it like this, come on, you can be lazy or stupid, pick a friend, I put a flat on the back and cut it to help me control it when I go to push it, I call it a success and I don't feel like taking it off if I have to, although now it's time to clean the lead screw.
One method some people use is to take a rope and let it pass along the sides of the string while it is in the winch under power. I would only recommend that method if you are really tired of having 10 fingers. I have the lead screw installed on my lathe here and it's kind of funny that my life can hold everything. I have a special method for doing this that makes it much safer than spinning it with power. I have disconnected this drive lug. The shaft now rotates essentially free of these pulleys. The only thing that drives the shaft is the friction forces between the shaft and the. pulleys A setup like that isn't likely to jeopardize my ability to count to 10 so I'll continue, thanks, it worked pretty well, it's nice and clean now.
I didn't realize there was another lathe in the background of the shot. It was actually a casualty while I was doing this, but funny enough, the lathe was off and it was a knucklebreaker that I got while I was planing this part of the vise and my hand slipped and slammed into the dovetail of my tool post, now pointy little bastard. If it is absolutely necessary to clean the lead screw, then you should leave it on with the machine on. My advice, if you absolutely have to do it, is to not hold the lead screw in place with these two locknuts.
This is my normal thickness. 7 8 wrench now I'm not proud of this I'm doing it anyway yes, I'm embarrassed no, I'm not going to go out and buy a skinny 7 8 wrench just to do this caveman method worked great, putting these boxes back in changes yourself It can be a little difficult, you need to be very careful not to
bend
this lead screw while holding this gearbox in space, thread the lead screw through the worm gear into the carriage, making sure to place the slot on the correct position and then sliding it. to the head, holding it in place and installing these screws to hold it in place and make the job easier.I built a lifting system that will help me. I've had the idea of this system in my head for quite some time and never found a good reason to use it. This isn't a good reason, but I think it's as close as I can get and I'm really curious to see how it will work, so I did it for fun. here is a diagram of the system I am using the pulley on this orange rope allows the system to move from left to right the red rope can slide across these pulleys and leave the work at a constant height or move with this degree of freedom in opposition For the counterbalance, the workload could be anything.
Here I'm representing it as five imperial standard bananas. The counterweight has a mechanical advantage times two, so I use a counterweight that is a little more than half the working load, that extra weight helps overcome the friction and overall effect. It is an assistant system that allows you to move in the XY plane as shown here and if you adjust the relationship between the workload and the counterweight, the friction in the pulleys will keep the workload still if you let go. I'm holding it with one finger and I can even readjust the camera with my free hand.
Ok, I take back everything I said about not needing this system, that it was incredibly easy and I would set it up again in a heartbeat if I had to do it a second time. It feels very good. It is strange, almost wrong, to modify any of these original parts. There's no denying that many things about machines built in the past are much better than what we have today, but electrical safety is not one of those ways, hey Dave, why did your house burn down? I felt this strange misplaced desire to keep every part of my original lathe, so I left these Old Wire clamps that eventually vibrated and started electrically tripping.
Well, where do you think that misplaced desire came from? Well, let's go unpack. It's probably from the uh oh boy, do I feel uncomfortable kneeling on the floor right now? I had to shorten it so this is what's going to happen here hot from the hot wall to the hot engine to an accessory wire join all of these together neutrals from the wall neutral to the accessory wire I'll join them all the grounds will join and then I'll have another neutral leg from the wall going up the arm to the breaker box where it will travel with these two wires from the motor for high speed and low speed, you could send a leg of ground up the arm as well just because it's a very convenient place to connect the machine to ground.
I'm not too sure yet, I'll see what I do, so here are the brave wires going up the arm now. I have a switch that is a little more original for this machine, but it's in a condition I don't really trust, so I'll use them as a temporary measure. This is a basic on and off switch. It has a bridge that connects it. to this three way switch in the upper position the power will go to this terminal in the lower position the power will go to this terminal and that will be my high and low speed selection huh, I can't believe I have all the I went over the wiring and the I explained before realizing I forgot to run the wires through the electrical box I have.
I made this little bushing here to keep the sharp edges off the wires. I'm using this plastic mounting plate to hold that box up temporarily. this will electrically isolate the box from the arm, so I will need some kind of jumper connecting them to foreign ground. I think it will serve me well until I find a real switch in the future. I know this part here. It seems a little unusual, but at least it does now, that kind of functionality will reduce your chances of dying from electrocution, allowing you to find other means of removing this death coil.
I have my accessory power cord plugged into an outlet and my main power cord is plugged in as well. This is a great moment. I'm ready to plug it in and try it out. I'm just kidding. My lights are not on the same circuit as any of the outlets in my store, although I'm a little embarrassed to say that this is the first store I've ever had where the lights were properly connected to a separate external circuit. I had to replace the original belt on this lathe. I found this one online, the original was a quarter of an inch thick. leather, this is a modern material, it's not that wide either, but it looks like it will do a good job, this is the place I bought it from.
I must say I really like your business card, yes this is the main screw that controlled the cross feed on the lathe it has quite a bit of play this screw was unusable so I made a new one I found this guy on eBay he made a very good job was easy to work with I don't appreciate your hard work so much reaction there when I was looking at this nut here I noticed something very interesting the pilot hole for these threads breaks off and exposes the main screw that's not a mistake because this bolt that goes to those threads is hollow for some mysterious reason and If you look at the top, you can see there's a set screw there, it's an oil port, something like that is cool.
The guys who designed this must have had a whiteboard in the office with the word oil circled three times and underlined. If I start reinstalling something and notice it's backwards or incorrect, I promise I won't edit it and make it look like I'm smarter than I am. It might be redundant to grease these threads, but why not? I need some higher degrees. I am free to push this screw back in this direction instead of removing this part of the tapered fitting. I think I'm just going to take out this tapered pin. Note to myself. I put it on the table behind me where I can lose it more. easily, oh, it's great.
I'm glad I took this thing apart to take a look at it. I wonder if they were reamed in assembly so that the taper of this hole matches the taper of this hole. It seems to be coming back together, it's not an idea, right? now, but who knows if I'll end up taking this off for some silly reason. I'm going to put a timestamp here. There is no way to go wrong. I think it's fair to deduct half a point for doing something wrong because of that. one, oh wait, no, make it a full point. My plan was to slide this in here like this and then screw the thread into this nut.
I think you see why that's not going to work. I have to stop hitting the camera. I'm going to give you guys. motion sickness, this piece has a slot that references a corresponding slot on the end of that lead screw. I just realized that this had to go in first, well, right in the middle of correcting that mistake, I realized that I was making another mistake and I can actually lower the skirt a little bit and it will give it some room to let that part slide out the front. I'm still going to take away all the points I lost, going back like that, but I have to have a special category.
For points, I lost doing the wrong thing while I was doing the wrong thing, any stranger, back up a little so I can clean the gear teeth, but I feel where they should be so I can see they're meshing there for the record. I want to point out that I had the foresight to loosening these bolts that way when I dropped the apron this lead screw had a certain degree of freedom to move paying attention to this part of the car it reminded me of this scratch here this scratch was Not my doing and also the original screw here was a head screw flat.
I think someone was having a bad day back then. I'm glad this is mounted on pegs. This zero was absolutely etched during assembly. These two pieces must be joined together. It will be better. It will be a replacement but I must admit it is quite impressive, this ring here is predisposed to stay closed so I have to open it with the screwdriver to put it in there after which it is quite easy to move this piece is quite clever it has a steel . fixing screw, but inside it has a brass plug so that it does not damage the shaft, this is how you avoid losing a machine key.
I just reached the level of this slot. I realize it's not a slot at all, it's a drilled hole and this. It is not the original key at all. I cut a short piece off the end of a cheap eighth-inch drill bit. It's great to see that there isn't much to say about this cylinder head. It's in pretty good condition. It just needs to be cleaned. HEwhat I feel, I deserve it, I mean, I don't have it open yet. I could take this thing off and discover that it's cracked and half in, but until then this concludes the segment related to the tail that the tapered attachment sits on.
Next, this is really cool and gave me a big surprise when I realized they were actually two foreign pieces. I didn't know he did that. What the hell is good? I guess you know, cleaning up twice as many of them I could probably edit together. a full minute of wrestling with threads I hate adding a washer to an otherwise respectable machine, but socket head screws have considerably less bearing surface than hex caps here's the taper attachment in action as I move the carriage on this way this tapered dovetail is I'm going to push the cross slide this way and by this I mean it's actually going to drag the thing along the bed because I didn't tighten it enough.
Well, here's the taper attachment in action. Strange, kind of hard to watch and not very exciting here. I'll tilt this more extreme than you'd normally see, hopefully that shows now that I've shown you how it works. I have it unsecured and hanging there. I'm going to use this taper fitting probably once every three years and when I'm ready to do so I'll put the composite slide back together, it's a job that will be easier on the bench, how the heck did this get put back together? I don't think it's even remotely possible. so I can keep playing and keep track of when I put something together wrong a lot of this stuff happens off camera dude come on why don't you fit in overseas?
Gosh, it's the right hand thread, a little strange when the threads come worryingly loose like that. Oiler for the indicator screw for that dial is nice and bent to hell also pretty well taken apart for now, the composite slide is held in this hole via these little hardened pins and pushed in with some leveling screws, this it's not just a plane, they I have landed at the end, this is actually a concave radius, I just have to use the power of mental thinking very quickly to know which direction to orient it and what you do is you just press them under the face, there are two very carefully to maintain that.
Rotation orientation now don't just add the jack screws. Poke that hole in with a tool of some kind and press them in that way, they sit against the base of the compound and any rotation of this screw won't pull them out. foreign lineup is starting a winch appears and sounds like a winch and rips your arm off like I'm getting really close to finishing here and I'm pretty excited about it. I just finished hitting as many lubrication points as I could find. using a SAE 10 weight oil without detergent and I am using it for everything, only the spindle bearings should receive SAE 10 and everything else should be sae20.
I'm only going to use 10 weight oil for everything that way I don't have to store a ton of oils and organize cans and if there are any South Bend purists out there, I hereby invite you to come to my house and fight me in my front garden. If you are having trouble getting 10 peso oil, visit Look at your local auto parts store and ask for 10w20 10w30 no detergent, any of those oils will work the 10 in 10 W, which refers to the viscosity at room temperature and the Another number refers to the viscosity at the operating temperature of an engine and I don't.
I know how to use a lathe. I'm not here to judge, but when I use a lathe it's usually not at the temperature of an engine, although this lathe showed a good chance of being at the temperature of an electrical fire if I had left it on. wiring as I found it, it's taken me a lot of work to get to this point, to be fair I did a lot of things wrong, but it's still pretty substantial, there will be a lot of improvements over time. Tools. I'm going to buy solutions. I'm going to keep working right now, there's just a couple more things I want to show and then I'm going to start making some chips.
I have this leftover piece of protection and for the life of me I can't figure out where it is. it gets weird looking for spaces that fit, but it actually works well, there's a special word for being so stupid that you become smart again, well, I feel a lot safer with that in place, I guess I didn't get a Hold this lathe with a tool post or the T-nut that goes here. I made one that will do the job and designed it to work with this tool post I had. This tool post has been officially reassigned and uh it's.
My old partner is not taking the news very well. I woke up cold and photos were out of touch and the memories will never be enough, as you can see here, it's not a very high quality tool. Someday I'll probably come across a better one and a better outfit. This machine with it until then this is quite good. These Chuck Jaws are also quite damaged on the face. I don't know what kind of maniac did this to them, but as they currently are, I'm probably not going to get a good grip. on anything that uses this face, so I have a solution for that.
I have about 20 percent confidence in this idea, but that's better than zero. If this seems like a bad idea to you, then congratulations on your common sense. I guess I know it seems pretty strange. but I just had a giant stack of washers left to fit in there, you know, it seems pretty silly, but I'll be honest with you, it's actually a pretty stiff quick safety tip, if you're worried about a grinding wheel exploding, do it like this and listen for that sound. For ping, if you hear a thud, it means there is a crack in the wheel, usually somewhere you can't see, and a wheel that doesn't sound like that can explode on you.
The ideal would be to have some Peg. of hardened tool steel that is stationary in space here and the grinding wheel can pass by it on an axis parallel to the bed and I would dress this face here to fit perfectly with what I feel for what I'm doing if I I get pretty close and then make some conservatively light cuts, these will start to match up and then I'll have a much better angle to start grooming before I start polishing. I'm going to clamp the jaws on this piece. of urethane that will make sure that your teeth engage with the inner scroll, all similarly to each other.
I've taken some steps to catch some of the sparks that will come out of this. It's not too sophisticated, but I think it will get the job done, which actually looks pretty promising so far. I'm surprised I get away with it, so the polish isn't absolutely perfect, but I got a much better compromise on all the teeth that are still long enough to engage. with work I'll replace these Jaws one day but I think this will hold me back for a while man I really shouldn't have gotten away with it well I guess it's time to do something now it's funny I just finished playing. up these Jaws faces and now I'm about to make this guy, oh come on, small enough to not fit on those, there we go, that'll do it, so I'll be honest with you, I don't really have a plan, I just I'm going to make some fries and have some fun transition sequence foreign foreign foreign foreign
If you have any copyright issue, please Contact