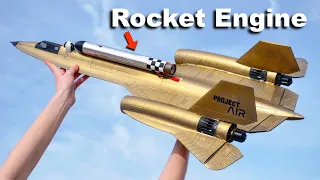
Flying a Plane Powered by AIR
May 16, 2024When I was a kid I had one of those Air Hogs air
plane
s that waspowered
by a small plastic engine, this engine used compressed air as fuel and I remember pumping it to high pressure with the small pump included before launching it into the sky and I never saw it again and since then i have wanted to build my own version, but this video is a little bigger and sponsored by oppra, so i started 3d printing some lightweight aluminum aer ribs in abs plastic that will make up the internal structure of a wing. I could have used other materials like Bola wood or carbon fiber, but they are more difficult to manufacture and would not save a significant amount of weight since these ribs are very thin once glued to the carbon fiber stringer.
I glued a carbon rod to the leader. Edge and a carbon strip on the trailing edge as the wing will be covered with a lightweight material so they will help maintain the full shape. I had never covered a wing like this before, so I quickly read the instructions on this material. It is very thin and delicate so it wrinkles easily, but on the bottom it has a heat-set adhesive that can be ironed onto the wing structure, which is why they are printed in ABS due to its high melting point once set on the ribs in quick time.

More Interesting Facts About,
flying a plane powered by air...
Jetting with a heat gun will shrink the film to create a smooth wing surface, but there are some problems, the first is that the ribs at the tip of the wing bend inward due to the tension in the covering film and this tension It also causes the air sheet to shrink. between the wing ribs creating an inconsistent profile along the wing span, plus you may have held the heat gun in one position for too long, causing the covering film to melt. I just want to talk about the wing design quickly, since this is the fourth air-
powered
one.plane
I tried to build and fly the first plane I built was the heaviest, but I used a very similar wing to the one I'm building now, although it was built with foam boards and, even though the plane uses a very inefficient engine, actually holds my personal flight time record of 16 and a half seconds, while my last air-powered aircraft, which had a much more efficient engine and was much lighter, only flew for 8 seconds, which is partly due to a that it hit a fence, but if the wing had a high lift-to-drag ratio, it may have cleared the fence.
I've been trying to make these planes lighter and lighter while trying to make the engines more and more powerful, but what I haven't been looking at is the drag caused by the plane last time. The wing I built was very light but also had a lot of drag and because thrust has to oppose drag, the very little thrust produced by the engines struggles to get the plane up to speed, so this new wing design wing uses a known error in profile that with the correct airspeed and angle of attack a lift to drag ratio of 60 to 1 can be achieved, so a little extra weight won't be a big problem and if you want designing a custom wing like this with your own bug foils, I highly recommend it.

I recommend checking the shape. I simply import the airo profile from tools.com and then, with some additional design features, it's basically ready to print. These ribs are the same color as my t-shirt to solve the problems caused by the covering film I decided on. To use a thin sheet of Boler wood to reinforce the leading edge, this material bends very easily and if you take it outside in the British weather it will bend even more easily, to the point that you could bend it around a 3D printed mould. of the wing and pin it in place until dry.
Once dry it maintains the curved shape of the leading edge and I can print some new ribs with a small step where the gusset will mount. I then gave the wood a few coats of bright orange paint to make it look nice. It looks good, which gave me some extra time to build a new wing structure. This new wing is similar to the old one, but has much thinner ribs, as I expect the wooden logs to add some strength, as well as some thin carbon rods to prevent that. the wingtips folded inward once the paint was dry.
I glued the stiffener wood to the wing structure with some Thin CA glue and the wing looked very good with the orange leading edge and gray ribs, then the covering film can be applied to check how the profile of the Airall Turns out it looks a lot better with the thinner 3D printed ribs too. This wing is actually lighter than the first wing and with two of these wings forming a 2m span, it is over 3 and a half times larger than the Air Hog aircraft. so we need a powerful motor to fly it, fortunately I have been developing 3D printed air motors for a while now and have tried many different Des designs, such as spring-loaded inlet valves, camon pushrod valves, piston-actuated pistons. diaphragm and the latest design that uses a custom molded piston seal that expands under pressure to make the piston airtight which is very similar to the Air Hog engine and this engine has been a big step forward in performance compared to my previous designs producing 350 G of thrust from a motor that only weighs 40 G, the motor is very simple with only a few moving parts.
High pressure air flows through the top of the motor and is sealed by this ball bearing. Then, as the engine spins, a small pin at the top of the piston moves the ball up and open. The y valve allows high-pressure air to fill the cylinder, but this seal at the top of the piston is a vital component to engine efficiency as it expands due to pressure and seals against the cylinder walls, thus which causes the pressure to push the piston down, closing the ball. valve and rotating the crankshaft, then as the piston bottoms out, air exits through the exhaust ports and the seal contracts eliminating any compression as the piston returns upward.
Now the air grade version of this engine is slightly different but works exactly the same. this 3D printed thread to attach to a plastic beverage bottle and the air flows through this thin tube into the cylinder head. I also decided to purchase a high quality propeller to hopefully maximize thrust power and surely the fact that this propeller comes with its own socks should mean that's a good thing. I know many of you are thinking why don't I use CO2 cartridges instead of plastic bottles as they can store much more pressure. This CO2 cartridge is pressurized to approximately 800 PSI or approximately 54 times atmospheric pressure, which is a lot, but.
Its volume is very small, only 21 ml, so if we let the CO2 gas leave the cartridge to equal one atmosphere of pressure, we would have just over a liter of gas, but if we pressurize a 2-liter beverage bottle at 120 PSI. or approximately 8 times the atmospheric pressure, we can store 16 liters of air, this means that we would need 14 CO2 cartridges to equal the storage capacity of the beverage bottle and considering that a single cartridge weighs more than the bottle, the storage ratio air to weight is more than 14 times greater for the beverage bottle, so moving to CO2 cartridges would be a huge degradation, but you know, what is not a degradation, try the Opera browser.
Opa 1 is the latest version of the oppra desktop browser and it really helps me with my workflow when creating these projects for YouTube, while researching and designing a project, my browser tabs can really pile up, but oppra has these islands of tabs, so I can organize the tabs into groups, like here is the island full of tabs for researching Wing's bug sheets and here is the island full of product tabs for purchasing the parts needed to build it too, so With ARA AI built in, finding an answer to anything has become much easier, for example, if you read something you need more information about, simply highlight it to bring up ARA.
AI message and then select between briefly explain, explore or translate depending on what you personally need to know. I love using the explain briefly option as I come across a lot of technical words while researching my projects and this feature saves me a lot of time and it also has a command line where you can ask it various questions which I find really useful if I need to do a quick calculation with a lot of questions. other features such as free built-in VPN ad blocker and messaging apps. I recommend you try it using my link. below to download Opera today and thanks to Opera for sponsoring this video, so to increase the runtime I am going to mount two 2L bottles back to back using a nylon bolt, this requires drilling the bottom of the bottles, which is the thickest part and shouldn't reduce the strength much other than hollowing out the nylon bolt, but to attach the bottles I need to place the nylon bolt inside the bottle, which requires cutting an old arrow shaft and attaching a ferrule 3D printed that perfectly fits the bolt and simply passes through the neck of the bottle, this allows me to sandwich a large rubber washer between each bottle before tightening it with a nylon nut which should hopefully create an airtight seal , but before we test it for leaks, we need a way to pressurize it.
The design I came up with is a 3D printed bottle cap that has a small ball valve inside and to fill the bottle with air I can use this hose with a 3D printed latch attached. This hose fits perfectly through the O-ring. on the bll valve and the latch locks onto the bolts with a small twist once the plane is under pressure I just turn the latch take out the hose and the ball should seal the air inside so I fill the bottles with water to reduce the potential. power if something went wrong and I pumped them up to 12 20 psi and both the nylon bolt and the 3D printed filler cap stayed leak free so it's time to build the tail of the plane for this.
I chose to use a wooden dowel. sheets but these 4mm ones are a bit thick so I ordered some 3mm sheets which believe it or not were shipped in a paper bag so let's reduce the weight of the thicker sheets by punching some holes first with a small drill bit and then with a large one. synthetic counter bit to reduce chipping and then finally with a 3D printed bit wrapped in sandpaper to make the holes nice and smooth, this reduces the weight by about 20% and after a few coats of paint you can Laminate with covering film to stop air. flowing through the holes because leaving a bunch of big holes drilled in the tail of an airplane would be a bad idea.
Then I added control horns and fixed the control surfaces with packing tape, since it is light, flexible and adheres well to the covering film, now I want This tail should be controlled by cables to keep the weight away from the back of the plane, so I used some spring steel wire as a torsion spring inside the control surface, this makes the surface loaded in one direction, which should keep the control cables in constant tension, now you can notice that there are only two tail fins here instead of a separate elevator and rudder and that's because I chose a vertical tail design.
I then printed this weird looking part that the tail arm will mount to and that I can attach. There are servos here to control the tail, which works great once the cables are connected. This center hub also mounts to the bottles with a flexible printed ring and a small bracket on the tail boom to complete the aircraft fuselage. Now all you need are the wings. attached to these points and we have a complete airplane, let's take it out for a test flight, we are at 60 PSI, but I can hear a leak in the rear bottle cap, not a good sign because I tested the pressure and this is already fine quickly .
Release here goes nothing, check the controls and start the engine, that's brilliant and can I land? Can I land? It worked, it worked, it looks like the propeller broke, although let's go and inspect it well, so the crankshaft broke, but that's it. Definitely the longest air-powered plane flight I've ever accomplished, so now that the record flight time for a 3D-printed air-powered plane has been increased to 31 seconds, I took to Instagram to ask how long you think it will fly. and the majority. of you chose more than a minute, so I can't give up yet to increase the flight time.
I fixed the leak in the bottle cap by resealing it with a larger O-ring and it was ready for another test and 100 forever. good luck please it worksright oh the battery's gone come on we can climb we can climb come on yeah that's great oh that's so much better oh look at it it still works great oh my god it's working buddy still it is working well. Just no, so I know what you mean about you and Rollo, yeah, wait, it's still CL, wait, the wind is coming from our right, isn't it? So it's coming from my back, I think it's okay, I'm trying to turn it, it's coming, it's coming for the The battery fell out, can you see it hanging on the side? and I put it away, oh no, I left it, oh, we have to make another one, oh yes, for the next flight I decided to add a small camera on board, but because of my enthusiasm for the previous flight.
While tightening a bolt, I accidentally punched a hole in the bottle. You see he's just whistling. Just whistle through that hole. Luckily I had some spare bottles so it was an easy fix, although during this period of adding the integrated camera and replacing the bottle I forgot to do one last vital check and that was whether I would push the tail arm into its holder correctly because this means that the control cables are too short causing a lot of elevator adjustment up 3 2 1 oh no no no no no no this may look like this on the end of this plane, but after a quick depressurization I was surprised to see how little damage there was, the only damage other than this 3D printed bit here, as far as I can see, this wing is fine, just this wing here, which has some packing tape on it. that will fix that, so I fixed the wing with a small piece of duct tape and reprinted a new Central Hub which I honestly thought saved the plane when it broke and the next day it was back up and
flying
, although not yet I've got over it. the flight record of 1 minute and 22 seconds again mainly because it really struggles with the wind oh no, no, no, careful, careful, careful, sorry I can't control it, it's too windy.I've had some flights longer than a minute, but I think. Some weight needs to be reduced before I get close to the 2 minute mark, even if I can reduce the overall weight of the plane by about 10% that will be enough to add another bottle which will help extend the flight time thanks for looking
If you have any copyright issue, please Contact