EASY Small Apartment Bathroom Makeover (Renter Friendly!)
Jun 06, 2021Hi friends, I'm Sam from DIY Hunters and I hope everyone is doing great today. I'm going to walk you through some simple updates I made to the
bathroom
of our rental that can be easily removed or taken with us when we move in earnest. The best thing about this is that nothing is really permanent, so we'll get our security deposit back when we move out because I'm going to put everything that used to be here back, but for now I'm really happy to be able to do it. I have abathroom
that we are really excited about.
I hope you enjoyed this one as much as I did. Let's get started. We've been in our
apartment
for about six months and while most of theapartment
looks really amazing, the bathroom. another story, don't get me wrong, there's really nothing wrong with this bathroom itself, it's pretty up to date, but it's just not our style, it doesn't seem like it fits in with the rest of the apartment, but since we're renting, we're pretty limited in what We can't do in this space, so I decided to focus my energy on making some tenant-friendly
improvements to our bathroom that can be reversed when we move out so we can still get our deposit back.
More Interesting Facts About,
easy small apartment bathroom makeover renter friendly...
In fact, I took these pictures you're seeing here six months ago when we moved into the apartment in case I wanted to make some updates to this bathroom in the future and I'm so glad I did and like you. I can see that one of the first things I did when we moved into this space was replace the toilet seat. This is something I do every time we move to a new space. I just have this thing about needing a clean toilet seat when we move into a new space. apartment I also wanted to install a soft close toilet seat so I unscrewed the old toilet seat and then installed the new one and it was pretty simple it only took me about 10 minutes to do this so I did another
easy
upgrade when we moved I was replacing the shower curtain, the former tenants were awesome and left us their shower curtain and I really didn't want to keep it so I got rid of it and replaced it with one that I really liked and matched like a mud. fabric vibe we had in our living room and also in our bedroom spoiler alert.
I'm replacing the shower curtain rod later in the video, but that was a super
easy
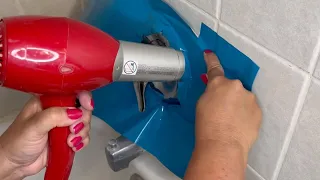
fix too and fast forward, within two weeks, I decided it was time to revisit this bathroom and start doing a couple of changes so I could start making this bathroom look like it was there for hours and one of the things I really wanted to do was brighten the shower grout on this white subway tile and Since we are renting, we can't just redo the tile or redo the grout, so I bought some grout cleaner from Home Depot, added it to a spray bottle, and then followed all the instructions to apply it to the grout to deepen. clean it honestly I was very skeptical about this product but it actually worked very very well and as always I linked this product along with everything else I talk about and show you in this video on my website and you can find that link. in the video description, but in terms of application, I sprayed it on the grout and then rubbed it in using my dremel versa that I got as part of the Home Depot prospective program.
You could use a regular scrub brush for this, but using the versa made this happen. Very quick and easy and honestly I was very grateful for the splash guard that comes with this right now because this grout cleaner is quite volatile, it smells very strong and you don't want it to get on your skin so have a splash guard. It definitely helped keep me from making a mess with this stuff, but it honestly worked really well when applied the right way, so I decided to move on to the grout and floor as well and was able to brighten the entire floor. the bathroom just cleaning the grout, so while the grout looked pretty good, another easy fix that I really wanted to do was to re-caulk the joint between the tub and the wall and this was actually full of grout and rental of hours that already It was cracking and falling apart so I used a grout scraper tool as well as a utility knife and also a detail brush with my dremel to get rid of all that nasty, gross grout and even though this is in fast forward mode it definitely got me I took my time here. because I didn't want to damage the tub or the surrounding tiles, but basically once I got rid of all that grout, I vacuumed all the seams to make sure everything was nice and clean, I don't know.
What's blocking my camera here, I'm sorry, but all I'm doing is just scrubbing to make sure all the debris isn't on the wall. Once all of those spaces were dry and clean, it was time to start preparing the caulk and I started by taping down an area where I wanted the caulk to go and I found that this is definitely the easiest way to do it, especially if you don't You have a very firm hand. I actually covered this process once before on my blog long before I had a YouTube channel, so if you're interested in seeing the step-by-step of this process, you can find the link below this video in the video description .
I spent the most time in a bathtub today and I probably have in my entire life so after being a drama queen it was time to really start this process and I always fill my bathtub before caulking and this just adds weight to the bathtub so that nothing cracks or moves out of place later. This is more in that blog post, so check it out if you're interested. Long story short, once the tub is full, I added my caulk to that seam between the tape and then spread it out with my finger. I then removed the tape fairly quickly. because you don't want the tape to dry with that caulk and then I smoothed out any imperfections or inconsistencies with my finger and that was it, it's actually pretty amazing what a little bit of grout cleaner and a fresh bead of caulk can do to your bathroom now.
This wouldn't be a DIY hunter project if it didn't include some woodworking, so at this point I moved on to this little corner in our bathroom that just doesn't serve any purpose and decided to make some shells, let's make some shelves now. Quick disclaimer. My original thought was okay, there is a corner here, there is an empty space. I really want to put in some storage. Let's make some floating shelves with hidden supports, but okay, that didn't work, but I'll explain how I made them anyway, just in case. you want to make floating shelves for your space and I basically started with some two by twelves that I bought at the hardware store.
Now I'm aware that I'm making a
renter
-friendly
video and not everyone has access to a miter saw, so you can definitely ask the people at the hardware store to cut these pieces for you if you don't have access to a saw. At first I had them cut them for me and then I trimmed them to their final size on my own. bought and as I just mentioned originally, the idea was that I really wanted to do some hidden hardware that didn't end up working. I'll explain why later, but it was actually a pretty simple process, in case anyone is interested, I ended up purchasing some metal brackets. and those brackets had half inch wide rods coming out of them so I started by marking where I wanted these brackets to go and then I ended up drilling half inch wide holes in the 2 by 12 piece.Now I invested in this super drill long. a little bit about this because I got some longer brackets and again I linked them in the blog post if you're interested in seeing them, but basically to make sure they were super straight I used a dowel jig and just drilled directly into those two by 12s. Basically , to make sure I didn't drill too much into the wood, I used painter's tape to mark the depth of how deep I needed that hole to be and then once I drilled those holes I ran a dryer. in shape to make sure there were no surprises later and luckily everything fit together perfectly now the moment I thought this floating shelf idea would work I just wanted to make this as easy as possible so I made sure to use my dremel. and simply sand the wood remains.
I wanted to make sure that these shelves basically slid on and off of those supports pretty easily and once I was happy with the movement, I sanded all of the shelves and stained them using a walnut color to match the vanity we already have in our bathroom . I also made sure to seal all of these shelves with polyurethane because they will be exposed to some moisture and I wanted to give them as much protection as possible and once they were dry then it was time to install them, I swear I always lose, I can never have too many pens or tape metric at this point I decided those brackets weren't going to work for this project, this space was too tight and I didn't want to remove the edge of the door to install the shelves, so I ended up going with the same brackets I used in building the folding bed and honestly they worked great once I finished installing those shelves I was pretty sold on the idea of replacing them. all the rest of the bathroom hardware with something that was matte black and the reason I chose this is because it already matches the hardware that is on our bathroom vanity now, as a
renter
I obviously don't want to make extra holes on the tile if not necessary and this towel rail was a really strange size so I decided to go for something a littlesmall
er, this obviously meant there were a few extra holes left in that tile so in order.To fix this, I removed the drywall anchors by inserting a screw about a quarter of the way into the anchor and then pulling it out with a pair of pliers and once those holes were empty, I filled them with the same white caulk I used. In the bathtub another super easy fix was to replace the toilet paper holder and I did this the same way, I replaced the towel bar where I removed it from the surface it was on, unscrewed the old hardware, screwed in the new hardware and replaced it. Using something that was matte black to match the rest of the finishes, I also filled in those extra holes using wood filler that was stained to match the same color as the vanity.
After replacing the fixtures it was time to move on to the lighting and I started by turning off all the electricity in the bathroom, honestly we have a horrible light in our bathroom and I really just needed it to go out so I started by removing that light from the ceiling and then I replaced it with a very nice pendant. that I picked up at Home Depot, okay, something I totally forgot to mention earlier in this project is that if you're replacing any fixtures in your apartment, you'll most likely want to put them in a box and store them somewhere, the reason why What I'm doing this is because when we move I want to put the old fixtures back in so our landlord will give us back our deposit and I also want to keep these nice fixtures for our future home okay but let's get back to this project so basically I just replaced this boob light using this cute fixture from Home Depot and it came with instructions that have some color coded wires that matched the colors of the wires that were in the ceiling it worked but if you don't feel comfortable replacing something like This for your account is definitely asking for help.
This is something that gets easier with practice, and honestly, changing out light fixtures has a big impact on any space you're in, so it was a fun little upgrade in this bathroom, as you can see. When these lights were installed, they were clearly painted instead of painting the wall or ceiling first. I would have loved to paint the wall or ceiling before installing these fixtures, but that wasn't really an option in terms of time because I did a lot of this after my full-time job every day, so I decided to install the fixtures first and then I painted around them.
Well, to be honest with you, I originally wanted to replace this medicine cabinet, but while I was replacing it. lamp I realized that the owner actually permanently fixed the medicine cabinet to the wall, which meant it wouldn't happen, so instead I removed the front of this mirror and found a mirror that was the same size to replace it and which was much more modern. and it really had a big impact on the space, oh, so much better. Honestly, I had big ambitions to create a medicine cabinet with this really awesome wooden frame, but sometimes you just have to commit to whatever you have to work with and this was one of those times and it worked out well, but it's okay to move past that , so once I finished replacing that mirror, it was time to touch up the paint around the accessories I put on and I use my dremel with a scrub pad to remove some of the raised paint that was around the accessoryexisting and then once it was nice and flat I just used some matching paint to paint around the fixture and also to paint around the ceiling and did two coats. each one and when it dried, I moved on to a new project.
If there was ever a time in the world where I was super grateful to be a little human being, it was at this point when it was pretty late in the game when I decided to replace the faucet. the bathroom sink to match the rest of the fixtures and this is a pretty simple process that I wish I could film but it was too tight because there is a shelf on this vanity so I will link a video below. this video in the description for you to watch in case you are interested in this process, but it is a pretty simple process.
I turned off the water under the sink and then removed the faucet, replaced it with a new one and added some new connections. Plus, honestly, this is one of the easiest upgrades you can make to a rental and like all the rest of the fixtures I put the old faucet in a box to store and put back when we move in now, while the water fixtures for the sink looked great. Replacing the shower heads wasn't an option for our rental unit because I don't have access to our particular apartment's water shutoff, so instead of stressing about it, I decided to upgrade the shower head and did so by unscrewing the old one. , then I replaced the plumber's tape on the pipe and then screwed in the new shower head and since I couldn't replace all the shower hardware, I added a matte black caddy to the shower head to tie some of the decor together from the rest of the room at this point, although it was totally time to add some of those finishing touches, so I started by scrubbing the bathroom and making it look super clean and then added some personal touches like artwork and finally replaced the shower curtain rod. the shower too when you live in a rental apartment it's really easy Make simple changes without having to feel like you have to do a major renovation and that's exactly what we did in this bathroom and luckily as I mentioned at the beginning of this video , I can easily reverse all of these changes I made when I move out so we can get our security deposit back, and while I didn't make any drastic changes, just making some
small
simple changes, like changing a few fixtures and adding some shelves, really helps the space. feels like ours. own and also helps function in a way that works for us.I'm actually really excited about this bathroom and I'm strangely okay with the amount of time I've spent in this bathroom over the past few weeks doing things that aren't bathrooms. related stuff and oddly enough I'm excited about the fact that we have a bathroom that feels like it's part of our apartment and not just an extra room in our apartment, but whether you're a renter or an owner, I hope you There were some tips in this video that helped you in your own space and as always, if you enjoyed this video, I hope you'll subscribe to my channel and maybe give me a thumbs up and a comment.
I would really love to, but As always, thank you so much for the love and support, it's more appreciated than you know and I can't wait to continue sharing some project ideas with you on my channel, but until then friends, happy DIY.
If you have any copyright issue, please Contact