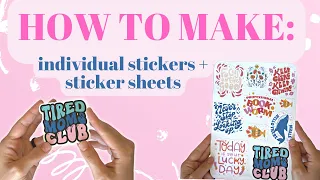
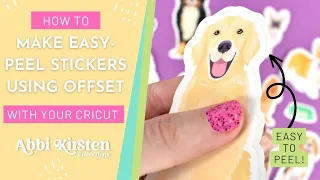
Easy peel Stickers - Easy Peel Sticker Cricut - cricut sticker - cricut sticker tutorial
Mar 10, 2024Hello friends, welcome back to the craft castle, today we will learn how to make those
, you know, the ones that have a really clean edge and are super
to
off, we will learn how to do this and it will be all in one step, so when you go to cut it on your Cricut you won't have to go through a lot of steps because it will cut it all into one map for you, it's the easiest, easiest, easiest trick, and when I show you this, you'll be like, Oh, How come I didn't think about that?
easy
peel
sticker
s
, you know, the ones that have a really clean edge and are super sticker
easy
to peel
off, we will learn how to do this and it will be all in one step, so when you go to cut it on your Cricut you won't have to go through a lot of steps because it will cut it all into one map for you, it's the easiest, easiest, easiest trick, and when I show you this, you'll be like, Oh, How come I didn't think about that?
So let's learn how to do it today. We'll use some koala
paper they have. a lot I just got this holographic stuff it's not that pretty I don't know if I'm going to use it this intimidates me a little have you used these things? I just got it. I opened it. I thought: oh this. It's really pretty and then I put it in my drawer because it intimidates me so much, but my favorite material, like the best of the best of the best label paper on the market, is koala. I have matte material, actually I'm not.
sticker
paper they have. a lot I just got this holographic stuff it's not that pretty I don't know if I'm going to use it this intimidates me a little have you used these things? I just got it. I opened it. I thought: oh this. It's really pretty and then I put it in my drawer because it intimidates me so much, but my favorite material, like the best of the best of the best label paper on the market, is koala. I have matte material, actually I'm not.sticker

More Interesting Facts About,
easy peel stickers easy peel sticker cricut cricut sticker cricut sticker tutorial...
I'm really a fan of matte because the
stickers
are shiny to me, so I don't use matte ones as often just because I want a little shine. I want some shine on my labels so this one here my package is almost empty and it's like high gloss sticker paper and apparently koala is owned by Aesop it's the same company just two different names. I've used one sheet and I didn't do a full waterproof test on it so I'm not really sure which one holds up better if you've used one or the other let me know in the comments of this video because I'm curious to know if they are, is it the same company, just labeled differently, isn't it so strange that companies have like? several names and it's like it's getting a little confusing why I like koala vinyl wallpaper so much compared to other brands.
I have tried many brands but this one seems to be thicker like the actual vinyl material is thicker but then it is also waterproof and there are some other brands I have tried where they say they are waterproof and then they actually don't. they are and then you have to put a transparent film on top or something additional. steps and these things I've been using for about a year and I've never had to put a clear film on top of them or a clear transparency or a stick of transparent paper. I've never had to do anything extra to make them. waterproof so this is just a printed sticker here is my water I just poured a big amount in there and you see all that water dripping and none of the ink falls off my hands and this has not been prepared. any other way, so that's like the real reason I love this role so much.

I assume it is adhesive paper or vinyl paper. The reason I love it so much is that it's actually waterproof without any extra steps, like clear, but. the final sheets are fine so I want the majority of this video to be about how to create easy peel decals so with that being said I'm not going to design a decal from start to finish what I'm going to do is get some Create a Fabrica clipart downloaded into Cricut design space and then show you how to do the easy peeling part, you can get these clipart anywhere. I'm going to get them from Creative Fabrica.
You can get them at Cricut. to design access to space, if you pay, you can get them on the Internet, you can get them anywhere. The reason I love Creative Fabrica so much is that you have so much at your fingertips and I don't have to keep searching for things. We guarantee that they will be high resolution. We guarantee that they will work with what we have and yes, there is a membership, but it's like five dollars a month and for everything you get inside Creative Fabrica, I definitely think that. worth it, someone on my Instagram asked me if you could do a
tutorial
on Creative Fabrica and I said what kind oftutorial
is real and they told me how to navigate it, wow I don't even know, it's almost like a bottomless pit and a dark hole that you can go down like a rabbit hole and spend all day so whenever I'm looking through creative fabrications I always go there with the intention of something I don't like just perusing this website because There really is so much that you can honestly feel overwhelmed, so for this particular project I wanted some stickers like Happy Mail Project or Happy Mail for my packages for my stationery.I wanted to include a nice little wrapper on the outside of the packages packaging. so all i did was put in the search in the search fields like happy mail label and this one came up, look at these stinky snails, they are so cute. Real snails aren't cute these snails are so cute and then I found these other ones that are like a summer package and then this has nothing to do with snail mail or happy mail but I think these stinky cats are really cute , so I think what I'm going to do is make this the first one that appeared. up for me, I'm just going to download this one, they make me happy, these snails make me happy, okay, so what you want to do is open a blank window in the design space, so I just loaded the design space.
I'm going to go over here to these hamburger lines and I'm going to go down to Canvas and this will be your new canvas, okay, so we're going to upload and then upload the image, okay, so what you have to do is Go get the downloads that you have downloaded, so again, if you have downloaded clipart from the Internet somewhere other than Creative Fabrica, you need to find all of those downloads. Mine will go here in the downloads folder right here, so I have all of these. I'm going to import them into qriket design space and the way to do that is to just grab one, so let's grab this green snail below and I'm going to drag it into design space.
These are really cool because there is already a white border. so we're not going to have to flatten anything or do anything special with it, you can just cut it out as is, it won't give you that nice edge, but at least it'll all be grouped together. to go to complex press continue, I don't have to do anything else and I'm going to press apply and continue, you want to make sure you check the print and then cut the image, if you go here to the cut you just made. to get this weird looking grayish stain, so you have to go here and make sure it looks exactly how you want and we get snail mail, so that's okay.
I don't want to change the name, we're just going to upload okay, upload the image again. I'm going to continue placing the clipart that I want this warning to hide for my husband it's so cute, so doing the same thing we placed, let's get to the complex, continue, no I don't have to do anything else, press apply and continue making sure to print and then cut. I don't want to change the name, so we'll just upload it doing the same thing. Okay, when you have all the cliparts you wanted loaded. In design space, all we're going to do now is click on all of your uploads so you can see how when I click on all of my cliparts there's like a green box around it and then there's also little thumbnails like um. at the bottom, that means now we're going to be able to put them on our canvas when you've clicked on all of them, just hit add to canvas and they'll be big and they'll be in charge, so we're just going to make these. smaller just so we can see what we're doing, well I went and grabbed my handy little chicken scratch Post-it from the new eight and a half by 11 size, then I cut it out it's bigger than it was before, like this What, what am I doing?
What I'm going to do is go here in shapes and I'm going to press this straight this square. What we're going to do is come up here to the unlock button and we're going to to change this width to 6.75 and then press Tab and then for the height we're going to do 9.25, okay, just to make sure that we have the right size for this , what we are going to do is change this. rectangle from operation from basic cut to print, then cut, okay, you see when I made this great little animation. Mark oh opened let's click on that and it actually says it's 6.29 by 9.26 so we're just going to auto size it okay that's the perfect size that's going to give you the full print sheet and then cut the one that you can use for this.
Okay, we can go ahead and turn this into a guide, so what we're going to do is place all of them. our stickers inside this guide, this guide here will be the print sheet that will then be cut once we've changed it to a guide, what you want to do is go to a range and then send it back to go to the Very back now, what we want to do is take all the stickers that we're going to want to use and we're going to resize them so that they fit inside the rectangle. You are going to fill this rectangle with how many times. stickers that you want in the size that you want, okay, when you have your stickers page the way you want, we'll just go down here to this guided square that we have, we'll hide it real quick now.
We'll select everything so you can run the a command or you just drag the cursor and select all those stickers that you have. We're going to go here to the scroll and we're going to create a scroll now that you want to do. Make sure this weld offset is not checked. Now what you want to do is see how some of these offsets are large and are in charge and cutting out the other sticker, what you want to do is drag it down to where it's going to be. a little bit bigger than your actual decal that you have like this made with brown, see how you can faintly see this as a Gray Line right here?
Anything more than that Gray Line will be your easy peel portion of decal, so if you want it to be larger, all you need to do is drag this point or we can just change it like .07, press return and it will be a little bit larger. large, so the larger the offset, the more of this easy-to-peel portion you will have. I'm going to have 0.7 which looks good to me and mine changes for everyone depending on how big your stickers are. I don't know if that's like a qriket glitch or what, but you should know that my 0.7 might not look like your 0.7.
Okay, when you've done that, make sure this here is unchecked, that's crucial for this step and we're going to hit Apply. Okay, let's sort G and group this real quick, so with all of them selected we're just going to sort G. group and we're going to need to do multiples of this, so I like to do three passes on this so that we have one, we'll do the command D that is duplicated, there is our second and command D that is duplicated and there is our third, so what I'm going to do is those three things, one, two, three.
I'll align it in the center and we'll move it up a little bit and then I'll fix it back, okay? so now what you want to do is take the three offset shadows, you're going to want to move this until it's perfectly centered on your stickers, okay now, when you have them centered on your stickers, what you want to do is come back here to the right and you see they're black, we want to change them to white, so I'm going to click on a group, we'll find the three groups, the reason I didn't change the size and color before is just to make it easier to see when it's from a different color, so I'm going to press Shift on my keyboard.
I'm going to find that second group, scroll down by pressing Shift on my keyboard again and I'm going to press that third group. so what you want to do is go here to operation and we're going to change it to cut and then we're going to change it to White, it changed to light gray, we want to change it to White, okay, now we go back. in those offsets that we grouped we're going to select one of them and we're going to ungroup them so we can right click and press ungroup to find the second grouped thing, we're going to right click and press ungroup and we're going to find the third group and we're going to right click and hit ungroup, okay, the next thing you're going to want to do is select just one label, one label, and then those three offsets that we created. and we're going to go down here to attach doing the same thing with this one, we're going to select the snail and the three offsets and we're going to press attach doing the same with all of them selecting just the sticker and its offset press attach You see how when we made this sticker it's getting really close to the other.
Now we can move it to where they are not touching. You want to make sure the outer edges of your stickers don't touch anything else. we're going to select this one hit attach okay we want to make sure all of your decals are now attached if you didn't attach your decals in the correct offset then you won't have a good printed decal sheet and then when we're done with all of that , you can go ahead and double check to make sure everything fits your print, then cut, so we'll go over here to the square that we hid earlier and just go in there.
If something is like getting close to the edge or over the edge, we want to make sure we just drag it in and anything that's inside our rectangle will fit into our print, then cut the sheet, if it doesn't, that means it won't fit. a little space, so I'm going to make a couple more cute stickers. Okay, I added more stickers that I also made. I'msure all my stickers will now be inside that rectangle, so what I'm going to do is hide them again. I'm going to select everything that will be on my sticker sheet and press attach.
The reason I did this is that if you go here and do it now, everything will be on one sheet and will print exactly how it looked in our design process if I had skipped this. step which isn't necessarily wrong if you wanted to do it if you wanted to skip that step, but what's going to happen is let's say I didn't attach everything now, see how it doesn't look exactly like it was in the layout field? and now it wants to cut this sticker on the second mat, you can select this, press the three dots to move the object and then come here and press confirm and then you can move it, you can make this wrong or wrong. step is something that I would prefer to do in this step because it eliminates having to do the second step which is in the cut area, so what I'm going to do is select everything, press attach and then we'll come here and do it and I'll press continue and then we'll send it to the printer, okay, every time I print and then cut I don't like sending it. to the printer like this, I'm going to keep the bleed on, this is not a right or wrong, I know some manufacturers like to keep the bleed on, some manufacturers like to keep the blade on, I've never had any good success turning off the bleed, so I leave it as is, however, when it comes to print settings, especially when working with waterproof paper, I like to come here to the system dialog, open the system dialog, and then press continue.
When that happens, you'll get this like a spinning wheel and you'll be stuck here and you might get frustrated because you're waiting for a dialog to appear, but nothing ever appears, it's always behind your Cricut screen. So look how I moved my Cricut outline down a little bit and then this pop and then this was like waiting for me, that's where it is, so for me I'm going to go into the medium quality, now this print settings that I'm using. for my printer it wouldn't be the same for you if we don't have the same printer, okay, so I'm going to stick one of these koala papers on my printer.
I'm using the glossy photo paper setting and I'm going to use the best setting for this, it's fine whenever I'm working with high gloss paper, especially when I'm trying to work on it with the
s. Crickets don't like reading registration marks because the brightness affects these sensors with printing and then they cut out what I would like to do is use the cheapest craft you can make. The supply you could get is a white crayon. This thing is like a bump, so all I like to do is rub my crayon over the line of my registration mark.
cricut
s. Crickets don't like reading registration marks because the brightness affects these sensors with printing and then they cut out what I would like to do is use the cheapest craft you can make. The supply you could get is a white crayon. This thing is like a bump, so all I like to do is rub my crayon over the line of my registration mark.cricut
This just gives It's like, I don't know if you can tell, but it has a matte finish, which is what Crickets like, it's the matte finish, so make sure you cover the whole line and then we can load this into our machine. . Okay, so I'm going to open up my Cricut. I'm going to stick my mat on my machine and I'm going to change this to the vinyl plus setting. I'm going to go ahead and choose quick cut mode on my Cricut. and then I'm just going to press the flashing C button, okay, so whenever we're working with a new material or it's like a new craft that you're working on, I always suggest that when you're done cutting, you just try to take off.
Your material to make sure it stays behind. Some of mine didn't cut completely, but this one did because not everything cut like it's supposed to. I'm going to come back here instead of hitting the eject button. I'm going to press the C button again, what will happen is it will now suck up my mat again and re-cut exactly what we want to cut, making sure that it will now be cut completely, if so. If you had pressed this flashing light, check that it didn't cut completely and reload it, you would definitely have misaligned cuts, so you just want to make sure and check before adjusting while we wait.
On the second sheet that I cut, I went ahead and printed it on this same hologram sticker sheet, that holographic sticker paper because you know I shouldn't be afraid. I should move on, though, I really don't think so, even with my crayon hat that the Crickets would read this. I'm not entirely sure, but I have it and I've shown in a previous video how to create these rectangles, they're like little L shaped things and what I do is I like to take them. and I'll put them in the corner, okay, it's going to look ugly, but what I like to do is just do a trick.
The Crickets machines think I'm using white paper and this is like matte sticker paper, so I'm going to put these on. on all four corners of my sticky note and I hope the Crickets can read it now that we're done with round two. You can see that some of my stickers are coming out perfectly and others are still coming out. it doesn't come out at all it's probably because I need to change my qriket blades if I wanted to you could go ahead and do this for a third pass but I'm just going to eject them and take them out myself okay same with the holographic paper.
I'm going to load this into the machine. We have done the dark adhesive paper trick. I hope you read the registration marks and we don't have too many problems. I'm just going to load it. I have it. set to vinyl plus mode, I think I'll leave it there. I'm going to press the flashing C button and hopefully the Cricut will register even though it's holographic paper, okay so I can scan the first two lines perfectly, but then when I get to these final lines, for some reason the Cricut doesn't want to cut it so here's the original white sheet that we made and I cut off the bottom left corner, all I'm going to do is go To stick this on the corner here, I'm just going to take a piece of painter's tape.
Masking tape would also work for this and all I'm going to do is tape this to the top of my transfer sheet. I'm also going to do the same with the one below. I'm just going to take this cut from the bottom. I'm going to attach it to the other side by taping this. Sometimes we have a trick to make the Crickets think. We are using white paper. Okay, let's load this back into our machine. Let's press the flashing C button and look at the thumbs up. Well, this trick worked very well. These seem to work very well.
I don't. I don't know why they didn't like it on the ones below, but they obviously weren't for the ones above, so now we're going to do the same process we did before this decal sheet seemed to cut much better than the last one. like this and then look, oh, it's already easy to peel it for me, that's great, okay, let's go back to the desktop and I'll show you if these are actually waterproof or not, so I have these that we already know for sure are waterproof. These will be the new ones I have tried.
Remember that you have never tried them before. Know? I'm glad I forced myself to do this because they are so stinky. Cute and easy to peel. Look at that pretty edge. let's do the test, the test of whether it is waterproof or not, okay, let's make a holographic on a normal sticker. I'll show you it's easy to take these off too, here we go, okay, we just add a little bit of water, can you see? that puddle is now a rub ooh look at that absolutely zero ink on my hands nothing nothing on my hands and it stays there the ink stays there this is exactly the reason why I love koala paper so much because look, it looks like new even though they are soaked in water they're curling because they're that soaked in water yeah, okay, I hope I inspired you to create and I'll see you later.
If you have any copyright issue, please Contact