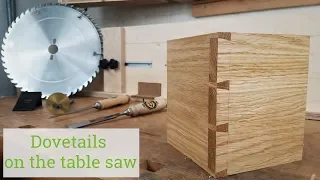
Dovetail Jig for the Table Saw // Woodworking Joinery
May 31, 2021I made a
table
sawdovetail
jig for my next project. I'm going to make some drawers withdovetail
joinery
. This is something totally new for me. I had never made dovetails before, but I kept seeing this jig for thetable
saw. It looked really cool and I really wanted to try it, so I couldn't find any videos of anyone doing it. I just saw a bunch of pictures, I saw videos and people using it but they didn't do it so I had to improvise, so if you want to see me figure it out, keep watching. I used half inch MDF for most of the pieces in this template and will have a cut list on my website that will break down all the different parts of this template. so I started by just breaking all the pieces down into what I thought would be good for my purposes, since these pieces all look the same it was important to label all the parts I knew what they were at this point I needed to decide what angle I was going to do them at. the dovetails.
I decided on a midpoint of 8 degrees. The tail ramp is 28 inches long by 2 inches wide, so to get that 8 degree angle I marked it at its midpoint, which is. 14 inches then I took a ruler from the corner to that 14 inch line and this is twice a one in seven ratio because it's 2 to 14 so it creates an angle of about 8 degrees. The reason I'm marking the angles now is because I'm going to glue these two pieces together and I wanted to use a brad to prevent any slippage during fastening and I wanted to make sure I didn't put any bread on my cut line while it was drying.

More Interesting Facts About,
dovetail jig for the table saw woodworking joinery...
I cut a little more. MDF in four inch wide pieces and these will act as the supports that are on the back holding the template guides so I set my stop block to 4 inches to have perfect squares and then I had to cut them out. into triangles so I used my taper jig and I couldn't get it set to 45 so I cut a scrap piece on the miter saw at 45 and used it as a clamp on a stop and then I got two perfect triangles. the back ramp is all dry and it's time to cut it, so I'm going to use the taper template again and I already have those marked lines there that I made earlier, all you have to do is line up the cut line at the bottom. of the template and then just clamp it in place, so since I had to remove the stop lock on the back of my template because I'm cutting all the way to the corner, I just set my square at that distance so I knew how to repeat the cut in the other side so I just made a cut, turned the piece over and made sure it was in the same position using my square, clamped it down and then I was able to cut the other side making this back ramp actually the hardest part Of this template, the rest went from strength to strength.

I had the dowel guide and I just cut it in half and then set the miter saw angle to about 8 degrees, it didn't really matter if it was perfect to just cut. those ends so they meet in the middle now all my pieces are cut to the side and ready to assemble before assembling although I took the base pieces and marked where the blade was going to hit on the template this one goes on template. to mount in both miter slots, so I needed to mark the blade on both sides of the template and then carried all those marks to the rest of the pieces so I didn't put nails in any of those places on the first part.

The part of the assembly I did was attach the braces that will keep it at a perfect 90 degree angle, so I put a little bit of glue in there and made sure everything was perfectly square and then attached it with Brad nails in the front. I did that on the dowel fence and then repeated the same process on the back fence making sure I didn't put any Brad where I put the marks of where I was going to hit the saw blade on the jig so I set that aside for the glue. it was able to dry out a little bit and then I started working on the runners so in the past I used these HDPE plastic runners for all my sleds and it worked great so I decided to use them for this as well, but you will.
In a moment I see that it didn't work so well on my first take. I actually got a perfect thickness and thought it was going to work great, so I marked the hole locations on the HDPE piece and drilled a hole that was wide enough for the screw to go all the way in so as not to expand the plastic. and then I used a countersink bit to get the screws flush, then I used a VIX bit and drilled a hole and then put one screw in place and then making sure everything was really square I drilled the second hole and put the other one in screw in place, so I had a lot of success using HTTP as runners, or so I'm not sure. what the problem was but you can see it was super flexible and the jig moved from side to side.
I think maybe it was the quality of this one or maybe it's because the jig was so short and there wasn't much surface area. area for it to connect so I swapped it out for this oak one and then we were ready to go so I decided to assemble the dowel jig first but I used the back ramp as a guide for where to place the dowel jig like this. It didn't really matter what angles I cut on that back ramp, as long as the pin guide angle is installed at exactly the same angle, the joint will fit great and of course it can't be glued without going crazy.
Somehow I glued this all together and got it very even with the lines and I actually used the cone template cuts as well to make sure it was completely at the right angle and then put everything in place. I realized there was no easy way to hold all of this together so I quickly took it all out of the chamber and used some super glue, CA glue along with regular wood glue to act as a clamp. and then it worked totally fine and now the tail jig is much easier to assemble, all you have to make sure is that the front of that ramp is flush with the front of the jig and make sure everything is nice and square, so I put Glue everywhere and did the whole super glue method.
I also used some Brad nails to hold everything together and once everything was set up a bit, I turned everything over to the other side and Brad nailed everything from the bottom as well in a last step. was to add a little safety feature so I ran the templates through the miter slots just to create a gentle curve so I know where the bleed will go and then I cut some in pairs to act as a blade guard so the ones on the dowel track, I actually cut an 8th degree angle on one end so that when the saw blade comes out, it goes straight through the 2x4 and isn't twisted along with the angle of the dowel track, the offensive of the tail that I just cut. regular two by four, so I just clamp it in place, let it dry and that's it, so the template is ready, you can see it in the background there and now it's time to put some design lines on your wooden pieces , so every time I see a video about people doing dovetails.
I see them taking some skins and crossing the wood to discover the design of their dovetails and there is no explanation and not how they got that measurement, so I will try to improvise here and figure it out well so the first thing you should do is label your piece this is going to be facing out this is going to be seen so I marked it I'm going to mark the pins first and I know there's a big debate about whether to do pins or tails first, I think these pins are easier so I'm going to approach a quarter inch from the ends and I'll just make a mark.
Now I don't have a set of dividers to divide this evenly. I'm going to try to do the best I can between these two brands of pins I made. I have three inches to work with, so I don't want to think about this too much. I'm just going to try to make it as even as possible, so actually if it's not perfect that's totally fine, you can make them as big or small and space them as much as you want, it actually looks more hand cut that way , although this will be machine cut. So waiting around the one inch mark, I'm going to go around it a quarter of an inch and at the two inch mark, I'm going to go around a quarter of an inch, so it was easy to do although they're not going to fit perfectly.
Even this one in the middle is going to be a little bit smaller. I could do the math to figure it out, but it doesn't really make a difference. Now I just take the joining piece of the net, line it up, make a mark and that's how high you're going to go. set your table saw blade so you don't need to take these marks all the way up because you will only have the table saw set to that depth, all you need to do is mark your waist so you want to make sure you always cut on the waist side of your line.
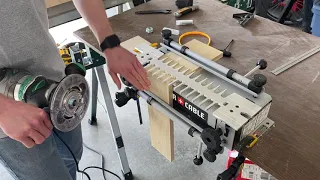
Okay, let's take it to the table saw. Okay, now this is the dowel jig, so the reason I made it shorter and separated them into two separate jigs was because The distance between the distance on the front of my table saw here is actually only about six inches. If you don't have a table saw on the job site like I do and have more space there, I would totally recommend converting this to one jig, not two. when the template is in the left side miter slot, you want to align it when you look at the piece to the right side of your cut line, so I'm going to cut this part in an X here, so I'm going to align the blade when I look at it towards the right side of the line, so if you're looking at it on camera, it's actually the left side of the line, so don't get confused. that and then I'll make the cuts on all three of my marks at the same time and then I'll shift a template to the left side and do the same thing, so let's get started.
I almost forget it. I had already set the height of this blade to the correct height, but you have to set the height of your blade to the line you made before and then you can make the cut and see how it is perfectly aligned with that cut line. Now I'll continue, sorry. About that guys, okay, come on now that I've defined all those cuts. I'm going to clean them halfway up until I get to that X. I don't want to get halfway to the of the queues. Now I'm going to switch it to the other side and finish the cut.
Now that Jake is in the right side miter slot, I'm going to align the blade on the left side of my cut line. Now fresh out of the saw, that's pretty impressive, there is a bit of tearing on the back. it ends here, but I think I could easily clean it up. Also, this is the outside face, so this will be on the inside and won't be very noticeable. I think it's pretty awesome, pretty fast and now it's time to queue up so this time. I did the opposite, I barked at the board and looked it up then took the board with the mark facing out and lined it up against my board here making sure it's flush on the sides and I also use a square on the back to make sure make it nice and square and then I'll take a very sharp pencil and, making sure not to move the bulletin board, I'll mark the pins and just trace them so that now the pins are I'm going to fit into these slots here, so this one will be the waist creating the two, three tails.
Now I just need to mark the height and take it to the table saw. Well, this is where it gets a little complicated. so I didn't make some test cuts before so I know if you look at this you can see here is the miter bar and you can see the distance from these two slots that were cut is not the same so I completely forgot Note Please note that my miter slots are not perfectly spaced from my blade, which means I will have to change the height of the blade on either side of the miter slot, which is a bit of a pain.
I think I'll have to do it. I tried to figure out something else because getting the right blade height is also a little tricky, so it looks to me like I have a good blade height here and it's just kissing the line, so I'm actually going to use a test piece. first because I had some problems with this before so it looks like it's just kissing the line but I don't know let's see so the problem is that the blade when you're putting it in is placed towards the bottom of the cut so that's it, I am very happy to have made a test piece.
I don't know if you can see it that clearly, but the top corner of the cut is above the cut line, so I'm going to lower the blade a little bit. Let's see. how's it going that's closer I just want to take it down a little bit more well I think we're good ok now I'm going to cut my pieces so when it gets back to the left miter slot you're going to want to be there on the right side of the cut line , but this is easier to follow because you can see that when you tilt it, the angle looks right to you, that looks bad, that looks good, so I'm going to get really close. to my line, I don't want to continue with my line and now I'm just going to repeat the same process for the rest of the queues.
Now I'm going to move it to the right miter slot and remember why the distance I put thismiter slot? Do you know what it could really do? I could change the location of this miter slot maybe that's what I'll do right, not now, but I'll do it now. I need to change the height of the blade like You can see that the blade is now too high so I need to lower it. I'll make a test cut first just to make sure it's now in the miter slot on the right side. I'm going to cut on the left side of my cut okay, this is what the cut looks like just made with the table saw and as you can see if you get too close the angle of the blade doesn't allow you to get close to the line, so I can't clean the cut, so they make special saw blades that come at a specific angle so you can get to that cut and you can clean it.
I don't see a reason to buy one of those unless I'm constantly rolling this joint and working in a production shop or something, so I'll have to clean them another way, we use hand saws, a band saw. I think I'm going to test the router too, so let's give it a try. and I'll see which way works best. The first way I'm going to try to clean up the joints is to just use some hand saws, so I marked the line on the side here and I'm going to clamp it to my bench. Now I'm not going to cut the line.
I'm going to cut next to X. I know I'll have to clean this up with a chisel afterwards to get the debris out of the way. I'm going to wear a cap. saw again I'm NOT going to continue with the wine because this doesn't leave a clean cut at all at least this one and my skills now I'm going to try the band saw. I put a fence on my band saw that will cut almost to my line again, not all the way first. I'm going to try to clean up that one that I just sit on with the jigsaw because it's actually not that good and will still need a lot of cleaning work with the chisel, let me. just take the other end so I can go right away and clean them up with a chisel, but I'm going to try to clean it up with a router, let's see.
I use the board to set the distance from the bit to the fence. You can also use the bulletin board and see that it's flush, so I think we're ready to go there and this is actually a little stressful because one slip and I have to start all over again, but essentially what I'm going to do. What I do is simply assemble the piece and clean it until I get to the corners. I'm still going to have to clean up the corners with a chisel, so that was a little stressful, not really the easiest cut to make.
I have to be very careful that the board doesn't pull and snag and just completely remove one of your tails, so I'm going to clean this up with the chisel now, okay, scratch that change of plans. I just decided to make a new one. back board because I didn't like the router idea at all. I didn't like making that cut so I just wanted to make a new board to see how I can chisel it right away after using the handsaws or band saw. I just want to start with this next. Part of it is to say that I only made two test pieces before making this third one that I actually filmed, so I say that for two reasons: one, don't judge me by what you're about to see and two, I just want people to tell me. judge.
I feel like even if something seems really intimidating to them, like dovetails, they tend to be intimidating, just go ahead and try it. This is the third dovetail I have made and I am sharing it with everyone in the world and I think it turned out pretty well in the end, if you are ever afraid to make something do it as this was only the third time I used a chisel to clean some dovetails. I have no right to give anyone any advice, so I'll link below to a video I watched that was really amazing. Cleaning these tails with the chisel was actually the longest part of the entire process.
It took me about 15 minutes to get it perfect, so the pins on the table saw took me about that. four minutes, the tails took me about two and a half minutes and then I was about a minute on the band saw, so it took me about seven to eight minutes to get to this point and then I spent 15 minutes cleaning it up, so I hope that with practice. I'll be able to reduce that number and then these dovetails would be super fast. Now, in the moment everyone has been waiting for, let's see how the joint fits together.
That was super satisfying, after a bit of sanding. Now it looks pretty good. Very good, the final result is quite impressive. I mean, it looks really good. This is just poplar. I'm not sure what I'm going to use as a material for the actual project, but it looks great and is super tight, super strong, very, very. I got excited about it so the pins were super easy to cut, the tails were a bit of a pain so I still had to do a lot of clean up work. I still had to use the chisels to try to get it to look perfect, so if you're looking for perfection, like machine-made perfection, the router is your best option, this is not your best option if you're looking for something that looks like a cut ten and it takes a lot less time, I think this is a pretty good option, there are definitely smaller jigs like this that take up a lot of space in the workshop so I know I could have tilted my blade at that angle and done a lot of things different like that, but not I'm always afraid that every time I tilt my blade I'm not doing it right, so if I have these jigs that are at the fixed angle, then I don't have to constantly worry about making sure my angles are right .
I know while I was putting it together, I was worried about getting the angles right, but that's a unique concern to worry about every time, so just weigh your options. These are really big templates and I also split them into two because of the space I have. my specific table saw and if I had the choice I would prefer to have it on one so one side is the tails and the other side is the pins which would take up a lot less space on the table in the first place. store. and it would also be easier to use, so overall this was a fun experiment, that's all it really was, so thanks for watching.
I hope you learned something. I hope you have tried something that you want to use with this template or not. I want to use this jig and again a big thank you to this week's Woodcraft sponsor, where I couldn't do what I do without them, so from their sled to the clamps to the chisels, they have it all, they have everything you need for
woodworking
, so go check out the link below and thank you all so much for watching. See you at the next one.If you have any copyright issue, please Contact