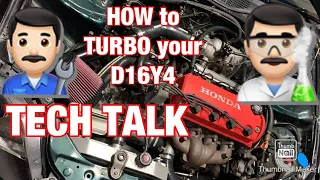
DIY VITARA BUILD D16 TURBO ENGINE - EK Civic Ep49
Jun 04, 2021Good morning youtube
turbo
tristan here welcome back to the channel today we are going to try tobuild
anengine
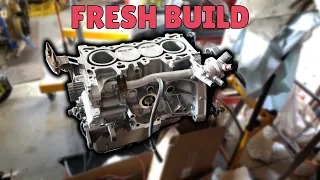
this is the very daunting task ofbuild
ing my firstengine
um I am not a mechanic I am not qualified I have never built an engine before so these are all my excuses , but I have most of the pieces to put it all together. I'm going to assemble the swivel assembly at the bottom end and attach the head as you'll see in this video. I've done a little work here and there over the last few weeks making little bits, so I'll add them to the mix and show you what I've done, which includes separating and filing the piston rings and assembling the rods. and the pistons um I already finished the head so you'll see I then cleaned the block it's all covered in oil right now because I've had it sitting for a few weeks I'm going to go ahead and use a flex gauge to measure the clearances of the bearings to make sure everything is good and then I'm going to put it all together.
Got my arp head bolts, bearings, pistons, rods, rings, head bolts all ready to go, valve trains ready to Go get the head gasket, got the intake gasket. You may have the wrong timing belt. I'm not sure I have the crankshaft rear main seal. I need to order a front camshaft seal. I forgot, so I'll get it. ready soon water pumps there I'm waiting for the oil pump to arrive so I can't put everything fully together until it's here we're going to build an engine okay youtube so I'm not sure what order I'm going to put everything in This is there but I have the rods of my Vitara pistons and everything is done.

More Interesting Facts About,
diy vitara build d16 turbo engine ek civic ep49...
I have separated all the rings and I just want to show you so that no one gets upset how I did it all, so there is the block, the block has already been polished. the guard is on as you can see it looks pretty good it fits like a glove so these are the pistons they are a cast piston that has then been machined they are much stronger than the factory ones nothing fancy they are Teflon coated, so they slide up and down the holes. These are the rods, so the rods are at least twice as thick in all directions.
Very pretty, solid and strong. I am very happy with the quality of them. They are the p2po d16
vitara
spec pistons that I don't use. I don't know what that means, they all have numbers on each side and I'm not sure if you can see it, so this says 201 and 201, so it all pairs up and I'm using those numbers one through four, so 201 202 203 204 for know which one goes in each cylinder, so I already separated all the rings, put them all on and assembled each piston and rod in anticipation of the bearings and everything that will come, so that's number four, so it goes in four, you can see here these arrows now on a normal honda engine, when honda assembles it, the arrows point towards cylinder one with the drive towards you, but the vatara pistons, for some reason, when they melted, the larger valve reliefs in the admission.
The side with the arrow is pointing towards the flywheel, so just remember to position the bearing caps so that they are pointing towards the front of the engine, so that the bearing caps are towards the exhaust and the arrow is facing towards the engine. the steering wheel. so I've already gone ahead and done four three two, I'm about to do number one, so I'm going to grab the tripod, these rings are already separated, so I'll show you how I did it, here's how it is. It's done, first you put the ring on the sleeve or on the cylinder.
I get a piston, push it down so it's nice and level. I feel like meters measure space. Now I've set the lower one to zero point zero twenty-one thousandths or however, you do that in American, that's equivalent to 0.533 of a millimeter in the metric measurement and then you take the top ring and you do the same thing there, you push the piston down and level it out. . Now, I have done this up to the 0.18 point, which is 0.457 of a millimeter and then the same measures that so that it slides freely up and down and doesn't snag.
Now we are going to place the wrist pin on the piston. You want to make sure this arrow is pointing towards the steering wheel. and on the rod, you want to make sure that these cuts here for the bearings are facing the exhaust, so run it through there and then you want to take this little circlip with your circlip pliers and fit it in there so there's a channel too small to fit in there, let's go and just give it a push and you can hear that click and that's all the way around, push the wrist pin back as far as you can to the other side, take the other circlip . and hold it there make sure it's definitely because you don't want this to come out come on that's such a satisfying clicking noise that's okay so that's it now it's time for the rings so now it's time for put on the rings so you take the oil scraper ring, put it on first and then there's one of these that goes on the bottom, there's no particular order with this, there we go and then there's another one of those very thin ones for the top , much easier to do without a camera. on your face, there you have it and then obviously you turn them so the slots on the rings don't line up.
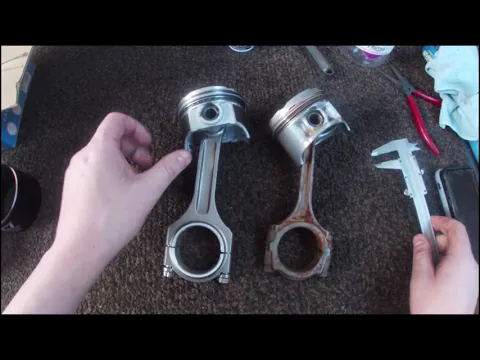
I always go to opposite sides just to be safe, so you take the bottom ring and put it on the arm, like this. so turn it and then push the ring up with the same stroke and then of course once you put them on the cylinders make sure the rings are facing opposite directions and that's the assembly of the pistons and the gaps between the rings, well done, comparison time because this is it. Filmed out of sequence, I just want to do a little comparison with the rods and pistons I'm using, so we'll start with the factory one, so the total thickness of the rod is about 15 millimeters now with the new one. one we are going to go up to 23.
So there is a pretty big difference there and in the width of the side we are at 15 and then this one, the original, is 11 millimeters, so really big differences in general, the rod is what is going to Be responsible for the force of the engine with the piston if you have a bad fit or bad fuel or too much boost and not enough fuel it will be damaged, but what you don't want is for a rod to heat up and bend and then send the piston out of the side of the block now I'm told this is the non-notched rod with a slightly extra length so the compression is slightly higher, it looks like it's a taller bee's dick, it's very hard to see on camera , but a little longer which will give us a stronger compression stroke but yes overall I am very happy with this just have to wait for the bearings to arrive and I can assemble the bottom end but this is the main reason why you want to build it. because these little things as thick as your pinky are no good, I have the Wiseco piston ring compression sleeve that will make things easier, but yes, there they are all numbered from one to four piston ring spaces correctly presented so the Internet can be happy with Yo, okay YouTube, so we go back to the shed and I'm finally tidying up my head.
As you can see I have all the cylinders ready with the bc valve springs and retainers so they are all there. I have replaced all the valve stem seals. I just have to do the last two and now I'll show you my technique. I bought one of these things, a small one, it was shit, I bought a big one, it was shit. the part of that first and then the one I showed you earlier in last week's video where it was a massive mistake and I couldn't get it to work so I'm going to show you my technique on how I make the valve. stem seals and valve springs, so like last time, take the bushing extension with a 16mm bushing, lay it over the edge, take the hammer or mallet, give it a whack and it comes right off, so get rid of the old spring and retainer, grab your trusty magnet and pick up the pieces always a little that flies somewhere else, there it is, so it's the tweezers.
I called them collars last time, but they are definitely called clamps. Take out the valve. Put it in there. Is there. Set it aside. The brutal pliers. I'm sorry if. It's a little dark, it's night, rip the old seal off the valve stem, take the new one first, what you want to do is give it a good clean, so don't forget to put this bad boy on it, this is like the retainer on the bottom , but you just use the standard ones, take the valve stem seal, not the stem cell stem seal, push that in, take your 10 or 11 mil bushing, wiggle it a little and then give it a gentle loving touch, like this It is now normally when I show it.
Guys, how I do something is a bit like a tutorial. I always tell them that I am not an expert, but I always try to share my knowledge or my exercises or my formula for doing things in this case. I don't recommend doing what I do, so don't do what Donnie doesn't do in this case, but I'm going to show you what I did and how I did it because as we figure out those tools I bought, it sucked. I know there is one that has a shape like that. He comes with two accessories. Everyone around the world uses them on their Hondas.
I should have bought that one first. I really didn't want to break the new retainers so my way of fixing it is. cable ties and a vice, so put some cable ties in there, tighten them in the vise, close them nice and tight, you can see you've compressed the spring quite a bit in there and then it's just a matter of sliding it in and at the Push it down, take your new retainer bc hit that bad boy, grab a pair of pliers, slide one on the top and one on the bottom and then I took the side cutters, give it a little cut one by one, all they come out nice and tight, you can double check the way it doesn't come out and then remove the zip ties, now come on the ones on the inside, these don't come out at all, always do a little test like that to make sure they are all seated properly , you can hear the valve.
Punching up and down perfectly normal, that's what happens anyway, 85,000 times a minute on each one for hours and hours straight, if you're on a track doing this it doesn't really hurt, it's anyway eraser. I have one more to do so I'm going to go ahead and do it which means we can finally finish the head and then move on to the block so what I have here are two sets of bearings the h and the hx so the standard. the spare ones and then the ones that are a little tighter. I have the thrust bearing so they are just standard and I have the main cap bearings.
I don't know what between this box and that box, but I have it all here. I have a flex meter so I did the YouTube certified crash course on how to do this so I'll fix it all up. I'll put the flexible meter here. I will do that. Pistons one and four first and then turn the crank and do two and three, measure them and then do the same with the big end of the crankshaft, but I'll have to clean it right now, it's just there in its old bearings. Without further ado, let's get stuck into this now, the reason I have two sets of bearings is because Cameron from Yama Racing recommended it.
Now I trust that guy, he's built millions of engines. He tells me that Honda at the factory mixes and matches. a lot of the bearings on it, it's possible that each individual rod or each individual main cap bearing has different tolerances on all of them and they just mix and match them at the factory and that's what you have, that's why I have two sets. First, I'll lay out the standard ones and do a measurement with the flex gauge to make sure they're all uniform and within spec, and hopefully they will be. If not, we will take the tightest ones and change them to the ones that are not tight. in the specs and then test again and then hopefully we can work it out so they're all even, so my non-notched rod and piston set is now a notched set, get this, it's the rods hitting the side of the sleeve, so now I have to separate them all and machine the side of the block a little further.
I wouldn't be me if I didn't have some trouble making notches in the block, which I've already done now. I cleaned it up, it's cleaner than ever so take a look at this, this is the work of notching there so I had to polish all the way back on each end, it's smooth to the touch there are no rough edges and they're all The bottom of these is pretty much even and wide oval, so when the rod swings it doesn't hit, so you're all set. I'm going to start putting it together and hope I don't have any more problems, but yesterday.
Plasti gauge or flexi gauge all bearings all clearances I only had to change one, which is one of the main bearings of the jack, which was a little, sorry, it was a little loose, so I changed it for a different bearing, of Otherwise, everything else looks pretty much the same, yes, I hope I don't have any more problems. The reason I didn't show you the process and all that is because there are already a million videos on YouTube. I just realized it's probably going to be a little dark because the light was behind me, here's my face.
I'm going to put this in a time lapse.and put it all back together, fingers crossed, like that, like that, okay, problem number 347, uh, look here and here, so now we have the bigger cranks and everything there. I have cleaned each cylinder so it doesn't knock when it spins, but now we have a problem with this thing, the girdle, whatever you want to call it, look right here when I crank the engine every way beautiful and bang just here and here and then back again on the other side beautiful bang now this is not such a big drama I just have to undo all that I only told you about the first configuration and I was about to do the second round and cut them all, I'm going to just undo all this, remove this , give it a good polish both there and there, hopefully that won't affect the strength of this thing, you shouldn't take this thing out, take the bearings out, grind it, clean it, wash it, put it back. three, okay, so the cleaning is done.
I bought every single one of them even though I only hit these two. I made these holes bigger. It was very fine casting there, so it wasn't my intention, but it was just bought. So I made them both bigger, cleaned up the other side and also got rid of that lip there to make it a smooth transition and now to finally put it back together, okay, now the bottom end is finally all together, as you can see. it spins pretty well it doesn't catch on anything and the way you have to do this you have to test everything is a suction test so the compression touches my hand and then it sucks on the arm perfect so it's okay youtube it's the next day the engine. he's armed, which you would have seen in the time lapse.
I had some problems like the clearance of the sash or the main cap part at the bottom when I started the engine cylinders two and three were hitting that so I have cleared all four on both sides in case the Heat or anything causes the metal to expand, so it's all clear, it's all done. I talked with my head down and texted a friend of mine, Michael McGuire, who builds these engines like they are. it's going out of style, specifically the D series, it has a drag car that should be very very fast, it's very angry, so I got some expert advice from some people.
I didn't follow the specifications on the head gasket sheet or any of the other recommendations. I came from people I know who have experience with this kind of thing, so fingers crossed, it's very stressful building an engine for the first time. I would compare it to being a parent because when you are a parent and you know you make a child you really don't have any control over what happens next so you know in the delivery room what could go wrong you can't do anything you're helpless and I'll pass it on to building an engine because I've done my best, I've put it all together and we'll see what happens when it turns on, whether it will come to life or not and whether it will work, whether it will work perfectly and you know, it will be everything you wanted. so it will be, I hope I get it with my engine and it just runs and does everything it's supposed to do.
I still have to put the rear main seal on. I have it, but I'll do it when the oil pump is off the bracket, I'm waiting for there to be an additional video where I have a high flow or, you know, increase the oil pump pressure, people have a lot of success with that and I've seen it done many times, so I'll move on to that. I have to order a cam seal and a front main seal, but I'll do that later. I'll probably paint the block once it's all together. I have to take this to trick the factory and have them weld a plug in there.
I'm not going to drill one into this one. This one looks off the car and I have time, I'll weld a proper one on there, the reason it took me so long because I was using a cordless drill and a carbide milling cutter to drill the bottom of the cylinders so the rods would be clear and also to clean things in the belt, so I kept discharging the batteries and having to wait to charge them, so it took me days now that I built a motor. I'm sure you could build virtually any engine. I'll be more confident once this one runs, drives, and makes power, but the rods and piston bring it all together.
That looks good, it spins good, it's nice and free, so fingers crossed it should work fine. The reason I didn't do a step by step on how to build an engine because I have never built one before, next time I do it, I can definitely do it. make an instructable because I will have some experience under my belt with this engine. I was really just watching other people build engines and getting their advice and doing it that way. I really have no place telling anyone how to build something if I've never done it before, which is why I didn't make a tutorial, which is why most of this video will be in time lapse.
You'll be able to see what I did wrong and all the times I stop and scratch my head and you know, worry and get nervous but it'll all be there but the big D series is ready to fly now so hopefully we can increase this from 14 psi to 20 25, maybe even 30 and start doing. I'm thinking some serious power because it's a track car. You could leave it around 18 psi and then have a switch with an electronic boost controller on the straightaways. You could give it a twist to say 30 as a boost mix like before. what to do in the old days to be able to overtake cars on the straight and then get back to a more manageable boost because I don't have an LSD or a gearbox built yet so by turning the power on and off in the corners I could have the raise the boost lower maybe even 15 or 16 psi and then move it to 25 or something on the straight so that should be interesting and I can do the same on the street I'm driving on leave it at low boost If I'm If I have a race, then I can hit the switch, see you later, but that brings us to the end of this video.
Sorry it's taken so long to send you one, but I wanted to make sure I had all the parts. Everything was big here. thanks to the yammer racing cam he helped me with a million questions i was probably brainstorming him and michael mcguire as well as two local guys who helped me but yeah guys proud dad moment i built myself a motor , just remember to do. Be sure to check out the Patreon page if you can sign up and become a Patreon. The more we get, the more things we can do, the bigger the channel grows, don't forget to subscribe and give it a boost in the next episode.
If you have any copyright issue, please Contact