DIY Staircase Makeover With DIY LED Lighting // Renovation
Jun 02, 2021Alright, we tear off the carpet and pad. The next step is to clean the pad and then tear off a bunch of fillets. We have a new clean slate. Okay, I'm going to do the risers and the treads. For the risers myself, I'm actually going to use half inch plywood. The reason I chose to use plywood on these front risers is that you can't see the edges anywhere where the tread overlaps and overlaps, and you can't see it at the end, they'll just be painted white, so what this is the perfect material, usually pine or oak, or if you're doing something like that, but our treads will be stained and painted to attach them to the front of the risers, I cut them a little shorter height-wise and I'm raising them up flush with the top, the tread will sit here and overlap this and then I fixed it in place so that each
staircase
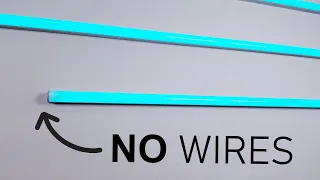
will have LED strip lights at the bottom of the overhang and what we need to do is create a groove or slot, let me use my stack of slots on the table saw, that's the width of the tape, so the LED tape is about a third of an inch, so for that I'm going to aim my stack of dice and cut a slot in each rung of the ladder.
I just made a test cut on this piece of poplar with my die, so here are my LED strip lights and there they go. how it's going to look, probably with I don't know hot glue or ca glue they'll embed themselves in the stair tread like this, so I'm going to go ahead and do it on the actual pieces, good for this project. This guy came up with the idea of LEDs, so I said, "Well, you have to help me with this." This is my friend John Mark, he's going to talk a little bit about the system for the LEDs that we have here, yeah, so the first thing we did.

More Interesting Facts About,
diy staircase makeover with diy led lighting renovation...
What we did was find a really great turnkey package, that has all the components that you need, it has the power supply, it has a little dimmer to control the intensity and then it also has the right amount of LED tape footage that we used. I need all the steps, yeah, which was 60 feet, I think so, around that, because each step is three feet and we want to make sure it's fully lit, so the tape comes in rolls like this, you saw us put it in. We saw it before and it can be cut to any length we want, so that was very important for this project.

The other element is that since we had to put the controller down, we used a thermostat wire, so this is an 18 gauge two conductor thermostat wire and that's it. What is recommended for this LED load, yes low voltage, yes it is all low voltage stuff at 12 volts. You can't really get hurt too much with that, but we want to make sure everything is safe and secure, so if anyone else was investigating. They wouldn't get hurt by that, so the only problem we ran into was the original design we had set up to have a light photo sensor in the air deck of the floor, this little light sensor we installed inside the air ducts , but unfortunately there wasn't enough light down there to activate this when it was daytime, so it just didn't work at all, so we ended up rewiring and used a different approach.

Andy found this really great product, it's from GE and it's a remote switch. light sensor and everything wireless, no cables, runs on battery, so what I did was place it in the window that faces east, where the sun rises, so that it receives the most light as quickly as possible in the morning and I think that's important because if I put it on the other side of the house, the lights will be on until 11 in the morning, all parts available, so it's very easy to do. If you have to do any electrical work, ask some people about it.
We are not electricians, in our state we are allowed to do this work in our own homes, so we have done things in the past, yes, yes, we talked to some electricians about how to do everything, yes, but this is ready to use. Things are really cool though because everything is plug and play, yeah, so it's great that we have products like this. They will be below in the description, you can find access to them. Everything I bought was on Amazon, so yeah, be sure to check them out. If you are interested, that's fine, we have cut everything to the final dimensions.
We have the die on the back. I have the die right here where the cables are going to go through the last two things to do to get them ready. put a round on the edge on both the top and bottom sides and then do a final sanding with the poly orbital spray sander and these things will be ready to go oh hey man don't those LEDs look so good? That's incredible, a big scream. Thanks to John Mark for helping me design and SP really spearheaded the installation of these LEDs. He really changed the entire final product.
We concluded that we didn't need to stain them, so these stair treads are solid ash wood and poly-coated. you can see how good they look. One thing I would do differently is that I have had a little trouble matching up the seams. You would put the treads in first and then you would put in the risers and what that would do is they would still be there. There would be a seam there, but it would be a lot less visible, so what I did was get it as close as possible and then I reapplied some caulk to match the paint and it turned out really good, so I think that concludes this. project, thank you so much for watching, make sure to hit the like button and subscribe and if this inspired you to do something or a project of your own or do something different, let me know in the comments.
I would love to hear from you. I'll see you next time to build something in my shop.
If you have any copyright issue, please Contact