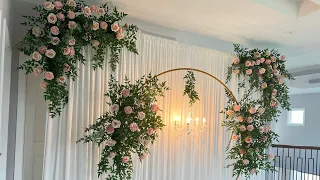
DIY Dollar Tree Crystal Garland Chandelier Wedding Centerpiece
Feb 27, 2020Hello guys, welcome back to my channel. I'm very happy to have you back in today's video. I'm going to show you how to create this DIY Dollar Tree Crystal Candelabra Wedding Centerpiece that you won't want to miss, stay tuned and watch me put it together. this beautiful masterpiece too, don't forget to subscribe to this channel, don't forget to like this video and don't forget to share it with a friend if you are looking to buy any of the items I mentioned in this video, don't forget to register on Ebates where you can Get cash bags for all the items you purchase and also get discounts on all your purchases.

The link is in the description below this video. This is practically sold out. Before we go ahead and add the second cutting board on top of the
chandelier
, as you can see here, these are the personal comments. I'm going to go ahead and make thecrystal
s on top of the cutting board using my 6000 glue, so far I have about 24crystal
garland
s 24 and if you want to know exactly how many little glass crystals I have in each variety, I have about 24, so 24 glass gardens and it's about 24 glass beads and each strand, so I tell you to glue it towards the tip of the cutting board you don't want to do it all the way to the middle you want to do it to the tip leave some spaces in the middle now I'm going I'm going to go ahead and show you a nice little trick that I'm going to do put together this whole personal garment under thechandelier
like this, so I'm going to show you a little trick, it's super quick, it's super easy, so I'm going to go ahead and use this yarn fishing invisible.
More Interesting Facts About,
diy dollar tree crystal garland chandelier wedding centerpiece...
It is very clear that it cannot be done. Even see it and if super super clear it's super invisible, then we're going to go ahead and take that, you need to take the tip, you're going to pass it through the little hole through the little glass bead, not through the ring but through from the small hole of the glass bead, you are going to do that process for all the beads, you are going to pass the fishing line through all the times together, so pay close attention to how I do it, so I cut the strings to you just take the tool you take the two of the invisible fishing line you put it like this and that's how it turned out 11 you want when you put it in to get when you put it together you tie it around the chandelier very tightly look how easy it was that's a little tedious but not too tedious no you have to worry about it breaking we're going to tie it around the chandeliers in many knots the beauty of opposites no one will know you use a fishing line to keep all your crystals standing As you see it now, as you can see, I left some of the little showers and the bottom of this, as you can see, hanging down and the reason I left those little rings, so you want to make sure when you're separating your
garland
. you want to make sure that at the end of the garlands you want to make sure that you have your rings hanging like this because what we're going to do is use the crystal, the rest of your crystal garlands that you had left over. we're going to use it to hang it on the ring of the little hanging ring and it's going to hang like this and this is how it's going to hang, you're going to take it of course you want to measure it because you want to touch it. the plate, so I'll tell you exactly how many of those crystals you're going to need, so there should be about 24 of those little crystal rings from your garland hanging, so you're going to go ahead and you're going to connect it through it, look , as you can see, I went ahead and connected my little rain through the garland and it was going to hang like this, so you're going to leave about one, two, three, four, five, six, seven. eight of the little crystals to go down and hang a little leaf like you see here and they're just going to add the little crystals around it through the hooks, okay guys, as you can see, I'm done placing the burning crystal on the bottom, like this you will need eight of the crystals to hang it through the loop like I showed you before so you can have it here.
It usually looks absolutely amazing. You like it. The result surprises me. All you need is just a little patience and all honesty you guys, the whole fishing rod idea, we're using this invisible fishing line. I literally got that idea while I was recording this video and literally because my original plan was to use my Este. six thousand glue to stick each of the crystals under that chandelier you see here but it didn't work and it was too tedious. I think this was going to be too much. Who decides to create this
centerpiece
and me? I wanted to make it as easy as possible for you, so I came up with the idea of using the invisible fishing line to thread it through the little holes and then tie it around the candle holder so it faces away. right now and it looks absolutely amazing guys so it takes a lot of patience but you'll get through it just fine so comment below and let me know what you think about using the fishing rod idea if you think it's a good one idea. idea and let me know your thoughts and let me know your thoughts too on the result.
The only thing to really spend money on is crystals and crystals are totally up to you. Whoever you want, you can use glass crystals like me. or you can use acrylic crystals. It is completely up to you based on your preference on the type of crystals you want to use. So what do you think? Let me know, comment below. I wanted to add some microphones to it. Comment below and let me know. I know if I should add some push lights. Can I turn on my chandelier? Let me know what you think was a little complicated.
I don't understand it, but I'm very happy that I achieved it and then I'm very happy. in the result and how the you turned out
If you have any copyright issue, please Contact