Day 1 Dialux evo Training - Managers Office 1
Jun 06, 2021Good night all. I would like to create a short video on how to create this room. This is based on our first
training
appointment, where we will create an administrator screen from the basics in evil dialogs and we will not import any drawings or any CAD files. but we're going to do it in all the evil tram dialogues, so let's start and do it now, open my Evo software dialogues and then we'll move on to planning exteriors and buildings. This is a very short video just for your summary of how we did it because the video we have in ourtraining
is very blurry and my voice is also not clear so I decided to create this one.
This is now Evo's dialog screen and we will create our room based on these help lines. I hope you search. for this tab and see all the options for each tab from horizontal to vertical here, for example, in construction you will have many options here and for light, another one here, calculation objects and for export in manufacturing, so let's go to do it now. So we start with these help lines and labeling. I told you to create a 4 by 5 space, so we'll use this drawing reference line to create that one, just click on that one and then place a line or drag your mouse down and then save 5 meters. and you will see that the 5 meters will have feel and make it 1 right so zoom out or expand you will have your 5 meters and then on the other side create a man again and say it is 4 meters and then say 1 again if you believe 2 or 3 for example, you will see that I created three lines here, so since I want to create just one line, although we will create around them, just place one, so now this is our room for a 4x5 manager's
office
, just drag it there. also the other one, okay, now we have our four by five room, so from here we will go to our first stop, which is the side tab, and then we will create our terrain or ground where the building will be built, so let's select this. rectangular floor element just place it outside of these reference lines and then if you go to the 3D view, you'll see now that you have your terrain.
More Interesting Facts About,
day 1 dialux evo training managers office 1...
If you have a site plan, you can follow that side plan, but for now let's just make it square. area and then after posting your terrain go to the plan view again and set your building by clicking on this to draw a new building so click on this and then click on each point on your reference line and then close for the weapon, right click and close the polygon. If you want to know the thickness of your wall, you can use this again and set another reference line, but in our training I didn't ask you to do that because I just told you to create a wall, but for this one I want to do it correctly, so let's go to establish a new line and sometimes the thickness of the wall is the pen point or the 15 point, it depends if it is an exterior wall, then the 15 point or the 10 meter point or 1570 and 2020 is useful, so just let's do a use a 15 meter point here or 15 20 and then make it negative to go back to that previous even line so if you put negative here it will go to the other side and then another draw another reference line here and again save 2015 and then put one and then another here, let's imagine this side is now on the inside side up to point 10, then make it one and on the other side let's split into its side two, point one and then a piece, so let's make it negative. towards the inside of the line, so let's imagine that these two sides are the outer wall and these two sides are the inner walls, so after setting the thickness of the wall, let's now go and select this third tab, this is now your new and this is no, it's going to be your interior wall, so let's click on this new to draw a new interior outline and then click on each point, then click here and then right click to close the polygon if you made a error and you want to organize this, press escape. to delete your command and then click on it again so you can adjust the wall points correctly.

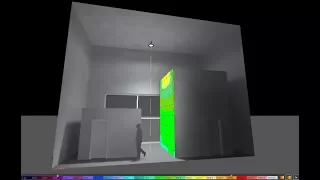
Well, whenever you want to delete your command, just press Escape. Now to a certain extent you see you have your room and then I told you to do it. just use ceiling height 22.8 this is a default value of evil dialogs so our goal is to create a room like this so you need to place light furniture calculation surfaces then render and then create a wall like this , so okay now we set now our room so if you go to the side tab you will see that you will have your last black area and also the building and if you go to the building tab you will only see the building without land if you go to On the story, you can rotate your room or your building and you can see the view of your steps open and if you go to the room you will have three open views and then from the ceiling of the floor or to add everything to all sides of the walls, let's go.

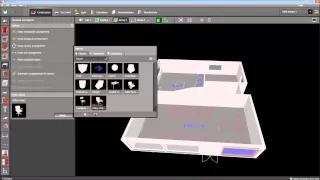
Go back to the plan view and make sure you're on the history tab because now we're going to place our objects so if you place if you want to place your objects go to the objects tab here if you hover you'll see what these tabs mean or the names of the Cubs and from there you will see that they are furniture and objects, click on that and then press select and then if you select and press select you will have many options here here I saved many objects from my previous projects and if you want, for example, you have your favorite objects, you can right click on that object's tab and then say favorite so it goes to your favorite.
They have four favorite objects here and then if you have your folders, it has different objects, you can also upload it here so that every time you need it it will be easy for you to access it, so our goal is to create a room with the table stand that take care of our light fixture and also these cabinets in the back of the manager.
office
so let's go and select those tables and chairs so now I selected the table so once you've selected it here okay so let's go back to the catalogs in case you don't have it in your favorites if you come back the catalogs this catalog tab and then press like double click on the object tab and go to the office furniture click on the down arrow and then you will have a selection of tables, chairs and you will also have the accelerated exhalation and if you want to go back just click on the top tab here and then some workbenches, so let's select all the papers and find our favorite table for the manager, which is this one, then say apply, make sure to click apply once you've done click apply the object will go to this puppy and this is now ready to go so just click here place individual objects and then click on your room go to 3d and now you will have yourmanagers
tables so go back to the plan view and then rotate it and then move, you can also scare your tables to see examples. so right click and then click on the scale and if you want to make it a little bit wider you can also do that and then do another right again to move it so go to 3d and see if your steps are happy or satisfied with the result . go back to the plan view and then go and select our wire chair actually this sub will be minimized so it will be on the bottom tab and then just click on it and it will go back to your selection so let's go down select a chair. click on the chair tab of your option and then you will select for example this swivel chair number three and then click on apply and now you are ready to use and then click here go to the 3d and see how it will rotate for your mouse. front view and then go to the plan view again and then right click on your object and then say go grab like this okay so the admin table should have chairs here in front of it so let's go back to the object and select another one. chair for the front table, so I'll select this cantilever chair and then click Apply.Now it's ready to use, so I'm going to use this drawing line arrangement. If I click on this in one shot, I can place objects in a single shot with different numbers, like this, the default is always three, so I can change it here to two and I can move it here like this and then you can edit it or rotate it individually, so for example, I want to rotate it or I'll do it here. like this or I'll do it manually here just select a chair and then right click and rotate it and then select again and move it a little bit, rotate it to the paper and now you'll have your chairs and tables so let's check now that we have chairs and tables. now we're going to select again a sofa and a side table or a dresser, so let's go back to our dialogs, go back to our object collection and then go to the objects and maybe it's in the home furniture, so select, Click the arrow and go to for a promoted piece of furniture and then select a sofa similar to that.
I think one if I'm not mistaken it emits one two three so it's a three so far LC two three height and then I apply it and now it's ready to use here go to the plan view and then place it and then rotate it and then right click and move it to the corner go to the 3d view again and see okay now it looks good go to the plan view again and let's select our side table or coffee table so click on the tab the table and select the table you want. I prefer to use this, say this Barcelona, load tables, click apply and then put the individual objects tab back and then click on your screen, it's a little bit bigger, so let's adjust the size of this Barcelona in two steps eight point six five point six you can type it or you can adjust it here by right clicking and then scale so if you have an accurate dimension you can place it here so let's go over the treaty and then it looks perfect let's do it a little bit more low and let's say point four, there you have to save it and now we have our complete furniture, but wait, we need one more here.
Cabot behind the manager's chair, so let's go back to the plan view and select this. furniture if this is from office furniture and I think it's from auxiliary aids and storage and go and select it's a sliding door okay then click apply and then place it here so I'm going to do it in a drawn line arrangement how are you doing. I'll already have three or individual ones, so if I select the arrangement of the lines I can rotate them like this, see in your 3D system, it becomes like this to review, yes, it's continuous, so let's go back and arrange this one correctly.
Eliminate the individual. selecting it and press the lift and then click on it, right click and then move, select the corner so you can grab it easily and then select one, move it too and since this little one is a little big, you can scale this cabinet for strength size one meter let's make it a point two and then move it here again a point two. I'm changing the length of the cabinets now and this is also a point two if it's not okay because there's a gap just right click on this one and say scale and then move it like this let's go to town and see and now it looks perfect , go to the room, you can see all the views, yes, it feels good and let's check so that the cabinet also has brown color, so let's change.
This one is similar to those chairs or the sofa, so I'm going to go to the materials, press the materials tab, then select this, choose the material because you want to copy the material available now to your 3D, so select the materials, click this one and then just drag. and-drop if you have the same color for your tables and cabinets
If you have any copyright issue, please Contact