Creating amazingly realistic miniature rocks easy using a no-cost material
Apr 08, 2024in this video we will create these unmolded uncarved rock sides
using
a freematerial
hello and welcome to this video in which we will create rock sides for your model railroad or diorama or whatever you are building actually the advantages with the method. as mentioned in the introduction, it is not carved out of styrofoam, there are no molds involved and thematerial
we are going to use is free ofcost
, so it is not even lowcost
, no cost, yes, and it all started in July. He was contacted by a guy named Eric. He was on vacation here in Sweden and asked me.
Hey, can I stop by? I just said hello and said yes, of course, why not. It sounds like a great idea when it once appeared here. He gave me some photos of his model railroad of him and uh, the side of the rock looked, it looked amazing and I said, hey, how did you make them? and they said, well, I like all your videos and I want you to know, do like you do. collect materials from nature and build my model railroad
using
that, but well, I live in New York City and access to said materials is somewhat limited, but when it came out, one day he looked at this, there was a lot of it and started collecting and from that he built the mountains.
More Interesting Facts About,
creating amazingly realistic miniature rocks easy using a no cost material...
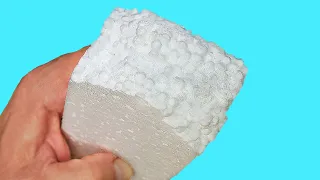
What it is. Look here. The base material we will use to create this side of the rock is bark, which is usually used to cover flower bed grounds around hotels. urban environments and so on a playground and I picked up some pieces of this bark and they look like this. The first thing we are going to do is cut them to get two halves that can easily be placed on a flat surface and The good thing is that you get twice as many rock sides with the same amount of pieces and here they are now okay, so they will be assembled into my test wall.

Here I crashed a camera on this rock side, so it has to be prepared to do that, I covered it with toilet tissues that have been soaked in Elmer's construction glue and water. When I'm attaching items like these pieces of bark to the side of the rock, I use a flexible type of construction glue, it's polymer based, so you just press the sides of the rock into that and they'll be tight, you don't have to hold it straight. no way. I also use it to pin tracks to the trackpad. It's a very good material, so now I have all the rock pieces in place.

It's time to plaster the surface so the rock pieces blend together. To do this, we use plaster or plaster of Paris. This is the same material, about half the cost or less compared to what manufacturers offer on the market as landscape plaster. How to mix this. Well below we start with the portion of water that is one part and then we spray one and a half parts of this plaster of paris. The trick here is to continue spreading or spraying this powder in the water until dry white islands of the white powder are formed. that happens, what you see here is an island sticking out, but as we get closer to the part and a half with the plaster, we will see that we are left with islands of white and then the proportions are correct, let it sit now. for a minute and then we'll mix this for another minute before we start applying this now when I apply it on the side of a rock or a mountain like this, I normally use a brush, this is a wide round brush and we have about five minutes to complete the plastering before the plaster of paris hardens, making it a quick process.
The good thing is that we can continue with the painting pretty quickly. To do this, I am using acrylic paint, the base paint is titanium white, which I mix with a portion of burnt umber, this will result in a very light brown color, almost like milk chocolate, and we don't want that, so that we must add a drop of black to the mixture and that's it, then we have a natural warm gray color. All we have to do then is mix a thinner, this thinner in this bottle is homemade, it is one part isopropanol alcohol and nine ports of tap water and with this I am painting the entire side of the rock and the mountain, including the pieces of bark and when dry.
It looks like this, it looks a little shiny on top, but that's because the paint I'm using is not matte, it's satin. Now we will create the color variations on the surface. The first paint is a Vallejo flat earth color. This is something similar. to raw amber brown and I'm just applying it randomly over the surface when I move on to the next color which is burnt amber brown this one has a bit more of a reddish tone and the same I'm applying this using a soft brush randomly over the surface to get this variation color.
It looks a little worrying at this point, but there's no need to worry now to add contrast on this surface. We're also going to apply a black wash. This black wash is created using black. one part acrylic paint and nine parts water, then I add isopropanol to this mixture, which reduces the tension of the water and makes the paint the resulting wash, the paint will flow better over the surface, a good idea is to hold a piece of toilet paper under the area. you are painting this way you avoid getting too many stains of this black wash on your floor carpet the black wash covers the entire surface then let it dry now we are going to paint the last layer of this support on the inside and that is a method called dry brush, we're going to use white acrylic paint, so I'm pouring a drop into this mixing bowl here and moistening a soft round brush, then wiping most of it on a piece of paper next to it and a small amount of white still on that The brush will color the raised, protruding pieces of rock and this will enhance the outline of those objects.
This is a very important part of the process because it really enhances the look of these. sides of the rock, when you are happy with the result, let this dry properly because next we will add static grass. The glue I'm using is pva glue so nothing special here. I have actually never seen any difference between static grass glue and pva which is equivalent to elmer construction glue for you guys in the US, the grass I am applying here is a 2.5 millimeter medium green grass and I'm using a static grass applicator. If you don't have an applicator you can use grass like Well it works well and after that it's just adding bushes and trees based on your preference this depends a little bit on where the
rocks
are located and this is the end result.Yes, I must say I was surprised at how
easy
the process and quantity was. of area you can cover quickly using this barking method, so it's a fantastic contribution from Eric there in New York. Okay, that's a fantastic method. I was stunned and now I also presented it here in my design, you know, and like the material is already there. You don't have to shape, carve or do anything, you simply glue or assemble these pieces into place. The method is actually very fast. You can cover a lot of peroxides using this quite quickly and as shown in the picture.In the tutorial you paint everything at once, so you don't have to play a lot with all the details, it's something quick and this crust. At first I thought it might be a fragile and very absorbent material to work with, but. no, it's actually pretty
easy
and straightforward, so yeah, I really like this. From now on there will be more bark in my design. Yeah, did you know that this channel is supported by guys like Eric who are sponsors and support the channel monthly? So if you want to be one of the good channel supporters, think of this as magazine subscriptions because a niche interest like the YouTube paywall transportation model will never really work, it works well for cooking or fashion or something like that. that music with millions and millions of views, but for a channel like this I need support, so if you want to be one of the good ones, get over the patreon, set up a support account of you know, like one, two dollars a month or make a One Time Donation using the PayPal dialog found in the video description below and if you are not already a subscriber to the channel, please subscribe and enable that little bell and you will receive a notification once the next video is published until that happens.If you have any copyright issue, please Contact