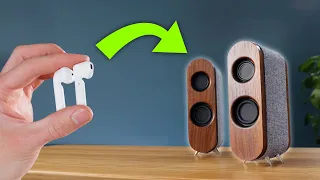
Building EXCEPTIONAL speakers using MODERN TECHNIQUES
Apr 16, 2024Building homemade
speakers
that compare favorably to manufactured units that have all sorts of built-in digital signal processors, precisely tuned ports, and computer-calculated internal air volumes is difficult, simple boxes will no longer suffice, however, 3D printers they could do it. It helps here its ability to make complex shapes with millimeter precision is perfect for making computer aided designs but there is a slight problem with thin extruded plastic, it is not as good acoustically as it has little mass, vibrates and resonates easily which is terrible for sound. quality If this basic enclosure, for example, is measured with a calibrated microphone, we can see that this resonance appears in the range of 100 to 500 Hertz and presents itself as a distortion.
Making the chamber walls thicker would of course help here, but it would require a lot of filament and takes days to actually print, however, what if we printed just a hollow shell and then used it as a mold? Instead of doing it this way, you get faster print times as the filament only has to be deposited into the casing, leaving a large internal space for a filler material, a cheap and readily available option for this filler material. is, of course, plaster of Paris, which can be added to water to make a hardening paste. It has a problem for solid applications, although it is a very brittle material.

More Interesting Facts About,
building exceptional speakers using modern techniques...
It has a teacup sound, it has the potential to sound worse than plastic alone, but there is a way to fix this by adding PVA glue during the mixing process, which changes this quality completely and the difference between the two. It's day and night. The PVA edition creates a microscopic level of flexibility that reduces its brittle nature and makes it behave like a much duller sounding material, perfect for use in our 3D printed mold which, once dry, is much more solid than our earlier version. These new thick chamber walls reduce the 100 to 500 Hertz distortion significantly, which is great, but as the cabinet is much more rigid there is now a new problem dealing with the internal reflections seen when a speaker driver It moves back and forth, sending sound waves not only towards the listener but also backwards.

The cabinet, an ideal cabinet, is supposed to prevent these sound waves from escaping, which is a solid cabinet now doing a decent job, but since these sound waves have nowhere to go, they bounce around and eventually hit the back of the speaker driver again, coloring its output due to time delay, this is not ideal, but adding soft materials to the inside of the cabinet is a good way to dampen these reflections. Here I go with some soft automotive acoustic pants followed by a folded layer of cotton towel and then Some sheep's wool which will act together to prevent sound waves from being reflected and overall compared to our fin enclosure original, we have gone from this to this.

More improvements can be made
using
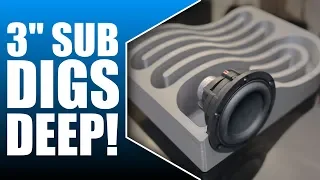
higher quality drivers which we will dive into. later, but essentially this forming technique has made 3D printing a viable option for high fidelity sound quality, which is really exciting because we can now use its ability to create complex shapes to our advantage and an area in particular person who will benefit a lot from this. are the subwoofer frequencies you see, if we replace the cabinet with a long tube it will keep the rear sound waves contained only until they come out the other end because the time this takes, it essentially delays the audibility of these rear sound waves making it enough. so that they become additive rather than subtractive from the forward sound waves of the driver, making much greater use of the power of the speaker, a remarkable subwoofer that has become something of a legend in this setup, mainly thanks to its Fellow YouTuber hexibase, this three-inch unit from the Tang band, despite its tiny eyes, should go down to the low 40 Hertz range, which is crazy for such a small driver.Calculating the dimensions required for this to be done correctly can be done with software called horn resp which can plot the expected response allowing To obtain two key measurements, the length of the tube and its cross-sectional area, the length of 1.4 meters needed for this is quite long, so it can be folded to make it more compact and be able to print it with the 3D printer again in an effort to reduce printing times. I am making this design completely hollow with the aim of filling it with our special mixture of PVA and plaster of Paris, since it is approaching 60 centimeters in height it needs to be divided into three. individual sections so that it can be printed with the widest variety of printers and as you can see I have included a sealed enclosure on top of everything for a dedicated midtone driver as the subwoofer is not very good at reproducing these tones.
All of this with plaster of paris can be done through a hole in the top, although it needs to be tapped repeatedly to ensure no air pockets remain. It makes thick walls around the subwoofer port and midrange chamber and makes the The unit is extremely heavy for its size, but it feels high quality and very solid during testing, although I found that the subwoofer notes, although extremely deep, they were not as strong as I would like. Now that it's me, I'm still not satisfied with this. I want to take this design as far as possible to make it the ultimate 3D printed speaker and to do this my conclusion is to add another subwoofer driver, this doubles the surface area the base will provide and should hopefully solve the problem. but it comes with its own challenges, namely that not only do we need to find space for the controller itself, but also the port has to literally double its dimensional volume and if I want this to remain the same size, it will be a huge challenge. but to be honest, the solution is annoyingly obvious, you see, in an effort to have enough space for the plaster of paris to form solid bounding walls throughout the speaker, including those surrounding the subwoofers.
Port. I forgot to ask myself if they were all necessary. See, the purpose of this subwoofer tube is to redirect energy, not contain it, since the end is open. Your walls really don't have to be as thick as I made them because they don't have to hold any energy, just run it with this in mind for the second try. I've decided to completely eliminate the need for plaster of paris for the subwoofer port and instead opted for four millimeter 3D printed boundaries, saving enough space for the now much wider and longer one. The downside to Port is that it consumes twice as much filament and takes twice as long to print compared to the original, so let's hope it's worth it, so a few days of printing later we'll have everything printed ready to assemble.
Now this is a relatively simple process because of the way it's designed and divided, but we do need some glue. Now this isn't structural at all, it's just to form an airtight seal between the different layers, so let's get to that. after a nordvpn ad with nordvpn you typically get the world's fastest VPN, but it also includes threat protection that protects you from malware trackers and potentially malicious ads. This works at a connection level rather than just within a browser making it effective and secure, they also offer a data breach scanner which will tell you if your credit card details, passwords or email addresses have been compromised. appeared in a data breach, which is essential for keeping your online account secure, of course, this is all in addition to your main VPN service, which can provide you with an encrypted pathway through which you can route all your data, adding another layer of protection against unscrupulous actors.
One of the best things about nordvpn is that it also gives you the option to look like you are browsing the internet from anywhere in the world. world which I find particularly useful for researching and finding unusual components for my products in different countries. It's actually quite remarkable how much localization affects search results these days. If all this sounds good to you, visit nordvpn.com diyperks VPN to sign up with a special offer, it's risk-free with a 30-day money back guarantee, so again, that's nordvpn.com DIY VPN advantages now is the time to start gluing, as you can see that the biggest change from the original design is how it was divided for the printing process.
With smaller individual parts instead of three large ones, this has been done to reduce the chance of print failures if they come off the build plate before completion. However, if you want to print a set of these yourself, keep in mind that it is still important to clean them. the build plate and apply some school glue for better adhesion once everything is printed correctly, build platforms 1 and 2 can be glued together first
using
a couple of H-clips to make sure they are tight As you can see, the glue has a tendency to squish all over the place, but it's easy enough to wipe off any excess.You've probably noticed that these pieces have many small discs. They are actually centering guides that line up with the pieces below, making them easy to position. Precisely here I am adding the bottom part of the subwoofer chamber and if we turn it over we can see that there are four holes underneath, these offer self-tapping screws of two millimeters in diameter that allow us to hold the pieces from here inside. Air guides can now be added starting with piece A, this just needs a thin bead of glue along the bottom as well as any vertical seams it touches.
The guides help a lot in positioning them correctly, after which the screws take over. It is important to ensure proper glue. Here for a tight seam considering that any spills can be easily cleaned. This process should continue with all the internal air guides that complete the tuning port of the subwoofer, allowing us to move into the midrange chamber, as you can see. This is the only section that has retained the hollow forming technique, as it has proven to be very effective for the use of midtones. For a nice, strong length, this final deck can get additional support from the subwoofer output port which, as you can see, has a wiring guide in.
In the top half there are a total of four pairs of cables that need to be run through. this: one pair for the upper chamber, one pair for the middle chamber and two pairs for the lower subwoofer chamber, the holes for these of course all need to be sealed. up so that no air can pass through. Once this is done, the hollow cavity under the midtone chamber can now be covered and is ready for the PVA and plaster of paris mixture in just a moment, but before we do that we could also add the chamber damping. materials at this stage, although we have easy access to them again, this is just a layer of 15 millimeter thick automotive acoustic foam, followed by a folded layer of cotton towel and then some sheep's wool, yes by the way can't find sheep's wool.
It's worth noting that loose and rock wool can also be used here, something you can find at most hardware stores. All of this means that we can finally cover the unit with its top covers, as well as the speaker mounts. It's worth noting that the fact that they are separated is intentional as it means that the design can be easily adapted to different speaker drivers, so to finish up, it's time to make what will hopefully be our last batch of PVA and Plaster of Paris, while Plaster of Paris is generally safe, it should be respected as it can set quickly and generate some heat while doing so.
Be sure to read the safety notes in the video description before attempting to use it. The amount required for our pore is 750 milliliters of water that has already been mixed. with PVA in a proportion of about 10 to 20 percent, this can be followed with one kilogram of plaster of Paris powder which should be mixed gradually once a smooth consistency has been achieved and can be poured into the chamber at the back Completely surrounding the midtone chamber with a solid 16 millimeter thick wall doesn't take long to set, after which the back can be closed with a small lid.
Now technically the cabinet is ready to be assembled. the various drivers, but aesthetically I think there is room for improvement, especially since not everyone likes the 3D printed look, especially when there are seams that are still visible, but fortunately there are many different
techniques
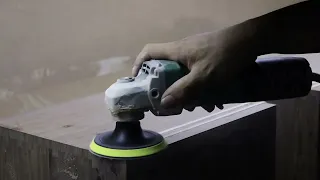
that we can use to make this look really special and make the joints less.In case of a problem they can simply be filled and then sanded thoroughly, although this can be done with hemp, it is worth borrowing a disc sander as it saves a lot of time and provides a really smooth finish, ready for some paint, you can apply some plastic primer.It is used here first as it provides a good key for the top layer. There are a lot of great finishes available these days and I'm going for the textured paint that looks a bit like metal, a far cry from the original printed plastic, that's for sure now. If you look closely at the sides of mine you will see that I have masked them to hide what is underneath a beautiful wood veneer. I added this before the painting process by spreading a load of glue and gluing the veneer on top of the veneer for those who don't know, it's a very thin slice of real hardwood.
Being rosewood, it gives the cabinet a really high-end look, especially when oiled as it brings out the richness of the wood. The rapid transformation of his appearance is truly remarkable. and from here the preparation for mounting the speaker drivers will only improve. The holes for them need some small M3 threaded inserts to screw them into place when wiring them. It is worth noting that the polarity of each speaker should be correct with the red wires going to the positive terminals, one that is often overlooked, but a very important addition is to add a border of blue tack around the edge before screw the screwdriver into place as this creates an airtight seal, as you can see they are slightly proud rather than flush so to make them more aesthetically pleasing they can be visually attached with a very good little bracket, with the With two subwoofer drivers now installed, it's time to tackle the midrange driver.
Choosing a suitable one is somewhat daunting as there are literally hundreds of different models available, each with widely varying performance characteristics in an effort to select the best possible controller for this project. I spent literally days testing various controllers and finally settled on this one, which again is a Tang band unit. It has a nice smooth character to its sound output with lots of mid-range details and seems really smart to start an amazing feature of this. The driver is that it can actually cover high frequencies as well, so it can do double duty as a tweeter, which is great for those on a tighter budget and for those who want the best high-frequency detail;
However, the design does support dedicated tweeters, although it will probably only be appreciated by the most demanding listeners, so it's up to you to include one or not, as the speaker can be printed without the hole either way with all the drivers added, It looks really stylish and it's easy to forget that it is in fact, now, 3D printed, some people might prefer the drivers to be covered, which is why I've included these holes. They are for a grill that can be made by gluing some threaded steel rods to a mesh that can in turn be attached to the front. of the speaker with some 3D printed pins, you could even paint it black to give it a different look.
An optional extra I've included for the Hi-Fi Buffs, by the way, are some side baffles. I embedded magnets in them before the painting process, allowing them to be added or removed easily and the idea is to provide a smooth surface for the sound waves to spread out to describe the effect, it is as if the sound is projected slightly forward with them, but it's only a small difference, there are still options for those of you. For those of you who want it now to get the best possible sound out of this thing, we're going to need help from our secret ingredient, a digital signal processor.
Surprisingly, these are really cheap to buy now and can provide four fully programmable sound outputs allowing you to run. As an advanced crossover to use, we can simply mount it in a small 3D printed box along with a voltage regulator for power. You will receive your audio signal from a phono jack which can be inserted here along with a DC Barrel plug. This essentially takes the audio signal from the phono jack and splits it internally into four separate signals with specific processing for each, as the board cannot do any amplification, although it needs to send these signals to a 4-channel amplifier, which I have here is a Class A Type B that uses a little more power than Class D amplifiers but has a very low level of output hiss that can reach annoying levels on many other amplifiers;
Of course, there is a camera prepared for this on the back of the speaker. and each pair of controller wires should be connected taking care of polarity change. Cooling. A small cover can be placed on top that features a slow-moving fan. The amplifier can operate passively, but when listening to loud content for an extended period of time. It's probably going to be pretty hot and the small amount of air movement the fan provides is all that's needed to keep it nice and cool, so it's worth it. The signal processor can be added just below and connected to the amplifier's input cables.
The order doesn't really matter as we can set them up digitally later. The last thing we need to do is add a cabin to cover everything, which completes the build. Now for the stereo, I made an identical pair and they look much better than I thought. I would ever particularly like 3D printed
speakers
, but do they have the audio quality to match their appearance? Let's find out after giving them power. The first thing we must do is program the signal processor. This can be done with free software called Sigma Studio. which has many different filters and algorithms.I've spent many hours creating a profile that makes the most of this design and you can find it in the project's 3D printable files. Link in description to load it into the DSP, we can simply use a cheap USB Programmer. It has three gendi scl and SDA pins that correspond to those labeled on the DSP, so they simply need to be connected together. This allows the profile to be compiled and tested live, although to save it to the DSP the wp pin must be connected to ground, after which the profile can be written to its entire general memory now, if you're wondering what the answer looks like of frequency, I have tuned it to be extremely flat up to 50 hertz, where it then narrows slightly to 40 hertz.
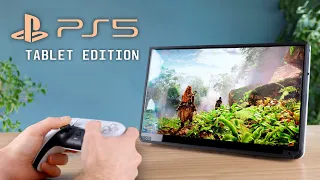
The measurement is done without any boundary reinforcement as it has been done outdoors, but in a typical indoor location with a wall behind them they measure flats up to 35 Hertz, this is incredibly deep for such small speakers and this level of performance usually it is only found. on floor units or external subwoofers, as they would make great gaming speakers, it's a perfect opportunity to show you how Vivid, their Sound Stage can be strange, as they are tall and sleek. Having them sitting on either side of the TV is a great alternative to a sound bar, especially since they will sound significantly better.
Here's an example versus a much more expensive Bose unit overseas. They can even trade blows with high-end, overseas bookshelf speakers. If you want to build a pair for yourself, you can do so. Find the printable components for them in the video description, although note that they now take about five days to print. I can't offer any guarantee or support for them, but as you've seen in the video, they are pretty easy to put together. and they are worth
building
, it took many weeks of prototyping to evolve the design to where it finally ended up and I would say it is a great success, we have made them very competitive with manufactured units and to boot they look good now.In my next video I'm actually going to be doing the first PC build I've done in a long time and it's going to be a dive so make sure you're subscribed so you don't miss it and I'll see you there.
If you have any copyright issue, please Contact