Build a Museum Quality Train Station - Realistic Scenery Vol.25
May 31, 2021Hello everyone and welcome to another long-awaited tutorial in this video. I'll guide you through the process of creating fantastic
museum
-quality
design work. It's not an easy task and there are a lot of things involved in a project like this, so sit down. and enjoy watching this project come to life. This module is being designed for a specific space, so before I startbuild
ing the plinth, I make sure I know exactly how big it will need to be. The base is simply seven millimeter plywood and pine bracing glued together. and nailed together, there are many different ways to construct the module plinth, each has its pros and cons, but the most important thing is that it is level, square and rigid.
The seven-millimeter plywood top helps keep the module rigid, but there will still be some potential warping. Along the module to help limit the amount of warping I add two additional pine strips diagonally along the base, this almost completely eliminates any lateral warping making the module much easier to move and less susceptible to damage. The spaces are filled with putty. and sanded back to keep the module looking good and you can see that with those diagonal braces there is minimal lateral deformation. I like to use extruded foam board as a base to
build
the stage on top of.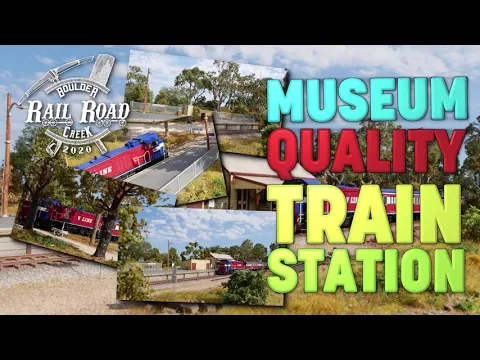
More Interesting Facts About,
build a museum quality train station realistic scenery vol 25...
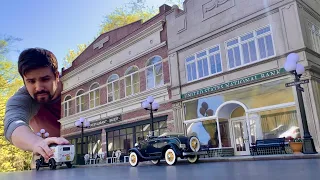
To glue this, you will need a strong base. Glue that works well with foam. I think any polyurethane glue works fine, but just make sure to scrape the foam a little to give the glue a better chance of holding onto it. It is also activated with water, so you will want to wet the surface to be glued beforehand. joining the two pieces together and don't forget to put weight on it as the glue will expand as it cures once the foam is down and secured the edges are again tidied up and sanded so the foam is flush with the edge now on The module's main feature is an Australian-style railway
station
building commonly found throughout country Victoria.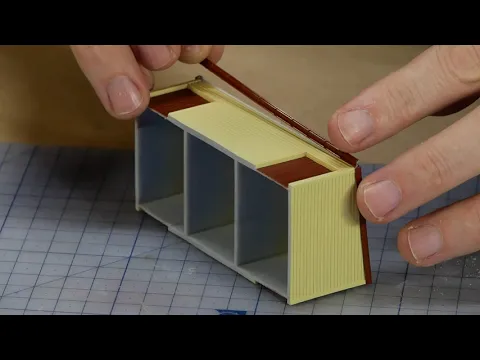
It's a very simple design and fairly easy to build, so I won't spend much time on the basics, but I'll show you what I did. improve design laser cut buildings like this are really fun to build the pieces usually fit together with minimal sanding and a simple knife sandpaper and wood glue are the basic tools you will need wood has a tendency to warp so i I make sure when painting and priming, I do it evenly on both sides of each piece. Any loose bits of wood fibers and lint on the surface like this can be pulled back and removed with some fine steel wool.
Now we just have to repeat the process and before you know it. The main structure of the building will be complete. The roof is the first change I made. Instead of using the supplied laser cut wood corrugated sheet, I opted to use corrugated sheet glued to a 0.5 millimeter styrene base. I will be using Brunel Hobby's corrugated iron machine to create each individual sheet and you will want a sturdy drop to work with once again. Each sheet is cut to the proper size, placed on the corrugated iron machine and the dye is pressed and dragged to create the corrugations that you only need to press gently.
To avoid tearing the foil and eliminate any warping, I also turn the foil over several times, leaving me with a nice flat sheet of corrugated iron. It takes a lot of time, but the end result is certainly worth it. You will notice that there are some additional details. such as 3D printed gutters and much more. I'll talk more about how I create all the little details later in the video, as long as you place the first corrugated sheet perfectly, the rest will simply overlap the first sheet and line up with On the panel above, I use gel super glue to set the sheets to the styrene base, one by one, each sheet is glued and pressed until the entire roof is covered.
The ridge is an important detail, especially on a corrugated roof. I tried adding ridge by folding a piece. of aluminum foil, but in the end it was much easier to use a styrene rod along the beak and then glue a thin strip of styrene along the edge to create the layer. After a quick wipe with alcohol, it is ready to go. paint. Valejo white primer works well as a base. coat and for the main color opaque metallic gray mixing a little silver and light golden gray as the light weathering used is simply applied with rust colors and a sponge.
It's just a distressed roof of course, so I do my best to avoid doing it too much. I focus on adding. Rough spots along the seams and joints between sheets can be added more highlights by using some paper as a mask and lightly spraying some of the rust color with an airbrush. This effect really highlights each individual corrugated sheet, resulting in quite a nice effect. Lastly, I'll add some dark earth pigment over the roof to give it an old, dusty look and to help fade the effects of the rust. It's hard to see right away, but the difference is certainly noticeable when you compare both sides of the roof now to the rest of the building, the color scheme is influenced by an actual Pyramid Hill location in central Victoria, so I I am using it as a guide not only for the color but also for the additional 3D printed details I will add.
The kit comes with laser. I cut chimneys, but to be honest, I didn't think they looked that good. These 3D printed fireplaces look much better. They start with a light brown base coat, followed by dry brushing mahogany, and lastly mortar is added by covering the chimney with dark powder. Weatherproof Pigment Once excess pigment has been wiped off the surface of the brick with a damp paper towel, you will be left with a very
realistic
and great looking fireplace to complete the rest of the building and add all the little details. It's just amazing. level of detail that can be obtained with resin 3D printers these little taps are just one example five years ago this level of detail was almost unheard of and no Australiantrain
station
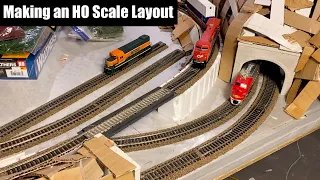
would be complete without an outdoor dunny the shed next to the building The main station building is simply small enough to be fully 3D printed, so all that needed to be done was add the corrugated roof along with some gutters and a nice paint job to match the theme of the station building. major.With the buildings complete, I can start planning the track. and the location of the platform, but first I need to make a clue, that's right. I actually 3D printed the track to make my own flexible track that way I can set the tire size and spacing exactly how I need it to match the Australian prototype and I can also use a lighter rail to better represent a Australian branch the 3D printer is from nova 3d and is called elephant. All of the 3D printed details you see in this video were made with this 3D printer, just remember to wear safety gear when working with uncured resin.
As it can be harmful to the skin once the print has been removed, I wash it with isopropyl alcohol once it is clean, I remove these supports and final cure it under some UV light once it is fully cured. I sand a little lightly to remove any imperfections, the rail is a 55 scale atlas and code once I have removed it from the n scale bindings I thread it onto my 3D printed bindings, you just have to be very careful as these small spikes that hold the rail are extremely fragile and don't take much to separate once they are all together, it is a good piece of flexible track and the tolerances can be adjusted when designing the track tires to ensure the rail is perfectly coupled.
The road base is only a three millimeter thick foam, nothing more. It is elegant enough to raise the track above ground level and give the ballast a good profile before building the platform. I need to know the height of the cart for the main structure. I ended up laser cutting some styrene. However, the laser cutter runs on styrene. It will leave a raised edge that can be sanded if necessary. The platform is assembled as a styrene kit. The retaining wall along the front edge of the deck was also laser cut using one millimeter acrylic along with some 3D printed steel posts to get the Acrylic that looks like old cement, I textured the surface by adhering weather resistant pigment with spray adhesive.
It may take two coats to get the desired amount of texture. The gray primer works as a nice base coat and lines are drawn to remove excess pigment between the cement slabs. A nice light cement gray color is sprayed over the top and various light and dark brown pigments are sprinkled to vary the color a bit. I also add a little more light gray to highlight the individual cement slabs and a very light overall misting of gray over the top to blend all the weathering pigments, the posts have been painted a rusty color with some rusty paint splatter effects and a whitish dry brush similar to the way I did the rusty red bridge in a
realistic
setting volume 24.Now everything can be assembled with a little super glue using the ruler to ensure it is aligned correctly and can then be attached to the main platform structure. Any excess is removed and the end pieces are attached to the deck surface. I'm using a three millimeter sheet of PVC foam. Fairly stiff foam that is also easy to cut with a knife. All I did was simply trace the platform shape on the foam board and then use a sharp knife and ruler to cut out the shape. The aluminum tube ruler helps ensure that I am cutting down at a 90 degree angle.
Polyurethane glue works well for gluing the foam to the deck structure, just make sure you don't put glue too close to the front edge so it doesn't spill out and ruin the nice cement retaining wall because this will expand and ooze out of the holes. smaller spaces. Also, don't forget that there is a protective plastic wrap that needs to be removed. The deck surface also needs some texture. I found that the mig asphalt paint gives a nice effect and the weathering is done with some powder pigments again, don't forget the protective plastic, the paint spreads by rubbing it over the entire surface of the deck.
I only want a very thin layer of paint so a little goes a long way, keep spreading it until the entire platform is covered with a nice very thin layer, then the area is covered with dark powder pigment and pushed and pushed until all the asphalt areas are covered. Any remaining pigment is removed with a brush and then with a slightly damp paper towel. drag it over the surface removing the pigment from the raised surfaces and leaving the pigment in the recesses of the textured paint and again to help bind the colors and lighten the surface a light mist of light gray is applied by mixing a little bronzer and gray neutral, it's just a light misting to change the tone of the deck slightly, as for the front edge of the deck, I'll dye some basswood strips with leather dye, mix some tan with black and thin it with isopropyl alcohol.
Test small pieces of wood first just to make sure you get the desired color. Once satisfied, the wood is soaked for about a minute and then removed to dry with a hair dryer, which helps speed up the process. I repeated the process twice to get the desired color. The color I was looking for has now had loose fibers and splinters removed from each piece with fine steel wool, which helps give the wood a worn look. Lastly, a bit of India ink is used to give the lighter areas of the wood strip a more grayish tint after about 30 seconds.
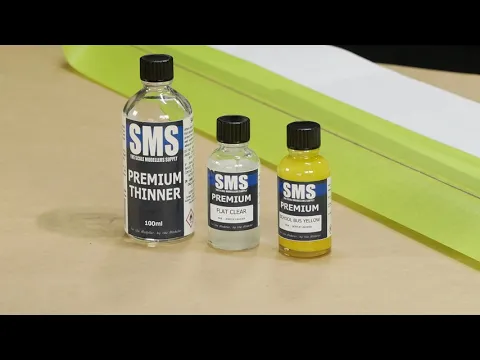
Remove and dry the wood strips to create these separate sections of wood. The strips are cut in half before being glued to the leading edge of the platform. The retaining wall posts are designed so that the wooden beams sit perfectly on top of them and stick out from the deck just the right amount, some bolts also give a nice little touch to add a little more realism and we can't forget the line safety device to prevent people from falling off the edge. A little trick to help prevent the color from bleeding under the masking tape is to first apply a couple of coats of clear matte varnish, this will fill in any of those small gaps that may have caused the paint to bleed underneath and will now be clear .
Additionally, yellow paint has very little pigment and is almost impossible to apply over dark colors. So first I apply some white primer and then I apply a yellow paint. A little bit of the powdered pigmentIt helps weather the yellow giving it a nice used look. Now we can finally start putting together the scene, laying it out, and roughing out where to place various ones. characteristics of the module before gluing the track I make sure that the edge of the
train
does not hit the platform when it passes but at the same time is close enough to make it look realistic the base of the track is glued with polyurethane glue using the line I drew before as a guide and then I weighed it to join the track.I used code 70 rail joints and trimmed them to the right size to fit between two tires, then the joints are made permanent by welding them to the track. Standard wood glue is more than enough to secure the track onto the deck. of road foam because this section of road must be placed very precisely due to the edge of the deck. I use pins to make sure it stays exactly where I need it. The glue dries, the excess rail is removed and because the ties are so fragile, I apply a bead of super glue over the last seven or eight ties that are near the edge of the module that way a straight tee isn't going to break The track as it is trapped as it passes the contour of the terrain is constructed with foam.
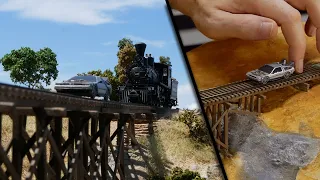
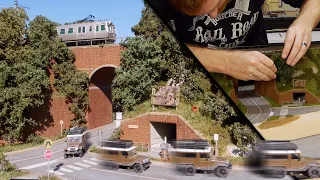
I use my DIY hot wire foam cutter for the initial layer of foam just so I can make sure it's the right height to meet the At the top of the platform and bridge, you might recognize this bridge. It's actually the bridge I built in a realistic scenario vol. 10, but some changes had to be made to fit the scene. The foam is built up around the bridge and glued with 3m super 77 the super 77 spray is strong enough to hold the foam in place and then once the plaster is applied on top it will create a hard layer permanent on the module.
The rest of the frame and outline can be built using scrap foam. which is secured with spray adhesive protruding from the foam sections are removed using a hot knife and a hot wire foam factory sled. These tools make it very easy to get a nice square edge and will also do a good job of refining the outline of the foam before adding plaster. The track has an initial layer of Israeli gray sand that acts as a base color. Various shades of brown and beige are then airbrushed onto the selected zip ties to vary the color. Then, with a little off-white, the flanges are dry brushed to highlight the raised details and edges of the tires.
I also apply a little weathering pigment to help give it color. aged look and then sealed it with an opaque coat applied lightly with the airbrush. As for the rail, I stick some masking tape so that the joint plates and rail are exposed and then I apply a coat of red hull, finally a little off-white. It is dry brushed over the top catching the edge of the rail spikes to make them stand out. Don't forget to clean the top of the rails, otherwise the trains will not run. The platform is ready to be glued before covering the entire module with plaster.
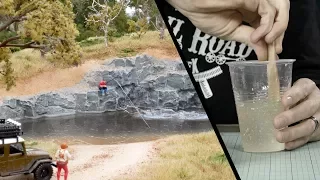
I have some rock castings ready, this is a rock mold and I am using hydrocal to fill the mold. However, you can also use plaster of paris just as easily. I actually needed the rock to be slightly curved, so once the hydrocol starts to set. but still a little soft, I rest the mold against the edge of the module so it curves now that it is dry, you can see it has a nice curve and will fit perfectly under the bridge. The module is covered with a sculpted modeling mixture. It is similar to the most common sculpting mold found in art stores.
It takes quite a bit to cover a large area like this and I use it a lot in my dioramas so I usually buy it in bulk for office jobs. It's excellent to work with. As it holds its shape well and can be used to fill large areas and create natural looking contours when it comes to gluing precast rock molds, be sure to wet them well before pressing them into the plaster to ensure it adheres properly. I keep pushing it in and manipulating it to get the desired look and continuing to smooth it out, especially in the areas where I plan to have dirt roads and paths so the bridge fits perfectly.
I had to cut out sections of rock. Hydrocal is really difficult. once it's done, i needed the dremel to do the job. There are many ways to paint rocks, they all have their various benefits, but for this one I opted for the most commonly used leopard spotting technique, using brown and beige for the base colors, followed by a dark gray wash and lastly I used some off-white to dry with a brush over the top and highlight and highlight the edges. You can use this technique and make slight variations in the colors you use to represent specific locations you are trying to model. the rest of the white areas are painted brown, this will soon be covered with dirt, but painting them brown to remove the white will help hide any areas that are overlooked when applying the dirt.
The soil itself is a mixture of dry, sifted soil from the backyard. mixed with equal amounts of beige grout to help the dirt adhere to this sloping terrain, I paint over some diluted mod podge, first then apply the coarse dirt textures and then using the sifter I sprinkle over some finer dirt textures over any dirt on your own tends to look very dark once the glue is applied and has dried, so the lighter color helps it look more natural and dry. This process is repeated over and over until the entire module is covered with the grout and dirt mixture, excess dirt is removed. of unwanted areas before gluing here, I'm using the airbrush with the air pressure turned all the way down that way it will remove only small areas of dust directly in front of the airbrush without completely erasing the rest of the dirt behind the pad.
Also done for the track, fixing dirt is a two-step process. I use isopropyl alcohol and a little bit of my stage glue mix which is one part mod podge mat, three parts water and a little bit of dish soap, spray the area with isopropyl alcohol first. pre-wet the dirt so the glue soaks in, then apply the glue completely covering the module and all areas where dirt was applied, any built-up areas of glue can be absorbed with a paper towel, as for ballast, I'm using a forest Scenic's fine mix, usually used in n scale designs, however, is almost perfect for ho scale designs, plus a good amount is poured along the track and spread with a soft brush; you want a nice, even distribution so there's no ballast covering anything.
From the tires to remove the stray pieces of ballast on the top of the tires, you can tap the rail with the handle of the brush. This will help the ballast bounce off the top of the tires and settle between them. Instead, this process is repeated along the top of the tires. length of the track, just as we glued the ground, isopropyl alcohol is sprayed to pre-wet the surface and then fairly heavy stage glue is applied over the top using a dropper to apply the glue. It also works quite well on the path that joins the The bridge will be an old loose gravel path.
Some forested landscapes are smooth. The plaster spreads forming the surface of the road. I apply the plaster along the areas I plan to have the path and start spreading it out with my fingers. I keep spreading it out and smoothing it out until it's smooth. begins to set, this will ensure that it is as smooth as possible before it dries. I also apply some of these plaster over the road junction and once dry the plaster is quite smooth and sands very easily, this will further remove finger marks and imperfections. A base coat is painted over all the white areas and then just like we applied the mig asphalt texture paint on the station platform, I do the same here, however I applied a much thicker coat basically creating a skin over the road edge surface.
I add some fine Woodland Scenic gravel to form the shoulders of the road. It spreads similarly to ballast for gluing. I simply moisten the gravel with alcohol and apply the glue with a syringe to give it that loose stone look. I sanded the road surface this creates a smoother surface but also highlights the small bits of sand that are embedded in the paint causing them to change color enough to stand out. The sanding dust also acts as a weatherproof powder to remove excess sanding dust. From the elevated areas I wet my fingers and simply drag them over the road.
I also apply a layer of opaque coat so the powder stays where it is. The road lines are added by masking off the areas and airbrushing white over the top, just be careful when applying. light coats so the paint doesn't run under the masking tape when removing the masking tape, just be careful not to peel the road surface because the textured paint created a skin effect and can also be accidentally peeled off if you're not careful. Don't worry if you make a mistake because you can always make it look like a pothole repair, since for the track crossing the excess plaster is removed from the wheel tracks, the nmra track gauge will give you a good idea of how much will I need to scrape.
I also sand the top surface enough so that it is below the height of the rail. Now with a little bit of paint and some dirt texture on top it will blend perfectly with the dirt texture. It has a much lighter color compared to the other dirt texture you can see, this is my dirt road mix and it has a much lighter grout added to the original color, once again it is set with alcohol and glue, now the Real fun starts with adding
scenery
. I used a lot of trees, some made from forest scenic trusses, others made from twigs, and some pre-made trees.I especially like the full-scale scenic trees on the Osrail model trains because they do a good job of representing the trees that can be found locally in Australia. Each tree is tested and then planted. The module, one by one, begins to fill with trees and you begin to get a good idea of what the finished scene will look like. Now that the trees have a place, they are replaced with these little numbered flags, this way I can fill in the rest. of the landscape at ground level and know exactly where the trees will be located and avoid placing things like static grass and small shrubs around the base of the trees.
Also the trees won't be in the way doing it this way for the grass on this model I'm testing the range of world war scenarios. They have a good range of muted greens and yellows that are perfect for the Australian type landscape and dry climates. The applicator is powered by a nine volt battery to start, I mix some spring two. Millimeter grass with a cup of dead grass and a cup of wild meadow to obtain the desired color. The mod podge diluted approximately one to one with water is spread randomly over the surface taking note of the position of the trees and other details, then the applicator is rotated.
The ground wire is pressed into the wet glue and the applicator is gently waved over the wet glue areas like magic before your eyes. You will start to see small grass fibers standing up after about five minutes. I suck up the excess grass. Using a vacuum and a sock, the sock helps trap loose fibers so we can continue using it in other areas of the module. This process is repeated in small sections at a time until the desired areas are covered. Now we can start layering. The next layer of four millimeter grass over the top more glue is applied over the top of the two millimeter grass and again the applicator is shaken over the top.
This layer builds up on the glass creating thicker, taller grass in all areas where the second layer was placed. A layer of glue was applied. Worldscapes also have a detail applicator for making small areas. It's great for making little accent areas like this and for making little tufts of grass along the track, but it's also great for moving around buildings and other details, as you'll see. a little later one of my favorite ground scattering materials to use is mixed dried leaves, it looks fantastic and it's free, nothing special just some dead leaves collected from outside and mixed together to create a fine texture that, you guessed it, is It looks like dead leaves.
I focus on applying. This around the base of trees and anywhere you can see fallen leaves. The other forest scenes. Ground foams are used to add denser areas of weeds andshrubbery. I tend to use more thick burnt grass foam, but I also accent it with a little medium green. Well, to prevent the scums and leaves from settling on the grass fibers, you may need to use a brush to strip them down a bit. I also remove any texture from unwanted areas like roads and paths. Once this is done, everything is sealed with alcohol and staged. The platform and station details with extra glue are built like the chain link fence you can see in the chain link fence video tutorial from a few years ago; however, in this version I sprayed the fence frame with spray adhesive before gluing it to the nylon tool. remove the excess and give it a coat of paint.
The small barriers for trails are made with a two-millimeter peg and are also painted to blend in with the landscape. I've had these highway guardrails for years and finally found a use for them. They are pretty simple to build, basically just follow the instructions on the package; However, if you plan to bend them to fit a certain area, you will want to soften the plastic with heat first, as plastic is quite fragile and can break quite easily. They also add that they have their own tutorial. If you plan to do your own similar science, we can't have road crossing tracks without signs, so some crossing signs from Bush will work perfectly once the area has been cut out and a hole drilled for the cables, signs They are glued together and set material is added to help blend them in with the rest of the set and with a bit of railing left over they certainly look like the part you could spend hours and hours on adding endless amounts of detail to a scene like this.
These scrap pieces of rail look great and were weathered using a micro-engineered rail weathering solution. The sleepers were leftovers from the 3D printer. Piles of dirt are not an uncommon site around an old rural train station, as are old pellets and car tires, just be sure to give the pile of dirt a good soak with alcohol and glue to make sure it doesn't become go nowhere when gluing the buildings, I only put enough glue to hold it down, the reason is that if at any point I want to remove or change its position I can pick it up again and hopefully not cause any damage to the building more 3D printed details these were in actually leftovers from last year's subway diorama every station needs a name boulder creek seems like an appropriate name for this station this is where this little applicator comes in handy.
I can use it on details like this, just putting grass in the areas I want without sending grass fibers all over the scene. I can see myself using this applicator quite a bit in future dioramas. Additional lighting effects are added. Some Woodland Scenics lights and light center work very well and are very easy to install and wire. No soldering is required for Woodland Scenics lighting products. However, I did do some soldering to add some extra wiring for the bush crossing signal road. The tracks are created using yellow ocher pastel, sprinkled on the road and mixed to create the tire tracks commonly seen on cars traveling up and down the road.
I also add a little dust along paths and tracks to show off frequently traveled areas while the brush is out. I also overcome the burden with a little aim. Dark earth weathering dust. This material is quite strong, so start with light and gradually add more until you get the desired look. It is very difficult to remove this material. of the ballasted areas, some of the excess can be wiped off the top of the tires using your finger. Almost done, the bridge can be permanently glued onto the track and we can now start placing the trees back into their intended positions. a piece of cake since we take the effort to mark and number the position of each tree with the planted trees, their trunks are blended by adding some of the mixed leaves around the base once the alcohol and glue has been applied.
Those trees aren't going anywhere. Lastly, as a landscape, I will add small trees and bushes. These are a variety of woodland scenic heathers and finally foliage along with some meerschaum trees which I made by spraying on green foam and tapping leaves. They are all planted in various places in the module. I try to hide the edges of the module with bushes to make it harder for someone to peek. on the model to detect where the module ends, it's actually a lot of fun to finish this process and it's amazing what a difference a few small bushes make to the overall look of the model and lastly I'll paint the edges black to help frame the module .
We are done, this was a huge project and took over a hundred hours to build. I filmed just over 28 hours of footage, which is a record for these videos, but all that time and effort was certainly worth it at the end of this module. It looks amazing on camera but in person it looks even better now I need to start on the adjoining modules so the train has somewhere to go besides the Boulder Creek station. I hope you enjoyed watching it and I hope you managed to get a little tip or technique from the video, if you like what I do and would like to help support the channel feel free to visit my Patreon page where you will find more information about these updates of dioramas and some rewards for supporting the channel, greetings and thanks for watching
If you have any copyright issue, please Contact