Best, Cheapest DIY Acoustic Panels. Broad Spectrum Damping Panels You Can Make In a Weekend!
May 30, 2021Hello and welcome to 42pursuit. So today I have a little conundrum. The two rooms I spend most of my time in when I'm at home working, this room, my office and the workshop; Both have terrible
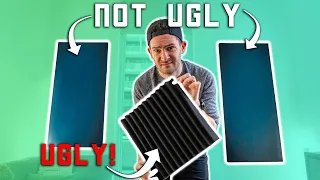
like these that I've seen everywhere online. But after examining them, I realized that they are much less effective than I originally thought because they are quite thin and not very dense. So I started looking into more pro-grade options, but quickly realized that pro-grade
are out of the budget I have for this project.
acoustic
s. I mean, every time I try to record quality audio, I find it difficult. So first I thought I'd get somepanels
like these that I've seen everywhere online. But after examining them, I realized that they are much less effective than I originally thought because they are quite thin and not very dense. So I started looking into more pro-grade options, but quickly realized that pro-grade acoustic
panels
are out of the budget I have for this project.
So I did what any DIYer would do and did some research, brushed up on my acoustics knowledge, made a 3D sketch model and bam, just like that, I now have a design for a panel that won't work. It won't break the bank, but it should be super effective at reducing wide
spectrum
echo in a room. Let's do it! For this build we are going to need a couple of things. Two sheets of 3/4" MDF One 16" block of safe and sound rock wool insulation. One roll of 4' wide weed barrier. Some type of acoustically transparent material I chose craft felt fabric.
More Interesting Facts About,
best cheapest diy acoustic panels broad spectrum damping panels you can make in a weekend...
Some light chain. A bag of small cup hooks. Some 3/8" staples. Some wood glue. Some #9 by 2" screws (you won't need that big of a box of screws). A knife with a sharp blade, gloves and a mask to treat isolation. Now we're also going to need some tools. A table saw. Now, if you don't have access to one, you can also
make
all the frames instead of MDF, 1"x4" pine board that all home stores sell. You'll also need some type of drill, as well as a screw bit and a countersink bit. And a manual stapler, or an electric stapler.
I'm also going to use a pneumatic stapler to assemble everything a little faster. Shoot these types of staples. This is not entirely necessary but should save some time. I will have links for all the supplies and tools in the description below. We will start by making frames with this MDF. You can see the dimensions of this frame that we are going to build here. Go ahead and take a screenshot for reference if you're building along with this video. I should also mention that I'm building 12 of these panels to use up the entire layer of insulation, so I bought 2 sheets of MDF for that reason.

This frame is made up of three sets of 2 identical pieces. Two sides. Two extremes. And two rear pieces. To
make
a simple cut list in Sketchup, I made 24 copies of each part, laid them all flat, and placed them in two 4'x8' rectangles. Feel free to screenshot this as well for reference. To make these heavy MDF sheets easier to handle, I will first cut one a little over 47" from the end. I will cut the second a little over 49 3/4" from the end. And then trim the cuts referencing the factory edge of the table saw. You can do this first step at a home store with your panel saw.Then there are a lot of cuts on the table saw to make a bunch of 3" strips and then those strips are cross cut for the side, end and back pieces. 24 of each. Now that all the pieces are cut, we are going to take two of each size and we will begin to assemble the frames. We will put a little glue on each joint, staple the boards and then add screws for rigidity. If you are using a pneumatic stapler, there should be enough 3" screw per joint. but if you only use screws, use two. Next, we'll staple some weed matting to the back of the frame.
Flip it over and put in some insulation. Now take the fabric that you are going to put on the front and cut it approximately to the right size. Now place the frame back on the fabric and make sure the back is up. Now lift the fabric tight and start stapling it. Don't go all the way to the corners, as we need some room to fold the fabric into a neat fold that I'll show in just a second. Oh that's good! Go ahead and cut off the excess and there you have a finished panel! Very good, one done, 11 more to go.
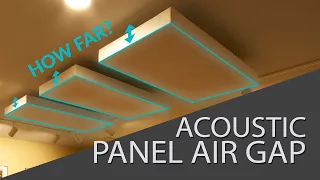
Hmm. *whispers* yes! Now that these panels are made, the last thing that remains is to hang them on the walls and ceilings. Something to keep in mind: this type of panel will be much more effective if it can have a couple of inches of air space behind it. So for the ceilings we'll use some chain, probably about 3 inches, and hang them. And for the walls, we'll take some of our leftover MDF and turn them into French slats. There won't be that much of a gap, but I think we'll be fine. I'm here with my friend who is an audio teacher.
He brought some of his equipment and we're going to characterize this. Hall. We're going to look at the reverberation times across the
spectrum
, looking at the individual frequencies and seeing how long they reverberate within this room. So this is the before. And we'll take a graph and then we'll see. Make an after. Take a plot. And then compare the two. Making loud noises. Get ready! Okay, quick pause. What's going on here? The control computer is also outputting an accurate audio frequency test. As the reverberant sound bouncing around the room is recorded on this high-precision microphone, the computer then does some calculations and subtracts the original audio played through the speakers from the resulting audio recorded from the microphone.What remains is the room reverb data. The computer then takes this information and generates a data set of how long it takes for each frequency to decrease by 30 dB. Okay, the panels are hanging. (Panels are hanging) Panel Test #2 (panel test) Okay, I'm going to shorten it because you don't want to see any more tests. You want to see the results and the results I have! Now I put eight panels in this room. 2 on the roof, 2 on each side wall and 4 at the rear. This room is 10' wide, 11' long and has 8' ceilings. And now these panels made a difference?
Check out this plot! This graph is an RT30 graph. RT is the reverberation time and 30 is a decrease of 30 decibels. Which means it shows at each frequency how long it took for that frequency to decrease its amplitude by 30 decibels. On the left side you can see that our y-axis is in seconds, on the bottom you can see that our x-axis is in frequency. Early readings without the sound panels are blue and later readings with the sound panels are orange. At most frequencies we are seeing a 0.2 second decrease in reverb time. That's significant! We went from about 0.5 seconds to about 0.3 seconds.
I'm very excited about these results, as it's very difficult to show the room reverb before and after on video. But now that I have the numerical results, I am confirming what I think I hear with real data. These budget dashboards are working even better than I first thought. Now you might be wondering why I mentioned putting panels in my shop space but I haven't shown any before and after, because I put most of the panels in this room; There are only four in the store right now, and that's a big enough room to think I need a few more panels to make a difference.
If you are interested in the effect acoustic panels would have on a store space, please comment below and let me know. Also hit the subscribe button as I hope to make more panels to put in the store and then do some more before and after testing. Now that we know how well the panels work, let's look at the total cost of the project and how much it works out per panel. We have a layer of Roxul insulation. Two 4'x8' 3/4" MDF sheets. One 4'x50' roll of weed control fabric. 10 yards of fabric for the front cover.
One package of lightweight chain. One package of cup hooks. And what I figure it's about Ten Dollars worth of supplies including screws, glue and staples, which comes to a total of $217.04 for 12 panels. Dividing that number by 12 gives us the price per panel of $18.09. per square foot of these panels turns out to be a mere $4. .price So for what you get, $220 for high quality acoustic panels that you can make over a
weekend
seems pretty reasonable. Thank you for sticking around. I hope this video adds value to you and if it does, would you be so kind as to?Do it. Hit the approve button below that helps the channel. Also, if you notice anything interesting, think I missed something, or are going to make these panels yourself, go ahead and comment below. I would love to hear from you. Thanks again! Take care.
If you have any copyright issue, please Contact