Air Bottle Helicopter
Jun 05, 2021I usually start my videos by talking about a physics or engineering topic that is related to what I plan to build, however, I've been working on this project for about eight weeks and it's not going to work. The full extent of what I've built, as you can probably see, is nothing like what you just read in the title of this video, so I think what I'm going to do is show you. everything i have been developing and i hope we can put some of these parts together to produce something that does something this video is sponsored by kiwiko more on them later for a
helicopter
to fly there are three main requirements the first is that it must produce enough thrust to lift its own weight, the second is that it must have some form of stability or control to stay level and avoid a crash and the third is that all the torque produced by the rotor must be counteracted by either a tail rotor or another rotor that turn.
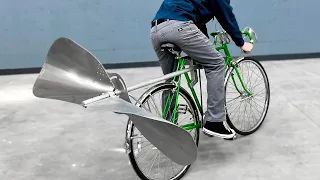
In the opposite direction, after reading the comments in the above air turbine video, several of you suggested that I should build an air-powered quadcopter and I agree that four turbines linked in cross formation, all controlled by compressed air , they will be amazing for a drone to maintain without problems. stable flight it is very important that the specifications of the propeller and motor match the intended rpm, for example, this small motor is designed to rotate at 30,000 rpm, but this large propeller is designed to rotate at only 5,000 rpm, so which would be like trying to put tractor wheels on a formula one car, but aside from the thrust produced, the quadcopter is controlled by varying the speed of its propellers, and generally smaller propellers have less rotational inertia, meaning they require less torque to change speed and since the turbine blade design doesn't have a lot of torque I will need some smaller propellers, this means adjusting the turbine gear ratio to match the optimal rpm of the smaller propeller.

More Interesting Facts About,
air bottle helicopter...
The only problem is that I can't get it to produce anything close to the amount of thrust from the larger propeller I need. I can only limit myself to the smaller propeller being less efficient. I then mounted an electric motor on the thrust dyno to spin the propeller at a controlled rpm, allowing me to measure the energy drawn from a battery. This is essentially a basic method for measuring. the efficiency of the propeller by slowly increasing the engine rpm I can record the power consumption and the thrust produced to clear a graph of thrust versus power and from this we can read the efficiency of the propeller, for example with 10 watts of consumption of energy, this propeller produces 1.16 newtons. of thrust or equivalent to lifting 118 grams, then I repeated this test with the larger propeller and the results were very clear, but with the same power output, the larger propeller produces almost 40 percent more thrust, which is a big difference in efficiency when we look for small five to ten percent improvements in the turbine design, so this is where the problems begin.

The larger propeller is much more efficient than the smaller propeller, so I basically have no choice but to choose a larger one, but using it on a quadcopter will do the trick. It will be difficult to control and the frame will need to be big enough so that the blades don't overlap, which means it will weigh more, so I think what we need to do is go back to square one and go for a
helicopter
design, the only. What we need to worry about with helicopter design is that because it only has one large rotor, it needs to have a tail rotor to counteract the torque produced by the main rotor and because the tail rotor pretty much only blows air to the sides. , it is basically consuming the compressed air that we need to use to fuel the helicopter, but it is not producing any useful thrust to lift the helicopter off the ground, but what about a helicopter with counter-rotating blades like the new Mars helicopter, where both blades rotate in opposite directions?
This would counteract any torque from the rotor, but would also mean that we need to build a gearbox and shaft system so that each propeller can spin in opposite directions, which is not a problem for an electric plane, but because these turbines air cannot produce much thrust, they will probably produce too much friction with a gearbox and also a lot of weight. The other option is to mount one turbine on top and another turbine below the ship, as this will basically achieve the same thing in terms of counteracting torques, but we won't need a complex gearbox. and the shaft system, but there is another problem: two turbines means additional weight and also double the air consumption, so we simply add more
bottle
s of compressed air, this starts to become a vicious cycle of needing more thrust and then produce more thrust than we need. more compressed air storage, which then adds more weight and then we need more thrust again to lift that extra weight and so on, and if we look back at the propeller efficiency graph at low thrust values, it produces about 20 grams of thrust per watt, but at higher values.For thrust values it only produces 13 grams of thrust per watt, so as thrust increases the efficiency of the propeller decreases probably due to the additional resistance of the propeller from having to spin faster, so What we must do is produce the lightest ship possible with a single turbine and a single plastic
bottle
. Something interesting I realized when considering a tail rotor is that instead of mounting a turbine on the end of a tail arm, why don't we use a small nozzle to bleed off some compressed air since the Torque is the product of a force at a perpendicular distance.If we have a really long tail boom, it will only require a small amount of thrust to keep the helicopter pointing straight. Take, for example, one of the turbines which is mounted on a 0.2 meter long tail boom and produces approximately 1.4 newtons of thrust at 4 bar pressure which means that a torque of 0.28 is produced. newton meters with a total weight of 58 grams while if we take that same turbine nozzle and mount it on the end of a 0.8 meter tail boom it produces much less. thrust, but we get the same torque produced while consuming the same amount of air, but now it weighs only 27 grams, which is a big difference.
Then I found a YouTube channel called science-ish and he made a video producing supersonic shock diamonds. burning alcohol inside a plastic bottle and guess what. I am also using a plastic bottle which might suggest that my nozzles are also producing shock diamonds to see if these nozzles are actually producing supersonic flow. I have decided to build what is called a Schlieren imaging setup. Basically, here is a magnifying glass lens. Many people would like to use telescope mirrors, but I couldn't find any for a reasonable price, so I bought this magnifying lens on Amazon for a pretty cheap price and at the focal length of this lens. is a small point light, it is basically an LED mounted inside a 3D printed housing.
Now on the other end of the focal point of this lens is a camera and placed right in front of the camera is a very sharp blade and the idea of this. The setup is that over this long distance the air will refract any type of light that travels through it, so basically, if you have a high density chunk of air or a low density chunk of air, it will refract. up or down, so some of the things that are high or low density will hit the knife and cause a shadow on the camera image. It's probably best if I give you a quick demonstration with a candle lighter.
Okay, so the high speed camera is recording, so it should be I can light the candle in front of it, I stop the high speed camera and then if we take a look at this, we should be able to see some pretty interesting air flows coming out. of that, that's great, so now I have the mouthpiece mounted in front. of the lens and I have a pressurized bottle down here, it's actually not pressurized yet, but I'm about to inflate it and then we'll see if we're really getting supersonic flow, let's play and it's Unfortunately, the resolution of my high speed camera It's not great and it was also slightly out of focus, so I ran the test again using my still camera and captured this amazing photo where the clash diamonds are clearly visible, but what does this mean?
Well, maybe I can design a bell-shaped daylight nozzle like the one seen on rocket engines. Now I have no idea about that area of fluid dynamics, but luckily the clever people on Twitter saved me a lot of experimentation, although I still had to try the In theory, I printed two more nozzles with a very small expansion section and there is definitely a difference visible in the blurred image. However, the theory was correct. The single standard nozzle produced the most thrust in order to keep it simple. I connected the turbine directly to a carbon fiber tailboom and because the tailboom is hollow, if I seal both ends it can be pressurized at the turbine end of the tube.
I designed a three way fitting that allows the incoming air to pressurize the tail boom but also acts as a nozzle to feed the turbine and then on the other end of the tube I drive a 90 degree nozzle that will act as the tail rotor with the propeller and air supply connected. I can spin the turbine and see how the torque compensation works and it seems to be working better than I expected, so I need to reduce the diameter of the tail nozzle, but at least it seems to have enough thrust. I then printed a very basic rotor head that was inspired by Peter Shreepool's rubber band helicopter where the blades are simply attached.
A kingpin is fitted and then a weighted stabilizer bar is fitted at an offset angle. This stabilizer bar is very common on small scale helicopters and the idea is that the gyroscopic stability of the bar will keep the helicopter level during flight or at least long enough for the air. the supply will run out so with the helicopter suspended from a rope mounted on a bearing it's time to see if this thing is going to fly apart from the air supply tube pulling the helicopter it actually looks a little promising so Let's connect a one-way inlet valve. to fill the bottle and see if it can run on its own air and without the safety strap it seems like the nose of the helicopter lifts up very violently as soon as it takes off causing the stabilizer bar to come off because it is only restricted to about 30 degrees of pitch, I believe the reason for this is that the air supply acts as a nozzle once the helicopter takes off producing a rapid jet of upward moving air that hits the nose of the helicopter.
I also noticed that the turbine barely runs for more than a couple of seconds, almost like the propeller blades just spin freely, suggesting that the bottle is not being pressurized to fix both problems. I redesigned the inlet nozzle with a larger diameter so that there is more airflow into the bottle than out through the turbine. I also designed the nozzle to vent air sideways once inside the valve, so that when the helicopter takes off there won't be a vertical stream of air pushing up into the nose. The only problem is that the new large diameter inlet nozzle has too much friction for the helicopter's thrust to overcome.
So why not give it a little help in one last attempt to see this thing in the air? I built a little lever to help it come out of the mouthpiece. The bottle definitely seems to store more pressure now that the turbine is spinning for much longer. Let's remove the safety strap one last time, just a little more pressure should do the trick. I'm going to pause here and show you the slow motion because not only does everything look better in slow motion but it also makes flying easier. The time seems longer, I honestly don't know what else to try on this project, I just don't think it's going to work, but you know what works.
Kiwifruit boxes. Kiwico creates these amazing boxes, each containing hands-on projects designed for display. from children to science, technology, engineering, art and mathematics, and they never fail to impress me. The boxes are expertly designed to not only be educational but also a lot of fun and each box includes all the necessary supplies so there is no need to go to the hardware store too. Like an instruction manual clearly designed for children, each Kiwi code created is different and there are over eight different subscription lines, each catering to different age groups and topics, so there is something new to learn every month.
Cubico believes that the best way to change our world tomorrow isteach children problem-solving and innovation skills today and I completely agree that learning to solve problems really opens up future ideas and opportunities. I just wish I could improve my table tennis skills. You can get 50 of your first month from any kiwico box. going to kiwico.com slash tom50 the link will be down in the description below thanks to kiwico for sponsoring this video and thank you so much for watching if you liked this video it would be great if you could leave a thumbs up below if you're new to my channel and want to see other projects like this, click subscribe below and a huge thank you to all my followers on patreon.com for making this project possible.
Honestly, I couldn't build it. This kind of thing without your support, so thanks again for watching and I'll see you in the next video, bye.
If you have any copyright issue, please Contact