5 Ways to Print on Wood | DIY Image Transfer
May 10, 2020What's up guys? I'm Brad Rodriguez from Fix This Build That and today I'm going to show you five different print
onprint
out of each so we can compare them and show you the results. I have my logo here, I have a little
ways
towood
. I'll show you four DIY methods and one method that is totally tricky. And the results were pretty good. That's not even the best. Let's see them all. For the five differentways
, I'll use aimage
, so if you want to take a photo, you can see what it looks like. And some text so you can see how it works in all those different scenarios, and that's what you might want to use in yours.
The first way to print on
wood
is with acetone. I'm going to show you this. Again, this is all based on laser printing. So this is all toner. This is not inkjet. However, this method will work for inkjet. Just not so good. Totransfer
the ink, I placed the mirrorimage
on the wood and folded the paper over the edge to hold it in place. You can also use masking tape here. I used a plastic hotel card wrapped in a shop towel and then dipped it in acetone. Then I simply pressed the card firmly onto the wood and let the acetone soak into the paper.
More Interesting Facts About,
5 ways to print on wood diy image transfer...
And I rubbed the towel back and forth along the surface. Now it doesn't take long and the ink
transfer
s. Then the paper just peels off. There is no stickiness and it reveals the image. Alright, that's the acetone here. You can see the quality of the image. It turned out pretty decent as I mentioned, but in the picture it's a bit bad. When you have a lot of dark text, it's not the best either. But with the small text, it actually looks pretty good just for the line of text. So it's OK. Advantages: it is very fast.
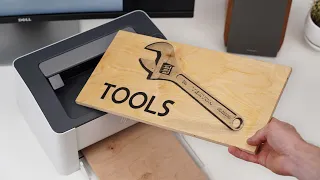
Is it clean. It is cheap. As for the cons, you know you're dealing with harsh chemicals. Acetone is a bit unpleasant and obviously the image quality would be a disadvantage as well. Let's move on to the next one. Alright, the next way to print on wood is to use a clothes iron. Now you probably don't want to use the one your husband or wife uses around the house. Do not do that. Go ahead and get one from Goodwill. This one I think cost me two dollars and I use it for edge banding. But the idea is that we have toner from a laser printer.

We'll use heat to transfer that to the wood. Let's see how it's done. The method of ironing clothes is extremely simple. I just put the paper down and folded it over the edge like I did before. Then I literally just ironed the paper making sure it didn't move while I did it. I tried pressing hard and I had the iron up but I still don't think there is enough heat. When I removed the paper it didn't look good. Alright, pros and cons of the clothes iron. Obviously for professionals it is very cheap. Almost everyone has an iron they can use that is fast and effective.
The cons: Image quality is not great. Works well with text. It might be better if you had a hotter iron or a more insulated heat source. And also, from a con perspective, you can burn yourself, you can burn the wood. That brings up some variables that you may not want in the shop. Alright, let's move on to the next one. The third way to print on wood is to use water-based polyurethane. I have polycrylic here. I'm going to put this on. I'll put it on the wood, put it on top and let it dry and then we'll remove the paper and the image should be underneath.
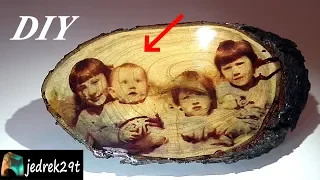
Let's see how it works. I applied the polycrylic with a small acid brush trying to get a thin film that was wet but would not pool. I think less is better than more in this case and you really don't need much. I then press the paper onto the wet polyacrylic and smooth it from the center out to remove any air bubbles. And firmly seat the paper on the polycrylic before letting it dry. It's been about an hour and the polyacrylic seems pretty dry, so I took some water and a stiff toothbrush, and I'm going to remove this paper from the back using a little water to loosen it.
I found that the easiest way to remove the paper is to wet the entire backing first and then peel off as much as you can by hand before scrubbing. Then just gently scrub with the toothbrush until all the papers are gone. I cleaned the wood with a shop cloth and then looked at the results. I finished the polycrylic and it looks amazing! Really good job transferring the ink, very dark and the image is almost perfect. So this one did a very good job. The truth is that I'm a little surprised. So for professionals, obviously, the image quality is going to be, first and foremost, excellent quality on that transfer.
It will look amazing. Plus, if you're a carpenter, you probably already have some water-based polyester on hand. The disadvantages are that it takes a little longer because you have to let it dry. It's also a little messy and I'll have to go in here and clean this up a bit. But ultimately, this is a great option. Alright, let's look at the next one. The fourth way is probably the most popular and I've seen many YouTube videos: using an acrylic gel medium. This is a liquitex. I will have a link below in the description of this, as well as all the different materials I use in this project.
But this is basically for acrylic paint. But when you put it on the surface it will also transfer that ink to the wood, so let's see how it works. Gel medium is similar to polycrylic, except it is a gel versus a liquid. Then I found that a foam brush worked well to distribute the gel because the brush left too many ridges. Now, again, less is more. I pressed the paper into the gel and then pushed out all the air bubbles with my fingers and then the card since the gel is a little thicker and it wasn't as easy to move. polycrylic was.
Then I set it aside again to dry. Okay, this one is dry and let it sit too. The process will be very similar to the one I did in the last one for the polycrylic. I'm just going to put a little bit of water in here, a little bit of warm water, and I'll take it off. I just let it sit for about an hour to an hour and a half. You don't have to do it overnight from my test. Let's see how it turns out. The only difference with the polycrylic was that when I rubbed the gel medium it seemed to grip much stronger.
I think this is because the gel is thicker and then there is more buildup on the surface. So perhaps it might help to dilute the gel with water before application. Very good, the gel medium turned out excellent, the quality is excellent. Same as polycrylic. Looks great, very dark, great transfer. The unique thing about this one is that this paper really sticks, especially if you left it on overnight. It would be extremely difficult. This is about an hour and a half, and I still have a lot of paper left here and I rubbed it a little more than the polycrylic.
So for the pros, I'll say excellent transfer quality. You know it's pretty easy to continue, but it's complicated from a scam standpoint and it's also a lot harder to get out. So I'm going to come back to this, clean it up a little bit, and take you to number five. I'm going to cheat a little. The fifth way I'm going to print on wood is not DIY, but it is awesome and yes, it is cheating. It will use a CNC laser. Let's take a look. This is my full spectrum hobbyist laser. You can engrave wood, plastic, leather and the setup is really easy.
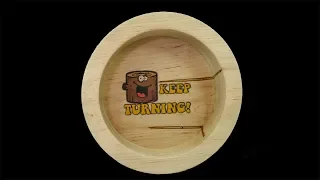
I simply place the wood in the machine, line up the little red positioning dot, and then press print similar to printing on your own printer. Now the laser begins its journey and it's not fast, but it sure is fun to watch. Now I bought this laser from Rockler Woodworking, and it's an older model now, but I'll have a link below in the description if you want to see what these things are all about. Okay, so the laser printing obviously turned out great because being laser controlled the logo looks really impressive. Everything is very well defined. The only drawback of the laser when using it on pine is that the density between the woods is not consistent.
So it burns deeper in some areas that you see on the logo there. But again everything turns out very well. The obvious advantages of the laser are that it is super precise and the text looks amazing. But the disadvantage is obviously the price, okay? But if you're going to print that on wood, not only are you going to do that, but you're going to do other things like make boxes and things like that. It's a great tool. I'm lucky enough to have one and you may be able to access one at a local Maker Space. So you don't necessarily have to go out and buy one.
Alright, I have these five methods laid out in front of me. I'll give you a close up and show you how each of them looks compared to the other. Then I'll give them a little finishing and we'll see how that also changes things when you look at them. I think polycrylic would definitely be my first choice. The medium gel is my second only because there is a lot of extra effort in that one. Then acetone if you wanted something super quick and easy. Clothes iron, it wouldn't work. And if you have a lot of money, then I'll take the laser.
I'm going to put some hairspray here and see how they change. After putting on the finish, I'm starting to change my mind a little. I'll tell you what, acetone number one really darkened it. I like the look of that. The clothes iron, which we can say is really not good at all. Polycrylic is still by far my favorite. The blacks are super sharp and the finish is very, very smooth. Half gel, this one changed my mind after finishing, you can see it here. It's not smooth at all. The finish highlighted all the little bumps in the excess paper and meant I would have to spend a lot more time cleaning it up to get a really nice finish.
I'm going to knock that one down behind the acetone now. The CNC laser turned out great, but it doesn't darken with the finish and isn't all that black if you really look for it. It's much more of a wood burned or pyrography look. There you have it guys, you now know five different ways to print on wood and how each of them turns out. I'll stick with polycrylic. I really enjoy it, the finish is excellent and it's a good combination between being easy and having a good product in the end. If you are not already subscribed to the channel, I would love to have you as part of the team and until next time.
Get out there and build something awesome!
If you have any copyright issue, please Contact