5 Tips For Better Live Edge Tables
May 30, 2021Hello guys, welcome back to the store, in this video I will give you five
tips
on how to makebetter
live
edge
furniture, including material selection design and breast sweat finishing. Check it out, the first tip when it comes to doing anythinglive
edge
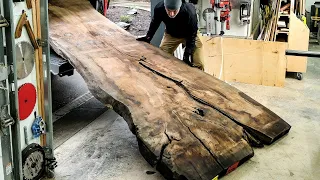
is to understand if your wood is actually dry, which requires a basic understanding of moisture content, is whether your wood is dry or wet. For those of you who are not familiar, moisture content is how much water is in the wood now when you buy kiln dried wood it will pretty much be ready to rock and roll and it should be nice and dry if you are going to use it .
That way all you have to do is take it to your store and let it acclimate for a couple of weeks, it should be ready to go, but if you don't buy it and you're like me and like to get things cheap. Local guys saying it's dry, you'll want to go ahead and get a moisture meter. Now I have a couple linked in the description that are some really good options. However, I recommend if you are going to follow this. route of just getting a nice expensive pinless meter right off the bat. I have this cool meter from Lignomat and it comes with this nice little chart here that shows you what settings to put it on for your specific type of wood when you buy slabs. of sketchy guys on Craigslist, you want to make sure that when you go to pick them up you take a block plane or this is a smoothing plane with you so you can use your meter correctly, all you have to do is have a nice flat surface and then this meter no pegs like this just goes on top you set the wood type based on your board and here we're working with maple so it's 55 then we'll hit the read button this can will give you a depth of three. quarters of an inch and as you can see here right now it's reading eleven point eight percent, which is down from twelve percent on three quarters of an inch, which means I'm happy enough with this to flatten this thing out and use it for a piece of furniture, so what does that eleven point eight mean?
More Interesting Facts About,
5 tips for better live edge tables...
Well, there are moisture rates for types of materials, like building materials, they should be below twelve percent and furniture grade, you typically look for a moisture content of seven to nine percent. The reason this is important is because wood expands and contracts the wetter the wood is, the more it will contract as it dries over time. Why is it so important to use kiln dried wood now that you know your wood is dry enough and no guy on the street is ripping you off? you're going to want to go ahead and flatten the wood and glue it to your tent, let it dry.

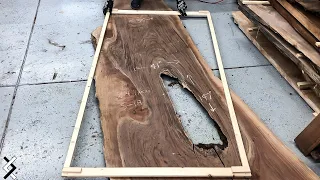
I would say let it acclimate for about two or three weeks before using it, so even though this wood is 12% it will still move. which brings me to my second tip, which is to stabilize the wood. I like to use a sturdy metal base. If you're familiar with my stuff, I use a lot of metal bases on slab furniture or you can also use wood, so some people do c. -Channel inserts, you can buy them. I actually made my own specifically for this table and you can see here. It's just a piece of C channel. I created some grooves inside for the wood to move.
I learned how to set up the seed channel a few years ago. A long time ago, from my friends in Canada who do a lot of slab work, it's really cool. Basically you put some slots where you will put some threaded inserts into the wood and into the slots that allow movement of the wood along the grain. We're going to be able to insert this piece of C channel and help keep the wood flat. The reason we want to keep it flat is because when you look at the grain of the wood in the end grain, you can see here what the end grain looks like.
I'm going to want to hollow out the wood this way, so putting the C channel in there helped keep it nice and flat. I like to use these button cap hex screws that way, they're nice and round, no jagged edges to catch on. a washing machine, so if you follow along you'll probably recognize both boards because this brings me to my third tip, which is to allow the wood to speak to you. Two ways I really like to do this is by using the gaps in the wood and allowing them to be accentuated in eccentric ways (gibberish) to make your piece more beautiful.
As seen in classic furniture, flaws are usually cut or unused in any of the pieces and with live edge furniture you now have that opportunity. I love using inserts to do this. If you haven't noticed but don't know what an insert is, it comes a little closer, then this is what I mean by an insert, they are essentially just inserted into the table to add visual aesthetics, here they are. We're actually putting these two together and they look really cool and are kind of functional. This is a more classic application of an insert called a dutch or bow tie or butterfly inlay and I actually have a video on my channel.
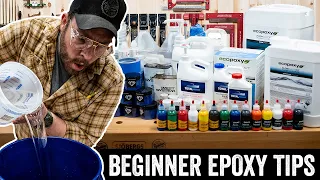
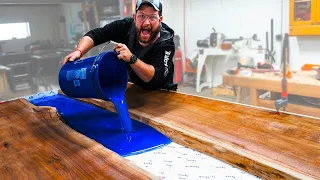
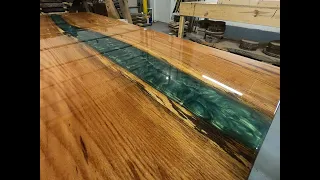
If you want to see how to make one of these yourself, you can check out. I have a link under this piece of furniture here specifically, which I would never use on classic furniture, so what I did was I took the void and I let it become an accent in the piece and I filled it with these stainless steel bow ties that I think They made the piece look absolutely amazing, so the classic application of a bow tie is to stabilize a crack in something like this, but that doesn't necessarily mean you have to use another piece of wood or try to hide it or make it match because it's wider on the outside than in the center, prevents the crack from separating unlike the zipper table where square those are only used for styles, you can basically use any shape if it is wider on the outside than in the center and create a really cool visual touch on your furniture, another amazing way to let the material speak to you in your The building process is to think of the gaps in whatever you're making as an opportunity to fill them with something like epoxy.
Now there are really popular ways to do it right now, but I think a really cool opportunity to use epoxy in a build is in the way Matt Cremona did it with his wall hanging cabinet, this is a really cool piece just because you essentially made your own panels with slabs of black epoxy matching the books and then cut them up and used them in a more traditional sense, it's now a really cool app. For me personally, it was two projects that I did in the last three years where I went into the project and let it dictate what I was going to do, first was the collaborative build that I did with my friend Mike Montgomery in modern constructions, so Today I will start helping my friends John Malecki, who is a great welder and will show me the couple of bases that together with Brad Rodriguez fixed this build and who actually made an epoxy resin table last summer at the manufacturer. ranch in California, he recruited Brad and I to make a kind of large coffee table out of resin with some cookies he bought, so these olive wood cookies were really cool, but they weren't big enough to be a piece independent, so we filled them all. epoxyed the dead space and let the look of the slabs dictate what the table would look like.
The second example is the reason my channel exists today, it's basically the live edge River table I made with the finger type on it now. When I cut that slab I had no idea that void would be there and I was planning on just making a basic glass river in the middle, but lo and behold, the void was there and I had to make a design decision at that moment. moment, so instead of trying to get around that and cutting the table from the opposite side of the slab, I decided to incorporate it and it ended up being the reason this piece is super unique, but before I start doing any of those things, You need to make sure your material is properly prepared so you can apply the perfect finish. put more effort into your finish.
Promise that you will see
better
results, and to start, you need to prepare the surface the right way. Here are sometips
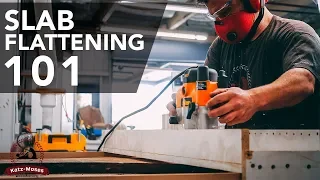
: 1 without bark, get rid of the mark stop leaving bark the bark continues to grow after the tree has been cut it is actually a properly dried piece of wood the bark should fall off a little, so it should not be there anyway and then two: it will continue to die and fall off anyway you don't want a piece of bark falling off in a client's house, just don't leave bark on your furniture when I flatten the slabs myself.I always start with 80 grit after flattening, now I use my Rotex and I have There is a lot of information in other videos on how to do this, but here are a couple of tips to start marking the surface of whatever you are sanding with a pencil or scrap of chalk. The reason you do this is because it doesn't help you. skip any area on the table and two if you go slow enough to remove the pencil you will go slow enough to remove the swirl marks that's a rule of thumb you have a thumb you have a thumb give this video the thumbs up above, this is a vacuum cleaner. and you want to use a vacuum when you sand, then we give you a better finish because you're removing particles from the surface, so if you're wondering what a swirl mark is, it's the annoying little pigtails that are left behind. your end when you're going too fast to help you see those pesky swirl marks.
I like to use a low angle light like these, what it does is it casts a shadow from the side and shows the swirl marks and then if necessary. more help to see them I use mineral spirits, what I will do is go in after I find a circle and then once the mineral spirit dries you will know where your swirl mark is and you can focus on going a little slower. I go back to that area, so for me my favorite slab finish is single coat blonde, because it's one application and you only have to sand up to 120 grit.
It's a two part mix with low V-O-C oil based, you don't need a large amount. In the cabin, it is not necessary to spray it and you can apply it by hand. It is super simple and very easy to repair, and it also makes it easy for your client. If I'm not using Rubio, I'm using enduro var for general finishing, this is my go-to. -To top off almost everything else, if you don't have a nice safe shop where you can spray, I would probably go with the hand applied finish if you are interested in learning more about Rubio specifically.
I have a complete video. on how I finish live edge slabs using Rubio - check it out at the link in the description or above on this card and I have links to all my favorite finishes below for you guys, that's a wrap on this one if you guys have any tips on how handle your Live Edge furniture, leave them in the comments below. I also have a playlist of all the Live Edge furniture I've made a video on, stand up right here and thank you once again. It's time to tune in, go punch your next Live Edge project and we'll see you in the next video.
What's up yinz? Welcome back to the store. In this video I will teach you five tips for making better Live Edge furniture, including material selection, finishing and tit sweat.
If you have any copyright issue, please Contact