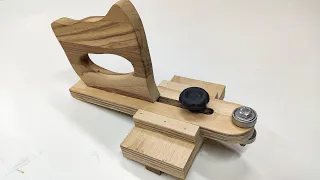
15 - How to Make Deep Reach C Clamps All Wood only $10 Extreme Strength
Feb 27, 2020Hi everyone, my name is James, the reason for today's project is that I'm actually working on something else and I discovered that I need some
deep
reach
clamps
. I went out and priced them and there is over 100 dollars for a good clamp that canreach
Approximately 12 inches so I decided tomake
my own. I started here by drawing what I want on my assembly table, this gives me an idea of scale and perspective, and what I built ended up being roughly that. except I had a 12 inch reach, now this is the perfect project for some scraps because the widest board you need is actuallyonly
two and a half inches and I have a lot of walnut cuts, but nothing in oak, so I chose Sal and buy this board.
The reason I chose red oak for this project is because red oak has an
extreme
ly high modulus of elasticity, this measures stiffness and flexuralstrength
, which is exactly what you want in clamshell. There are two other unique factors thatmake
oak perfect for this project, the first is that it is cheap, you don't need to have FAS oak, in fact you can get the common number two and sometimes you can end up buying it for around $2 per board foot. This entire projectonly
takes about three. board feet the second reason and this is quite important is that it was a study done in 2007 between fine carpentry and Case Western Reserve University.
More Interesting Facts About,
15 how to make deep reach c clamps all wood only 10 extreme strength...
They tested different types of
wood
and six different types of glue to see which formed the strongest and by far the strongest bond. The strongest bond created with domesticwood
was red oak with PVA type one, which is tight bond three. It had more than twice the breakingstrength
of many other combinations, so needless to say I was going to expect a lot from theseclamps
and if you wait until the end, you'll be surprised. I try them with a video scale and the results are pretty good. Okay, let's get back to what I'm doing so far.
I have ripped out all the wood in the description, routed in sections of three and here. I'm about to try to plan and square everything together. You can start with quarter paper, which is about three-quarters of an inch thick, then tear it widthwise to the equivalent of about three times the thickness, and then simply square it. I'm just going to cut everything out, this is kind of a behind the scenes look at a new cross sled I'm making. It will have features that no other cross sled has and you should pay close attention to this without hands. death zone you want to stay away from.

I'm using finger joints here to hold the clamps together and I have a little stock that's mounted on my output table, since the saw blades are so tall, I want to make sure that they don't Obviously, you're going to cut the back off with a few feet so tall, you'll want to square it up every time before attaching it. You want those cuts to be nice and perpendicular and there's a preview of the two back cuts. I'm doing two. clamps, so there is one for each clamp as I want them to fit very precisely. I'm going to go ahead and make a sample on a 2x4 piece and do some sort of test fitting them together to make sure everything is perfect, okay this actually looks perfect and I'm happy with it so I'm going to go ahead and cut the oak now to match, marking the hole locations where I can thread the threads for the wood screw, just make sure you get a good grip before trying to cut those threads. and it really helps if you put a little bit of lubrication in there basically the best thing i found to use is tung oil it's very viscous so it doesn't tend to run or drip much and it really makes the threads cut very well using a large peg for the wooden threads.
In fact, I'm going to cut the strings on that too. You could turn the pin on a lathe. I got lazy and went ahead and spent ten dollars and bought a meter long dowel at the store when I was editing this video. I could have sworn that thing looked like it was going crooked, but it's actually going straight. If you haven't threaded threads before but have worked with oak, you might think that Oh Giz is a bad wood for this, but oak. it actually cuts the threads very very well, you can look here and you can see that there is not a single tear, it is a perfectly clean cut thread for the peg, however you really have to soak it overnight with oil, I always seem to try that without and I always get a little bit of a tear when I soak it overnight and oil it, it works great and those first two inches are Ted because yesterday I was too lazy to soak it in oil and I thought I'd go ahead and try it and sure.
It's pretty cut already, you can see the rest is cut cleanly, although by the way, this is accelerated to three speeds and here is the normal speed, so you can expect to spend a little bit of time cutting this. I think it probably took me 15 minutes, maybe 20 minutes to cut the entire three feet of dowel, once I got to a certain point, I turned the dowel over, wrapped a towel around it so I could hold it, put about three or four clamps and I'm finishing touching that side, quick test to make sure it works as I don't want the glue to fail.
I'm going to put large amounts of glue on this joint, I think it's just the right amount of glue, yes. I put this clamp in reverse so it doesn't close while I put pressure on the main one. Okay, we have to fill these wounds with large amounts of sawdust to prevent bleeding. Okay maybe I was joking but this actually has a really cool feature every once in a while you get these joints that don't fit perfectly or at least you see little gaps in them if you do this now before you close it any little gaps you had will be 100% invisible when your joint is complete, try it and you will see more glue coming out.
I had no idea it takes so many clamps just to build a clamp, it makes you wonder how the first clamp was made. It's okay, everything is dry. and it seems like a nightmare to endure, it is very difficult, but I will tell you a secret, many people are afraid of becoming aggressive in the arena, when they start, don't just be a light touch, let's start with a very aggressive role that will eliminate a lot of material in a short period of time. I'm using 36 grit paper on my belt sander in a minute. I'm going to switch to my disc sander and start with With 60 grit, it will clean up all the marks in just a couple of minutes of the belt sander and then I'll switch to 100, then 150, then 220.
This entire clamp can literally stand up in about five or six minutes if you go. On this route start very aggressively, try to keep an eye on some of those finger joints as you go, you'll notice there are no gaps in them, not even a fine gap, using that sawdust really makes a difference, so I had a 36 inch. Luckily Dell these clamps required an 18 inch plug and it worked perfectly. I got two of the members to just put a little bevel on it and right on the edge of the dowel where it's going to go into the wood, I could use the disc sander, but it was also.
I'm too lazy to get out the sander. This is the long piece I was talking about. I'm going to use this to make the rotating handle to tighten the clamp mainly. I just like drawing shapes on wood. I'm going to put a hole in each handle so I can thread them into the top of the hickory threaded screw very well; and this is a one and a half inch tap, by the way, I used one and a half inch dowels. See more drawings, you can use the a band saw to cut the handles or a jigsaw works well, even a jigsaw, anything will work for that for the first five years I worked in wood.
I couldn't afford a band saw and then for the next ideas, woodworking ideas, ah, so I got very, very good. With my jigsaw, I hope you can see the shape of what that handle is going to be now and that's why I had to do all that drawing, of course, here's a 3/8 inch radius that looked really nice on the mango. rounded feel and makes it easier to grip and you certainly don't need a router table. This is a perfect job for a palm router. I have one that I bought at Home Depot. It is a rigid palm router, has a quarter inch shank and works great.
I think I paid about ninety dollars for it, so I'm going to attach the handle to the end of the screw with glue. It's pretty tight anyway, but I'm going to put glue on both the handle and the screw threads. I didn't do it here, but it would have been a good idea for a participant to a little bit of sawdust with that glue that way, when you screw this handle on, it's a little bit tighter, it's not really very critical. In fact, I'm going to drill all the way here with a 5/16 inch hole and I'm going to put a double pin all the way through.
I didn't let the glue dry before drilling it, so the glue burned. the end of my drill bit there, but it cleaned up nicely and remember the best course of action is when you're done putting glue on, just put a little more glue on and then hit that peg with your giant lignum vitae Thor's hammer, I thought. I would go ahead and round the edges here a little bit, which was going around the back, so they decided not to set it up, they wanted to compromise on the strength there, but rounding on the front here won't take away from the strength. and it makes it look a little better, okay, this is the last time I'm going to draw on the wood.
I think three pegs going through these finger joints will really stiffen it up a bit and I'm not going to rely one hundred percent on glue, although I think it's enough, this will also give us a little bit of mechanical holding power and allow me to give it a feature. nice design. I can use a walnut dowel for a contrasting color. and recently I decided to pass this round to the entire piece. Here's that little palm router I was talking about. I had to use it to route this part of the clamp, so I'm going to cut some walnut discs for the hold. pads walnut is a good wood for this because it's not too hard, it's not as hard as red oak or maple and you don't want anything that is too hard to be a holding surface as it will go against the wood and potentially will dent these hole saws I like to drill a little more than half turn them over just relocate my hole and drill the other half then take it out it's always much easier to get the discs out that way and for a couple of these I have to put some holes in along them will fit into the end of the wood screw, as you'll see here in just a minute, so I have to put a slot in the end of the wood screw, it will be a point where the clamping pad can grip and rotate freely when the screw screws into the object it's holding, you can't make the shaft of the screw rotate against it, it will damage the wood, so it has to be something independent with the clamping pad and you'll see how I put it together so it's pretty easy to make this cut on the table saw, we simply set the distance we want.
I've set up my court here. I make a cutting motion. the fence about an eighth of an inch to make the second cut and then I get a total width of a quarter of an inch and it's easy to do as long as the handle is not attached to this screw, unfortunately it was on the dummy and I moved on . and I already put the handle on the other screw so I had to come up with a different method to cut the slot on my other screw so I had to move on to my really old router table because that's the only table I had on it.
For some reason I would have carried a quarter inch shank bit on my newer router table, so I can't fit a quarter inch shank bit anyway. Quarter inch shank for a quarter inch putter raised to the correct depth and it's basically suspended over the position and I turned the screw, sir, and that did a good job too. I imagine there are other ways this could be a mascot if you're a crafty woodworker and you can probably find a number so I have to glue these discs on and a little rough on some of the surfaces since it was scrap wood so I just wanted to touch them up on my disc sander to make sure they are perfectly flat so they will stick well if you do this be very careful. hold it firmly or maybe just play it safe and place them on the sanding block and here I just need to glue the flat disc to the ring.
Dumbbells make fantastic clamps for things like this. I have this solid block of steel here that probably weighs. Ten pounds is going to work for one of them and for the other all I have is a block of aluminum, a small block of steel and a little bit of copper, so I hope it works. I need to sand the end of the screw here so that it fits inside the clamping pad, but we don't want to stay too long, we want to leave the shoulder there so that when the clamping pads are built around it it has something to hang on to for the holding pad no If it doesn't fall off, I'm going to use a very thin slice of oak to make a small disk to hold thesupport pad on that shoulder.
Say it more by drawing on wood. Sorry, I have to make the full size here to make it fit right. that slot that we gave the wood screw but not so big that it will fall on that shoulder. I'm making three because I'm sure I'm going to ruin one, so if you don't have a band saw, I wouldn't do it. use the jigsaw here to cope with the sighs much better the jigsaw is really too violent for this small piece of 1/8 inch thick wood, okay, time to put it all together, this is the assembly method secret, don't tell anyone how it works while I What we really need to do is split that little piece of oak in half along the grain because it will stick back together perfectly and you'll never notice the break.
We'll glue it back on and go to the nut at the same time. Instead, this will basically keep the pad permanently attached to the screw, so I'm going to hold it in place and put a little bit of pressure on it for half a minute to a minute and that will allow the glue to adhere enough that it can sit and hang. it's its own and then I can use some tape as a clamp to tape it together. I cut that oak disc a little larger than the walnut itself, that way I can sand it so it's flush with the walnut when all is said and done. and voila, and this actually has a considerable amount of force, it takes quite a bit of force or it will take quite a bit of force to even remove it if it ever gets damaged because there is a lot of glue surface that the oak is glued to. nut in all directions and are under normal use, you will never incur load in that direction, all the load will basically be the screw pushing down on the 3/4 inch thick flat part of the nut against our clamping surface and we can see how it's going to spin freely into place.
I will allow the screw to turn and it will stay still. I thought about doing this with another clamping pad on the bottom also with walnut just to really make it look and here you can see me using this clamp for the first time it will actually hold that pad in place for me so we'll hold it tight and if You came this far, you must be attentive. I'm going to test this clamp on a scale here. in just three more minutes, so my favorite finish is lacquer. It's very easy if you have a small project like this.
You can buy spray lacquer. The nozzles for this are great. One thing you should never forget: you should wear a respirator if I'm wearing hairspray, it's very dangerous not to wear a respirator, okay, it's time, so I have a scale, the biggest scale I could find is this one, it's a five-hundred scale. Fifty quid, we'll see how it goes. I know Matthias Wandel. No I don't know if you follow him on YouTube, he built some kind of C clamp, a
deep
reach C clamp and I think he weight tested it up to about 200 pounds so we'll see what we can get out of this so I'm I'm going to use one of these clamps to hold the other firmly in place.I think I'm going to first place a piece of plywood so that all four legs of the scale can touch it, and then I'm going to place a piece of plywood. On top of that, distribute the load so the clamp doesn't put a hole in the scale, not that it can do that, but just in case, here we go. I will have two cameras on, one will focus on the reading. and we are going to hold the other one with our hand, yes, we are very excited. The scale went up to 564 pounds and then it gave an error and you can see I have a square on the clamp on the back.
There was no deflection inside. I have a little less than 1/8 and that's about 2/3 of the distance to the screw, so it's pretty good after releasing the pressure. I'm just going to check and make sure. It looks like the clamp is back to being perfectly square so that's fantastic, so we're really excited that the results are great because it's actually what I expected. You know, a little bit of science and research was done to give the wood the most strength. and the best glue joint we could, in fact I have a feeling this clamp could probably withstand a thousand pounds of pressure, so if you're ever watching my video, Matthias, I'm up for a clamp challenge, thank you so much for look. and please subscribe
If you have any copyright issue, please Contact
![GreenSaw G-Clamps - How to Make C-Clamps, Homemade and Easy DIY [4K]](https://i.ytimg.com/vi_webp/G9E1r00vG1Q/mqdefault.webp)