12v Electrics for Off-Grid Campervan - Fiat Ducato Budget Build Ep12
May 05, 2024Hello and welcome to another episode of this cheap Fiat jakato built camper van. In today's video we will take an in-depth look at the off-
grid
wiring system, see how we generate electricity, how we store it, and how we can provide 12 volt DC and 230 volt electrical power for our RV conversion. I will briefly discuss each component and why I chose it and then we will see how they are all connected together, so the first thing we need to do is What we are going to look at is how we are going to generate the electricity and by far the best way to do this is with solar panels with any other means of getting electricity, whether it's connecting your truck to a DC-to-DC charger or even Having a portable generator outside your vehicle comes with a cost, whether you pay for the electricity or the fuel to run it. a motor with solar panels, although it has an initial capital cost, after that the energy is completely free. of the Sun, that way the system will pay for itself in a short time.
For this
budget
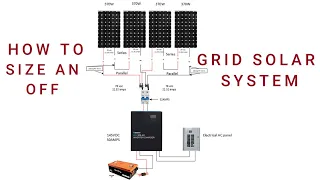
, solar panels have come a long way in technology and efficiency is improving all the time. I have selected some 175 watt renergie solar panels that are almost 22 efficient, meaning the space they take up is much smaller, they won't take up as much space on the top of the van, and they will provide more power for the space they take up. These panels only measure 1260 millimeters by 700 millimeters so they are much smaller than the previous ones we have used and give more electricity currently, these panels only cost £129 each so that is less than a pound per watt and if If you look at typical campsite electrical connection charges, let's say five pounds a day is a conservative amount.
More Interesting Facts About,
12v electrics for off grid campervan fiat ducato budget build ep12...
The amount that these panels would actually pay for themselves in about 50 days so now we need a place to store the electricity and then we need some batteries and again for this
budget
I have selected AGM Leisure batteries which are a lead based battery and experience of our other truck. I'm still using the same AGM batteries I installed in that truck five years ago. I made sure the voltage never dropped below 12.3 volts, so I kept them at about 70 full and doing so. I have had almost 2000 cycles in the last five years and the batteries continue to perform very well, proving that this is definitely the most economical and perfect solution for that budget.
Yes of course lithium batteries have advantages in their size, weight and capacity but based solely on cost these agms perform much better financially in the long run because this is a mid wheelbase fan we don't have much space in the roof. I have enough space to fit a couple of panels in there, so I'll probably need an alternative generation source, so we'll consider using the van's starter battery and the alternator when we drive with the DC to DC charger as a second source of charge in our leisure batteries when you are driving your truck, the engine rotates the alternator, which in turn generates electricity and a voltage of approximately 14 and a half volts that runs all the electrical elements of your truck while drives and also recharges the starter battery, so what can we do?

What we can do is take advantage of that starting battery and alternator power and use it to charge our leisure batteries while we drive. Normally I would use an mppt charge controller for the solar panels and use a dc to dc charge controller for the alternator power. It requires two separate pieces of equipment to connect this system but I am going to propose using a Renergy dc to dc charger which has a Built-in MPPT solar charge controller, all in one box. The cost of purchasing this combination from CC to CC. The charger and mppt are much cheaper than purchasing separate items and the wiring will be much easier too.
When selecting a suitable charge controller, you should refer to the specifications for maximum input, maximum power input in watts, and maximum input. Voltage input, this particular controller has a maximum input voltage of 25 volts, so we won't be able to wire the panels in series like we did before. These panels will have to be connected in parallel, so we must connect the positive. to positive and negative to negative and there are some simple mc4y connectors that allow you to do this very easily. They're IP67 rated so they're suitable for being outside on the roof of your van, water won't get in there and then in line with the positive we'll put an inline fuse.
This is a 30 amp cartridge fuse that will protect that positive going down to the controller. I am also going to install a bipolar isolator switch inside the vehicle because all the time the solar panels are in the sun they will generate some electricity so with that bipolar isolator I will be able to break both the positive and the negative if I want to work on the system or If I just want to insulate the solar panels. during installation that switch will be left in the off position until we have the leisure batteries connected to the controller first we will talk about the wire size and the size of the fuses in a few minutes the nominal voltage of the leisure batteries is 12 volts and The ones that I have selected for this vehicle are 110 amp hours each, so to connect them we also need to connect them in parallel, that is, one cable from positive to positive and another cable from negative to negative that maintains the system. at 12 volts DC, but that adds the amp hours together, making our total storage capacity 220 amp hours.
Then we simply connect the positive of the charge controller to a positive of the first battery with an inline fuse and then we connect it to the common negative of the charge controller to the negative of the second battery the reason we connect the first battery to the positive and the second batch to the negative is to use both batteries as a complete chain to ensure that the electricity flows through both evenly and that way we do not use one battery more than the other and this will prolong its life and then to complete The charging side of this system we only need to connect to the vehicle battery to go from the positive side to the vehicle side. from the charge controller to the battery positive with an inline fuse again for protection and then from the common negative back to the vehicle battery negative and that completes the charge from the truck so now you can see with that single controller on the In the middle of this diagram it is very simple to connect this entire system.
We have solar generation coming in on one side of the controller. We have generation from the truck when the truck is driving, entering the other side and then out of the driver to our Leisure. batteries, so with this combined charge controller we can measure both sources and charge our recreational batteries accordingly and one of the really great features of this combined charge controller is that when the vehicle is stationary and the solar panels have been fully charged , recreational batteries will then begin to slowly charge your vehicle's battery, ensuring that your vehicle's battery is always fully charged for when you need to start your next trip.
Therefore, for the cable sizes on the solar side, the four thousand PV cables that come installed on the solar panels are adequate for individual panels, but when we connect them in parallel, the amps add up, so in a single wire amps will exceed 20 amps so we need to increase that single wire to a six mil PV cable, the fuse on the common positive will be a 30 amp inline fuse which is about the maximum rating for mc4 connectors , so you don't want to put many more panels in parallel than that and the rating of the bipolar isolator should be above the rating of any of the fuses, so at a minimum I would go with a 32 amp isolator.
Wires and switches should always be rated higher than the fuse; the fuse must be able to blow first to protect all other elements of the system due to the C rating of AGM batteries where the charge rating. I selected the 30 amp combo charge controller because I don't want to put too many amps into these batteries. So based on 30 amps, I calculated that the cables to the truck battery and the cables to the leisure batteries should be 16 millimeters. Each circuit will be protected by 40 amp fuses to complete the generation side of our off-
grid
system and the storage side so we can generate power from the Sun while we are.While we are driving the caravan and we can store that power in a couple of AGM Leisure batteries, now to use that 12 volt DC power in the van we are going to need to distribute it to all the appliances, so we need to install a blade fuse. Fuse holder, this has a positive and negative supply to the blade fuse holder and then has multiple outputs which are all individually fused. I previously located this blade fuse holder in the garage and ran all my appliance wires to that location, but obviously that involved running a lot of wires throughout the van for this camper to keep costs down.
I am going to locate the local fuse holder where it is needed i.e. near the kitchen as that is where most of the power will be needed and then I will simply run a single set of wires from the Leisure batteries to the fuse holder to move it away from the batteries and to save on all that wiring. I will connect a positive and a negative to the Leisure batteries and run it through the van. and plug it into the fuse holder and I'm going to protect that circuit with a 25 amp fuse. You will notice that I removed the positive from the second battery and the negative from the first battery, in fact the battery opposite where I am charging, the reason I did this is that I am charging on one side of the battery chain and I am removing power from the other side of the battery chain as it ensures consistent usage and longer life, and then from the fuse holder it is simply a case of taking an individual positive and negative for each appliance.
You can take a look at my wiring diagram above to see how it's done, but it's simply a positive and a negative for each appliance, taking into account the wattage. that each of those appliances need to size the corresponding wire and some sizes, the fuse holder will provide 12 volts DC for most equipment inside the motorhome such as ceiling fans, water pumps, any lighting fixtures or any 12 volt cigarette socket. or USB charging points, these will all be connected to that fuse holder, in the van a 230 volt mains may be required to plug in a laptop or perhaps a TV or something similar, so we need to be able to generate a network 230 volt electric. energy from our leisure batteries and for this I am going to install a 1000 watt inverter.
You should be careful when choosing a suitable inverter so as not to exceed the capacity of your battery. Batteries have a c rating, which is their charge and discharge rating. and many batteries will not actually discharge enough amps to power these large inverters. Most appliances you'll need to run, whether it's a TV or a laptop, only need 100 or 150 watts of power, they don't need a huge amount of power, so unless you're using a horrible dryer By induction hair or boiling water, you don't really need a lot of electricity, so it makes sense to keep the inverter as small as possible if you want to use a lot of power. electrical appliances in your truck then you really need to consider using lithium batteries as lead acid batteries will not deliver enough amps to power the inverter.
The inverter takes its power from the batteries with a positive and negative connection again on the discharge side of our battery string, so the same terminals that we connect the fuse holder to we take a positive to the inverter protected by our 100 amp fuse and we take a negative from the batteries to the inverter to complete the circuit due to the size of the inverter it could be drawing many amps so the wire size needs to be much larger. In this case, I selected a 25 millimeter battery cable and it is protected by a 100 amp fuse at the output of the inverter.
It has a simple three-pin connector. So you would plug in a regular three prong plug connected to a 2.5mil 3 core Flex. I suggest using arctic blue as it is very robust for motorhome installations, this will provide you with a means to plug in your device's remote control from the batteries in this particular. The inverter also comes with a remote on/off switch indicated by that little device connected to the green control wire. You can place it in the living room of the vehicle so you canTurn on and off the inverter when you need it. It is always advisable to maintain it. the inverter turns off when not in use and stops consuming power when you are not using it now, a really great feature of this Renergy inverter and one of the main reasons I chose it is that it has a mains input in addition to the battery input so you can connect your electrical connection cable to the inverter so that when you are at a campsite and it is plugged in, the output of the inverter is powered directly from your connection and does not draw power from your leisure batteries. an automatic switch with the inverter inside, so as soon as you connect to a campsite and turn on the plug supply, it will automatically switch and all the plugs in the van will be powered from that connection and will not draw power from the batteries and then as soon as you disconnect that connection it will go back to drawing power from the batteries and it says this is like a UPS so it's a brakeless shift so you can have a device plugged into the van you can disconnect the connection. and the device would continue to run on batteries without interruption in our previous van.
I made a system similar to this with a manual shift switch and made a control panel it was quite complicated to be able to do this myself but having this inverter with automatic shift does everything in one box, really simple and easy. Everything on the main 230 volt side will need to be grounded, so be sure to ground it. Your live neutrals and ground wires to all outlets and back to your electrical connection. The inverter box often needs to be grounded as well, and you will usually find a grounding prong on the inverter box for that purpose.
It is very important to ground these 230-volt outlets and appliances because the potential for damage with such high voltages is much greater. I plan to make a video dedicated to grounding off-grid RV wiring systems because there is quite a bit of confusion. between the ground connections of the 12 volt and 230 volt systems from the Earth and what is actually required in a camper van, so I would like to make a video dedicated to that just to clear up some of the common mistakes and finally, About this camper van, I just want to talk. about an emergency backup charging method as with our previous motorhome we had a battery charger installed in the garage so if we had been out for long periods without sunlight or were sitting in the shade for an extended period of time and the leisure batteries were really dead, we could connect a campsite to the mains and then turn on our mains battery charger and recharge the leisure system directly from the domains and in the five years we have been living off the grid, We've actually only needed to do that a handful of times, the solar system works great, but when we need the portable power technology battery charger has worked so well, I'm really impressed with how good it is, I'm going to put one.
In this new van there is also a slightly smaller version, only 15 amps, so the initial purchase cost is a little cheaper, but it works really brilliantly and I will put some links in the video description of all the products what you see in this wiring diagram. If you want to buy them for your own motorhome conversion, here we go. I think it is the perfect setup for a motorhome. If you want to be off the grid, it has a couple of means to charge the batteries, a couple of means to use the power all devices combine multiple functions to keep the cost down and make wiring installation very simple, so I really hope you enjoyed the video.
Please give me a thumbs up if you liked it, if you know anyone else who needs help. your wiring, share them. A link to this video and if you have any questions about anything I've shown you today or just want to say thank you, please do so in the comments section below. I will do everything possible to return to each of you and I can only say thank you very much for watching and I will see you soon, greetings.
If you have any copyright issue, please Contact