Floodlight Simulation
Apr 07, 2024Good afternoon everyone, I'm Mel Karoko again and I received a crazy request from Mr. Sail Sayed. He asked me to create a video about spotlights pointing at his coverage area. I don't know what he wants and why he wants to know, but anyway. Well, then it's about reflectors. I think he wants to experiment something with the spotlight on him. I also asked him what brands he should use when doing this reflector
simulation
and he said Phillips or Thorne. Okay, I already have the reflectors available at Thorns, so I'm just going to use the Thordon reflectors, so I'm just going to use this Altis and um flood area, so this Altis is good for sports lighting and the flood area.
Flood is good for overhead lighting, so it is symmetrical and this. one is symmetrical and if you want to consult the brochure of this Altis you will find this link here and you will say look at this one. I think this one is very important, so this is one of the facts that you can find in the Thorn brochure. So you can see here, this is the symmetrical reflector good for sports lighting. They have an 11-degree narrow beam, a 20-degree medium beam, and a 30-degree wide beam. You can see here in this elliptical lighting layout how it works.

More Interesting Facts About,
floodlight simulation...
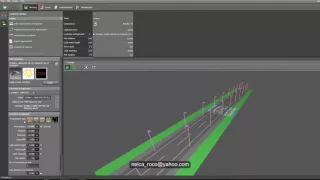
It looks like you can see this 55 degrees wide or 12 degrees narrow like this okay and if it's symmetrical it's usually mounted like this like zero degrees or 90 degrees here and then there's no direct light up because it's pointing down, just you will do it. See below how it looks when we test the 40 degrees and 60 degrees with a symmetrical reflector. Well, since we want to see it visually, I created this nice wall and terrain here. I think it's a 20 by 60 lot and 20 by 60 wall and I also put a guy here to see the ratio of our flood-like
simulation
, okay, right now I have this narrow beam, you can see it's very narrow , this is Thorn's 11 degree symmetrical reflector and when I aim just right click and rotate it, this is what it looks like when you aim, look at the flood lights and the wall, so you are doing sports lighting like a football field or you are doing facade lighting, this is what it looks like. like around the update so it's very narrow and you can see I added a grid so you can see how many grids it covers on the wall and also on the floor.
Well, I usually use this one for a golf course if I'm working on a t. -The t-area of the ground is a very, very small area, so I use a narrow beam with a lower wattage or a lower output limit because it only covers a very small area, so I don't waste lights on the surrounding area. I'm just putting lights in the perfect location or correct or precise location, okay, so when we go to change it to, for example, medium beams or replace, let's replace this with the medium beam now, okay, let's replace it with a medium beam and the middle beam looks like this Is the middle beam okay?

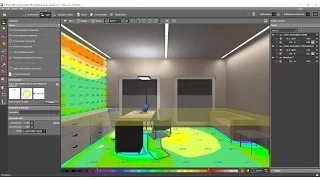
It applies and no, I'll say no and there you have it. Now it's a medium beam and the medium beam says it's um 20 degrees, so let's see what it looks like in reality or in the simulation, so yeah. a little bit wider now if you can see the difference okay you can't see maybe I can put them next to each other so you can see it really well let's go and put our narrow beam here so this is a narrow beam and this It's a medium beam, oh. look at this one, I don't think there's that much of a difference, ah, okay, yeah, I hope you can see the difference now, it looks like it's not that much of a difference, but actually yeah, you can see those little yellow dots or around it. here that's the focus light uh the one you'll see similar to the mid beam is the spill light almost a spill light the yellow one okay let's go to that false color oh okay I need to render it let's render it okay, so let's go. go and render, look there you go, you can now see the difference, the narrow beam is a very intense point of light, well the medium beam is not so good, this is how you can see the difference, you might think this is what same, no, it is not. actually, when you run a calculation, the values, the number of values will tell you that there is so much difference between the two, so go and turn on the ground, it's like that, yeah, there you go and let's try it, there you go, now It is the wide beam.
You can see that the white beam is a little blurry compared to this one, it's very focused. The narrow medium beam isn't as blurry, but this one is blurry almost now on the ground. It doesn't have as much focus as the narrow beam. with a strong one, okay, let's aim at the wall too, so let's rotate and do a calculation and check the false color, there we go and now you can see the difference so you can think about the visualization when rendering it. it's not that much of a difference but yeah now you can see the full effect of the differences of the two so this is the narrow beam and this is the medium beam and this is the white beam and if you mark it in the false color see that, now this is the effect, okay, sale, I don't know what, why are you trying to experiment and show this one, but yeah, if you're looking for something like sad lighting or sports lighting, go and check out this brochure from Thorn and you will learn a lot about these types of reflectors and how you will use them in your design.
Okay, now let's test our asymmetrical beam-like area lighting which is usually used in parking areas or a normal sports field. We don't have a wide area like a tennis court, a basketball court or a small soccer field, so let's try this magic beam now, okay, let's go to the other side because I also created this floor on the other side , so these are the magic rays over there. go and let's try to render it, okay, so this is a note, if you are working on façade lighting, don't use an asymmetrical beam, okay, maybe you can use it, but generally, the idea of using an asymmetrical beam is to aim down and to not spill light, that's why the optics are like that, it points down, the optics only points down, so if you use it in facade lighting, I'm not sure if it will be ok or correct, so it's like Semantic beam looks good, so let's visualize, let's go to visualization, so if I click on this, okay, so I think we need to render it, so let's calculate, okay, so let's check the false color so you can appreciate it. rather, now these are your 60 degrees and these are your 40 degrees, so now you can easily imagine if your area is a wide part like a wide lot like a white parking lot, here are the 60 degrees, whereas if your parking lot is narrow and goes towards the front. then use the 40 degrees because it's narrower towards the front compared to 60 degrees and wider towards the side, okay, so yeah, I think just go and check the dialogue and play with the lights, you can aim, in I actually like what I What I'm doing now just rotate and point like this so you can see the difference.
In fact, if you are an expert in sports lighting, you can easily guess the type of optics you need to use for a specific area because you are already familiar. with the Optics and your product, okay, so sell if your goal is really to see what it looks like or its effect or what are the functions of using those Optics, the different Optics, then that's how to play with them, just experiment and see how it seems like when you're not doing anything just do something crazy like this okay so if you have any more questions or requests just don't make stupid requests okay just let me know and maybe I'll answer your question so See you again in the next video yes and of course don't forget to subscribe and sign up for my Udemy courses.
I'll see you again in the next video.
If you have any copyright issue, please Contact