Photography Masterclass - See What's NEW - Oct 2022 - TAKE 2
Apr 10, 2024thank you, thank you, very good, good morning, welcome everyone for the second
take
. We're going to try this one more time, so if you try to watch my previous stream on Adobe Live and my own channels, it failed miserably, there were all kinds of buffering issues and it was just a bad experience, so forgive me for that, It wasn't actually something I did on purpose since I'm still using the same settings I use every week, but I think there was some kind of backup or something running in the background, so I turned it off and let's see if this goes better .
I'm also recording it, so worst case scenario, if the stream doesn't work, the recording will and then I can post the video after the fact, so I should probably start doing something. on a regular basis Hi Kevin Stewart, how are you doing? That said, let's dive in and because this is not a time slot like it is in Adobe Live, where I have to stick to an hour and do an hour, no. It doesn't matter
what
if it's less than an hour, great, you need more time in your day folks, a little bit I doubt it.
More Interesting Facts About,
photography masterclass see what s new oct 2022 take 2...
Great, you get to see more content, so with that being said, thanks for watching again, thanks for hanging in there with me. and coming back and good night in Zanzibar and it's 7:21 p.m. m. Its a great hour and I'm glad you're here so let's go ahead and dive into
what
I was trying to show before and again for people who weren't watching. You don't know or care before, so let's dive into the new features, what the new features in Photoshop and Lightroom and Lightroom classic for photographers that were introduced a week and a half ago at Adobe Max in Los Angeles are all about.
So for those of you joining me for the first time, I do this every week when I'm not traveling, so I do it every week at 8am. Pacific Time, 11 a.m. ET and is a multicast stream to Adobe live, which is b.net. Here I'll show you this so you have that URL. It's normally on b.net Adobe Live which crashed and burned today and it's also on my channels that you're watching now, so if you're watching this on YouTube, Facebook, Twitter. and Linkedin amazing, thanks for joining me on my channel and let's go ahead and I'm going to
take
a sip of water okay so I can't cough let's go ahead and dive in.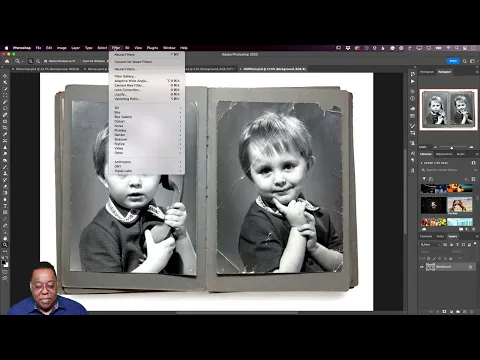
Okay, so let's get rid of the banner and Go ahead and go to my desktop, we'll start with Photoshop, some new stuff in Photoshop for photographers or anyone and then we'll get into the Lightroom stuff, some of which I covered on my own YouTube channel above and Facebook too, but we'll put it all together today so you can have a nice package to look at. That said, I'll start in Photoshop. I have some images open so I can show them. For these features, the first one is to make selections with the object selection tool, so the object selection tool that was introduced, I want to say, two or three years ago, was when it first came out and, a year Afterwards, he gained the Auto ability. detect images I implement it in one of the maximum Keynotes and now this year it can do more so it can do more auto detection so basically this tool is on it's third iteration of repeat so with that being said what is it for?
Basically, when you click on the object selection tool, you'll notice that you might see a little spinning icon here to refresh the object finder, which means it's looking for objects in your scene that you can select with a single click, which what's great, for example, what's new and improved. this version is the same tool, but now it detects water better, the sky is better, not natural soil, plants and architecture, so that's the kind of thing they train the AI with to do a better job and it's great, now we have a better object selection tool. I have to select it, the objects in this image have already been detected.
Let me hover over those objects to demonstrate, so if I hover over the sky now you can see, hey, it's outlining the sky. If I click, I will get heaven. It's going to get part of your hat because this hat has holes in it, so it's trying to do a good job of selecting through the hat into the sky as you hover over this bird, it catches it if I hover it over it, it catches it if I hover it over it. I place myself on the lamp, against the lamp, I place myself on the um, the boat it's in against the boat, the bushes or the trees or whatever.
I can't tell how far away it is, so probably the trees and water are doing what they should. what I'm supposed to do and again, if I wanted to select any of these things, like the bird, I just click and that's the selection, so you can select any object by just clicking on it, if you want to add more objects, you would hold the Shift key. so if I want the basket to now be selected, if I want the water to now be selected, then it does those things by just holding down the shift key and adding them to my selection, so that's what the new improved object selection does. you can deselect it with command D or Ctrl D on Windows and again, if I select the sky, the sky will appear and little holes in this hat, as well as try to select the sky, so if you did something to the sky, it would in the hat. which should also do, by the way, better object selection if you miss something, for example, I see that although I select the sky by selecting part of this lamp at any time, any selection, any automatic selection, it doesn't do a good job as in this case. it's too much and instead of too little, you can always add or subtract, so if it's too much, I would hold down the option key and subtract this, say no, no, don't select the lamp, just select the Scott if so. anything else like this little mountain here no problem, hold down the option key and subtract that so you can or not, actually you should, that's true, no, that's true, it's the sky, not the mountain, like this that he did well.
I was trying to add it. when it shouldn't be so cool, it's doing what it's supposed to do and you can always toggle and Option or alt to subtract with any selection tool, the object selection tool, bind whatever you want, do that, it's good. Those are the new and improved object selections, let's move on to the next one where we're going to add to that tool another new capability, so if you combine these two things, it's called One-Click Delete and Complete, maybe not one-click, maybe two, but anyway. it's a mouse click and then a keyboard shortcut, so I guess it's technically one click, but anyway, one-click delete and complete is brand new and uses the content-aware fill technology we've had for a few years and lets I show you what I mean by this if you use your object selection tool to make the selection it's the only way it works you can't use the lasso you can make the selection but you have to be in this tool once the selection is made.
You made the selection with the tool or not, so I like horses. I don't even care about horses aside. I don't want the horse in the middle, so I want to get rid of that horse just from the photo, obviously. so if I hovered over that horse and clicked on it, it would select it great now to get rid of it, maybe in the past I would have just hit delete to bring up the Contents panel. Error while making settings, click OK, but now there is a new technology. with one click delete and complete to where you just hold down the shift key on your keyboard and delete on Mac and backspace on Windows and what you do is you use the object selection tool to make the selection and normally you would never make a selection that pressed if you wanted to use content-aware padding because the content-aware field has traditionally preferred to have a little bit of space around the object so it works better when filling it, usually if you select right on the edge you'll see some of the leftover edge . one click one click delete and fill has some magic where you see it's tight and behind the scenes it expands a little bit when the delete is done so you don't have to worry about that anymore just select the object and hold. shift key press delete and it does it, that's it, it's great if it's not great again.
I see a little leftover piece right here. I'll select it again with that tool. Shift, delete done, so getting rid of the stuff in your photos will be that. Much easier and faster now with object selection to select it, even if you have to use the lasso or whatever to do it, as long as you use the object selection tool, select it when you press Shift, delete, okay, the next, go to the next photo. I'm going to put it to the test now if you've been watching me over the years. I have used this photo to show how to eliminate or get rid of distractions for years.
I have used it because this photo has a classic style. distraction the light stand the backpack that is used as a sandbag to hold her it's just that that's not the photo her sitting on that rock is the photo so to get rid of this in the past I made the selection with the lasso I' He Finished Warfield content. I have made the patch tool. I have made the healing brush. Now we're going to use the new method because I have all those other methods that I've done in the past to compare it to, so let's move on. and I notice that it is detecting pieces, so click to select the light box, the survey here, click Shift to select the backpack from the survey, click Shift to select the backpack, but this little leg protruding is not detected, does that mean I'm stuck? no, just do it manually, hold down shift and drag that little thing that wasn't selected and it will add it to the selection so cool now that everything has been selected and I'm still in the object selection. tool and I'm at the bottom so you can see there are no layers in my layers panel, there's nothing under my sleeves, caps, delete and it's been removed better than any other method I've done in the past, like I usually have a a little bit to clean up and I can see where maybe my little left edge around the top, whatever it is, it's the best and quickest thing I've gotten rid of and then you know I could argue that maybe this is part of the survey and I need to get rid of that little piece, but for the most part you could look at this and say it was never there, so it's amazing how far this technology has come with AI.
Next up is this an old photo, classic old photo. an old print that was photographed and then turned digital and of course it is being photographed as is with all the scratches, creases, tears etc., now photo reproduction is a very manual intensive process that can take hours, days, weeks, months, depending on how bad the image is, I've seen people restore things where half the face is gone and they have to use the other half of the face to turn it around and blend it in and make it look better. see well or the whole face. it disappears after you use it, you know, remember other photos, whatever, I don't know how to do it.
Wait, David asks a question when you delete a selection. Are there any unwanted artifacts left behind? Can you zoom in after the demo is shown, okay? I'll go back to that photo since there was a question, let me go to my zoom tool and no, David, there are no artifacts left, that's where the lightbox was, it's gone, that's where the survey was, it's gone, usually no. , there are no leftover artifacts, hopefully, that answers David's question and anyone else who has it, he didn't zoom, he cheated, no, I zoomed, you saw it well below, so let's get back to this process manual using the tools to remove all scratches etc.
So a couple of years ago we introduced neural filters and in some cases neural filters are simply designed to give you an advantage, so let's say this restoration would take an hour. Well, what if it could only take 30 minutes? And if? Manually it can only take 15 minutes because the AI helped you start in a better place, that's what this next neural filter is about, it's not about doing it perfectly, it's about giving you a better head start, so if I go to my menu filter, low For neural filters, there is a new beta version called photo restoration and in my experience photo restoration will do one of three things: it will do a really good job, it will do a good job, or it will barely do anything like I have done I.
I've clicked on it in some cases and I can't even tell the difference, barely a difference, but what I haven't seen is that it makes me undo it, which means it did something wrong and I had to undo it because it ruined the photo. so technically if that's the case, if it's going to run from a little or a lot, there's no harm in using it correctly, plus it exits to a new layer, so worst case scenario you miss something and it's still in a cape you can get.get rid of everything now that I've set it all up for you and told you I've set the expectations that it's not a day and a night, let me show you how it works.
I'm going to click on Photo Restoration and there's a slider down here. I haven't turned it on yet, there is a slider called scratch reduction and for some reason the Photoshop team reduced it to zero and what I'm afraid is that a lot of people are going to try this and being at zero, you won't see much difference, so what I always do now is turn it on and immediately, even before it can finish, put that slider up to 100. So it processes it with that slider already at 100. Now it may take a few seconds, you know, 20 seconds, 30 seconds, 40 seconds per minute, depending on your machine and the high resolution of this photo, but a minute versus hours or minutes is worth several minutes. for me so again here's the before here's the after and maybe that saved me 15 to 20 minutes of work maybe maybe less but whatever I do it did so I don't have to do it that's the period, so whatever time it would have taken me to do it, I came back and now I can work on the things that it didn't do, that's what this neurofilter is all about. now let me show you what you would have gotten if you had left it at zero, let's put it back to zero thanks and now let's look at the before and after, that's before, that's after, so that's what I'm saying a lot of people are going to do. .
Go in here and they'll tell you I didn't do anything because the scratch reduction, for some reason, is at zero. Photoshop Team. I want to increase that as default. Alright. I don't know, there's a reason they put a zero. I don't know what that reason could be, even if you don't go all the way, even if you go halfway and let it finish, it's night and day compared to zero, so , again, a few seconds, let it cook. you don't always need 100 but I haven't found anything 100 Hertz so I put it all the way up so it gets as much as it can and I can always, if it did, just distort something or whatever, maybe it was a line crossing your eye and it somehow distorted the eye when you removed it, so I would just remove it, but I prefer to start at 100 and remove it if necessary, then start from scratch and oh, can I move forward a little bit? higher can go up a little more Can I go?
Yeah, it's easier to go up to 100. If you like it, you're done, if you don't go back, okay, so now let's say I click OK so that output has a new layer. I had it set to go as a new layer so you always have the original to go back to and it was on my previous stream and I closed it and moved on to the next thing and you're like, wait, you didn't do that. shows Eye Color and I thought, oh yeah, you're right, coloring isn't new because I was focusing on new things, but yeah, you would absolutely want to try coloring this now, just as a heads up.
I'll show you what. coloring does, but I wouldn't do it yet if I was doing this in real life because I'm not done yet, so I finished the editing, I finished the manual part and I never tried to run that neurofilter twice to see how to clean the scratches left by the first time maybe we'll do it, but first I would clean it up, fix the edges, cut out this old paper background like I cut out the two photos and then maybe put them on a new background that I would get. the photo is ready, in other words, before coloring, once the photo is ready, once it's done, I would go back to the neural filters and colors, but now I'm curious, let's go back to the neural filters and try it.
I'll just go for the sake of I want to see what would happen now or nothing will happen or if it starts to remove those other scratches, I'll be very happy and then we'll learn another lesson that I never thought of trying. Do it more than once to see if the results continue to improve and they did. OMG, there's your bonus tip for the weekend. He didn't get everything. Make a new layer. Run it again. See if it works this time. Just running it and I'm kidding you guys. I'm not kidding. I've never tried it twice and running it twice actually gave me a better result the second time.
Brilliant. Alright, next, let's talk about the coloring. now since we leave all these other things in the background, it will try to color them too, that's why I said I would finish them first, let's color and that's what colors, colors everything in this case, even though the paper material I don't want, but Look, not bad for an AI that colored the photo. He missed some things, like on his shirt, he's missing some areas, so you can go here and click on the focal point and what I want. would they add to this I would like them to add a dripper and I heard they did but if I heard they were thinking about it they did it.
I can't find it right anyway. I wish there was a dropper, maybe there is but I don't know where it is, if there is one that sets the color with a dropper then I could use the blue color which I made anyway and I've always had people tell me how they knew the shirt It was blue. I guess I picked such a strange color that it has a way of distinguishing it from the black and white of what color it used to be, so it's always funny when people ask that question because they're like, yeah, you're surprised, how do you do that? you know it's a blue shirt it doesn't look right so I'm just clicking on the focal point again here and what will start to happen if you're not careful about adding too many focal points is it'll start to color the background as well so yeah , okay and probably click one down here because I don't care if you color this, let's do one more, yeah, not bad, so again I'm going to put a new layer, click OK, so now that's the new one for So this is where we started, this is where we did the first one and this is where we did the second one because I combined those two features and we only got one layer, but if I had done the restoration first, okay, then I would color and then have a layer to each one of them, okay, but that's the new photo restore, run it twice if you didn't do a great job the first time and that's coloring, okay, let's move on to the next thing, let's go to the file and open.
I'm going to open a raw file now, of course, open it in Camera Raw like you always do and I'm going to do that. I just want to make sure I reset the defaults. Here we go. I already made an adjustment to this photo. with the first stream so I'm resetting it to the way it was fine so masking we'll see all the new masks and stuff in Lightroom but there's a masking feature in the Roth camera that didn't show up in the Lightroom in right now, so when I click on the mask, there's all the new stuff here and I'm going to go ahead and make an object selection, which again we'll talk more about that later, but let's go ahead and just say Hi, I .
I want his hair, his head, it's fine and it does a good job even though I didn't finish filling it in so I'm experimenting with not filling it in all the way and so far so good so now the new thing is that you well. we'll get into object selection, it's new, but we'll get into all that, but the new thing in Camera Raw that you don't have in Lightroom is that once you create your mask, you can use curves in a mask, so that's it. for people who love curves uh I'm not a curve person I think there are easier ways to do this but if you love curves you have curves and masking so we can say done.
I'm going to press cancel, but there you are. Wow, that was the last little thing there, um oh, there's one more thing that can be helpful if you're a photographer because sometimes you might want to share your progress with someone and get feedback for new ones to share and review. is here now it's not going to work on this image because this image is not saved in the cloud uh let me go maybe I'm just looking for something small here so it'll be quick let's go to um let's go to the image size. I'm going to make it really small, it's probably already pretty small, but let's make it even smaller, it's seven megabytes.
I'm just for the same example, I'll leave this down, oh, it's already pretty small, okay, let's go. go ahead and just save it to the cloud so save it as uh saving to create a cloud and we'll call it already it's called horses, great saving because to use this feature you have to have it as a cloud document now. which has been saved to the cloud and I click Share and I get two options: invite to edit and share for review, share for review is the one I mentioned earlier, where you want comments, you just want people to be able to see your image.
They don't have to be Creative Cloud users, they don't have to have Photoshop, they just have to know what Photoshop is. All I need is a web browser because you will get a link for this image, the invitation to edit takes them. to a web browser, but it gives them the Photoshop tools and allows them to download them for editing in case you want to collaborate with someone who wants to be able to edit their image, so let's say I share to review images in a cloud. document, so now I can create a link and once I create a link for that person, I can share that link with whoever I want in any way I want, with as many people as I want and yes, skip this, copy the link.
Let's open it. a browser window, you know what, we go to Chrome and here's Chrome and we paste that link so this is what the person would get. I'm not logged into Chrome, so I'm not even logged into my account and they would get your image and they would get markup tools, so for example, if they say, hey, maybe they don't like these horses after all, to be able to say, hey, these horses, these courses are a distraction, that horse spell is wrong. I'm sure the horses were our distraction now when I press send since I'm not logged in it will say: Hello, do you want to continue as a guest or log in and continue as a guest?
I'm going to be Bob Smith. Alright, I'm Bob Smith now and I'll continue as a guest. guest I go ahead and mark it I can add more more things I say hey maybe it's a compliment this is cool and then I give them uh you know Emoji hey I love this uh cool send and I keep sending I'll have to log in once or tell him who I am a time so that the person receiving these comments can know who they got them from, so now that the comments have been given again, everyone you gave this link to can give comments.
How do you see those comments if we go back to um Photoshop and open up the comments panel that appeared here for some reason we open the comments panel we see what Bob Smith said we don't just see what Bob Smith said we actually see the marks so that let's see the dot, we can click on it if we don't see it, it will take us directly to it and you can hide them if they are distracting, so you can hide the notifications. so you don't see them or show them that way, once you take care of something, you can respond to the person, um, you know, I don't want to press reply, here we go, I'm going to say no, they're just staying because you made a comment doesn't mean I have to do what you say right and let's move on and that's fine, and also if you took care of something like, for example, they just said this is great, go ahead. and say resolve so you don't have that blob as a comment so it goes in your resolved file so they know this has been resolved.
I'm going to post that last comment and so if I had made an at Bob Smith Bob Smith will get a notification saying I made that comment or he's actually a guest so he won't get a notification but he'll be able to see it if he comes back okay so That's the new um um. share to edit and share to review and that's Photoshop now let's go to Lightroom classic here in Lightroom classic and I already made videos on this so I'm not going to spend a lot of time on this because many of you have already seen my videos on the new masking, but I have an update, we will do it all combined, so first of all, what's new, the new AI based people masking, so if I go into the development module of this image and then I come. down and I say I want to do masking and then I say I want to um or oh wait this one already has a mask wait reset reset reset there we go um down and I say I want to mask it detects all the people in the scene so there's only one person, so we see person one, there were two people, we see person one and two, etc., and so on, when I click on person one, which is also new because it was the same as select subject . but what's new here is that it detects the skin on your face, the skin on your body and the body scan would be on any skin other than the face showing arms, legs, feet, any hands, whatever, um eyebrows, for what your eyebrows are masked if I choose the sclera of the eye that I didn't know that was the white of your eyes, um, iris and pupil, lips and hair.
Now when I made this video, I did my hair before and we're going to do it again, but I didn't really show that you can combine them. I can make several masks, you can say hey, I want the hair and the lips and since right now they're both a little bit red, I want to change them to a little bit green. I can select them as one mask or I can have them create two. separate masks so we don't have to come back here doing them one at a time, so now let's create those twomasks, so the first one is the hair, the second one is the lips, so we know which one is which. one is the one we can't, we'll see the little icon so big that the selected hair and then I go down to the local tone, for example, and I adjust the hair color so I can get the type of green that I want to remove the exposure. below, make it a little bit darker and again an AI based mask for the hair, so go to the lip mask and do the same.
It's going to be a super bright green because her lips are bright and we don't want them to be that bright, so we're just going to reduce the opacity or the opacity exposure so that the lips are nice and the dark green is still too strong. I wouldn't choose green. I'm not a makeup artist so don't knock me, but we're just playing with the color in the background, but you don't have to change the person's lips at all, that's how it would work. Next, let's go ahead and go with this guy who has teeth and is detecting the person we selected. the person we're going to go to their teeth and create a mask for that and we would call them teeth and we're just going to lower the saturation because there's a little bit of yellowish color in their teeth just to brighten the kettle, we can even make them brighter, not too much bright, we can make them brighter, but here's how without the white strips that you're buying at the drugstore, you could actually do it right here in Lightroom, okay, next, this is an image from my colleague Katrina Eisman and I noticed that this image is the Great Wall.
By the way, I've been looking for an image like this. I can't find one like this. The wall is perfect for demonstration purposes because it has all kinds of things happening on it anyway. I could do the person thing, but in this case I'm going to switch to my next new favorite tool and that's the new content removal tool. now the old spot healing brush or healing brush that they call it in Lightroom is still here and the way it would work if you clicked on it or painted with it, it always goes and tries to find a place to use, sometimes most Sometimes it is an assumption.
Well sometimes it doesn't and you would have to pick it up and move it to a better place and this takes a lot of time as I hate doing this so if I had a lot of this to do I would just head to Photoshop. and do it because it's faster, now I can delete this because I will never have to fight with it again. There's a third new tool, a third new tool, the content-aware removal tool that works the same as the healing brush, so I can paint it. uses the surrounding pixels. I can click on it. uses the surrounding pixels.
I can get a large area like this and it uses the surrounding pixels. It's much faster and easier than having to use the spot healing brush to get better and better results. So I love it, I love it. I love that it is that way and what is also better than Photoshop is that it is non-destructive. All of these little marks can be changed or deleted, so if you delete something that wasn't left to delete, you can come back later and say oh, I didn't mean to delete that and delete the little one. Check the little brush for it and that element will come back because it hasn't actually disappeared, it's just using the surrounding pixels to hide it and now that they open this funnel. of the use of surrounding pixels.
I wonder if we will ever have a content recognition bill in Lightroom? That would be nice, we'll see, but we removed content recognition and I'm happy with that in the meantime. We're here, let's go to the third thing, which is actually let's do one more thing and then we'll come back to this, let's go to this one and do another people thing. I just want to show what happens. when you have more than one person then go to mask, detect people, detect all three great, so you can click on any individual person, you can click on all people, you can add a person to the selection, so if you want just him and her and not him or him and her and not him, you can add those people in um, but anyway we select a person and I want to go to the skin of his face because if you look at the skin of his face, exit this mask. the skin on your face is brighter and not as warm as the other two people, so let's go to the crepe skin mask and heat it a little to reach the temperature and slightly increase the temperature so that your face is as warm like the boy next door and we can even reduce the exposure because your face is super bright compared to his, just a hair, just a touch and that's how easy it is now with the new mask.
I know, new conscious content is fire. Okay, um and yeah, awesome and you're okay, you're welcome David, okay, so let's go ahead and go back to that photo because I was going to show one more thing in this one, let's go to the third thing, which is. the new object selection, so we did it, we knew that people masked, we made the corridor content aware eraser, but let's go to the new selection method because before we had brush linear gradient radius grading and color range and brightness range, now we have a new category. called objects and over a year ago, when they were working on the new masking from last year, I remember saying to the product manager, oh my gosh, this is so cool, it's so awesome it's going to change the way I use Lightroom, but I really wish I had the Photoshop object selection tool that we just looked at earlier and she liked it, yeah, that was on the roadmap, we were thinking about it and I was like yeah, yeah, she's just trying to tell me let me go anyway, uh, I was right, it was on the roadmap because now it's here, so if I click on the objects and I want to select her dress to change the color, I can start painting.
Make my brush bigger too by the way. I'm going to start painting. You'll see how careful I'm being. I'm not being careful. I'm just giving Lightroom an idea of what I want and Lightroom selected it, that's it, it's been masked, so now if I change the color of a dress, I'm changing the color of a dress like it's not in the lines . I didn't even finish painting the entire interior. I gave him enough information to say, Oh, he wants the dress. Great, no problem, the dress is selected now. I can do whatever you want to address the color change.
Change the temperature. Change the exposure. Do what you want because the dress is now at Mass. This is a By the way, it's a game changer to have this in Lightroom and Lightroom Classic, by the way, everything I'm showing you right now in Lightroom Classic is exactly the same in Lightroom, so I'm not going to waste my time going and coming. If I'm showing it here, you can also do it in Lightroom, okay, the only thing you can't, oh, let's make one more, let's make one more object. I did this one in my video, so let's do this one.
I'm going to go to she's going to select the person but we're going to go to the objects and she wanted a red frisbee so again I'm going to see how little I can do with mine, let's do it like this, let's see if that's enough , yeah that's enough so now I'm working with what little I can brush and she still figures out what I want so I wanted the Frisbee because she whispered in my ear to the person photographing the file that she would love it a red Frisbee. I can change the Frisbee to a redder color, lower the exposure to make it really red, there we go and now she has a red frisbee, so this is really going to make life a lot easier and basically reduce the amount of trips, we have to go to Photoshop to do simple things like this, you use Photoshop for the more complex things you want to do, now we have this, yeah I know, Christine is great, I wasn't going to tell her. you're next okay so let's go ahead and do another uh aware of deleted content here's pixel one of my My new puppy.
I was going to say one about my new puppy. I only have one new puppy, at least of course our older puppy and me. I'm going to go into the new um Outline removed because Pixel hates his leash like it's I'm a I'm a young puppy I can run all day and he can but sometimes you need a leash but not in a photo so I'm going to keep going go ahead and paint your little tracker, paint the strap and again, this is the new content conscious removal, just making sure I have enough and drop it, and it uses the surrounding pixels that it would have.
I never tried that in Lightroom before. Now I see I'm okay with that, but it seems like maybe I went a bit off or picked up on some of that, so here's what if you want to add, remember there's already one. there, so you can't brush it because there's one there, but you can always go a little bit out of it and brush it again and that will pick up that little bit, so you can't brush it over one that's there, but you can brush one past one that's there. and it will take care of it for you, so this is again another example of conscious content removal.
I have one more here. It was a challenge for me or at least I thought so. It would be because of the brick wall. I want to get rid of this distraction behind his shoulder. I don't want to crop the photo, I just want to get rid of it and I thought, "Oh my God, that brick wall is never going to go away." see correctly because it's a pattern and I said let me try it in the worst case scenario. I hit undo and was impressed that it wasn't one hundred percent perfect, but it's really good, I could live with that, maybe I could tweak it a little more. but I agree with this result, especially the time it took, which was a couple of seconds.
Okay, one more selection method and that is the new background selection. Now, if you wanted to select a fund earlier, you would simply say select subject and invest. two steps minimum whenever you just wanted a background, well the Photoshop teams thought, sorry, the Lightroom team thought why should you do two steps, just make it one, so now it just gave you a background selection, just click on it and that's it, click on background. selected now, that's much easier and much faster than doing it twice, so now we have the background selected. I'm going to add a little bit of defogging to the background to make it stand out more and we're going to go ahead and drop the expose a little bit more to the background and make them stand out more, that quick, that easy, that non-destructive, okay, now that we have that , uh um, last but not least, if you want to bring this stuff to mobile.
Unfortunately the only thing that made it to iOS devices, iPhone, iPad, is the content removal tool, which is great to have on mobile, don't get me wrong, I'm happy, but you didn't get all the people to mask things that you did. You don't get the object selection stuff, you don't get the object selection stuff yet, but the people selection stuff is just there, it's right under the hood, there's no UI for it, if you're going to mask in your mobile device, you can simply select Sky select. guy, if your device is powerful enough, that's it, you don't see selected people, you don't see any of that, so let's go back and play a game, let's go back to the first image and restart it, oh god, I hate it.
I hate that green on her lips let's reset let's bring her back to her natural color uh and let's just do this let's click on the people and let's go ahead and create a hair mask create and name it here and that's it now because I made the mask and I didn't even I didn't even make any adjustments. I didn't change the color. I just made the mask now I can make a preset, so if I go here to presets and I click on preset, I click on create new preset and I'm I'm going to call this one here, take two to match the broadcast and this is the second version of the transmission.
I'm going to uncheck everything, check nothing, and just check the mask, so the only thing this preset does is a hair mask, that's it. when I click create, it will create a new preset that all it does is select people's hair because it's an adaptive preset in June, we got adaptive presets for um, we have adaptive presets for selecting the sky and selecting the subject, we now have adaptive presets for our selections. of people, so if I go to a totally different person, one that we haven't used yet and it detects it because we're on desktop, but if I went to my presets and click here, I grab two and then go to mask because it's already created the mask, oh sorry her hair is selected, totally different person, totally different hair, but since I have a preset called hair, it takes two, it will select the hair on each person photo, now what you can't do is it will select if the three people will select the hair of the three people, but you can paint it, you can unmask and subtract from the selection the other two people that you didn't want, that's great on the desktop and what about my iPad?
Let's reset this. let's get rid of your mask hello, hello sir, let's go back to Lightroom on desktop now Lightroom on desktop has exactly the same features, but Lightroom on desktophas one more thing that makes working with mobile devices easier because it's the same Lightroom that you have on your iPhone and iPad, so when you download Lightroom from your app store, you use a lot of the same interface and things that you get here, so if I make a preset in Lightroom desktop, not classic Lightroom but Lightroom, that preset will sync to my phone automatically, I don't have to do anything, it will sync to my iPad automatically, I don't have to do anything, so for example , if I get to this person, I'm going to mask, I'm going to get rid of them. the mass that is already here let's delete it and let's create a new mask oh sorry, new mask yes, yes, I know I can do a tour, let's click, yes, I know, I got it, come on people, oh, there we're detecting people, let's click on her and Click on her hair and that will create a mask just like we did in a Lightroom classic, that's why I said it's the same thing.
Now we create a mask, we call it hair, but now I'm going to move on to the presets, let's get out of uh. let's put on a mask for a second and go to the presets. Oh, actually, we can go back to editing, there we go to presets and uh, I'm going to create a new preset. I already have one here called masking masking 3.0, blah blah. we're going to create a new preset called the same thing, we're going to get rid of everything uh, we're going to turn off everything else, is there a selection made? Oh uh make a masking just that hair mask so just for preset called hair only then we know the difference take three so now we have a new one called heretic three save the preset in my presets of user and in my user preset there should be a here, take three there, now it's if I wait, it's syncing like this. now that's a little sync icon and if I were to wait for it it will eventually sync to my iPad, but I already have one on my iPad to show you so let's go in and switch to the iPad and go to a totally different person than the one we have.
I haven't used it yet and let's go to the presets, which is the second icon on the bottom right, that's all the presets I already made. I made a preset for each new thing. I made one for the body, skin, eyebrows, face, skin, hair, iris. lips, that means if I go in now and touch the hair, it will detect people, so it will look for people in this store, then it will go ahead and make a dough. Now I notice that some of the things are grayed out. Scalera, eyebrows, Iris and pupils and lips are great because you can't see those things, she's fake, she gave it back to us, so she's smart enough to say I'm not going to give you the chance to apply a mask to the things I can't see. so I selected the hair, if now I say done and I'm going to mask, there's your hair mask, so now I could go into, for example, the color and use the local tone and do my adjustment, and if it's not all the hair okay, go ahead and paint some more with a brush, that little piece there at the bottom didn't have any problems, painted back with a brush, add to the mask, that's it, okay, so it's presets adaptive for people to mask themselves on their iPad or iPhone isn't on Android yet but I would expect they'll probably add it since it's on a mobile platform it should probably be on both but in the meantime if you need it on your mobile device , go ahead and create all the presets like I made one for each and then you can use them on your mobile devices, so if I go back to the presets, I go out of masking, I go to there's my um oh, I'm in my presets from user, let's go there and there's hair that takes three so it's there so it's already synced and there's hair that takes three here and I could use that mask if I wanted to so just go create them in light not classic Lightroom .
Classic Lightroom doesn't sync them automatically. There is a way to transfer them to Lightroom, but why not go ahead and create them in Lightroom on the desktop and then they will sync automatically? Even if you don't use Lightroom on the desktop but you use Lightroom on your phone, that would be the way to do it right friends, I hope you were able to see all of this. I don't see any buffering issues or complaints so I think we've got it and I want to say cheers, thanks for sticking with me and I have to. Do this twice, hopefully it was better the second time, and this way it's good for recording for anyone who needs to watch it later, now you'll be able to watch it on YouTube, Facebook and Linkedin, Twitter, it should be on all my platforms.
Well everyone, have a great weekend, see you next time, stay tuned for now, you're welcome, you're welcome Kevin Stewart, you're welcome Christine, you're welcome, okay, greetings everyone, bye .
If you have any copyright issue, please Contact