Designer Salon Floor Coated Using Epoxy | Ultimate Guide
Mar 28, 2024We raised the
floor
with cats Trey and John on the mixers and got the business owner herself to write the design, let's go together, so we've already started the polishing process. Trey has already arrived in this room and you can see that he reached the edges, he remembers us. He had carpet glue all over these edges. Jim has some really good shots of that, so this room is basically ready to take the next step. He comes out here, he already hit here. He got as close as he could to the cabinets. It took a lot a lot more stuff and then it's going to work on this room right now, we have a lot of carpet glue on all of these edges that didn't come up and again, we don't want to cover things like this so we're going to take the time to do this. good for him, help him lift it up good, clean all these edges, another thing we did was remove the doors good, if you could remove them you should be able to save yourself. a lot of time we can go in and out we're not going to have a door hanging here we have to close it behind open it to go out this makes the coating much easier and faster if you can Remove those doors so you have this room.
You can see that we have already taped all the door frames and notice that they are taped high. We always stick high tape in a couple spots here and then we're basically going to start patching. so we're going to do our Patcher beat and all the cracks that the sock cuts and we're going to finish this and then we're going to show you the next step together so when I'm mixing I'm basically mixing it enough until I have a consistent color, I don't have any streaks or nothing, we just mix a whole batch and what we're going to do is start filling, we want to make sure we press it right.

More Interesting Facts About,
designer salon floor coated using epoxy ultimate guide...
The cracks are cut out by the saw and then we're going to scrape them out like a flat, feathered edge that way when we apply our
epoxy
sealant coat in about half an hour. We don't have high ridges or anything like that. To deal with Strange Edge now there are no ridges, it's full so I always like to hit the hairline cracks, anything that theepoxy
can seep into and not fill, so what I did while Alex was vacuuming, I went through each room and found out the correct square footage, 108 squares. feet this room right here tape on the walls this one was 66 square feet, we come here this room is 100 square feet and it will make it easier.
I can go to the rooms and add square feet above, so we're First we're going to mix three gallons and apply our epoxy Sealcoat so it goes to 400 square feet per gallon, so if I'm doing three gallons and it goes down to 400 square feet per gallon, I'll cover 1200 square feet, the guys have already started preparing the product for the seal coats and we're also going to pigment the seal coat because we're doing a soft tan on this
floor
, so we're going to add pigment to these with this epoxy. light tan of the same color, only to stain the concrete with a more tan color.
They already poured the A parts of what we need to do into the bucket, added the pigment packets just as I prepared the Patcher paste and so on. what you have to do now is add the hardener, so you just added the hardener and then he's going to do our 3p2 process. The very, very thorough mixing process that we devised ensures that there are no soft spots, ensures that we know for sure that all the resin is going to be removed. to set up and be tough, so he's going to do that, mix everything up for us and then we're going to spread that three gallon kit again which should take us almost to the right, all of these rooms, all of the Exit almost to that door and then a gallon and a half will finish the rest so we know we have enough product.
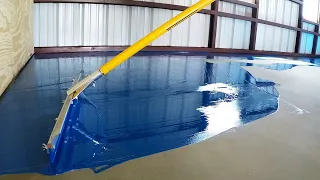
So the plan is to pour this into beads everywhere. I'm going to hit it real quick and spread it out with the squeegee. our flat squeegee, we've also used our Notch squeegees to cut the notches, but that's more of a push to the right, a push test, we're always pushing it and stuff, this is more of a pull to the right. the right, so it will spread quickly. and then Alex will go behind me and scratch it as hard as he can with just a drywall tool made for drywall, so the next day we're basically getting everything ready to start the coding process by looking at the floor.
I really see how pitted it is from the polish. I mean, you can tell where all the low spots were, so the seal coat helped fill in those low spots to level the floor and that's a good thing because if we were to put our epoxy right on top of this, maybe we'd apply a WB primer on top, we'll probably need additional resin and because we're losing a lot of product at these low spots, it's now a relatively flatter floor which is always great for making a decorative floor, we want it to be as smooth and flat as possible, so that what they're doing now is basically putting tape on the floors and addressing any places where there are bubbles, maybe there are bits that we need to scrape off. okay, just going around making sure there aren't any bits of ridges sticking out in the concrete, making sure we're going to fill in the degassing bubbles, here's another couple of bubbles we need to address here's another one you can notice because it has a Circle perfect, obviously it popped up, but we still want to fill it and we like to fill them with Bondo, it dries fast so we can patch these stains, put Bondo in there and sand it right away and then we can start covering them.
They're basically preparing as much as they can before adding part B, which is the hardener that starts the chemical reaction to set the resin and while they're doing that, I'm going to map out how far each section goes, so we want to. We want to make six gallons of epoxy at a time, we are making 45 square feet per gallon multiplied by 45,270 square feet. I want to know how far those six gallons should go on this floor arm, so I went ahead and just taped everything together. so that makes a little more sense so I'll go over it real quick we have several sections so our first batch of six gallons will cut here most of this little section that James already knows and in this room the second section , on the right, the second lot.
We make six gallons will cover from here this line of tape and then these two rooms, the bathroom and then this other room, so that will be our next six gallons. Our third batch of six gallons will cover from here to this line of tape all the way to that wall. The next six gallons will be covered from this line of wall-to-wall tape to this one, all the way to the cabinets, we once mixed the station there, so I'm not going to tape it shut and obviously we're moving. that as we mix the product, the next one is going to cover this whole section all the way to the cabinets with this blue tape and then our last section is probably going to mix like a gallon and a half and we're going to cover this little area here, so what's going on? here are the three gallons of each bucket so we have there is a section those two these two are another section these two are section three these two are section four those two are section five those two are there section six okay, let's set them all up the buckets we'll need to make the first part of the mix, we poured in the two gallons of part A, so all of these buckets have the two gallons of part A.
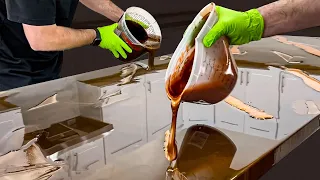
John is going through and adding one of the three gallon pigment packets to each bucket. We're doing a three gallon soft tan so basically we're trying to do as much as possible before we add the hardener let's do our 3p2 process and then we'll move on to coding we'll go over all of that how to create this beautiful design to see it because we're doing again a different technique, a little bit different design-wise, okay, so we're ready to go, we've got our Legari Spike shoes ready, we're going to walk on them, we've got our Notch squeegee and then we've got 18 inches. roller what was like the cross roll after the nap has been removed without squeegee 3 8 and then the nine inch what are we going to rotate the floor and create the look that we are going for with the nine in the Same 3 8 snap, make sure you remove the hair from them, this is what it looks like 3p2, so we have two gallons of part A, we have the pigment there, so 3p2 we go from the top right after Trey adds the hardener, spinning the drill . the way to the bottom, once you get to the bottom, go around once or twice, come back slowly once you get to the top, go around once or twice, you will do it three times and then the letter P means pour into the secondary mixing container, which We have blue tape because we can reuse them and then it will do the same process up and down two more times, so that's the most complete way to mix resin.
You will never have a soft, mushy or sticky area on the floor. strange place, we need to cover these two rooms, that room on the left and this little section here, so we're going to pour this and then I'm going to take the squeegee to cover the entire floor, we're going to roll it. the floor after that and then we're going to add reflections and rotate them, so that's the process to lower the floor. Soak my rolling pin because it's dry right now. I don't want to soak it one bit. So I jump around the floor hitting different spots once it gets saturated.
I'm just rolling it really fast. Tray is getting Trey to mix up the reflexes, so we have the extended base trainer in our first section. Okay, basically let's go. around we put a brush on a post, we're going to go around and make sure there's resin all the way to the edges, especially around the door frame, the edge of the door, sure, there's no more decorations there, obviously, we have decorations around everything the base, so it doesn't have to be perfect, okay, so we have the highlights on the moment I throw them out. I'll have them start mixing the next section, the trick is not to screw this up, is to start small and jump back and forth and add more and more and more, so what I like to do is just take it out, it's a lot of directions different ones that I didn't use much, we have color everywhere here, so again.
I'm just going to run around getting color everywhere and then we'll go back and add more where needed. I still have about half left, now I want to go in and make sure we have color on all the edges like we want this floor to look like. like it's under the wall, weird, you never want to run out, you better waste a little or put too much in one section, you don't have enough for the next section, so what I'll do now is just go and add a little at some of these points, so the trick with the swirl is just going in a bunch of different directions, just mixing it, we're not trying to move the resin, we're just trying to mix the colors we need to do.
We're sure we've got some color up to those edges. We don't want just a half-inch white liner around the entire floor, but again, just roll it up really quickly. We're not trying to move the product, we're just trying to mix it. Mix the color odd section well spread Mixed The last thing I have to do is disperse the surface with isopropyl alcohol, we use 91 or higher. You can see here what it does, it just adds a little more dimension to the floor if you don't. so you can skip that step and just spray denatured alcohol, but we have a nice smooth glass floor, now it looks really good and then notice we already have the second section down, this is how we want to do it, we want to get a finished section and then we don't want to have to wait, so when we start mixing those highlights, we tell the guys to mix the next section well and now they're going to start diff
using
this section.I'm going to disperse. the surface and then I like to let the isopropyl evaporate for about 10 minutes, 5-10 minutes and then if there are bubbles or anything on the surface, I like to spray it with denatured alcohol, we just don't want to flood the surface right now. We don't want to muddy the colors, we just want to apply it very quickly and lightly and that will create that glass-smooth finish. Thanks, that's the process, so these two, the first section is done, spread the base layer and roll it up. Real quick, add your highlights, mix them together and then make sure you get a good color on all the edges and then the nice thing about this process is if you wanted to do a solid single color floor, you might want to do a soft tan.
You would just do this process, mix it with denatured. Now you have a solid color floor of a single color, so similar processes. You're just not doing highlights, so it's the same process until we're done and the reason we do sections. This is because we always want a fluid and fresh product, so this is a new product, when we get to this section, a new product is simply mixed, the work time starts again and this is how you make a great project , a 10,000 square foot building is made with the sameprocess and We will always have fresh produce, so now we are in our third section, we have Jade here, she is helping to mix the floor.
She owns this building and we're dumping the second three gallon kit here so again guys. We did the first section, we just completed the second section. Jade is mixing the colors and then we'll extend the third section while they finish. By the time we're done, she'll probably be ready to apply the isopropyl. alcohol and then I mean she's going to start moving quickly as soon as we get out of the rooms, the hallways, the tight areas, entering the big floor, so we'll be able to spread this even faster. Thank you. Foreigner, we will do it. filming it probablyWe won't talk much, we'll wipe down all the tools with denatured alcohol on a rag to get them nice and clean and then tomorrow we'll come back and apply the top coat.
Always map out your projects so you can do them right. one coat and do the next coat that is needed the next day, if you wait more than a couple of days you have to sand the surface and it just requires more labor, more work, so we try to plan projects that you can work on every day until We're done, so we'll finish this and then we'll see you here tomorrow. Stranger, thank you, so we'll be back. It's the next day. It was pretty cold last night, so the resin is still very soft. So what? What I'm going to do is show you that you can still put the resin on when it's soft, even if you're leaving Footprints, so what I'm going to do is stay here for a second and kind of push down, I'm going to leave a little bit. footprint on this floor.
Look, look, I mean pretty deep indentations. I'm going to explain what we are going to do today. We're going to go back and these are. everything will flatten out so I just want to point that out because you can still apply the top coat to the floor and if it's still soft, don't be alarmed by the footprints, they will bounce back properly and so what we're going to do today. See blue tapes on the floor, we have some outgassing bubbles that normally will always have some type of repair needed after applying the decorative coat, so they are sanding them flat, we have one right here, it has already been sanded properly.
There's a pinned hole right there, that's where the air was being released and if we didn't do that seal coat, the epoxy seal coat would probably have a lot more outgassing bubbles, a lot of this tape is just kind of residue that we need to arrange. sand with 220 grit, always use 220 grit or finer when you're standing in front of the weird top coat, so what we're doing now is filling in all the bubbles in the joints that we sanded, sanding them and cleaning them up good. with denatured alcohol we're just going to use our epoxy, we're going to pigment it, we're going to mix it, we're going to fill them immediately, we're going to overfill them and tomorrow we're going to sand them flush again and then we're going to be able to apply our top coat, so what we did was break a paint stick, break a tongue depressor, just dipped it into the epoxy and then let it drip into the places that we need to fill and just make sure that we overfill it that way when we sand it, it'll be perfectly smooth and flush.
Thanks thanks. Some things when we cover the top layer when Trey Spring always have high pressure in the sprayer and make sure to spray directly on the previous place. When he rolls it out, he doesn't want there to be a gap there or too much overlap where the product will be too thick and then when he hits the edges, try to hit the edges as he does it, don't just go around. a whole room and hit all the edges because by the time you get to it with the big roller it will already be dry and you'll have like a ridge there, so we've been hitting the edges as we go. come on, I'll reach for it and then we'll hit it some more and then always without pressure on the roller, we're trying to minimize the thick edges that will create roller lines and then we'll notice that we've never stopped in the middle. from the rolled floor he picked it up, it's always edge to edge, we pick it up on one edge, if it rolls and stops, you want to take it off the floor, don't stop and lift the roller, so let's finish this. and then we clean like the paddle wheel, anything we want to clean with just water, we're going to clean the sprayer really good and we're going to run a bunch of water through it, that's it, so once they've moved everything, we're going to go back to look .
Do you have some final pictures so we can see what this looks like with the whole room finished, all the stuff in here, chairs, it's going to look really cool.
If you have any copyright issue, please Contact