Kleiner (Schon-) Hammer Deluxe und wie ein 3D Drucker dabei hilft
Mar 17, 2024no, dear viewers, we are not building a Deluxe Nutcracker 2.0 but a
hammer
, much more ahammer
, more precisely, a Deluxe hammer, but first of all, hello dear DIYers, DIYers, DIYers. DIY lovers, dear creators and everyone who enjoys work and creative work, that's me, Markus, and this is the Fabrizium channel. Welcome, it's good that you're back, why a hammer? I get comments from time to time like, yes, what you're doing is good, but it's all very difficult and demanding. Could you also build something simple? That is an attempt to find an answer. The hammer is relatively easy to build, even in.
In terms of materials and tools, it is not that demanding. The second reason is that people often ask where this hammer comes from. We use it from time to time in our videos. It is a Bundier hammer that actually belongs to the guitars that are needed. where I imported it from America, but it's not that cheap until it arrives with customs and everything, so maybe this hammer is a good alternative, it's based on this one and yes, maybe a good and cheap alternative for all those who are interested. , for all those of you who say oh great, it's too easy, I already have a lot of space, maybe it's still there, there are one or two interesting tips in the example in the video and also this little tool here that will be useful for us, but Enough introductory words, now we are finally getting started.
More Interesting Facts About,
kleiner schon hammer deluxe und wie ein 3d drucker dabei hilft...
I hope you enjoy the video. Yes, I purchased these two walnut incense boards or incense boards at a big box discount store some time ago. Gourmets or barbecue fans. I'm sure some of you know this and they were pretty cheap. Apparently I couldn't get rid of them so I took them out of suspicion and walnut is very suitable for such a hammer handle. Of course, it is also possible. use ash. I don't have hickory, but I'm going to try it and we're going to glue the style with a strong veneer which is a leftover piece of cherry and a thin veneer which is maple for the head of our hammer that we need.
Here a piece of hardwood was chosen that I now have Plums, of course it could be something else, it must be as heavy and hard as possible, the important thing is that it has a thickness of at least 20 mm. For hitting surfaces. Now I've chosen plastic here and the POM is polyoxymethylene and I should probably say POM has already been pressed by a viewer. Why don't I always say fries? But to be honest, you don't know any other way. Of course, now you could use brass. or aluminum or copper, whatever you want or even wood, for example, depending on your taste, what striking surfaces you want on your hammer.
I just wanted to have a 22mm outside diameter here, like this brass tube here, which is 20mm on the inside and then we need another one that's 16mm on the outside and 14mm on the inside and then lastly, but Not least, we need some small parts, that is, two M8 brass dowels, a piece of M8 threaded rod, an M6 brass dowel and an M6 hex screw made of stainless steel. Yes, dear viewers, then the first thing we will do is take care of our walnut style. The walnut style sounds like salad, but it doesn't matter what they have to glue it and then while the glue is on. instead If you put it, we can build the head.
We can use the 3 cm wide strips to cut our sheet metal to size. Let's glue the following sandwich: walnut, maple, cherry, walnut. This is what you see. Like when it comes together, on the one hand, we have the right starch here for the handle of our hammer and the light stripe in the middle also shows us the center very well. This will be useful when working with the shape of the style. We'll keep everything together nicely and a few more forces looks good, yeah. While the glue is hardening we deal with the head of the hammer and for this we need this brass tube which has an inner diameter of 20 mm and I want to insert a wooden core into this tube, which means we need a round rod with a diameter outer 20 mm.
As I said, I use this plum wood for this and that is why it is important that it is at least 20 mm thick. mm. I'll do it on the router table with a radius cutter. If you don't have a router table, we wanted to keep it very simple. Of course, you can also buy a ready-made round rod. For example, you can even get them in Mahone at the well-known hardware auction house, they are usually made of beech or spruce, which is too soft and light, so if you do, you will see that there is beech or something nicer. a piece later, so as I said, do it yourself on the router table or buy a finished round rod, we will make it ourselves now, yes, I cut the plum wood on the circular saw, as I said, 20 x 20 mm and then we have to adjust it for the dining room table.
I use a ball bearing radius end mill with a radius of 10mm from the height. Let's make the milling cutter so that the edge here just doesn't stick out anymore, so Now we just go through here and adjust the stop so that the ball bearing just goes forward. Yes, it's still a little tight, needs to be polished a little more. But the good thing is that you can immediately see the places where there are. There is still work to do, they are slightly dark and if you sand them a little it looks wonderful and we have a round rod that fits exactly for our hammer head on our trunk.
So here comes this brass sleeve, the handle is then also fixed with a sleeve and has an outer diameter of 16mm. For a hammer, you would normally say it's an impact guard, as such would work here as well, but actually the point is more that, we want to attach the style. with it the brass expansion plug in its expansion function and so that it does not break the handle, it is more of a kind of clamp. Anyway, we definitely need a 16mm hole on one side and another on the other. On the opposite side is a 10mm hole for our screw head.
Making a hole here exactly tangentially in the housing seems easy at first, but it is not at all and many YouTubers have already thought about how to solve something like this: a variant works on the lathe of the three-jaw chuck. Basically, you insert the part so that it sits in one jaw at the bottom and is held in place by the other two when you tighten it here and then you can make the hole here. That's a good method and it will do it. definitely be precise. The only problem is that it's tangential and I think you can see it pretty well here.
If you already have a pre-cut part like this, you can't get exactly to the middle, so we're a little off center here. Now then it doesn't work for one thing and the other. Not everyone has a lathe at home, so you need a different method, another method that you can find on YouTube, I simply call it the three tube method, which is that you attach it . the target tube that you want to mark between two tubes that have the same diameter with masking tape, then you look at it here with a sharp object and draw a line exactly tangential here, draw everything again and rip over it again and of course then you have to being able to do everything and then drill exactly tangentially; that's the problem.
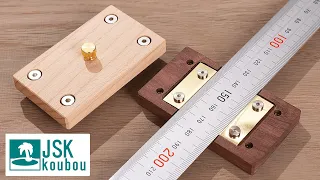
However, from my point of view, it can still slide a little depending on how you hold it in tenths or so to the left or right. , so you quickly come up with another method that is not ideal for this purpose and I really like it. This is good with the rule. You place the ruler on this side surface and try to get it as completely flat as possible, so. in this case I'm too far to the right, in any case I'm too far to the left and if I get exactly to the highest point of the lateral surface, it should now be around here, the ruler should be exactly horizontal, but the emphasis is on that, It is not super precise either and that is why I did not like it 100% and I thought of something else, yes dear viewer, I am a fan of stencils and I think that this little 3D printer stencil can solve the problem quite elegantly.
It builds and prints quickly and hopefully works like this: Yes, this is what the template looks like, basically blocks with a 20mm hole and on top is a drill guide ie. a chimney for the aft edge, and it is exactly in the center of the side surface, at the bottom, everything is open so that you can easily insert the tube. It also has the right width. It's done here. Then of course you clamp it in the vise and then install the figure eight hole in the middle of the case. I haven't tried it yet so I'm curious to see if it works.
You're there, yeah, it looks pretty good, I'd say it has to be. Now of course you have to build it and you use a step drill for this, it has exactly 16 and also the ten. I first clamped the tube with a figure eight drill to make the holes congruent again and then we need the one here first. The 16mm hole in jo fits in, albeit strictly, but we go over it a little bit with the steel wool and then it fits and at the top, yes, we still have to drill a little. Of course, we also need holes in our round rod and so now ours are under tension again.
Form a figure eight with a drill and drill here. It looks good, yes, it looks pretty good. I think it even holds up even though I didn't put it in. Well, the actual hold comes from the screw, which doesn't go all the way in, but then pulls it out. with the expansion pin, yes you can leave it like this 3 and 1.5 we are at 4.5 so let's draw where we want our round rod cut to a length of 4.5 to stick out from the brass edge on our wooden core Dear viewers, Now we need a hole with ten holes on both sides for our brass expansion plugs.
How do we get them as centrally as possible? Now the easiest thing is on the lathe or on the lathe, but what do you always do if you don't have something? So at home, don't worry. There is an alternative variant and now I will show you the following structure and perhaps you have already seen in another video of ours a vice firmly attached to the board and then here a piece of multiplex board. It can also be another piece of wood, it should be of a reasonable thickness. In this case 28 mm is clamped and then a hole is made with a 20 mm Forstner drill bit, not quite drilled but almost drilled, then we can insert.
Our center piece in this hole I have now wrapped with masking tape because it had already been sanded a bit and as a result, it was just under 20mm and it should fit really tight here, nothing should be able to move. throughout the structure. Please don't change anything else. We'll just use our ten hole drill. I already have a depth limit. I don't want to drill all the way through here and then everything should be fine. center and now we can place the hole here. I speak from experience when I say that it doesn't hurt to add a clamp here because everything likes to spin.
Well, let's try it then, the heels are still too long. We have to shorten them. a little In my case you need 13 mm, which means we only have a little bit of the expansion function left, but I think it's okay so I'll tighten the sleeve here now. With a threaded piece like this, it's easier to saw. The brass plugs should fit snugly into our core, but not so tight that it can only be driven in with a hammer, because what if it's too tight? So of course we run the risk of getting stuck here and having a crack. and we don't want that and we're still gluing it down with a few drops of super glue.
Now I'm even rubbing it a little bit here to make it a little bit looser, so work a little compassionately here. so that the core doesn't break us and then pass something a little super glue here, unfortunately I have a gel like that here, I didn't really want it, but apparently I wasn't paying attention when I was We bought it and then we put it here, this is what it looks like so far and now, of course, we still need our impact heads here and that's it. Unfortunately, this is not the right thread cutter. Actually, we need one for the blind hole. , but that will also work and then we'll cut our M8 thread here.
I've pre-drilled with 7mm, then let's see, I even have some brass thread. Here the threaded rod fits offset by about 20 mm. It's a bit more for me and now I'm fixing it with a screw lock. I don't know if it will hold up in the plastic, but let's try it and I hope it holds up. eye-catching surfaces. Now I could do a little post processing, I knew how to break the structure here, you could also make it a little convex, ideally if you want to do that. If you don't have one, you can also do it on lathe or lathe, but you can also do it on drill with a scraper sharpened and that's what we're doing now Hello dear viewers, I got it.
Now I made the black slightly crowned. I don't know if you can see it in the camera shot and with that we're at the point where we deal with the Hammer style with a brief commercial break of our own. Dear viewers, thank you very much for your participation in our survey about the Mitten finds Deluxe 2.0 material set, the comments were clearly thank you very much for that. We have implemented the material set, it is almost finished, if so. Snapinterested, leave us a short message and we will send you more information. Thank you so much. First of all, let's mark the position for the brass expansion pin that goes up there.
We'll drill it this long. The handle is still rectangular because it is easier that way. I offset the handle to 26cm and now of course we want to shape it. I want it to have an elliptical cross section at the top. We need a circle or a cylinder. 14 mm diameter of course you can mark it, it's not that easy either, that's why I built templates in the karting program. Moments of inspiration use Meute 3D. I get asked about it often and can recommend it even if I don't. I get anything and then I have it all in my memory, printed on the 3D printer, so we have these little templates here that we'll glue to each of the ducks with super glue and then hopefully we can just plan and sand the handle. in the right way, yes, that worked well with the style.
I also have my templates here. It has proven itself, so you can really get it into the right shape in the front. The sleeve also looks wonderful. You can also place the center piece. Here now, but there was another design error and that is that I also have a ten here on the front. hole, which means the screw would slide and I can't tighten anything, which means we definitely need a washer on the front. here so we can apply tension here and tighten everything. I have a washer here that has a, yeah, I don't know if you can see a rounded back, that means we can go in here with a countersink or a circle. head and then it should disappear so that our brass sleeve fits over it.
It sounds complicated but it is not at all. There is nothing left on the brass, it should work. Now I'm going to glue the extended pin a little. folded because it's supposed to stay in place just by spreading it out, but hey, it can't do any harm and why shouldn't you do it like that? Now put a brass sleeve in and you can hang the hammer on the nail. if you want or maybe even put a ribbon on it and on the back of the hammer handle I would like to end up making a lid with plums, I still had a piece of the fancy compass left over so I cut it off if you have seen the video or to mill and now We can use a scrap piece as a cover and glue it on the back or make it look good, yes, and while the suffering increases we can grind and polish the metal particles a little.
If it shines a little. a little bit and yes, now we have time so we can dedicate a little bit to the cosmetics, well this time there is not much about the oil, but even if it is a little bit, it is still fun, you can't see much that way with the walnut, but the stripes come out beautiful, of course, our plum on the back you also want a little bit of the center, you don't see much, but the little bit you see is a little bit darker and creates a nicer contrast with the brightness. brass, yes dear viewers, our little hammer is finished, I really like it, I hope you feel the same, it was definitely a pleasure to build and it's pretty quick, you can definitely put it together in two afternoons, yes, thank you.
I really appreciate you being part of the video, thank you very much for your time, I wish you all the best, I look forward to the next video with you, but don't forget until then, take care, your Markus, oh yeah, and now here are some examples of how to use our hammer.
If you have any copyright issue, please Contact