How To Make Your Home Studio Sound Amazing With A Low Budget
Jun 01, 2021So here's a
sound
sample of me speaking in this room before the acoustic treatment, as you can hear, it's a very reflective, open, spacioussound
and there's not a lot of speech intelligibility. It could also be considered difficult to hear me and here is a sound sample. of me speaking in this room after the acoustic treatment and as you can hear, the speech intelligibility is much higher, what I'm saying is much clearer, there are no strange reflections or interference in the room and my voice should be a little bit louder. rumbling heavier bass sound Hello Victor Guidera here from Recordeo.com and we are here setting up our newstudio
/office space as you can see this is in my garage so it is ahome
studio
and I wanted to take some time and film a video so we will show you howmake
your
home
studio soundamazing
and we'll show you how to save thousands of dollars in the process.
So we'll
make
your
room sound like this so in home studios we usually have a bedroom or a garage or a small room of some kind as our studio space and you know the main problem with the What we deal with is an unpleasant sound reflectivity, as you can hear in my voice in this room a buildup of low frequencies or echoes that sound strange or funny and So the main thing we can do to combat this is with sound absorption. You know, there's a lot going on with room acoustics and science, but we're going to keep it really simple with this video lesson and show you something extremely effective. on a lowerbudget
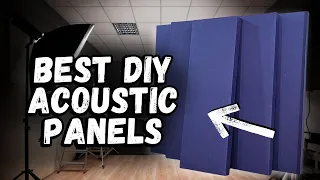
so with every studio I've designed I always use something called Primacoustic absorption panels, it's a two inch rigid fiberglass absorption panel covered with a breathable acoustic fabric and those as a prefabricated or prefabricated solution are great.
More Interesting Facts About,
how to make your home studio sound amazing with a low budget...
I recommend them and if you're like me and like to get a little dirty and like to save a lot of money, who doesn't? So I'll show you how to make your own type of Primacoustic panels, essentially we. We're using the same materials here and you know we're going to make them at 40% of the cost of those things, so make sure you download the free PDF guide and materials list either in the description below this video. or on this page wherever you are watching the video and so you have the follow up guide and you know where and how to get the materials and that's it, let's start by brushing or spraying the edge hardening resin around the perimeter and don't be shy in the corners , let it dry for 24 hours, then lay out the fabric, mark it at 3 feet to allow for wrapping around the back and you want 6 inches of fabric overhanging around the entire panel.

Center the panel. over the fabric and spray glue on one long side first while carefully pulling the fabric up and back and smoothing the edges to make a nice corner, then flip the panel carefully while holding the fabric tight and spray glue only on the side edge so that you can tighten the front of the panel and have no waves, always carefully smooth the corners without pulling too much or lightening so that you have a nice square edge and no waves, then you can flip the panel again and finish gluing the rest of the 4 inches of fabric on the back of the panel now for the corners, cut a square edge as shown here to prepare for the fold, dry practice the corner fold until it fits, then spray glue inside the corner and lightly hold the outer corner. with your thumb and at the end of the fabric, fold it down slightly as shown here and wrap the entire fabric up and over the back of the panel, then stick that rinse and repeat for all the corners and that's it, I recommend assembly.

Mount one or a couple of vertically stacked panels in the corners as this will significantly help combat low frequency buildup in your small room as we cover approximately 20% of the entire surface area of the room. I decided to evenly space the panels across the room both vertically and horizontally. Start by mounting the corner panels, then measure the distance between them and calculate how many panels you could place equally spaced without too much or too little space using a laser level measurement and mark the two outer edges of each panel along the space you have. calculated and then mark 6 inches into the panel from each outside edge where you want to place the Impaler clips since I'm using these little straight splices on the Impalers.
I have decided to use three clips per panel, you can use two, three or four. Impalers per panel depending on how stable you need them to be on the wall. Now with the ceiling mount, I decided to use the garage door tracks to hang a length of one inch wide steel tubing for an extremely easy hanging device. Place the cloud anchors. inches long and six inches wide and hang with the S hooks and that's it to mount the panels in our Recordeo studio, that's it and you can probably hear a big difference in my voice. I'm just talking in this room and I want to reiterate that as a prefabricated solution, if you don't want to make these panels yourself, Primeacoustic makes a great rigid fiberglass board with the same material from Owens Corning and you can also use something called Roxul which it's a little less dense and they actually make a rigid board, you can also build a wooden frame if you don't want to use the spray adhesive, whatever you do the point is to use a denser insulating material as sound absorption. your walls and therefore, to cover this room, I recommend doing a minimum of around 15 to 20 percent of the total surface area of the room, so add up the entire surface area of the exterior walls, floors and ceilings of your room and the amount. of material in square feet of your acoustic material and your absorption material should be about 15 to 20 percent to start with, so in this room we did, I think it was only about 20 percent and for placement, as you can See, you know we spread. all evenly around the room the main key points around your mix position are the first point, the first reflections from your speakers and that would be like straight out of the speaker cone bouncing off the wall and coming straight into your ear and that is turned off. this on the sides of the roof and the back wall, so those are the main key.
You know, the first early reflection points that we want to attack first and of course you know from there we want to spread even coverage for the rest. of the room and for the ceiling panels, you know, originally I was going to do something like what I did at Drumeo studios, which is a perfect laser level grid on the ceiling drywall plugs and I hook and hang the panels suspended from that. And you know, I wanted to simplify it. I have the garage door track, so I just put the steel tube in and was able to suspend the panels from it, and now we have a really nice acoustic treatment for the entire mix position. and the rest of the room we are completely ready to record and mix some
amazing
sounding instruments to a much more precise degree in this home studio space, so if you want more tips on how to improve your studio sounds and recordings , make sure to subscribe. on YouTube and visit Recordeo.com where we have all kinds of tips, tricks and courses being posted all the time, so thank you so much for watching and I'll see you in more lessons.If you have any copyright issue, please Contact