I invented a better quick clamp?
Jun 29, 2024Do you want to turn your workshop into a professional one? Buying things for the workshop can be very expensive compared to 3D printing and if you thought 3D printing was difficult, I will show you that it is not and these 3D prints will turn any ordinary workshop into a professional and the best part you can to do today. I will also reveal my best invention to date for the first time in this video. It's a work in progress and I've already spent a lot of time on it, but I think you deserve it. to see it that's what he said it actually works years ago when I bought my first 3D printer I had no idea what they were capable of but now that I've been doing it for a long time I can tell you that there have been many With the development, it has been become cheaper and easier and many of the things I 3D print I don't even have access to buy.

The best part about 3D printing is that I can have an idea and an hour later I can have it. in my hand and that in itself is just mind-blowing like this one, for example, although this is not related to the Workshop, well, it sort of is. This is my podcasting room and I have these headphones and I placed them on the table right here, that means less work space, so if I can mount my headphones somewhere else, it could solve that problem well. If you look on one of the headphone hanger sites you'll find a lot of files, but that's not what I enjoy doing, so I bet I'll do a challenge.

More Interesting Facts About,
i invented a better quick clamp...
I can design and print one in an hour, come on, so let's make a
quick
hanger ourselves. I know it's shaped like a circle, so just put in a number, we'll offset it by five and if I just add two screw holes, those will be the screw holes. just extrude all of this because the thickness is like 40, so we'll go further, 10 more, I say now it's 35, which will actually do, let's extrude five more like this. I'm going to add my own face to this as a logo because I'm a narcissist and that's why I'm on YouTube, I probably advocate a little bit for the screw holes, that we also round these corners a little bit, which look pretty good.
I would say okay, let's put it in the printer, let's give it a little bit of force cut the filament off the build plate on that black session, let's go and now it's going to be 48 minutes of printing, so I'll wait now, put it on the wall, hang your headphones, voila, see how this is anyone's best friend An hour ago I didn't have a hanger for my headphones and now I do. There are a lot of people selling these magnetic dust board connections on Etsy and I had them for a while too, but I think the majority.

Of them have a big flaw and I want to show you why I think they are safer and how you can print them yourself and I will show you exactly how I make them, but first I want to show you some 3D prints that I think are crucial for my workshop, including an update that it turns your
quick
clamp
s into perfectclamp
s and maybe at the end of the video you can tell me if you're intrigued about buying a 3D printer, so let's start with the basics, let's say you get a 3D printer. Nowadays you can get one for as little as $250 and up.I've had a lot of different 3D printers already and my favorite printer is the one just looking at the size of this thing. I'm just kidding, it's bamboo lab printers. this is the p1p which is currently $599 which is more than double the price of the cheapest one but it's more than twice as good if that makes any sense it's been really reliable for me and i can 3d print pretty wireless from my phone or computer which is just great, once you have a 3D printer you obviously need plastic. I pay about $20-$30 for a 1 kilo spool of filament and for reference this piece uses about 75G of filament which means I can print 13 of these on one spool of filament, that's about $2 per piece of plastic, there are now many different types of plastics to get and depending on what your printing is, you can decide on that, but that also means you have to determine what type of printer it will be. use because not all printers can handle the toughest materials.
I print mainly in PLA or PETG and for any beginners that is what I suggest too. Both are easy to print and you will get good results; However, both are quite fragile and cannot handle extreme heat or shock, so if you are looking to print harder materials or other types of plastic, you should research the printer you are purchasing and make sure it can handle those types of plastics once. once you have the printer, although with everything plastic. What you really need to do is get a file online or compose it yourself and press print online.
There are tons of resources to get files. What I find really good about Bambo LA printers and by the way, this is not sponsored. I love the way. They work, you can use the app, find something you like and just press print without having to do much work, for that reason I also bought my kids a printer so they could use it, so if you don't feel like drawing create your own things , you don't have to, there are plenty of great resources available and if you ever feel like it, you can learn the basics to draw simpler things later.
I usually go online to see if there are files and it rarely happens that I can't find it, but when that happens, one of my favorite things to do is solve the problem myself, so if you thought this was extremely difficult, it isn't and The workshop upgrades I'm about to show you will fit your workshop just as well as mine. They are made to fit any workshop and you can get them on my website. Now let's look at some of the real upgrades you can make with a 3D printer. This little thing, this little thing, can really go a long way.
A center finder is great. when you want to draw a line on the edge of your wood and in the center, then what I did is draw a very simple one. I have it in my printables in a couple different sizes to download, they are all marked. With the thickness of the material, you can use it for a 30 minute print and if you want, you can have a bunch of them in the workshop. They are especially useful when you want to raise the table saw blade in half the time. The thickness of the wood, for example, when making half flaps and of course the same goes for the router table or any other tool you can think of with a height adjustment.
They are also very good when you want to mark a location to drill dowel holes. for example, and the price to print one of these is about $1 or less and the ones I found on Amazon were much more hey hey what are you doing? Sorry, I just wanted to 3D print the things you were talking about. the video and I don't have a 3D printer so you thought you would steal mine yeah well no need because the sponsor of today's video is PCB way and they make PCBs and PCB assemblies but they also 3D print. and CNC machining, so honestly all you have to do is upload the file to their website, choose the type of filament color you want and then have them manufacture it and send it to you directly, oh okay, thanks, yes, no problem, friend, anytime, how nice.
Boy, now this might be one of my favorites of the whole stack of prints and if you ever want to make a round, my preferred way is to print one and use it as a template. The thing is, I thought it was a waste of printing. a new one every time I need it, so I made a base and that way I can print any size radius I want without printing an entire template at once. I say I need a 1 inch round. I print the 1 inch version and it is a much smaller one than printing the full template.
I set it to a tight enough setting and then drew around my material, cutting most of it off with the bandsaw or jigsaw and then doing the rest with a flush cut bit and the 3D printed template like the template Now, if you have a rectangular piece of wood like I have here, you can make all the edges with the same rounded sandpaper using this 3D printed 90° sander that I downloaded from thingiverse, which is an absolute 3D printing marvel, although It takes a while to put it in, it looks to me like it has a 90° angle and it makes sure we get a perfect 90° angle when sanding the piece, which is pretty important, especially for large tables.
This could be a trivet or a serving tray or a ping pong bat with a hole in it No, I don't care what you do with your round RS, just give them another very quick impression that I love is this little thing. I have a Bosch miter saw and a Fest tools dust collector, since there are two of them. different companies, you won't see a powder accessory from any of them, that would be like Coca-Cola and Pepsi collaborating on a new flavor. It's just not going to happen. I made one that fits the Festal dust collector in one hand and the BOS. on the other, a miter saw that solves a problem many of us might have with just a quick print, and if it ever breaks, you can print a new one, which of course works for all of these prints.
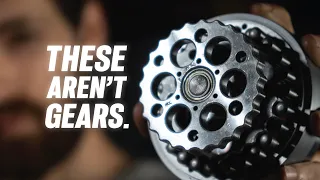
There really isn't much more to say about it. print and move on to the next now I have an idea for the project so I'm going to take you with me in the process of making it and it involves these quick clamps they come in different shapes but usually have some type of rubber on them. feet that you can actually just take off and put back on, so my plan is to replace them with something that allows me to hold them at an angle. Let's say if you want to hold the leg pieces at an angle, you can do it with this, so my plan is. to remove them, replace them with something else that allows me to turn it nicely, at least that's the idea, so I'll start on the computer and try to think of something.
I really think it's a good idea so it's a total of 40 30mm Space times 6 there's an opening at the top so I'll put those numbers in after a bit more CAD drawing. I printed them assembled with some 4mm machine screws and in just an hour I had my first prototype, okay, so the parts are printed, they fit but unfortunately they are a bit sloppy. I was going to put washers in between here, but then I realized that it's difficult with very small washers and big fat hands, so it's not tight enough like even this part is too tight. loose, so I'll change the dimensions a bit again and then I can try again after making even more modifications.
I had some ready to try, so my main concern here is that I won't be able to hold them well enough. but we can just try and to make sure it doesn't slip, I added some masking tape and I also cut these pieces just to simulate a set of legs, so I'm going to put them together to see if I can hold them. It really works, I mean, it works. I've applied quite a bit of clamping force and I was actually afraid these pieces wouldn't hold, but they also seem to be pretty stable, that's surprising, so what I'll do.
What I do is upload them to my website, but since all the clamps are different sizes, I'll upload the fusion file and you can go in and change the size of the piece that actually goes in the clamp, then you can print and use. with any quick clamp out there basically to change the size just open the file set the width and thickness of the first drawing and also the width you want the opening of The Gap to be and that should work for other clamps like well but anyway these come off. I can actually put the original back in there and use the quick lamp as usual, only this one is very tight.
I'll do it off camera later. I think this takes the quick clamp to a new level. If you want to use them in the other direction, ask well here. It's still a work in progress, but it works. This is something I've seen before and wanted to improve on it. This is a simple saw guide that you attach it to. your work piece and you can cut at a perfect 90° and one of the things that I think would improve it is to put magnets on it to keep the saw in place and also place them on the inside of the print that way.
Don't risk them coming loose. I'll show you how to do it in the next project because that also involves a magnet, but once printed it looks like this, you can see the magnets, but when you use it it will hold the saw next to the template and you can do it. your cuts without worrying about being out of 90 before I show my favorite print, although I will show some of the others that weren't cut for this video, but I think they are still great for storage. For example, I 3D printed a bunch of boxes for this small parts storage organizing all my screws on the router table.
I have 3D printed storage for all my tools but also for my drill bits to hang the drill. I have this little hanger that attaches to the drill hanger, which means I have all my drills stored on the wall, not to mention my sandpaper storage, which in itself is basically a whole video, but it works great. The tracks are on the wall with 3D printed parts, but I also have a cutting guide attached90° 3D printed. Now these are magnetic dust collection accessories. I have them on all my machines that use the dust collector and there is also one on the dust collector holes, so the way they work is that they connect the holes to the machines with just a magnetic lock.
The way most of these are made is with the magnets on the outside of the print, that way there is a risk of them coming loose and in the worst case ruining my machines or the dust collector, but It could also be dangerous for magnets to become loose around rotating tools. so I put the magnets on the inside with the polarity of each other magnet reversed which means all the accessories will fit no matter what I do so the way I make them is I load my file into the printer cutter 3D and Press the segment after finishing that part.
I'll drag the preview slider down until I see the hole for the magnet just before the printer covers it. I right click on the timeline and press pause then I can start the print and after a while it stops and notifies me that it's time to place the magnets, it doesn't say time to place the magnets but you get the drift so I take a lot of these. These are n52 neodymium. The magnets are the strongest and I also suggest you get these, they are 10x3mm thick. I put one in the first hole and then put the next one in the opposite direction.
The only downside to this is that the magnets are incredibly difficult to separate. your fingers wear out very quickly but that's a pain you have to live with and then I go through the entire print placing magnets and then press RIS zoom on the printer if you're worried about them getting magnetized. the print head is not needed because they are already magnetized to the bottom of the print bed once the print is finished, this is what I have. The magnets are secure inside but I can still attach them to any machine and they are strong, I usually have to twist them to loosen them instead of separating them.
These are for 100mm hoses and I simply attach the hose and a hose clamp and that will hold them in place. I even have a female adapter on my router table. to which I just attached the host and which is just a brief way to show how you can upgrade your workshop with a 3D printer. In my next video I will show something that I think is the best thing I have done so far and that solves a problem that would have cost me $11,000 until then bye
If you have any copyright issue, please Contact