Dollar Tree DIY SHELF | DIY Bookshelf
Mar 12, 2024Hello everyone, thank you very much for tuning in to today's video. It's a Dollar Tree
shelf
. Now this rack is very affordable and super sturdy. If you watched my video from a few weeks ago, I made a cornershelf
that is very cute and has a lot of space. saver, but I wanted to make one that was a little more basic so you could use it above your bathroom or as a little shelf and have more of abookshelf
style, so I really hope you enjoy this video. And stay subscribing to this channel and let's go ahead and start this project.
We'll be using these three wall plaques from Dollar Tree. No, they are made of very hard cardboard. They're definitely not wood, but they get the job done. They are very sturdy so I'm going to place them next to each other to see if they fit and now I'm going to flip them back to join them together and use two methods to join them together. To be safe, the first method is to use e6000 to attach them initially and I'm adding a very generous amount to make sure they are nice and aligned with each other, I'll use some binder clips from Dollar Tree.

More Interesting Facts About,
dollar tree diy shelf diy bookshelf...
They are much sturdier and hold it in place better than the clips I used in my previous video, so I'm going to do this with all the pieces and then once they dry after 24 hours, I'm going to remove the clips from the binder and, As you can see, it's perfectly attached with no issues, so now I'm going to reinforce all of this using this set of Dollar Tree hardware. It has nuts and bolts on it, so I'm going to drill two holes in the side just to give it a little extra. reinforcement, if you don't have a drill at home you can just screw a nail in there but it will take a while so definitely use a drill if you can so now I'm just going to add my screw and make sure I'm tightening when I add the part rear, this is what will give it that extra security so you don't have to worry when you add weight to the top of the rack and you can add another one if you want.

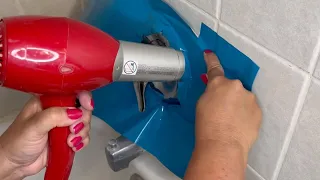
That's totally up to you, but I thought 2 was enough due to space, so now I'm going to do the same on the other side of this frame using the exact same steps and like I said, this makes me feel a lot better. Putting weight on this because I know it's not going to collapse in the middle, so now that it's done and you have a nice sturdy base, you can go ahead and paint this piece. I actually ended up wrapping mine in Dollar Tree contact paper, so I just measured the length of my shelf and added some extra contact paper because this will go on the sides and mine already has wrinkles in it, which really sucks, but It's okay because we can expand it, so once I cut it, I'm done. a group moves a backrest adjustment to make this easier for me and I won't add it at the end.

I'm actually going to add it, cut it to the table and then do it from the bottom pulling from the bottom as you smooth it out makes it a lot easier and avoids a lot of wrinkles. You can also lift this paper smoothly to remove some of the air bubbles and wrinkles. This is totally something you can work with without problems. You can also do this in smaller sections if it makes you feel more comfortable, like doing the sides separately, but I wanted to do this as a treat, so once I finished the top and it was nice and smooth, I made the edges really sharp and then I just folded the sides and bottom, although some parts are wrinkled, you can always lift and pull and you can always pop air bubbles, it's really no big deal, so I'm adjusting until I get the look I want and I take it off all the wrinkles and now I'm going to work on the back, so I'm going to cut all of this out, but in the meantime I'm going to treat these sides like a gift, so I'm going to cut the bottom and everyone wrap the gifts differently, but it's the same concept, you just want to tuck in the sides so it's not bulky, so I'm going to cut the top off because I don't really need it and then I'll make two additional cuts so I can then put those pieces inward, so now to make life easier, I'm simply going to place my shelf up and down so I don't have to smooth it out, as it smoothes itself out when Do it this way and with a cutter I cut off the excess paper, so when I cut out all the paper inside you'll see some scraggly ends which we'll deal with later, but like I said, you can avoid this. part of the DIY by simply painting yours.
I like the faux wood look, you can also use contact paper from Home Depot or the peel and stick one, it's much easier, so now that we have this, let's do the same thing for the other side, treat it like a gift, fold those pieces together and bam, this is what your shelf should look like and you can continue straightening out any pieces that look a little weird and I'll use these plants from Dollar Tree. supports, that's how they're supposed to be used. I want to use them this way, but you can't because they're too long, so I'm going to use them this way now that there are no holes to drill in the wall, so the holes are here and I want to make sure they're right here, so I'm going to make two marks on each of my brackets where I want the holes to be and then I'm going to drill them with a drill bit that's here.
It's wider than my screw, but my screw still fits and as you can see my screw fits perfectly, so now that I've drilled both of them, I'm going to take my East 6000 and use this little piece here to guide. me to make it perfectly straight so I'm adding my e6000 to the bottom and the side and then I'm pushing against that like I said don't worry about the worn parts later we'll take care of that so Now that they're in their Instead, I will let them dry very well for 24 hours to clean the worn bits of contact paper.
I just had some extra glue and folded them using binder clips, everything stayed nice and in place. much tidier so now I removed all the binder clips and everything should be perfectly dry and when you pick it up everything will be nice and sturdy and ready to go on the wall so when you're ready to put it up make sure it's Level them out and simply drill them into the holes you made and bam, you have a fully functional shelf. If you liked this video, don't forget to give me a thumbs up and thank you very much for watching until next time.
If you have any copyright issue, please Contact