DIY INFRARED HEATER | No Electricity Needed For Greenhouse Heat
May 30, 2024Hi guys, this is an
with a thermal fan attached to the top. It is very easy to build. It burns very clean fuel and gets very hot. I've measured it at over 500 degrees, so it works great if you want it. take a look and see how we put this together, keep watching and I'll show you exactly how to make one for you. Now, the first thing is to build the structure of our
. I have taken this dutch oven, this is the top, this is the bottom and this is just a heat exhaust pipe, it is stained steel, it is not galvanized, so it will act as a reflector for our heater. infrared.
infrared
heat
er
with a thermal fan attached to the top. It is very easy to build. It burns very clean fuel and gets very hot. I've measured it at over 500 degrees, so it works great if you want it. take a look and see how we put this together, keep watching and I'll show you exactly how to make one for you. Now, the first thing is to build the structure of our infrared
heat
er
. I have taken this dutch oven, this is the top, this is the bottom and this is just a heat exhaust pipe, it is stained steel, it is not galvanized, so it will act as a reflector for our heater. infrared.
Now, one thing I wish I had. I wish I had a much bigger one. a 20 gallon pot because I want to use this portion is a sand battery that will retain heat and therefore even if our infrared heater goes out it will still radiate heat into my
greenhouse
so one thing I need to remember is if You can get a much larger stainless steel base pot, something like a large boiling pot. I'm thinking between 15 and 20 gallons that would really be an advantage. I'm planning on updating this if I can go to the thrift store and find one that doesn't.
More Interesting Facts About,
diy infrared heater no electricity needed for greenhouse heat...
I don't want to use a new one because it's so expensive but if I can find one like at Goodwill or a thrift store I will definitely buy it and let you know about that too, so the first step to putting this together is I'm going to take off, oh I know it's so loud, I'm going to take off the top and I'm going to turn our pot over and try not to make too much noise, but what we want to do is fill this as high as possible with sand and that will act as a sand battery that will slowly radiate heat.

I'm going to try to get to that side of the table and add that too now we want to fill this with sand. but I want this to be as open as possible because it will act as a reflector and an infrared heater, so I'm going to try to do this without making a lot of noise. I may have to cut this. So I'll open that. I'm going to have to use my dirt shovel to fill the entire exterior with sand because I want our reflector, as it heats up, we want it sitting in full sand inside and out. outside and that will also help warm the sand.

Okay, so I completely filled the bottom of our Dutch oven with sand. Our reflector is kind of wedged in there, it can be easily removed because it is dry sand, but we want it. sitting completely on the bottom to maximize the heat of the sand. I'm going to put the lid on and try not to make too much noise doing it and that's the basic outline of how it's going to work, but there are some interior components that we need to assemble now, the next thing we're going to do is open up a couple of cans of peaches and I think this is a 30 o can, but what I'm going to do What I do is remove the paper so it gets in the way and will probably catch fire if we leave it there, so it's absolutely necessary to remove it, we're going to empty the contents and clean the can and move on to the next step, okay, I'm going to open this can, try not to make too much noise.
I know sand makes a lot of noise on this mic, it picks up every little noise, so I'm going to do it. We're going to try to get this out of there without it falling back into the can. Oh, I did it anyway, okay, I think we can push it up, let's empty out the peaches, we'll eat them later and I. I'm going to rinse this out and this is going to be the outside of our infrared heater. Okay, let's drill four holes in the bottom of this can. Now this is the top. We're at the bottom here.
We're going to put four holes in there and we're just going to put four equally spaced dots, it doesn't have to be an exact science, but we just want it to be basically four at the bottom. The can has been bent a little, but is perfectly fine now. Sometimes there will be a little glue residue left. You can just take a razor blade, put this on the film here and just scrape it off. It should come off fairly easily, but it only takes a sharp B bra if you leave it on. There, the glue can get very hot and release a really unpleasant smell, so I would recommend removing all the glue once you remove the label and make sure there is nothing there.
Now we're going to do the same thing with our inner can and it's going to be a little bit smaller and this one may be a little bit easier to open, but we still have that glue on the outside, so remember to take your razor blade and scrape the glue off. . Okay, let's open this one up and empty it out. the contents in a tupperware that we can eat later and we are going to rinse this one and prepare that one as the inside of the warmer will sit there like this and this will also have a small hole in the center just to release the pressure and make sure it doesn't It will build up and spray out, but that's how it will sit there, that's the mechanism of the heater and there is one thing that needs to be placed inside the larger can.
I'll show you that as soon as I've put the holes in the smaller of our two cans. Okay, we have our four holes in our inner can. I'm going to show you how this fits. like that, but there is one more thing that has to go in this larger can and that is the critical component of allowing the fuel to reach the flame area. Now our wick will be made of carbon felt and this is purchased on Amazon. I will put a link to that below but this is 100% carbon felt and that is what you have to make sure you are using this it will not burn it will just continuously act as a wick and is the perfect product to use as a wick for this type stove because it will last practically forever.
Oh, we want to make sure our carbon felt is the exact size, so I'm going to measure it and cut it and probably do two layers of it, but I just want to make sure it's the right size, it'll go all the way to the edge of our inner can, oh Excuse me, our outer can, so we want two layers of this around the outside, so I'm going to measure that and cut it. We will very carefully take a razor blade and make sure we have the correct size. Hopefully we won't move it too much and we'll carefully cut it to the right height. cut this so we have two good layers of carbon felt and that should fit right inside there, no problem and we may have to remove a little bit because we don't want three layers.
I only want two in this can. Okay, so this is our outer can, this is our inner can, they're going to fit in there like this. I'm going to wrap the inner can twice with our carbon felt and just make sure it's nice and tight around that and this. It will be our fuse forever. I'm going to carefully place it there. It's going to be very tight, so you may have to force it on. I can feel air coming out of that one, so it's a very tight fit. You may have to do this two or three times to get the right wick and height.
This is too high, so I'm going to work with it until I get it to the right height. In fact, I can cut just a little bit. from the bottom too now, after doing this a couple of times, I realized that I could twist it and it would go in there much easier, so just trying to force it in there won't work too easily, so if you want to have two layers, it's You may have to do that as you insert them, you can just twist them slowly and it will go in there much easier. You can see it's at a perfect height, it's now right on the edge of the outer can.
Well, I had to drill a little more here with a larger drill bit, this is our refueling and I had to push a little. I had to push the metal in because I don't want the metal to stick out. I kept it inside so it wouldn't cut your hands in the future, so I just pushed it back into the inner can, but I wanted to make sure it fit well in my kitchen funnel. This will be our refueling. I'm going to fill it about a quarter of the way and do some testing, but I would recommend you take it outside and do the outdoor test.
Also, this carbon felt will probably need some fuel poured into it. Our fuel source is Al. isopropyl alcohol, so we just want to make sure our carbon felt is saturated. We also have about a quarter of a container, then do your test and see how it works. We're going to put our isopropyl alcohol in there, not a lot. It's probably about a quarter of a can. We're going to carefully wet the outside area and wet the carbon felt with this and then I'll carefully wipe everything down and take it outside. I'm not turning this on. inside because there's isopropyl alcohol on the outside, so I'm going to wipe everything down and light it up outside with a kitchen torch and that way I can step back and make sure everything is safe and I don't have to worry about something on fire.
Pick it up and take it somewhere it's safe to turn it on and wear safety glasses too. Okay, I brought it outside. I turned it on. Nothing went wrong, so we look good and we're going to look at it carefully to see if there are any problems. a little while and see, make sure the absorbing action continues and stays warm, but no, we have another part we have to do, but I just wanted to take it outside and make sure it's a good safety precaution, it's also a good one to have. a fire extinguisher on hand in case something goes wrong.
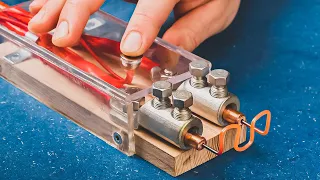
It took me a while to find the perfect stainless steel mesh. This one seemed too fine to me, it's not going to work. This one that I ordered on Amazon I think would work but Its size is a little big but the perfect size is this one here and I will link it below but I think this is the perfect mesh size that we are going to use to create the infrared action of our heater now, although This looks like a window screen, it's not, it's a little bit thicker and it's made of stainless steel and not fiberglass, but what we're going to do is take my stainless steel mesh and I'm going to use our inner mesh.
As a guide, we're going to wrap it there, cut it, and then put it together. Make sure you wear a pair of gloves when you do this because the edges are pretty sharp, but that's what we're doing. We're just going to create that size to fit the inner can to act as that infrared source and start reflecting back to our reflector and reflecting the heat, it's going to heat up our cast iron base, our cast iron lid and myself. I have an additional feature on the top that will actually circulate the air a little bit, but this is the key, it's the infrared, excuse me, this is the key, it's the stainless steel mesh, now what I've done with this is I created a hook where it hooks onto a piece that I bent at an angle and the bottom I folded up so it hooks and stays in place, so it's a little tricky to do.
It's no longer a perfect circle, but it will stay that way. What we're creating is a cylinder, so you need to make sure it stays together and you just need to create it. You hook them one way, you hook them the other way, and then you hook them. together like this so it doesn't open up, so that's the easiest way to do it, it's not perfect, but they will stay together like that, okay, to prevent my table from getting too hot, I put a ceramic pot in a U shape, you put these under the pots. They're actually normally like this under a pot like that, but I'm just turning them on their side so my table doesn't get too hot and I don't have to worry about the paint running on this very cheaply made table, but we.
We're going to put our pot in there and then we're going to turn it back on and we're going to do some additional things on top. Now this is the basic layout. We have our steel mesh in the center. We have our bottom can that too. It has an internal can, the hole is drilled so we can add more fuel to it. our carbon felt surrounds the inside of this. we have our original can that we cut. I put holes in it so that gas doesn't accumulate and escape there. it will get very hot and the inside of this will get hot, it will reflect the heat, the heat will reflect out of this as well, the sand will also retain the heat, just like the cast iron pot, the cast iron pot on top will also be will warm up.
We're going to fill our fuel up to the max and then I'll turn it on, let it warm up, and I'll show you the final item that we're putting on top. Okay, I put the cover back on our heater. Outside we're going to let it warm up and I'm going to show you an additional thing that we're putting on top of our heater. Now it's a little hard to tell with the lights on, so I'm going to turn them off. So you can see that the stainless steel mesh is starting to get quite hot. One more thing I'm going to add is a heat driven fan.
This will help circulate the heater throughout the
greenhouse
. It will take a little time. While it is a few minutes for this to get very hot at the bottom, but there is an electric motor there, it requires no external power, but is self-powered by the heat. I'll just place it on top and let it wait a few minutes. to warm up and it's showing that it was, let's see we're getting over 300 degrees there, so the heat will reflect back into the greenhouse and slowlyIt will continue to burn for about four or five hours and then once. goes out, we will still have the sand underneath that heats up and will also release heat, so initially you will get heat from the flame, but when it goes out you will eventually still have heat in your sand and your cast iron pots will slowly come pouring out towards me. greenhouse.Now the heat driven fan is working quite well and as long as this burns, that fan will continue to run and circulate just a little bit of heat. Heat was added to the greenhouse and the area below where that cast iron pot will heat up and stay hot for quite a while. Now there are lots of things you can use as the lid part, and I have some stainless steel pet bowls. You could wear it as a cap, you can wear it like I did in this demo, the actual top, but it's really hot around these edges, you can really feel it giving off heat.
My fan is working very well. It's going to circulate the heat slowly, but I will say. it just takes a little bit of time to heat up and one crucial thing about that wick, the wick has to get really hot, the alcohol starts to flow, once it does you'll see a lot more flame, it might go out if it's burning the alcohol and you'll see that It's more of a blue flame, it's a little harder to see. I'm going to turn off the light one more time so you can see how hot it is with the flame on, so I recommend having a charcoal flame. monoxide detector a smoke detector a fire extinguisher I recommend that you try it outside first to do your test and make sure that nothing lights up too quickly and just remember that this is an open flame and you have to be very careful so guys , yes This was helpful to me.
I hope you like it. And subscribe. If there's a way to do it another way, leave a comment below, but have a great day.
If you have any copyright issue, please Contact