Acoustic panels that actually look GOOD
Mar 07, 2024You see, these are
acoustic
panels
and their job is to absorb sound waves. You place them on the wall of the room and they drastically reduce the amount of echo and reverb you get in that space. They are somewhat similar to the sound diffusion panel I made a couple of months ago, but they work a little differently. This is probably one of the best ways to treat a room to getgood
, clean sound recordings. And that's why you always see them in the background of so many YouTubers and Twitch streamers. But as far as I'm concerned, these things have a fatal flaw.
I think they
look
really ugly and I don't want them in the background of any of my shots. So today we're going to make some coolacoustic
panels
and we're going to make them with a material that I don't think I've ever seen anyone make acoustic panels with before. But before I do that, I have to tell you about the sponsor of today's video, Skillshare. Skillshare is an online learning community where you can learn directly from creative professionals working in this field. I was recently taking a course in Scotland on how to improve voice over audio in Adobe Audition and I've learned a lot.
More Interesting Facts About,
acoustic panels that actually look good...
He taught me the basics of compression in cues and generally cleaned up my audio to make it sound better for you. And I thought it was appropriate because today's video is about room acoustics, which Scott also covers in his course skills. Its members have unlimited access to a wide range of classes on all kinds of different topics, from photography to logo design, and all without advertising. It's a great service. I really enjoyed it and I think you will enjoy it too. Right now, Skillshare has a special offer for my viewers. The first 1,000 people to sign up with a link in the video description will receive a free one-month trial of Skillshare so they can start exploring their creativity today.

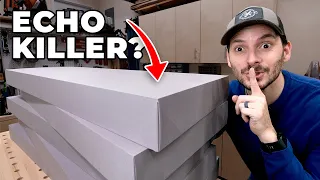
Alright, let's go to the store and get started on this bill. Now that we are here in the store. Let's talk about all the materials we're going to need for this bill. And I think the first one we need to address is this big, giant green sheet behind me. This is the Sonto Pad, and it is my secret weapon on this bill. Traditionally, these sound absorbing panels are made with rock wall insulation, but I have a feeling this could work a little better. And
actually
, it's kind of fun. When I first saw this, I assumed that because of its green color, it was also made of rock.
But it turns out I
actually
justlook
ed this up. It is made from wood fibers and then from a group of organic miners. Officially, Sono PIN is designed as a soundproofing material that you place in your home. You place it between studs and drywall and it absorbs sound waves that pass between rooms. So technically I'm going off label here, but I think it's a material designed to absorb sound waves, so I think it should work in this application as well. And here I have used traditional mineral wool as acoustic insulation in homes. It doesn't work very well, and I've also been to some trade shows where they demoed Snow Pan and it worked very well.So I have a feeling this might work a little better than mineral wealth, but that remains to be seen. Quick shadows, my friend marked some remarkable carpentry. He told me that the best way to cut Sono Pan is without tracks, so that's what we're going to do. Let's cut this into smaller panels. As much as I would love to hang full sheets of this material on the wall, I don't think it would look particularly
good
. So I said about subdividing my four-by-eight sheets into smaller pieces. If you don't have a place for the track, you can easily cut it with a circular saw or even a pull saw if you have all the time in the world.It is not very dense, so it cuts easily and quickly. But for my build, cutting my straight lines would make some of the later steps much easier, so the tracks were definitely difficult to overcome. Another reason I chose this option for this build is because of its slim profile. The rock wall is typically three to four inches thick, while the Sono Premiere is three-quarters of an inch thick. This meant I could make acoustic panels that didn't stick out as much from the wall. Alright, that's a total of eight panels for four sound traps. I'm actually going to duplicate these panels on each individual trap, so the next thing we need to do is make some frames to place them in.
And to do that, I'm just going to use two very basic panels. four by four. Nothing special here. The first thing I did was split my two-by-four in half. Sure, I could have bought two items at the store, but I need these frames to be relatively straight and square, and it's very difficult to find a decently straight frame to bite you. So cutting two by fours and cutting them in half seemed like a much better option. Then after that it was all about cutting them to the length of the song as I calculated all the frame sizes in advance, I was basically working on a cut sheet which was a bit boring but I kept myself entertained trying to get it right. triples with all of Kobe.
Alright. Now that we have all these guys, we can start putting our frames together, and that will really give me a good opportunity to try out these quarter clamps that I bought a few months ago and haven't found a use for yet. Let's see if this works. I'd love to tell you that I had a cool professional method for putting these miners together, but in reality, it was as basic as it gets. I applied some wood glue to both sides of the miter, planted them in position, and then screwed everything together with some three-inch constructions. However, if you want to see a cool technique for attaching wrestlers, you should probably check out my patio chair build, which I'll link on the screen above right now.
I want a little further for that. a box nailed three more before continuing. I expressed myself, I'm a little disappointed with these corner shots. I thought they would do a better job of tying things together, but they really just keep things in place, which is helpful. But they're just not the corner clamps I thought they were. So it's hard to get too mad that I only spent about 15 bucks on the pair of these... So yeah, I guess you get what you pay for. Let's keep going. When I was trying to determine the size of these frames, I was basically balancing two priorities, form and function.
When you're trying to combat reverberation, an echo in a room, the more surface area you can cover with your acoustic panels, the better. But I also don't want these panels to be so large that they dominate the space. So my compromise was to make four frames about two feet wide by four feet tall. Once I was done, I set three of them aside and placed the last one to give it a special treatment. Alright. That is our last painting done. Now this frame is not like the other three because of where it will go. I have a very special mounting solution for this.
We are going to assemble this one with magnets. So, let's drill some holes to mount them. Using a Forstner bit in my drill, I was able to carve some recessed pockets into the frame and let the magnets line up nicely for a clean, minimalist look. This particular panel will sit on top of a large HVAC unit in my office, and I still need to be able to access it from time to time to replace filters, make repairs, and things like that. So magnets seem like a great, non-permanent way to mount it in place. Also, I know it's silly, but I love incorporating magnets, whenever possible, into my projects.
The magnets are ready. The frames are made. I think now we can do the fun part of this job and see if our SonoPan fits into these frameworks. We'll see. We'll see. We'll see. And yes, they are too big. I actually realized I made this mistake a while ago when I was cutting out the frames. What I did was make these panels large enough for the inside dimension of the frame, not the inside dimension of the frame. Honestly, it's a pretty easy mistake to make and I do it semi-regularly, so I'm not too worried that it's better to be too big than too small.
To fix this, we're just going to cut these guys down to table saw size. Technically, you could add a table saw to that list of tools for cutting healthy bread from before. But be careful, it's never a good idea to push large sheets of anything across a table as it's uncomfortable. They can stick to you and it's a great way to get the soft stuff to throw whatever you're cutting into your face. Fortunately, at this point I was working with much smaller pieces of solid pan, so I felt very comfortable and confident. Oh, and as I walked back from the table, I noticed that the corners of my frames were looking a little sharp.
So I took the opportunity to round them using the molding. Rather, I know it seems like a crazy detail, but trust me, it will come in handy later. Well, let's try all this again. Oh, okay. 00. Oh yeah, that's going to count. Look at that nice, tight fit. Perfect. Nobody is good. Hello. Number two. Yes. Yes. Yes. Perfect friction. Fit. I love it. Next. Get this one out of the way. I do two at the same time. I dare? Yes Yes. This one is going to come in here as the last one. He is very tight. Oh, maybe the one who knows the most is the one who knows well.
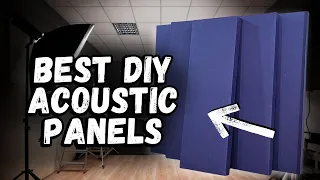
OK. That's for frames. All ready. At this point, you might be wondering: how do these panels look better than the ones you showed us at the beginning of the video? It's a fair question, but don't worry, we still have one more step to take. We're going to stretch some fabric over our panels to make them look a little nicer. I went to a local fabric store. I bought a nice blue-gray fabric that is a little sheer so you can see through it. And the idea is that the more transparent the fabric is, the more sound waves it will allow to transmit through it.
Although looking at this now, I may have gone a little shearing. I can really see through this. I'm worried it won't cover the actual panels, like the color difference between the wood and the Sonto pan, but if that's the case I'll just duplicate them. This fabric was really super cheap, I think it was like $4 yards. I actually wanted to get a fabric with a printed texture or some type of fabric with an interesting texture. But it was surprisingly difficult to find something I liked. So I ended up choosing this, which is nice and neutral, and I think it will pair well with all the nuts I have in my office.
Again, if you were expecting to see some kind of fancy mounting system, you may be watching the wrong video for attaching fabrics to the frame. I just staple it into place. Or at least I thought it was going to be simple. To be honest, it was a little difficult to get the fabric to stretch perfectly over the frames so that there were no wrinkles or lumps in the corners. Oh, don't even get me started on the corners. As someone who has never been particularly good at wrapping gifts, this part was the hardest for me. Anyway, after a bit of hassle and a lot of swearing, I finally put the first layer of fabric on the panels.
I was curious to see if the fabric was too sheer, so I pulled up a quarter and well, maybe it'd be better if I just showed what I started off like this. You can get a pretty good idea why I want to make two layers of fabric. You can see it's actually pretty good here in the middle, but around the perimeter where the wood is, you can see a lot of wood coming through. So two layers at a time. Unfortunately, because I didn't take into account the fact that I had to fold the fabric and also because I'm not good at calculating, I had to make three separate trips to the fabric store that day.
But hey, at the end of the day, at least he had a fairly friendly relationship with the older woman who ran the store. I guess that was kind of nice. You know, originally my plan was to trim all this excess fabric around the edges, but now that it's there, I realize it's doing a really good job of keeping it open and secure in the frame. So I'll just leave it. I'll staple it, make it look pretty, and it'll be in the back anyway. Alright. Let's turn this guy over and see what he looks like with two layers of fabric.
Oh, that's much, much better. I can't even see the wood anymore. Alright. Nails to the other three panels. Fortunately, by the time I got to the second, third, and fourth panels, I had perfected my fabric wrapping skills and everything went much faster. 30 minutes later, I had all four panels double wrapped in fabric and was almost ready to go, but I had one small thing left to do. I, oh, so I, am just doing the incredibly normal job of ironing my sound panels. There are a couple of wrinkles in the fabric that I wanted to fix. Nothing to see here.
I did my best to smooth out all the wrinkles in the fabric. But in the end, there were still some left. And this iron that I normally use in the shop to attach the edge bands did a very good job of removing them. Now that we're done with this little extra step, I think we were ready to take these panels home and respond.The most important question is: Will this video play the piano alone in this application? Let's find out. Alright. Now that we are home with all the panels, obviously the first thing we need to do is ride the ball around the room.
Then I want to write tests to record a couple of test sentences into this microphone that's here with all the panels up. Then I'll remove all the panels or record a couple more test sentences and see if we can hear any difference. I don't think these panels should be really simple, especially this magnetic one. I'm just going to pick it up and place it on this metal cover. This is a big win for me because I've always hated how this cover looks. It's big, it's white. It's annoying to see this, I think. Look, it's much better.
Although this panel got a little damaged during shipping, I may need to steam it to remove some of these wrinkles and then I will assemble and attach all the other panels simply using these new little slat clips. Don't worry, I won't bore you with too many assembly details because this was all pretty simple. I attached one side of the batten to the panels located on the other half of the batten on the wall, which luckily was very easy to mount just using drywall plugs because the panels themselves are very heavy. And then I lifted the panels into place, rinsed them and repeated three times for three non-magnetic panels.
And I finished. There we go, we now have 360 degrees of sound absorption in this room. So I'm going to clean up the mess here and then we'll do some testing. OK? I've opened the Premiere project file and we're ready to do a test recording. So I'll start with a couple of sentences and then I'll even clap a little. 2321. This is a test recording with the sound panels on the wall. The quick brown fox jumped on the lazy dog. Now, let's get all of this out of the way. Well, we're stuck there. What do you think? Should I also unmute the Fusion pedals?
I think I should. We will do all the sound treatment at once. Yes. And finally, the last one behind the camera. Alright, here we go. Well, we'll see how it works while I can already hear a difference with my ears. But let's do a more objective test. Try two. This is a test without sound effusion and without acoustic insulation panels. The quick brown fox jumped on the lazy dog. From what I can hear, this is a big difference and I would be surprised if this didn't appear on the recording. But let's see. So here's the pink paper clips test.
Here are the ones with sound treatment on the walls and then the green clips next to them. There are those that do not have sound treatment on the wall. Let's play back to back and see if we can hear a difference. This is a test recording with the sound panels on the wall. This is a test without sound effusion and without acoustic insulation panels. The quick brown fox jumped on the lazy dog. The quick brown fox jumped on the lazy dog. The quick brown fox jumped over the lazy dog, the quick brown fox jumped over the lazy dog.
So what do you think? Can you hear a difference? Personally, I can hear a pretty big difference. I find recordings with the panels up to be cleaner, sharper, and generally easier to listen to. Admittedly, it's not completely revolutionary or game-changing, but I think it should really improve the quality of the voiceovers in my videos. And honestly, I should record my voiceovers with the window shades down because those big windows are creating a lot of reverb. But I wanted the light to record this video, so my future voice should sound even better than those test clips because I'll be doing them with the blinds down.
I also really like how these panels look. I think the color blue goes really well with some of the wood tones and other colors here. And honestly, they make the space look much more professional than it really is. I thought I would regret choosing such a simple color, but now that they are available, I am very happy. And if you don't agree and want to do something a little more adventurous, all you have to do is pick up a different fabric at the fabric store. And I also think we just proved that yes, in fact, you can use Suno Pan to create acoustic panels.
I guess the only question left unanswered at this point is how does individual isolation compare to traditional Rockwell isolation? So if you want to see that comparison, let me know in the comments and everything. I'll go buy a pack and post a short short on YouTube comparing the two. But here's the thing, even if mineral wool worked a little better than full pan, I still think for my money I'd go the Sonipat route because it's so thin. These panels barely stick out from the wall and since they are rigid, it was much easier to work with them and then fit them into these frames.
And he is also much more pleasant to work with. I can't get close to a rock wall without feeling crazy itchy all over my body and the dust it gives off, even if you're wearing a mask it's like a back magnet here. Throw it away at all. I just hate working with it. And on top of all that, check it out. New fill angle, right? I like it, although I guess I need a light in that corner to balance things out, but overall I'm very happy. And in that sense, I think this is the perfect place to end this video.
So thank you very much for watching. If you like this video, please like, comment and subscribe. If you already are, I would personally appreciate it and help my videos reach a wider audience. Many thanks to all the Patreon supporters who you can see listed here and here. My backers got early access to this video, as well as a ton of bonus content, so if that sounds like something you might be interested in, they all include a link in the video description. Alright. That's all for me and I'll see you in the next video.
If you have any copyright issue, please Contact