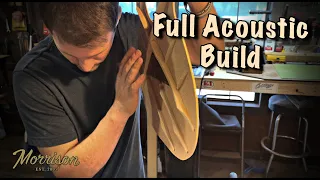
Full Building of a Custom Goodall Guitar
Feb 27, 2020This is James Goodall and Luke, my son, and Daniel, who made a wonderful video of our tour of the store. They thought we'd give you a little voiceover experience and maybe make it a little interesting for you. I'm breaking out some Hawaiian koa. You have great music from our amazing
guitar
ists, so we have to take the raw wood and level it perfectly so that when we run it through our machines everything comes out with a uniform thickness, you don't want to lose any wood. So beautiful, special and rare Hawaiian tail, we also choose very nice sides that match the backs, usually from the same board, which goes through our new segmented cutter head that does not splinter, normally a planer will splinter the wood and ruin it . but that planer does a really good job, it's our big Hitachi saw that they stopped making those years ago, but our screw supplier, Steve McNiven Bellingham Washington, upgraded it and saw that it cuts like roofing shingles and said Years ago, a Grizzly white belt sander I specified how we wanted it made for sanding thin pieces of wood and short pieces of wood and shiraz at Transpo Lea, a friend of mine who owns Grizzly Industrial,custom
made it for us. and he kept it as one of his models.
Hi, I'm Luke Goodell and as you can see here, I'm working on a book to go with this really beautiful Hawaiian koa interior set and I'm looking for the best mirror I can get. of these sets and I'm doing the same thing with this Italian spruce top that we're using on this
guitar
. This is a process called candling. Actually use a high powered bulb behind the spruce to see the imperfections in the wood that are only possible. In certain species of spruce there are sometimes hidden pockets of resin and bark, things like that that we want to know beforehand.
More Interesting Facts About,
full building of a custom goodall guitar...
I'm working on processing these sides and the background so that the top of the book matches. I'm lining up the grain. to get the most premium book combination I can, I can get this with wood, yes that hump is for the cut and you will end up cutting one of the humps on the side that is not the actual shape. The cut fits a little tighter in that area because it is extremely tight. Fold, so I wet my sides down and I'm setting a timer so I can evaluate when I should preheat my side benders to get the right heat.

I got the temperature perfect for this species of wood and as I slide it in, I actually use a couple of divider pieces to apply the heat only where I want it and right now that's going to be the waste, you know, it's very easy to overheat areas, a lot People experience problems bending the sides, especially real curly woods like maple or koa, but we don't have a lot of leaks from time to time, but it's pretty rare that Luke has a really strict regimen that makes that move. Evaluating the temperature of my thermal blankets, they tend to vary as I move my holding cauls into place.

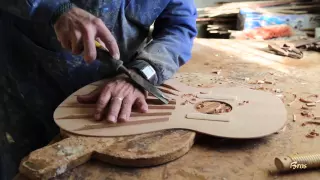
Here I'm using our templates which allow me to fit the perfectly matched back and top of the book. I am applying glue to join. The back that gives me a nice wide surface to build our guitar from that glue joint has to be absolutely flawless, so the tool that we use to put that edge on is called a jointer and it has to be really sharp blades and perfectly tuned. To give just a neat edge, that's perfectly true, so that when you put the two pieces together there's no tension or gaps or anything like that. Here I am locating my center line so I can draw my pattern.
Some wooden games are difficult to locate. the center line if they are really quarter sawn and the grain is really even, many spruce trees can be like that. I'm always happy when that happens, it means I have a very good and tight joint, there are very few species that are wide enough to provide a surface for the top and back of our guitar, so we join them together and set them aside to combine them once. Once joined together, these tops and backs are actually as strong or stronger than bare wood from Ryan, so now I'm going to cut out the pattern I've drawn on this Italian spruce top the same way as on the back.
Here you will see that there are two small spots where the pieces of wood are not wide enough. That wood is so special and amazing that they added like little quarter inch ears to the wide billet on the back and by the time we're done they're almost completely trimmed anyway, yeah we're talking about maybe 164 to 1/32 of an inch is very minor, so I have drilled a hole for an index pin and am marking the area where I am going to make the rosette inlay. I use cyanoacrylate to seal the area and roll it out to get a really hard surface.
This helps when I'm routing the slot of the rosette that I mounted and clamped on my back and I'm routing the slot forward, the back strip, we have an ebony back strip with maple, I have some maple edge on the outside now that I got the fifth backstroke just perfect. I'm using a little more cyanoacrylate. A little bit, you install it on the back. Now I'm routing the rosette slot. This guitar will have a bow. A shell rosette. The router bit must be. Absolutely new, razor sharp, otherwise it's a bit fluff and chicken, my dad converted an old drill into a fly cutter to cut a very, very thin channel that we are going to fill with a piece of stained pear wood very thin called eccentric ring.
Here I'm installing that eccentric ring which really gives it a really nice accent. On the light case we used an ebony maple laminate and what I'm going to do is insert them into the rosette slot and fit them nice and tight, but I'm going to use this
custom
designed radius sander which was an inspired little tool that I made and it has two different sound hole radii so the rosettes are a little bit different diameter so we made them a little aluminum sanding jig so I'm looking for a really nice fit on this PowerShell here these They are reinforcement strips for the back that we make from mahogany.They are the beginning of the structural integrity of the back brace. I'm doing this strengthening on a bench called a Go bar platform, let me. to apply pressure with these pegs exactly where I want them, you can see the glue comes out evenly on all sides, so I have raised these lids to allow airflow to go through all sides because we take humidity control very seriously inside our The build environment in our workshop is around 45 percent and then we have a special large room where we leave the wood for at least two weeks before we build the seasoning and we set it to around 34 percent relative humidity and we add a temperature of about 80 degrees, yes.
We are looking for a good middle ground in our humidity so that the wood can expand or contract appropriately as it travels to various locations around the world. We've heard from many of our dealers that our guitars are at least as durable, resilient and impervious to damage caused by low immunity and stuff, but there are limitations, but we have to choose a low humidity spot to build, otherwise , you will have problems when shipping guitars to dry areas that I am actually
building
. In this room because it's humidity controlled here, I'm installing the back braces and I'm looking to achieve maximum bond strength on our balloon.Our back braces are already within a 15 foot radius so I need a jig that allows me to hold them to match, we have sides that I removed from the bender and when removing the retainer it states that they use this belt sander to start clean the sides and they need some processing because the steam and heat from the side bender tends to shift the sides a bit, I am fitting, measuring and marking the length of these sides on our templates. I have prepared these sides and the neck and tail block to join the other just by perfectly applying the blue holding them together.
The part here I'm installing is our mahogany cut siding. It actually gives us a larger surface area on our sides so we can properly mount the top to the back. They use specially reinforced clothing pins to install the trim liner I'm cleaning. the inside of the sides and prepare them to mount the side supports. I need a really nice, clean, flat surface to provide structural rigidity. We tend to bend our sides. You know, these sides are a little thicker than most. I would like. it gives a firm foundation to the top and back resonating without damping any of those perimeter vibrations plus it makes an instrument more stable err I'm trimming the length of the straps to the perimeter of the top and back our experience with various species of woods and our knowledge of the different sizes of our models allows us to properly shape these orthopedic devices, the different sizes of instruments and the different species, which would make a big difference in terms of the thickness of the pieces, but it also depends on the individual pieces you may sometimes have. a stiffer response cap can be worked a little thinner and some people like it and some people don't because you get a little bit more punchy sound and a brighter sound and yet you may not get as much warmth in a stiff cap using a chisel.
To size these braces based on species and model size, I am now installing the sides into their corresponding molds and using clamps and expansion calls to hold them in the mold, this allows me to go to my 15 foot and 50 radius templates. Foot radius sanding templates that allow me to get the right radius on the top and back. Now I'm trimming the laminated extension block back and cutting the slots where the top and back braces intersect the sides back to those 15 and 50. foot radius many people give us a deeper radius on the back superior. I don't think it's a good idea because it puts more tension on the top which will increase the frequency.
We like to have an instrument that has, especially on the steel strings, a complete warmth. Powerful bass without losing definition or imbalance. It is very difficult to get a steel string that has good bass and we are actually known for having small instruments that also have great bass. That is very difficult and important. Each top and bottom are custom made. on the sides of the instrument, so now I have the instrument
full
y assembled like a box and this really nifty jig my dad made so we can do it all at once. I can actually remove all the clamps.Caulks go through your mouth because of the way they are designed. As soon as I remove the guitar from the template, I will immediately start voicing the instrument by playing the top, which gives me an initial idea of what this species is. sounds like and now that we have it in a closed cavity, I'm pre-routing the slots for the bindings that go on the edge of our instrument. The purpose is to protect the instrument and add beauty to it. I'm drawing on top. To help me focus on the specific areas I want to remove material, I'm voicing the top of this long belt sander.
I'm doing this specific sanding to achieve the maximum tonal profile of the instrument because each set sounds different. I touch the phone and stand and adjust as I go. I'm preparing the neck mounting area. Now that I'm done shaping the top and prepping the neck area, I can make my final joint slot on this router here and then. I can route the top slot of the snaffle. I bend the bindings and fillets to match the shape of the sides inside the benders. I also use another router to route the binding slots on our peg head, which is also bound like the body.
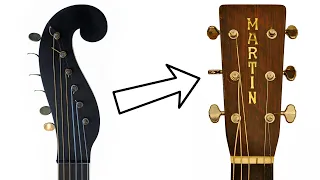
This is what we would call our Signature Series style egghead as I make my snaffle slots on the top and on the back, I'm actually actively putting the piece in place to make sure I have a perfect fit on this jig. it allows me to route my batch of terminal grafts and once I have my groove I can install the ebony and graft all of these really small pieces, all of these fine details will come together to form a cohesive instrument that is beautiful and well protected. on the edges of these very useful templates that my father designed but that allow me to bind the guitars and halves, it takes me many hours of fine miter work with chisels, sandpaper and a variety of other tools to install the binding on these very thin profiles. which is about ten thousandths of an inch per layer, about 30mm in total, we don't just do this for you, the player, but also for ourselves, because we're looking for a certain type ofexcellence, whether the person notices it or not, we do it. like we were
building
it for ourselves, you know, we really care about tonal quality as the main philosophy of our building.Yes, it's nice to have great looking inlays and fancy inlays, but we generally err on the simple and elegant side of beauty instead of overdoing things some people who might want a museum collectors of guitars and other things they don't play even that much They may not be as impressed, but that's okay, we just care about making the best instrument with the best sound possible, all the instruments in the orchestra, you know. We are not too ornate, there is a certain simplicity in beauty so that is our construction philosophy, we use excellent materials, incredible woods in extremely precise carpentry and precision throughout the process and of course the action has to be fantastic too And, speaking of action, here I am. working on the fretboard where the musician spends most of the time.
I'm installing the fingerboard bindings, these are ebony. I select all the embeds so that they are reflected in the interpreter. Actually, it's just a detail I'd like to have. on my own guitar and that's why we know that even one side of the shell will sometimes have more points than the other side, so you want to choose shell pieces that have the nicest looking. Attaching the peg head requires as much work as the body. At this point, I'm mounting the neck to the body after I've cleaned up all the binding and I'm doing a pre-adjustment of the neck for the angle fore, aft, side to side in relation to the relationship of the bridge to the top and adjusting the height of the heel to mount the heel cap, also Luke gets that nice angle so that when he has the guitar. later and adjust the neck you don't need to make many adjustments, the radius sander is what's really good, but the paper wears out pretty quickly and we have to keep it fresh after finishing the fretboard.
Now I can ride it on that. neck that I did the pre-fit on, you can't believe how much that Bertels menace slides even with indexing pins, so Luke is very careful to keep it from sliding one way or another, there are probably about a hundred fine details on They're hard to spot here, but they all matter. This is a process. I don't know if I'll ever be out of a job and retire. It is difficult to teach how to sand the neck. It's very, very easy. getting lumps and dips and that kind of stuff is like shaping a surfboard, yeah right, which I did in high school, that's one of the reasons I'm glad my dad is still doing this .
I'm sure the player will notice if you take one of our guitars, fill the neck, you'll see, you know wide angle shots are cool, we didn't actually film the maintenance process on some of the following rosewood bodies, we all stain and we have to clean. Decided points and fillet on the peg head sometimes the fretboard binding or fretboard binding will be a contrasting color and will need to be sealed in advance before we get stains. Joe is awesome, we have a guy who lives near us that we could hang out with. a huge city and not have someone as good as him, he is a good friend, he is humble, he is teachable, he is smart and knows a variety of finishes.
He actually travels internationally to learn special Japanese finishes and stuff, and he's incredibly easy to work with. then we give him our instruments. I thought we were going to set up our booth and spray ourselves, but he has an illegal paint booth and all the permits and everything, and he only lives a mile from us. We deliver once a week. two guitars, we made two instruments a week when we were in Hawaii, we had 15 employees and we made two instruments a day. These went through the finishing process in our curing, so there will probably be a five week delay for the finish to cure the property and not.
To not cringe after being at Buffett, I scrape the finish to get a really level surface and then go through five different grits of sandpaper, it takes a lot of time. I went down to 2000 grit, it's easy to sand through that. finish also because it is very thin, it may look like a table or a piece of glass, but we really put a thin finish on it. Our finish is incredible. I think we have the best finish on any guitar, it's incredibly durable when we switch to This lacquer finish solves about ten different problems we had, from checking finished to underarm printing, which lacquer gets gummy and by the time we When you spray a guitar with hairspray, it starts to degrade.
Selected amber. The amber feels hard, but if you dropped it. it would break, that's what lacquer is like, it doesn't cross-link, it can crack with changes in temperature and humidity, with things anyway, some guitars went to Germany and some ended up checking new guitars because they were taken away and they froze. a tiny plane and that was it, we changed this catalyzed urethane and it's not a UV finish and it's hard to apply and it's very difficult to polish while I'm polishing here, it's just something really hard and yet it's very thin and When we changed to it on our instruments, I noticed that they sounded like they were maybe a year old compared to the lacquer.
They were more mature and rich and had more character. It's really a great finish. You can't apply too much pressure and go too slow because it will apply too much heat, although this finish can handle it, you still have to keep moving and now I'm adjusting the neck to the body after polishing it, I check it, remove the tape from the fingerboard and clean the edges there. I'm adjusting the neck, that Engel neck is extremely important, we have to plan ahead for string tension and to get the Mac angle perfect, we have some simple little jigs that we use to keep that angle perfect.
I know that if it's not quite perfect, we have to adjust the heel angle so that the next body shot is at the correct angle. All of our fretboards are bound so you have a nice clean look on the ends without seeing the fret pins. Tell them about the Evo Gold face material, it's a wire made in Germany that actually wears almost as well as stainless steel, a kind of white bronze, very strong stuff, it's what boat propellers and car shafts make. ship bearings. I think so, great durability, yes. really wear resistant, it's quite hard to work with, but it's not as hard as stainless steel and some people say that stainless steel doesn't sound as good.
We put a nut with a bevel. I was cleaning the bezel and it kind of stuck. I guess there aren't many pictures of that, but anyway it's a really precise fit for that nut to hold it on with very little glue. I am now going through the process of gluing the neck to the bridge and have a special router setup. It barely sands through that finish. I'm talking about almost perfect, so there's no digging into the wood and then I release the edge of the bridge right here so that when it sits on top with the glue and everything, there's no thickness of the glue left. , yeah, it's just a very, very tight joint.
Some people say, oh, you have to use a lot of glue. Honestly, that material is inferior to what we're using. This industrial glue called tight bond is extremely strong, stronger than the wood itself. and it's almost brittle, it's not a soft, rubbery finish, so it conveys tone incredibly well, not only that, but it also allows for simple repairs. Yes, that's true, our necks fit where they are glued, right above the place where the fingerboard extends into the body. and they are fairly easy to remove and reset the neck angle if ever needed this is the next day after the neck and bridge have been glued.
That's a great shot, good job. Daniel needs to be careful when removing those clamps you don't use. I don't want to dent anything that fits the bridge pins. I use this stop so that all those holes are the same depth. I ease up the low E and A a little so the strings don't get stuck on the peg and then I go ahead and play. of a bunch of bridge pins only to get six that fit perfectly even though those bridge pins are cut on a CNC lathe, so we recommend on our FAQ page on our website that you keep your pins in order when change your strings, so let's put a pickup on Daniels' guitar.
Those are some really beautiful woods that he has on that instrument, that Italian spruce top and the amazing Hawaiian color, tell him you switched to the Ken K. Oh, well, yeah, we really love it. This Ken K pickup system has a few different options, but even the one without the internal battery sounds great and is very accurate to the guitar tongue and a lot of acoustic people love it. It's a good system, one of the The main reason I like it is that it doesn't require a pad under the saddle, which I don't like because our saddles fit perfectly.
Anything below that saddle decreases the tone of the guitar acoustically and that's a really bad thing in my opinion. When did you first decide to make transparent pit guards from the beginning? Yes, in fact, our instruments, most of them are fine. I don't know, at least half of them are of our design when I started building in 1972. I wasn't trying to do it. I just make another Martin guitar, so I have my own design. Some people say it's kind of California style, you know, surfer, and then in the late '90s we decided to do a traditional series that has a little more of that aspect.
Martin, my life is like Chevron herringbone marquetry inlays and it was that or it's some nice wood there, there's a picture of that nut that's wedged in from the side of the base and those mounts would fit very precisely, so which you almost can't if you actually take it out, unfortunately it's not glued because it needs to be removed from time to time to adjust the action. I set them so you can hardly even get it out with your fingers because I want to convey the tone as best as possible upwards using dividers to get the string layout.
I made these simple little jigs that hold these fret files so they stop filing when they sit on the first, second and third fret using a little jig to get the reaction height. I have to make a special compensation at the top of the cell so that the intonation of all the strings is correct, the bass strings must be a little longer to be able to intonate this property we use a truss rod that has a small bow and is not It's just a straight bottom rod so it works great, it's very efficient and tightening the truss rod nut doesn't make it overtighten, the rod on the neck only requires a little adjustment.
Here I am photographing the guitar at the end, actually providing a USB stick with high resolution photographs of our instruments, yes it is difficult to photograph something so shiny and reflective and in fact there is some dust on that back, but I really like I like the ones that go to five tens, they are the best machines I know, yes, They are really pretty and there is a matching gold pin for the knk. That ebony binding looks very nice on that koa. All of our instruments have that incredibly three-dimensional guitar sound. We have a wide range of options in over 35 different specialty woods from around the world. rare and precious many body sizes different unique instruments everything from our baritone to our parlor to meet everyone's needs we hope to build you a world class instrument that you
If you have any copyright issue, please Contact