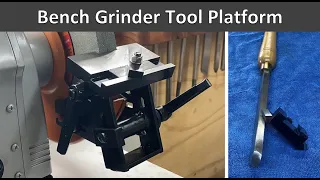
Bench Grinder Tool Rest Replacement : Part 4/4
Mar 18, 2024Hello Internet, my name is Quinn and I'm Blonde Yaks. This is
part
four and the conclusion of my series on how to make a new adjustabletool
rest
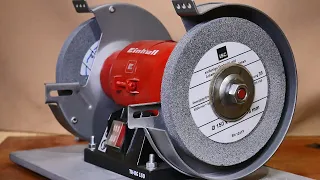
for my 8 inchbench
grinder
. We'll outline some details and make some adjustments based on the things I learned after using it in the real world for a couple of tests and you'll see the results of this effort in action. Okay, let's start with a quick recap here at the end of the last video. from a first adjustment and now we can see how we are lining up, so the peloton actually ended up very well centered from the beginning, so that was great, but it is not very square and some analysis revealed that the problem is actually, the sheet metal that is attached to that dust cover on the wheel is not very straight so a little coaxing with some channel locks and I was able to get it nice and straight, maybe for coaxing, now on.
We need to cut the slot for the wheel next and do some bluing on the plate to prepare for that before making any cuts. This initial adjustment actually revealed a couple more small issues we need to address first, so let's take it a step further. Go back and redo our fit and talk about some of the issues that are coming up here okay so we can do some test fit now that we have enough
part
s here so to mount the main bottom bracket I have an m4 bolt similar to what used the factory, but I have it short and it will only go through this piece here, not through the hole cover plate like the old one did, and I have a lock washer on there so it doesn't vibrate and come loose.
More Interesting Facts About,
bench grinder tool rest replacement part 4 4...
I made a lot of hay in front of all the lock washers and such on the original, but it won't be a problem here because this will never come off again, we'll just put the factory knob back on and this is We'll provide our depth adjustment and we'll never have We'll have to mess with that hardware and if you've never used forceps in your shop before you should get a set of these, the surgical aisle of your local store has some of the best shop
tool
s you'll find. The next thing I found was the vertical piece and here are those locking screws which were my crazy idea and the cool thing is that until they work really well I can feel them lock when tightened it almost feels like a Paul and the ratchet mechanism like you can feel like that's not that it's not going to come loose it's that it actually works very very well so that's the good news now what's the bad news so here's the bad news if I put the lift together and the plate here. platen coating I think I said that differently every time I put my thumbscrew on, now I feel like the lock is really good and that seems good, but here these two surfaces against each other are smooth and there's so much influence here that it just There's no way that's going to stay tight and come loose, so I think what I need is something in there that's going to keep the joint with a high friction so this thumbscrew can do its job on the outside, so I think what I need is once again, a lock washer.
I had a lot of fun with the factory lock washers, but again, this set will never fall apart so I'll never have to worry about those washers, the only thing I'll never do is loosen this guy slightly to adjust the angle of the platen and then tighten it again so as not to drop the washers on the floor, so the question is what type of lock washers should I use, there are many types of them. so I tried it, you know, you're just a basic spring washer and these guys, the problem with these guys is you have to really tighten them or they don't work and you don't have enough leverage with this little wheel to compress. one of these types and these types also wear out over time because they depend on applying tension to the bolt and the surface on each side and in fact these types only really start working once the bolt has started to loosen, in in a way they avoid it. getting worse, so these are a cheap but mediocre option, so I have a couple of other inte
rest
ing options here first: these guys that are star washers and they have these little teeth, so these little teeth here bite into the surfaces on both sides . so I think this could be a very good option and then I also chose some of these toothed washers which are like star washers but much more aggressive and I think again I may have the problem of not having enough compression.
It's forced to have to make this guy go deeper, but we'll see, interestingly, these guys only come in metric for some reason, so I got m8, which is a little bigger than the bolt I'm using, so give it a try. opportunity for that guy. and then of course we have the Cadillac option, these are Nord lock washers, these guys have two sides that have these serrations similar to what I'm doing with my wing screws, but then between them they have, actually, They are factory glued so they are easy to install so you don't lose the two halves, but I will separate them here so you can see the inside.
They have what basically amounts to a claw clutch and what happens? is that if these guys try to spin, they will actually lock up in the next type of notch on that clutch, so these guys are supposed to be the best in the business when it comes to lock washers. I've never actually used them. very expensive so these are you know they'll be kind of an experiment for me to see if they work but I've got a lot of interesting options here so let's see what happens okay so this is the basic star washer for tightening a that kind. as I can and it's definitely an improvement that that could actually work but it also comes loose pretty easily so once again I may have the problem of not being able to get enough torque on this guy to actually engage the other washer so let's try a bit.
Other options next we have the twisted toothed washers, the only common metric, for some mysterious reason all the metric people I know are pretty twisted so it could be because of that, okay that feels good but you can see that there's no real compression there again because I'm not getting any substantial torque out of it, but oh, that's noticeably better. Wow, that's actually pretty impressive. I mean, it's just finger tight and I have to go all the way down here, use almost all of the lever to get it to move, that's pleasantly surprising. if I really tighten that up, oh yeah, wow, that's rock solid, huh, okay, I'm surprised I was the least optimistic about that, but let's try the Cadillacs, so here's our Nord Lock lock washer for the 1% and I'm using a pair that's still glued out of the package, but if they're not glued, you want to make sure the dog clutch faces match up and these little serrated faces, so we'll glue that guy in there and give him the old university . bomb ok so yeah that's not cool honestly once again you know what the correct application is for each bra.
I think this is not the correct application for an order lock. This is not a criticism of them. I think it's just yes for a case like this where I just have to apply finger torque to the fastener, but that's not going to lock. I need something that will bite into it with much lower torque, so I think the toothed washers are the winner, okay, so let's do another assembly test. It will be a good time to ask you to go check out my patreon because I have a package of Nord locks that I have to pay for now I had to mortgage my house for those things these are the sacrifices I make for my YouTube audience so you can Look, obviously, this guy you're just going to loosen them up and you have a lot of height adjustments there which will be super nice and then a quick twist and that's rock solid these things worked great now the funny thing is I had to straighten this whole stand as you saw and what that actually did was put this guy a little bit off center on the wheel, it's got about a hundred thousand fluxes, but it's actually good news because I've got this extra thickness here that I'm going to insert that that's going to push the chainring that way. , so it really couldn't have worked out better, sometimes two wrongs make a right, so look that's actually going to be perfectly centered now, which I'm pretty excited about.
It doesn't really matter if this thing is perfectly centered, it's the only reason I haven't cut this out yet because I didn't know that you know exactly where it would line up, who knows if I modeled everything perfectly in cat or whatever. So my whole plan here is to install it and then glue it on and just mark where the actual cut needs to be made, so now I can slide this guy against the wheel like that and mark my edges, yeah, I'm pretty happy with the fact that it's more stable than the wheeled pedestal I have my
grinder
mounted on so that's a good sign yes I think for now this will work very well and it's certainly a big win over the rest of the factory okay let's dial in and cut to that guy so using my little square here now I can go ahead and trace the lines using the wheel as a straight edge and the front of the plate and like the other now yes I did my job right the liner and the wheel are already square each other, so the square that I'm using to describe the lines fits perfectly against both of them, so I have my lines marked there and we can set up.This is on the mill now and I've marked it precisely based on the edges of the wheel, but I won't try to get it too close because, you know, this is all going to change a little bit and stuff, but it's funny. The thing about grinder rests is that they have a strong tendency to self-clean, so if I get this a little small or a little crooked, it will fix itself. It's funny, how it works, okay, so we can finally do some machining on this machining YouTube channel. Fortunately, this is a very easy setup on the mill.
I just clamped it in a vise and didn't even need a parallel because the slot I need to cut ended up conveniently north of the jaws of the vise, so I'm milling this on the y-axis of my mill, which is a little less convenient because I don't have power there, but it means I don't have to turn the vise 90 degrees and by milling it vertically that way I get a square bottom. in the groove, which is what I need, so my basic strategy here is that first I'm going down and stopping five or ten thousand less from both sides and then I go back and do the fine adjustments and make a final pass on the bottom and the sides simultaneously to ensure a good finish and a nice square inside corner on both sides, so after roughing out most of the material, I use my depth gauge to check where I am and how predicted I need to be. do one more finishing pass covering both the sides and bottom and now everything looks great and then return to the
bench
for the traditional deburring ritual so we can now do what will hopefully be the final assembly and that's it. they have seen me Do this before in previous episodes, but this time I hope it's real and nothing moved overnight, so everything still fits together very, very well, yeah, it looks good, it looks like a grinder stand.These pieces of steel are ready to go. I'm going to go ahead and cold. I blew them out, in this case I'm using Jack's metallic black interior and I think Jack's works pretty well when the pieces can be completely submerged. If dipping is not a good option, then I find that Brownells aux Folles Blue gives much better results. You'll find a link to both products in the program description, but the basic procedure is to simply wet the pieces and they turn black almost immediately. You can leave them there for a minute, dip them in a little water to rinse off the excess, and stop. the reaction if you don't rinse them at the end you will get a sort of flash rust effect in the corners and edges and then you just dry them with a paper towel sometimes you want to do a second application and they will come off.
Different degrees of blue or black depending on how much of this you make, so just experiment. It's also worth noting that the better finish you have on your pieces, the better this bluing will work. Now these parts are not machined on all sides. They were made from hot rolled steel plate and even though I cleaned off the mill flake, there's still that kind of factory finish on two of the sides, so it's left in place and the cold bluing works well to even out the tone. , but To make it look better, it is best to machine all surfaces so that the finished product can be reassembled, hopefully for the last time, the moment of truth will be when you turn on the wheel to see if anything vibrates or something rubs or what other thing.
Exciting things can happen, perfect, so a little prologue here. I have been using this grinder stand and found a few issues that needed to be fixed so one of the main issues that I didn't foresee but really should have is that the factory rest was mountedon the wheel dust cover and this is a poor quality piece of sheet metal and it's not particularly rigid and it turns out it wasn't particularly straight so I did two things to fix it and I bent it until the rest was actually on square with the wheel and then I triangulated it with a piece of one-eighth inch steel bar that goes to the base of one of the mounting bolts and I just heated this guy up real good with the torch and then I just warped it into the right shape and screwed it together, so now this guy is really rock solid.
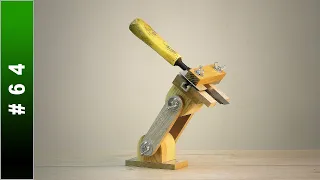
It used to vibrate a lot because all this machinery here has added a lot of unsprung weight to the piece. of sheet metal that was the rest of the factoryAssembled and the factory rest mat also vibrated quite a bit, but in this one the vibration was more noticeable because the rest is larger and has greater mass, so I am pleased to say that the rest is working super okay now with that simple downward triangulation. There I made this little miter gauge and that guy just goes in there and that allows me to set the perfect angle for whatever bit I'm grinding, so I wanted a thread cutting bit with the correct offset and now this one is going to be used for the other way around. thread cut down, so it moved to the right, set it to the left like they usually are and I said I used this miter gauge and my new rest to polish this guy and it was a simple matter of going back and forth like that until the angle was perfect and I have to say that this angle is absolutely as perfect as I can get it.
Honestly, I've never cut a bit that I said was this good, so yeah, yeah, the effort I think was worth it because it's grinding perfect tool bits every time, which I love now, this little miter gauge turned out to be an interesting project in itself. I mean, it's just two pieces of steel that I machined and put a bolt in there and the bolt is pressed in. and Loctite on the bottom piece there and then screw it on and put a knob on there, but it turns out that because everything is vibrating, so much vibration is incredibly powerful at loosening things up and you just couldn't tighten this wheel enough to keep it tight against the pressure of sliding it and stuff on the vibrating grinder, so I ended up putting a pin in it for now, that's not a figure of speech, no, in fact, I put a pin in it and this is a 30 degree Pin because that give my 60 degree thread cut and you know I could also do other angles that you really only need a couple, like if you have 85 y-y-y 60 degrees, then you probably have I've got all the angles that you're probably going to need to polish up a little bit, so we'll see how much more I use this thing, but it was fun to make and it sure made me completely stupid for cutting threads in the last lesson I learned. is that setting the angle on this table is pretty tricky because there's nothing square to reference from here, so I was aiming at 10 degrees with this bit, but you know my tilt ended up more like 30, so it still works , but that's a lot more correct than I intended, so yes, getting this angle set up right takes some time.
You may need to put some kind of scale or square reference here somewhere so you can actually know what that angle is, but for the moment what you can also do is just take a drill bit that has the angle you want and just attach it to the wheel and set your angle on the table that way and this concludes our four-part series on how to build myself a new tool rest for my Echo Reinder 8-inch Delta bench. I hope you enjoyed watching this and go ahead and buy me a beer on Patreon. Thank you very much for watching and we'll see you next time. you
If you have any copyright issue, please Contact