Part 3 - Build an electric guitar with Crimson Guitars
May 02, 2024welcome to day three we have an instrument that is practically joined together, the body and top have been joined, carved and routed and it looks like a
guitar
and the neck has a fingerboard that has been glued in place and hopefully, Hopefully, it is aligned correctly and you're done, today is going to be the funpart
that we've been playing with you to the point thatbuild
ing aguitar
neck is basically the most importantpart
of abuild
. Yes, the fret layout is. It's absolutely essential and if you get some sort of pre-fretboard and stick it in the right place it'll be fixed, that's not a problem, but installing those frets is the next stage of madness and something that can go wrong. so I'm going to walk you through the process, we're going to put inlays, then we're going to thicken the headstock down so there's a little breakover angle and finally we're going to carve the neck and now that I said that, it actually sounds pretty good.
There's a lot of work, so let's keep going. Normally I would cut all this excess off with a band saw, but since we don't have access to band saws on this limited tool, build the speech well, here it is, I had to think about that, okay? where the plane can't go, I've removed the smoke, okay, I'm going just so I can feel a little bit of a ledge there, okay, with the biggest chisel possible, layer on the flat surface and then I'm matching. away and that's leaving it flush and this way I'm not taking any risks well yeah there's always a risk I'm taking less risk of changing the neck geometry we're happy with that shape rinse and repeat you see that even when I'm doing. this, I'm holding the blade at an angle, so I'm cutting.

More Interesting Facts About,
part 3 build an electric guitar with crimson guitars...
I'm asking you what I'm cutting instead of slicing, which makes it easier, there's a little curve here, okay, so I'm just going to get rid of the waste section. and I don't need the tuning fork. I'll probably narrow this down even more later. Oh come on, put it in a photo shoot trying to do things quickly and inevitably. It's a bad idea dear viewers and that's a very blunt sawing sound, okay I'm just joking, there's just a very slight lip on the edge here and there was also one there that I'm getting rid of the radius and I correct, okay, there are different arguments for the next stage and if you put the frets on now, it will put pressure on the neck and could cause the back to bow or twist and things like that potentially, however some people prefer to carve the neck. neck first and then put the fret on a neck you already have.

Carving is no fun, so yeah, I prefer to put the fritzen on first and just make sure I have a nice stable piece of wood to start with, and yeah, that's what I'm going to show you for now. Myfritz batches need to be double checked for depth, never trust that the slotted fingerboard will be absolutely fine when it arrives, they are killed when they are flat on a machine and what the radius is actually made. The slot may be too shallow for your fret. and you'll never get a good soda, okay, I'm just looking at this.

I know how deep or how long the fret is. I put a piece of masking tape on the edge of the sheet leaving the sheet clear and there will be enough depth for the frit to sit properly and then it's just a matter of following the radius. I'm also cutting my locating pins here, it's incredibly difficult when you look at it on a curved surface that's also wedge shaped, it's very hard to see if it's actually crooked or straight and I think what I really have here is that Nick is It's moved a little bit, the wood has warped and it's crooked, there you have it and that's what gave me the clue because that's supposed to be flat my bench is not particularly flat and it's not at all, there was actually glue there, but there's a slight rock, which means the frit, the neck is slightly crooked and I actually need to fix that before I continue and this is one of those things that you really need to pay attention to and I'm going to finalize the depth of the headstock to access my truss rod and then see what happens when I adjust the truss rod I have. some backbone here, a little bit of backbone here and potentially a little bit of twist too and the fretboard is the user interface, it's the most important part of a guitar and it has to be right, so let's do it now.
The headstock must be 15 millimeters thick. People often ask me what I think or would be an essential tool kit for someone starting out in guitar building, in fact, woodworking and something many people never think about. For marking, measuring and drawing equipment, there is a huge difference between a good ruler and a cheap one. Well, now I have a nice precise line to follow and there really isn't much material to remove. This is very serious when I started building. For us, this scared the hell out of me. I couldn't figure out how I would get the right curve and thickness of the neck correctly.
You know, make sure it was nice and accurate. I thought about putting it on a thick plate, er and then removing it from the blade, which is naughty and hand carved etc. and it's actually not that scary as long as you know where you want to be at the end, so there's a curve on the side and another on that side now very much depends. You could carve that by hand and just use your amazing files and carve down to the line. Used spokes, shaved ones, would even do the job just fine, and I'm tempted to do it just to reduce the amount of dust I create.
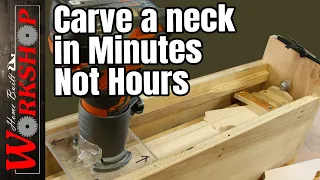
The oscillating sander has excellent dust extraction. Normally I would look at this, so what I'm going to do is fine, so the problem is we want to run this through a spindle sander. Let's imagine it is a spindle. It has a curved shape and you could pass through it. I angle and sand at the wrong angle of my fingerboard. What I want to do is put a piece of wood on the bottom of the neck here, which just rests on the Sanders table of the spindle and makes sure it goes straight and square. and it's pretty simple, we're using the wrist of the swing neck to align it, that's a ninety degree angle and then there's news, damn, where I need it to be and stay, yeah, so if I stick a piece of wood like that here , there was a problem.
I'll have a nice stable section to work on, so we'll do it quickly and go from there, let's check that everything is okay, so I'll be. I'm going to be. carving this neck later so I'm not going to bother. I'm not going to bother with duct tape and super glue or anything like that. I'll just skip a stiff ending, let's review, let's take a look at what's closer, damn it. Perfect, okay, so I removed a lot of debris in that area. It'll actually be easier to use a plane, so we'll make this crossgrain all crossgrain, which is incredibly annoying.
This one is at least five or six years old. old is used almost daily and is still sharp and impressive, you know, what we have is one of the biggest problems a carpenter has. I have one, two, three, four vices on my bench, essentially what I have done is created a curve here, I have gone down to the line almost on both sides and now I need to remove the excess, if it helps you can put the line of the pencil, so the headstock now has the correct depth, etc., and you just duplicate. checking where the sinters are, so my soul, the enema wand, is down there somewhere.
I'm going to start with a seven thousand Brad point drill and then I'm going to stop because I don't want to use this drill into metal because it's an amazing drill. The bit is fine so now I have a full center point on the bread to help guide me and now I can use a standard twist drill that won't be completely destroyed, maybe some trot, so the soul is double action . piece of steel two pieces of steel welded together and when you tighten a nut on one end it titans or loosens and moves the neck simplistically up or down which basically gives us some adjustment when you play the strings , vibrates to keep it still. in the nut it stays still at the bridge and the string vibrates and dances up and down and with a guitar you need a little relief on the neck to help the string not vibrate, in other words, not bounce off the fret and Yes, that is why the soul is there so that they can see what happened.
No, it doesn't seem to be crooked, actually, which is really good. What I do have is a rear bar, so I loosened the rear. This is a dual action. The soul can be compressed or whatever is the opposite of compressing. I don't know, it goes both ways. I have put it back to the middle position. I'm going to level the fretboard a little nice now to maintain this. Simple, I haven't built this guitar with the carbon fiber rods that we'll normally put in next year and I kind of regret that now because essentially what happened was the neck bowed a little when we took it off. the excess material, I mean, we cut it out, we've reduced the tension a little bit and it's gone to Bing and there's a little bit more than I want there right now, so what I was telling you a moment ago is that I I would like to worry. first and then carve it, actually now I'm worried that even more tension will be released as we remove the debris, so what we're going to do now is carve the neck, we release any tension, shake it a little and see what happens. and then go back and address the fretboard and see what needs to be done, so yeah, I guess it's good for me to have issues with timbre etc. during construction, you can see how to fix them and also what to look for.
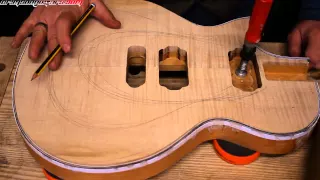
Well, basically what we need to really start dialing things in here is the body. I need to know exactly where. Oh, actually, could you look at that? It's starting to come together. Yes, I really want to have this guitar. drawn on the back of the neck where the body reaches, I don't want to carve that at all and in fact we're going to leave even more space from them and at these points there will be a curve in the behind the headstock we want a volume style that ends basically straight behind the capo. Good, because this is because this is one of my
guitars
.I'll probably do something silly in the back like that or we'll see. make it so that it is comfortable, okay, now I often use angle grinders, so we have a sanding disc that is normally used for welding a rider, cut it and you order it. I'm going to do something a little different this time, another option might actually be The spokes are fixed quite easily, that's time consuming and physical, and it's too hard to get physical right now, so what I'm going to do is carve the basic shape I want on the nut and 12th fret and I'm going to do that with rasps etc. and then I'll hug the material using the oscillating spindle sander and we should finish if you join that curve and that curve with a straight line, you'll end up with a nice neck. and we'll be sorted, so I need to take a quick look, this should be 20, yeah, 25 and a half million, yeah.
I wanted to go down to about 21 on the nut and then 20, 23, 24 after 12 and again because this is my guitar. and because I like to experiment and because it doesn't affect you in the slightest I'm probably going to be asymmetrical and because it makes it more comfortable in other words I'm going to size a little fatter so instead of the thickest section of the neck it's on the center and it's symmetrical, the thicker section will shift to the side and that fits the shape of my hand a little better anyway, now in the vise, it's okay if you remove the edges, but don't go towards the right. to the fingerboard, it gives you a smaller section in the middle that we can then remove and measure more easily than if it were just a big, long, flat, big, wide, flat surface.
I'm pretty happy with where that is, so essentially, now I need to try to visualize the shape I really want as it moves down the neck slightly off center, but it's not what you'll see below, we move roughly around the 12th fret which It's there and it's exactly the same process now. If it helps, what you can do is get a piece of cardboard, draw your neck on it, so let's assume it's a piece of paper, mark your fretboard and then find the exact shape you need, cut it out and have a template to work with. and there is a very strong argument for doing that for the first few bills and there are useful printouts that you can find on the web to help you with several different ways, but anyway I'm happy with this one and Now it's time to remove some waste and yeah, we could definitely use, for example, the block plane.
We could try pretty well and remove a pretty big chunk of material using that. I have used many forms of spokes, the problem. of shaving spokes is that they have a very small core and what we really want is a straight line between this point and this point. You don't want curved radius shaves to tend to create a curve, so yes, you should avoid that if possible. You make some nice chips there, however, I want to see what removing debris is like for the Thea oscillating spindle sander. Okay, what I'm going to do is basically move the material away, hold the neck at an angle, and remove as much material as I need.
Hopefully no more and one way to make it easier is to segment the neckdown, so for example I'm running my finger along the edge holding the pencil firmly to get a straight line along the edge. I want to remove that corner. and as long as I don't go outside the lines I'll be fine. I want to take a little bit bigger corner on the other side, but I'm going to do this in parts, so it's like those two and we want to get rid of that, the fun begins. Well, it turns out that the second method I used actually works better, so here. one section up to both lines and then move on to the next section instead of trying to do everything at once.
Now that I have, now we have a guitar neck, it's really just a matter of continuing with the lines for the next one. stage, if you are doing the marking I would use a line just away from the fretboard, you don't want to go all the way to the fretboard, leave it for hand sanding later, which is as close as you want, so one about a millimeter and a half away and if You put those two lines together, a very small amount of material is removed and you gradually get to a point where you use smaller and smaller sections and you remove less and less waste and sort it now, the other option or The other thing I need to mark while we are here is the depth and basically that.
If I remove this entire section up to that line and down to that line, we should have a nice straight back of the neck. at the correct depth, there are other options you could create. You could hold your guitar and hold your neck against the bench carefully because you don't want to introduce tension and build a sliding router and use the router as a thickness when it works. It works very well when it goes wrong, personally it is catastrophic. I prefer to have physical control of the tool on the machine, whether it's an angle grinder, planer, chisel, rasp, or even a spindle sander.
Now I'm going to clean everything up using The Japanese saw us first. I want to have my back perfectly level. Feel it with your fingers. You'll be able to feel bumps and waves and things and then if you hold it up to a light or any background, you'll actually be able to see. If there is a problem, this is a long process and can be somewhat cathartic and therapeutic like those exes, but yeah, you can't afford to skimp on the time it takes to do this properly, whatever you do, make sure you have The scratches from the quartz and sand are removed before continuing, otherwise you will have problems.
Okay, I'm going to drill the tuner holes and yeah, make sure that's done, so these are the holes that were drilled from the jig. right on the back, best practices, okay, I'll do it right, if you're drilling the back, you'll want to jump in now. I know this 2 mil hole will be drilled with a 10 mil hole, so there's a very slim chance I'll take out a 10+ mil section, but if you put the guitar, if you put what you're drilling into a backing and you hold it down, you shouldn't have any chips on 4, okay, so now to be absolutely paranoid, what I'm going to do is drill from both sides with a very, very good quality Brad bit, so I'm going to move forward a little bit and a You'll often see handmade
guitars
where this thing went wrong and you've chipped and it's just uh it's hard to repair properly, that was scary, let's do it here and there you have it.There's another tool that you can get that doesn't make this quite easy and that's a step drill that's up to ten mills from both sides and then basically you're going to have an eight burr section in the middle that you take out with a twist drill and that it's also a safe way to do it with the top tip of the grinder, well back to the joys of sanding, there we go, it sounds so good. It's a pretty comfortable shape and there are no hard edges, especially if you're going to have something with lacquer, you don't want 90 degree corners, that's where the lacquer will break.
The only issue I left unsanded is the front of the fingerboard because we're going to be working on that, it still looks like it hasn't moved a little bit anymore and I'm pretty happy with how the next task is going, the next task will actually be the logo. Oh yeah, that line is roughly where my rope is going to be, so the logo is aligned with the rope and it's not visible now because of the kind of finish I just decided we're going to do. Wear it on this neck, then it doesn't have to be embedded absolutely perfectly while I'm talking.
I'm actually changing my mind, it's my prerogative, he's a tattooed nut, okay, so here we go, take whatever you're going to embed, draw around it. or write about it at least I haven't. I have the line that I have written and I am making a cut to meet that line and then I will excavate the bottom of the cavity to make it flatter, actually the sycamores. working pretty well, I just remembered there's actually a second logo, there's something else to embed and that's the little
crimson
disc, I guess we'll put it in there so I need to go get a drill bit and do that little job, okay, 40, okay, now the real fun begins.This finish is a kind of half roast, the roast wood neck is where you take a piece of wood, you put it in a vacuum and then you cook it slowly and it's like a healing dry, but at speed and you end up with a roast which is also called Purified, syrupy golden wood, beautiful smelling, light and stable, and this is kind of a poor man's version of that and we do it mainly for the look and I particularly like the feeling of good, so the reason I do this It's because of that mark there is a filler inclusion in the woods that we just can't see and I don't like the look of it, you take some fire and very quickly remove the fuels from behind the fire without spending too much time in anyone's house . anywhere I try to get a fairly even burn and that's warm but not hot now that we have a sticky joint yes, it will open just a fraction of a crack along the fingerboard.
I'm not worried that the main joint is quite large, it will be fine and this beautifully highlights the flame, the flame on the flamed maple that is company, the last of that, okay, I need both hands ready. I don't want to leave this out because it's kind of annoying to light, here we go, if you're going to try this with a standard blowtorch, try it first, this burns a lot, which means it's burning the wood very, very quickly. If you do it with a standard blowtorch, it actually takes quite a while. It's time to reach the temperature and as a result of that the whole neck burns and heats up much more than would have been the case, look at the head stops going a little more extreme, there we go, okay, so this is Now , it's actually still quite hot, like I said, we've opened, there's just a little line along the glue line, but that's not a problem at all, now there's highly flammable matter, behind, and play now because I sanded this up to 320.
That's European grade pretty good. I started off with a very good finish and I'm back at 320 now. I should probably give it five minutes to cool down, but I'm too excited to show you what's happening. Okay, so this technique is nothing. new and that is exactly the opposite, it is a Japanese technique to preserve wood and they build houses with this, in fact, I went through one the other day in the UK, it solidifies the wood, it solidifies, it stabilizes, it removes moisture, that's not really really required and makes it more waterproof and stable. Now I can still see where that original inclusion was and in fact it's now a hole that I'm going to fill with some ebony and blue dust in a minute, maybe some charcoal dust that I have.
A lot of that out there is fine, as for the guitar we've skipped a few steps but we're supposed to do the side points first and just try to figure out how much the neck has moved again due to the heat and there's a little bend. so I'll have to address that on the fretboard in a minute, while the neck cools down and possibly moves a bit more. I'm going to mark the side points, it's very clever, it's just a case. of knowing where they should be 1 2 3 then 3 5 7 9 12 etc., bradawl to mark the positions and then after you have made the holes and you can't do anything about it, then you trip on the quadruple finger because you only have Well , I'm going to use a hollow aluminum tube, it's two and a half mils long and it's just a case of drilling a nice little hole with a good quality Brad point drill bit.
I don't want a blob of super glue everywhere, esp. Since we already have a finish that we quite like, I find a small area near me, put the super bass there, dip the inlay into that and then place it in place making as little mess as possible and repeat, this is what I'm doing. this at a slight angle so you don't actually touch it. I don't actually touch this. Fred's bullets decided to disintegrate a little there, which surprises me. It's not supposed to happen. If you've seen any of our videos, you'll see it. I know one of the things I say a lot is the difference between a hobbyist and a professional guitar builder and woodworker.
In fact, I probably stole this from some famous woodworker. It is the ability to hide mistakes and recover from mistakes. As it happens because wood in particular just throws things at you anyway, super glue is often the secret. I'm using my thumb as a depth gauge, so I'm just using my strop to polish this logo up a little bit. This chino is nice, but just a little too much there, which is usually the case, and there we go, the neck has not moved in a negative way, but has straightened a little, which is good and I need to remove just a little material. around the middle to give me enough relief while I play, so what I'm going to do is clamp it to the bench, the plane removed a piece of material, which is good.
Now I'm going to use a long radius block to see if we can improve, so I haven't put that under too much stress because I don't want to cause a crash. Also, I only want to work on one section of this neck, so where I'm putting my pressure is high on this end. Oops, we've got a little bit of sag here, which is actually what we want, and this mast is pretty much something to worry about, so let's get on with that and then, Mr. Leveling Beam, don't put too much pressure on it. a runner up finds a big pepper, okay, so this one is level, straight, flat, flush and very sexy. zero Cotto is a pretty nice word.
I'm going to hand hit it with 400 grit, wet and dry, this is the type of final finish really and What I do here will be felt by the player. I eat until unless the fretboard has all the frets, I hope it won't need to be done, it won't need to be in front of your ears, so I have a 12, let's put it that way, a 12 inch radius on this one. fretboard and I want to bend my frets so they have a tighter radius than that. This is the Crimson 5th Fret Bending Jig fret radius template that there are almost exactly 12 and would do the job.
Okay, before we continue get a fine triangular file, a saw sharpening file would be perfect and just bevel the edges of the fretboard, this guides the fret to make the whole process easier and more precise and also at some point it is The guitar will likely need to be upgraded and doing this helps prevent which helps mitigate ripping out a couple pieces of wood under the mat just to support the neck and the mat will take some pressure because the board will already twist and bend. and move around a little, but that's the nature of the beast.
You could now cut each fret individually to size and then play them all and I have created several tutorials on the different methods available. This really appeals to me. me so this is a
crimson
hammer it was firm Elsa PS so that is one of the others I built a guitar in nine hours on that wood and in the process I got a hammer but anyway the fritz that is on the neck is straight the frets are on the Nexus directly. I sound like something out of dr. Seuss, okay, long story short, I haven't done anything to the body today, we've carved the neck, we've weathered it, we've fixed some issues, the fretboard is a little chipped, which is interesting, zero koto, first time ever doing it do.I used it, burned the neck and then sanded it back and we are very happy with the finish, we did some inlays and the fritz is there, the neck is straight, so essentially we are in the home stretch, tomorrow is day four. I have to have the whole guitar finished and by the end of tomorrow it has to be really finished, so we're going to use Crimson guitar finishing oil and apply it liberally. I have to finish the fret work and also do the fret ends fret level dress the crown polish all that and maybe start installing some hardware.
I'm pretty happy, so essentially we're about 15 hours into this, I mean between everything else that's going on, it's about 15 hours of guitar, no. I hope you follow me and work and I hope it goes well for you and we will be back soon with the fourth day thanks for watching, like and subscribe, share with all your friends and yeah.
If you have any copyright issue, please Contact