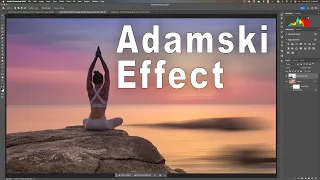
This EASY Photoshop tutorial creates STUNNING fine art abstract photos
Mar 30, 2024In today's video, I'm going to show you how
easy
it is to use Photoshop to transform a boring image likethis
into a dramatic and eye-catching work of art likethis
. I've made a video on this technique before, but it's one I really enjoy. I think it's an incredibly powerful way to inject some real Fine Art life into otherwise boring shots that could be washed out, so I thought it was worth going back and showing how Photoshop's recent tools make this even better. easier. It's so simple that it only requires a few steps, but the results are incredible, so the photo I'm using is one I took while walking yesterday on New Year's Day on a beach near Edinburgh.
Now I took my camera because I wanted to. to take some
photos
, but I didn't really take anything that I was particularly excited about, but I did take this photo and on its own it's nothing special, it's a little dark and not very well composed, it's just a very forgettable photo of a beach . but I liked that the image was at least a throwback to the first photo I took in 2023 and I thought it might be a really good candidate for using this technique, so enough of me taking it, let's dig in and take a look. the shot, so the reason this shot stood out to me as a good candidate is that we have this Solo figure standing quite small in the frame, it doesn't dominate the image, it's not a complicated figure with a lot of things around it.
More Interesting Facts About,
this easy photoshop tutorial creates stunning fine art abstract photos...
It kind of stands on its own and has a lovely reflection falling on the sand and that's been very similar to the other shots I've used this technique on. It's very much about having a small figure among this. a big, lovely expansive blur, so let's do this and show you how
easy
it is. I'll start by straightening the image because Horizon is a little crooked, that's okay, but that's all I'm going to do. to edit edit in Photoshop and here we are in Photoshop and I'm just going to use Photoshop's new object selection tool. I think in the previous video I used maybe the pencil tool or the lasso tools to select myself. subject, but this makes it even easier because I can select the object, we hover over it, it highlights that shape and all we have to do is click and it will automatically select that shape from its background, which is cool, so I just copy and paste.
I'm going to rename this shape and that's basically most of the work done, so now that we have a shape in place, what I need to do is remove the shape and shadow from the original image to get a completely clean background. is that if I apply that blur with this original shape in place, that shape will become kind of a dark, blurry blob and it won't look very good, luckily it's incredibly easy to do. I have the patch tool selected. and we can just draw a rough shape around this, drag it over here, we're going to deactivate our shape, deselect it, and it's done for us.

It's not the best you can see, these lines don't line up, but because we. We're going to apply this blur to the image, it doesn't really matter, as long as the figure disappears, we don't need to worry about these rocks or other elements here, we don't need to do any kind of cleanup. the image is basically perfect so to do the blur we are going to filter and then we need to open the blur gallery and specifically the path blur so this will basically give us the image and an arrow, now the arrow says which direction. we want the blur to disappear.
I like to do this by lining up the arrow along an important point in the image, usually along the coast, so in this case it follows the line of the beach where the water hits rather than specifically following the line of the beach. the beach. Horizon, you know this line is not much different than the actual horizon line, but I find that by allowing the blur to naturally follow the lines in the image, the lines in place look a little more natural and our speed at the moment . it's at 50, so let's make it really easy and just bring it right up to 500.
Right away we have this beautiful ethereal, softened image, it's very close to the kind of image that you might have seen with the people who do um ICM. or intentional camera shake photography, so you would use a slow shutter speed on your camera, maybe half a second, and slide the camera from side to side while taking
photos
of the landscape to get these kinds of ethereal, blurry effects. but we are creating it in Photoshop because we also want that figure so we press OK and the computer will render this will be fast or slow depending on how powerful your machine is gives you a moment to eat a small bite of leftover pizza so that our The landscape it's blurry and if we just turn that figure back on, it puts it back in the frame exactly where it was before, but of course it's just the figure itself, so it doesn't look particularly realistic, so what I'm going to do. it's simply copy paste transform bring it back to its position right click and then rotate vertically drag it down aligning it with the feet, it might be easier at this point to just press ok zoom in and then with the move tool selected we can use the arrow on our keyboard to move that up and down, so we just wanted to foot in there exactly as it would have if that were the real reflection.We'll rename this layer to shadow just so you know exactly what it is. which, but of course, right now we need to do some work on this shadow to make it a little more realistic. I'm going to start by opening up the transform tool by right clicking and we're going to go with the perspective and We're just going to scale it down just to give the impression that it's cascading down the beach the way it should be and then it's going to transform freely and if I hold down Shift and drag this, I'll just make it. a little bit more because if we go and look at the original, let me zoom in, you can see that this shadow here is longer than the figure itself, so go back to Photoshop, so I think something like that already gives a much better sense of proportion, but of Of course, it's just a big bold black shape, so we need to do a little bit of work here, so first of all I'm just going to create a layer mask and then I'm going to press G to bring up my gradients, making sure it's like this. black and white.
I can just drag a line like this to cause a gradient so that it blends naturally with the background exactly like the shadow would and I think it looks pretty good, but we can do a bit more by adding a bit of Gaussian Blur we don't need much I I'd say maybe 3.6 is enough, it's enough to help it blend in a little bit more with that background. Look, I think 7.4 is too much, maybe around four, something like that, I think it looks good and I'm just going to push it up to connect it with that shoe and that's it, it's not the most perfect of the Shadows.
You could spend a little more time, um, modifying this to make it look a little better. One thing you could do is use the blur tool, make sure it's at one hundred percent and just add a little bit of extra blur on top so it fades out a little bit more, something like that. I think it looks a lot more natural now, but we're not done because now I'm going to do some color work on the background itself because of course, if we don't have those figures selected, we still have this nice, beautiful landscape background. empty marine, but it could definitely use some emphasis and this is great. so we can go into the raw camera filter, this will bring up the same tools that you'll have in Lightroom so you can really play with the colors because we have a little bit of Fine Art um Seascape here we can Really play with the temperature, emphasize those purples because We had a beautiful sunset there, but this photo was taken a little later, so maybe we can increase those magentas in the white balance, increase the warmth slightly, reduce those reflections. a little bit maybe add a little bit of defogging just to give it a little bit more oomph to the feel of the white and we can certainly increase that vibrancy a little bit and as we do that it really brings out some of these lovely purple tones, but we can do that. that even further into the color mixer and at this point this is just for testing, there is no right or wrong way for me.
I want to highlight these lovely types of purples and oranges that we had in the sunset, but you might want to go. in a completely different way, so it's just me playing at this point, the image was pretty good as it was. I just want to give it a little more oomph. I want to make those oranges a little more orange, maybe bring in that blue. slightly in a teal tone here so we have a little bit of color contrast between the sky and the beach. I love that those purples are so intense on the beach itself, so I could increase the saturation over and over again because it's this final summary. scene, you can stand to press these sliders a little bit harder than you would, um since uh, for a normal landscape, certainly turn up those oranges hard plus 60.
So we've got some really awesome colors in this scene and such time in the luminance that I'm We're just going to increase the luminance of the blue because it's a little bit of a dark stripe in the middle, so this just helps balance things out a little bit and by slightly darkening the oranges it makes them a little bit richer, so which I think we've got lovely tones here, you get the vibe just by looking at this image of a beautiful sunset on a beach, so we click OK and it'll be applied to our background and then we just turn that figure back on and there is our Image done, how simple it is, I really love this technique.
I think the last thing I would do here is probably apply a 16 9 crop to give it a little bit more of an almost widescreen cinematic quality and I think I would just push it. So far, but I really love this effect. I think this shot worked perfectly because, as I said before, this figure is quite solitary in the image. I tried it on another shot that I'll show you, which is this one. Here with these figures walking the dog, but I think because they're so much larger in the frame I don't think it works as well, it looks too
photoshop
ped, it just looks like they've been pasted onto a background and not.It doesn't really have the same effect, I think while this one with this figure is such a small part of the scene, it really stands out with all that negative space around it, but that brings me to the end of today's video. I really hope they do. I've enjoyed looking at this technique again seeing how Photoshop's tools with object selection make it even easier to do. This really is so simple and so powerful. The more you do it, the more you will begin to recognize scenes when you are out and about. you think it could work great, but more than that, it will allow you to go through your catalog of photos that you already have and take a look and see if there are any that you think would work great with it and If you get good results, I encourage you to share with me at Battery HQ on Instagram because I'd be fascinated to see what kind of effects you get using these same techniques, but if you've enjoyed this video and found it useful, please like it and of course consider subscribing to my channel if you haven't already You've done it and I'll see you next time, thank you.
If you have any copyright issue, please Contact