I Broke ALL the Rules - Putting Epoxy Resin to the Test
Apr 10, 2024In this video I'm going to experiment with pouring eight gallons of
epoxy
resin
in one go. I will also do it using a very common appliance and I will stay until the end where I will go over all the details. and recommendations so you can do it yourself now the first question is why do you want to do this for me? I create these sculptures withepoxy
and they have about 8 to 13 gallons of epoxy when I do these pinholes I really have to do. Put them in six to eight different layers, that way the epoxy isn't too thick to cause an exothermic reaction and we'll get to that soon. , when you pour these layers, there will be a very faint seam line between each layer, as you can see. here and here on this sculpt isn't crazy, but it's enough to make me want to do this all at once.
Now the reason you don't want to do this all at once is because of the exothermic reaction, this reaction is feared. By epoxy users everywhere, has your epoxy ever gotten hot enough to start smoking? Now that we know the signs of the exothermic reaction, let's talk about why this happens. There are really only three factors here. You mixed too much epoxy at once. The temperature is too high in the room or wherever you are pouring, or three. the wrong type of epoxy and for this experiment I'm going to break all the
rules
. I'm going to try to pour three or four times the recommended depth into the bottle.
More Interesting Facts About,
i broke all the rules putting epoxy resin to the test...
Now there is a tool to make all this possible and it is probably something. completely unexpected now, if you have any idea what this is let me know in the comments. I'm very interested to see what you guys think. If you guessed the chess refrigerator and freezer, you are right, this will be my absolute game changer and What makes this so special is that it is a refrigerator. I'm going to go ahead and put a link to this cooler in the description and I know they make two sizes, this is the larger size, they make a smaller one and talking about that.

Here's a game changer, here's one more of this pot of mold release wax that I've had for five years and it's so easy, all you do is clean it, let it dry and apply one more coat. Throw that Tyvek tape in the trash. super expensive. I'll put a link to this in the description and it will last you forever. Here's one more pro tip for you: silicone on the bottom of the melamine before screwing and screwing everything together, this will ensure that you don't have any leaks when they do the final pour, okay, we're finally ready for our experiment now and I don't know about you , but I don't feel like wasting eight gallons of epoxy just for an experiment, so I'm going to go all out.

I have a beautiful piece of Here's a Black Walnut Root that I'm going to use for pouring, so I don't know if they actually do anything, but I thought why not? I bought a bunch of silica gel packets and threw them all over the refrigerator hoping that would be the case. it will absorb some moisture because you don't want any moisture getting into your epoxy. I also have this cheap little battery operated fan that I'm going to keep on low inside the refrigerator throughout the pour. Now let's quickly talk about different types. of epoxy and what to use Moss offers all different types of epoxies for a wide range of applications that we will use is Deep Pore X and for you Moss is offering a fantastic deal: they are giving 30 off all Deepport days use code blake dpx at checkout and I will put a link below.
It is crucial that you use the correct epoxy for what you are trying to do if you are trying to make pores larger than half an inch. you want to use a deep pore epoxy. This epoxy outperforms most other brands because it can be poured up to three inches thick. Now let's talk about mixing epoxy when you have a couple gallons like this. It is crucial to mix well. I start by using my drill. on a very low setting, you don't want to mix this at full speed because that will actually cause bubbles in the epoxy.
You're going to want to mix this for about three minutes and then take a stick and scrape all the sides and bottom of the bucket, this will ensure that you don't have any unmixed bits stuck to the sides. I always add a little dye for this project. I actually want a smoky black and it looks a lot darker than it actually is here. It looks black, but I assure you it's actually very, very transparent, there's just a lot of it and it's so thick that all you see is all that pigment, so after I add the dye, I'm going to mix it again for another three minutes , so in total, I'm going to mix this for about six to eight minutes and I think that's kind of crucial when you're making a lot of epoxy like this, this is not a necessary step, but if you have one or if you can afford it.
I'll put a link to this in the description. It is worth having a vacuum chamber. This will get all of these bubbles completely out of the epoxy before pouring it and you can see here how much air is actually inside of it. epoxy and this is probably a little over a gallon here and I had to turn the machine on and off probably 10 times to make it very clear if you don't have a vacuum chamber remember that deepport x is a slow curing epoxy system which basically means So you can let this sit for 40-60 minutes in the bucket, this will actually allow all those air bubbles to release on their own before pouring them into the main mold.
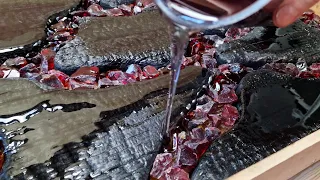
Here's another little trick I've learned over the years: use one long funnel for everyone. all the way to the bottom of your mold when you make your first pour, this will again eliminate and minimize bubbles. Everything we do here is just try to minimize the bubbles for my next pores. I just poured it nice and slow right on top of that nut there and Again, the key is just pouring very slowly trying not to create any kind of splash or turbulence like that. This mold has a total of eight gallons of epoxy and let's see how it works.
I forgot to talk about the other advantage. of having this cooler and that's the top with the top on, it's going to eliminate all chances of dust coming in from the shop and from outside, so it's literally a clean, sealed, perfect environment. This is after the first day, I'm just checking. the viscosity and temperature are the same as in the refrigerator, so right now we have zero reaction on the second day, the viscosity is a little thicker and the temperature is still about the same, which again tells me that still there has been no reaction. and day three now we're going to look at it, so it looks very similar to day two.
Let's go ahead and check these temperature readings to see if we have any reaction and nothing at all so I'm a little worried right now we're not. changed in the last two days, the viscosity is still the same, which has me a little worried. I'm not going to lie, so I'm going to go ahead and turn off the refrigerator, keep the lid closed that way it can contain that cold. air and gradually it warms up and hopefully we can get this to dry so let's try that and see what happens and on day five we have a firm surface now that's not completely hardened.
I could probably still stick my finger in this, but it's definitely thickening. I'm sure and the temperatures are over 100 degrees so this tells me the reaction is happening and I went ahead and left it another day so here it is day six the temperatures are starting to cool which stops It means to me that the reaction has already occurred. and it's just going to start to slow down and this is really going to start to tighten up. We're on day 7 now and we're the same temperature as room temperature, so we're ready to take out the mold now, something I didn't think about. not at all, but when I put the mold in it was how am I going to get this out.
This thing is a lot heavier than it was without the epoxy, so I'm going to have to move this and get it out of here somehow. A helper would surely be nice right now now that this mold is safely out and my back is still intact let's take a look at this a little closer and let's start molding and we have a problem here okay so this is very interesting. We're completely solid up here, completely solid and down here we're still a little sticky so I'm a little worried right now that maybe it hasn't fully cured down here or what I'm hoping is that the temperature just hasn't warmed up. .
Enough still down here and this will continue to cure and harden, so I'm going to go ahead and leave all the other walls up and we'll give it a day or two to see if it hardens. Here is the next one. day and I was happily greeted by a hard surface so all it needed was another day to fully harden and we're ready so let's get it all out of the mold, I must love that mold release wax okay let's see what we're working on. Now it looks like the sides need a little polishing because the epoxy is again tinted black so you can't really see the inside as well as I want so I'm going to go ahead and sand this whole thing down to a 5000 grit and polish it and see what we can see in here and for a little bit more clarity, I'm just going to put in this butcher block oil and this should really make us able to see through this thing and check it out, we just did it. an eight gallon pour with no bubbles, no fractures and no exothermic reaction even though we went around the manufacturer's perimeters three or four times to pour this stuff that's pretty good now the main question is how deep do we actually pour this because again we have this black color. walnut knot there that's going to displace a lot of this epoxy this section here is the deepest part of the pore it's eight and a half inches tall by nine and three quarters thick by eight inches wide which means the maximum depth pouring depth here is eight inches, which is almost three times the recommended pouring depth.
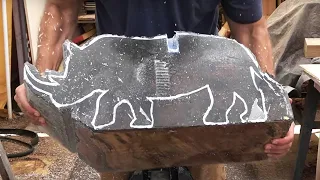
Well, I'm sure many of you are curious as to why I have this big cutout here and it's for a reason that let me show you this giant block. a black rhino, I'm going to carve this thing by hand and this little piece here would have been cut off anyway so this is saving me, I don't know between a half gallon and a full gallon of epoxy here and I think the smoke The epoxy black will look really cool in a really good contrast to the black walnut root buried inside, that depth is impressive and all but I want to
test
this even more so I went ahead and made a whole new pour this time I used about 9 gallons . of epoxy and it's 11 inches tall by 11 inches wide and where it meets the wood is about 20 inches, which means the deepest part of this pour is right around here and it's 11 inches thick, so I surpassed the previous one and simply poured four times the recommended depth into the bottle, so for this one I wanted to experience something a little different and paid a high price, as you can see there are bubbles spread throughout the process.What I did differently is that I didn't do it. vacuum chamber or let the epoxy sit in the buckets before pouring. My initial thought was: hey, once it's in the refrigerator, it slows down the curing process, which would allow the bubbles to rise to the surface and disappear, what really happens is the epoxy cools down. down will thicken and thicken enough that the bubbles won't escape. The key to removing it from this is vacuuming before pouring or letting the epoxy sit inside the bucket before pouring, unfortunately for this one it didn't work. the bubbles but there are no fractures, there is nothing like that, so it was a success, it was just a small mistake on my part for not being patient enough, okay, let's talk about the details now and what I recommend doing if you want do it yourself, tip number one. use a vacuum chamber or let the epoxy rest in the mixing bucket before pouring it into mold number two.
Let's talk about the temperature according to the results of these two pores. I would say the temperature you are looking for is between 50 and 55 degrees for the first one. A couple of days after the two days, if you could gradually increase the temperature, I think that would be your best option. What you want to do is
test
the viscosity every day, if it starts to harden or if it starts to get hot I would lower the temperature. temperature again tip number three, I would let it cure longer than you think once the top is hard, I would still give it two or three days for the inside to fully cure.Lastly, this is a learning community and I am still trying to learn this. So if you have any ideas, if you do this yourself, do any kind of casting work, let me know how you do it and how your results were different from this. I'm very interested in everything about low quality epoxy
resin
, so that would be great to learn from you too and I have one more surprise for you. This is the black rhino that I just poured into this video. I'm just about finished carving this thing and this full video will be live in the next two weeks and I'm really excited to polish this thing up and see what it looks like inside so stay tuned for that video.I hope you learned something.I know I learned something. If you like this video, let me know in the comments, subscribe to my channel where you'll see this in the next few weeks and that's it. I'm Blake from bm Sculptures. See you later.
If you have any copyright issue, please Contact