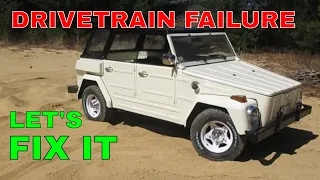
The $2 Jeep, Is it Roadworthy? Things Went Wrong...
May 01, 2024In a previous video I bought this Jeep for $2, but I had to spend twice as much to get it to move under its own power, so I got almost six dollars. At the end of that video I said I was going to invest $200 in it to try to make it road worthy, that didn't go as planned. My last video. I tried a Chevy rotor here. He started it, but it eventually broke. What I didn't see at the time. It was actually crashing into the distributor cap shaking it. all around I'm surprised we even ran so I dug out the $9.19 for a new cap because I bet one is beat up on the inside yeah they took a bit of a beating this should be a little better the wires around this engine was all destroyed it seems like water got in
things
started croaking and there were only five of them inside the car I found a V8 cover with a set of cables I already stole one, make it work I'm going to steal the rest to make a set of six that match previously.
I found a key in the vehicle, but it doesn't work at all with this ignition. I have had locks like this Reed each cost about 50 dollars. BJ's SUV had a new lock cylinder. With wrenches for $39 it's probably not a bad idea to have new contacts anyway, these are really easy to install, just push down against the spring and separate. I prefer to use an old, worn-out set of pliers where the teeth are completely rounded. and that causes less damage to
things
, so now grab the front, push the back in, twist, it comes apart, we just need to make sure we have the right connectors connected to the right points on the new one and this here it's a little light that will be a good reference point to make sure you have this oriented the right way when you make the connectors and also grab this little bulb first.
More Interesting Facts About,
the 2 jeep is it roadworthy things went wrong...
My old fuel system was a lawnmower tank that
went
straight to the carburetor, even if I got this fuel pump working modern fuels would just dissolve the guts and I don't want it to be bad enough when a fuel pump stops to pump fuel, but what is really bad is when they pump fuel directly into the crankcase, which is where that hole goes. I bought a pump for a different engine that engine is an AMC 232 but this pump is from an AMC 258 which is just a version larger from the same motor so it should work right away.
You can see it's very different at first, it's much smaller. that is because this unit is not just a fuel pump it has multiple functions the vehicle comes in this line now there is supposed to be a glass container at the bottom like this it is not here I don't know if it broke or it was removed but I don't have one, what would happen is the fuel would go down because it was a large volume, it would slow down and any dirt or anything would fall to the bottom of that container. It is called a sediment container because the sediment
went
to the bottom.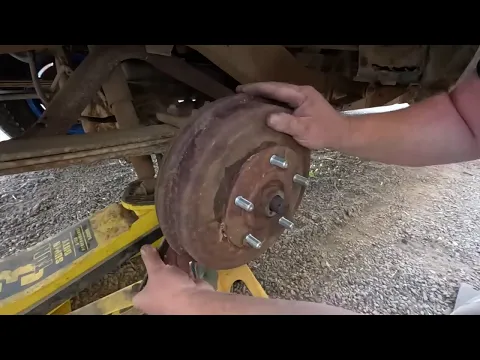
The pump pumped the fuel through this line. You may notice that there is a large section above here as well. This is something that is not uncommon on older vehicles. It is a vacuum pump as this pump moves back and forth. The bottom pumps fuel. The top pumps air. and create suction if you had vacuum operated wipers, that would be invaluable. Not all I need is fuel. This is for a 75 kokee. When vehicles became more modern they removed a lot of features like that sludge pan because they require maintenance and people didn't like doing maintenance so they just removed it.
I now have a pump that is much smaller and newer, so it should have rubber internals that are compatible with current fuels. If you look closely, you can see that they mount to the block. Same thing, but the arms are completely different, which baffled me for a minute. I had to explore a little. You can see the camera What actually operates the pump and I think what happens is one has the arm down in one direction and the other has the AR right on a different surface, the same lobe should power both. I assume the inlet is the barb connection because it will be a suction side and outside there is a flared connection that will be the pressure side, much more clearance on the shaft now.
I just need to plug it in, which means I need a flared fit. Luckily, I keep things like that around. The size seems correct. I have a bit of junk to clean up, though now I'm going to use a flaring tool to add a bead to the end. it's all to prevent a hose from slipping, that will work great now, the old fuel line coming from the carburetor is also just a straight line that was cut off with no way for a hose to attach to it, so let's take it off . Now we're going to add a bulge on this one too, make sure it holds the hose tight.
Add some hose. I even chose a new fuel filter and even the car has fuel. system but we don't have an air filter so I bought an air filter I just need some kind of housing for it. This is the hubcap I found in the front seat. I'm going to wash it quickly. We take this piece of alum and use the cube. Cap to draw a circle, so now I just cut this out, this is quite a difficult thing, little by little, in one corner, speed this up a little bit by making some rough cuts to make it easier.
I also needed some way to bind the air. filter housing to carburetor because the wire that used to do that was missing, so I'll make one that sticks out a little more than I want. I think I'm going to trim it a little smaller and now I can use the hole in the center, so whatever I trim will be concentric with the carburetor opening now that the diameter fits well, this hubcap has several stamped contours. I'm going to flatten them a little bit and try to level them out. Luckily, that air filter has a nice soft rubber seal on it, so all I have to do is bring it closer and it will work fine.
It may look like this hub cap is going to restrict air flow because there's a pretty good gap here between the edge of the hub cap and the filter on that carburetor has a 2 inch throat which means it's looking a little bit More than 3 squares in AC cross-sectional area for air to pass through. This has about a 1/2 space here, but on a 10 inch circle, now you take those 10, multiply it by pi and then cut it in half, we have a little over 15 squares in 15 square inches of cross section and you go into three, this is not going to be a restriction, there is the fuel line that is going to go to the fuel pump.
I'm hooking up my vacuum pump to it to see if we can get fuel out of the tank. Nothing comes out here and the gauge holds vacuum pretty well which means no fuel is coming through that line at all it's completely clogged here is the next fuel system joint we have a nice cracked rubber line and it goes to a line of metal in the tank, it coils up and goes down that way, this line may need to be replaced, this maintains the vacuum. Also, the clog is further down when I was cleaning the Jeep. I noticed this access panel.
I'm hoping this will allow me to get to the fuel tank pickup without having to remove the entire tank. Looks like I'm going to get the Vacuuming first I got a bunch more snail shells, apparently we had a colony of snails living in this. I have my vacuum pump connected directly to the pickup in the tank and it is clogged, so now we can remove it soaked all in penetrant. Hopefully we can take this apart without anything breaking, no it broke, the cable broke, who needs the fuel gauge anyway, there's the retaining ring. I think it's stuck there pretty good, here we go.
There seems to be some deterioration here, it smells like old gas. old varnish, paint, gas, let's see, we cleaned this and it works, it doesn't really matter, I broke the sending unit cable because the sending unit is rusted so I wouldn't have done anything anyway and the connector is not even . connected anymore there's no way that would have done anything so it's a good thing I broke it, saved some time. It looks like we have an obstruction here. Let's see if we can drill this thing. It's sticky. Old wood screws work pretty well for cleaning things like this. you can thread them and then when you pull it drags the sticky substance in there's a lot of junk in there the stuff acts like tar so I'm going to try some carb cleaner to soften it up and it turns black instantly which means I'm dissolving something that nothing flows through, although what I have here is an old piece of choke cable housing, it's totally clear now that this old sock on the end doesn't seem to be of any use anymore.
I bought some cheap ones. Whereas before, for a different project, it was smaller, but it actually seems to fit, so I think I'll give it a try and see how it goes, that's pretty decent, I think we could be good now, everyone who knows what they are . What I'm doing I'll have seen how this came out and I'll know that that tank needs to be drained and cleaned before I think about using it again, so I'm just going to put this back into DRP and use it like that's what I'm going to do now. is to replace this piece of line with another fuel filter and now the fluid that I didn't clean out of the tank is heated here before going to the fuel pump.
I'll probably have to change this quite frequently for a while, seems easier than dropping the entire tank, the float bowl was overflowing while running now it seems to be reading zero. I think the problem is the K needle that way at zero, there is fuel spraying, yes, dripping, now that is the pressure it should have been. the problem is not with that needle and seat at all, the problem is that new fuel pump. I think now that the engine is warm this is a good time to change the oil well, that floor is not as clear as I expected the warm oil from the pan to be. it's definitely hot now that we have chunks there must be a lot of sludge on the bottom of that pan more solids are coming out here we're going to leave this for a while that new oil even put in a new oil filter I was removing the old plate and all of a sudden he jumped forward.
The entire license plate is on a hinge with the license plate light which is going to solve this tail light problem because it has some problems. Try to grab it, turn it calmly. Luckily, I have one. Drawer for this type of things. This is what we need. Well, that part is resolved. Luckily this is a passenger side light because I can buy them new. This came from BJ's SUV, so we can have a new lens that it even fits well on. On the left side there is a small crack here, but most of the lens is there, which is good because they have been discontinued.
The large size tire comes. This thing still holds air. By the way, it is a care. I have to deal with this broken bolt. Wow, those shoes are showing quite a bit of wear, which could be a problem now if they were the original brake shoes from the 60's, they could have had asbestos in them, which means a lot of asbestos dust could have come out, I know. These have been redone because a lot of things are backwards from what the factory made, so it's probably not asbestos dust, but either way I'll stay way back and spray this whole thing with liquid if you hit it with an air hose.
Dust everywhere and if it's asbestos, that's bad. I have to remove that bad bolt. One thing you don't want to do is just put it down and push it. You are holding it on the edge of the drum putting the load in the center. We're putting a lot of force on that drum, so take a bushing or something, put it over the head here and that way, when you press down, it will rest right where it's pressed, without having to transmit the force through anything else . I'm going to hold it a little off the floor and there we go.
I found some bolts on clearance for 66 cents a piece, that's a price I like, the only problem is that they are correct and threaded and of course this one has four left. and screw in the bolts. I don't want to just put in one different thread, so I'm going to replace all five. You can remove these bolts with a hammer, but a hydraulic press is a better option. You can use the same used good. Make sure when it lays flat it is right underneath. I can press this right here and it will push that bolt out, but it may crush from the end.
I'm going to take one of the old nuts. I'm going to screw on the Insert the nuts until they're pretty flush, so we're pressing both surfaces at the same time and now we've removed a bolt completely cleanly. Pairing these new ones before installing them, you can see that the nural section is considerably longer. I could move on. and I machine the shoulder a little to make sure it is straight to the surface of the hub or I can add a spacer on the back to make sure it doesn't stick as much, also noting the heads on the original.
They are much larger than the heads of the new ones, so I am going to use a spacer which is also awasher to distribute the load a little more. I want them to fit really tight, so I'll wash them the previous size. down and reaming, you can see there's still a little bit of gurgling sticking out, it's not a lot, but it's a little bit, so I'm going to make sure that's okay before I go and put the other ones on. I put it on. without a rim in place and then I'm going to measure how much it sticks out.
I'm going to take the same bolt and the same nut. I measure the stick again. It's on an E8 that sticks out less, which means the nut is stopping on the edge without reaching the end of that bolt, so we're good, we can put them all on now. I put three bolts in, but I still had two of the old ones left, you can see that seam there, this drum is holding up. in that bucket with the bolts so I took them all out everything would fall apart now I have three new ones that will hold it.
I can take out the old ones and do this job. I have a bag just for the left and lug nut stuff and now I have four left wheel bolts and I can add to them so next time I need just one, I already have it here while I'm here, I decided to take a look at the wheel cylinder, That's not entirely encouraging. On the other hand it seems like yes, something is falling, so I should probably do something about it. There goes the spring, it's not so bad. I'm using an air hose on the front of the brake line to remove any debris from the entire system I have. a bunch of old wheel cylinder kits collecting dust on the shelf I hope one works, they don't.
This here is my old glass. It has the correct outer cups, but the inner ones are two different sizes, so one won't work. Add another. one on the east side is also
wrong
these exterior cups are completelywrong
but the interior ones seem to be the right size so we are going to use the exterior ones from one kit the interior ones from another and hopefully we can have a wheel cylinder with these leftovers from the car project covered what do you think are the chances of them fitting now? I have the wheel cylinder assembled from leftover kits.I had leftover shoes from another project. I think we're ready to hit the drum. I want to make sure this cone is pretty clean and smooth that way the hub and drum go all the way and they got a nice solid assembly here, at least as solid as you can get with a two piece axle system. Okay, I've got the cone on. the drum is also clean so now I can slide it together because this is a limited end of the shoe and the other side is on the ground. I won't be able to turn it that easily.
Once I lock it, I'm going to make a draft. Adjust my brakes right now while this is still spinning on the cone, you can hear the drag, it's locked there, we're going to drop my wrench into place, we're going to pour some lube on the threads and the washer here like that It will act as a push. washer, when you tighten this nut, all the torque will be used to tighten this. I know it takes a lot of torque once I put a tire here and it's on the ground I'll finish tightening it and that'll happen. soon, because now we have all five bolts ready for a wheel, the old Master Cinda was bad, but it was no big deal because I could buy a new one for less than $30, this is where things started to go wrong, just to make it Sure this is the wrong master cylinder, the seller assured me it wouldn't fit this application but I went ahead and paid 120 because not only did I have this master cylinder but it also includes a vacuum booster and some brackets and I think these mounts are really critical, this is a problem I've run into before, when I put a 5 speed in this J10, I found out that you can't have a clutch master cylinder and a vacuum booster on the firewall, here on this I chose a Hydro Boost.
I turned off the power steering pump, there is no power steering pump on this engine so that is not an option. I think those brackets will move that reinforcement far enough away from the firewall that it can be right here and I think it could be clear that this is where the brake is. The master cylinder enters the vehicle. This original master cylinder mounts on a TW bolt flange. I see below where the master cylinder was mounted. There are two more bolts. Now the brake booster will go right in this area where the throttle cable is connected, but I can move this. to a different location, so for now I'm going to delete it, put this in its place and then see where I need to be.
I haven't been using the C choke anyway, we're just going to remove it completely for now, now we have a There's a lot more play space that fits in there now, when I did the last two bolts, I found out that this is a lock plate. By removing it, I can use this as a hole pattern to make my new holes in these brackets. I tried a In a couple of different locations, I finally think I have the bolt holes where I need them to be on this one. I'm also going to remove some of the lip because that side of the flange was hitting the clutch cylinder and couldn't seat all the way. where I wanted it, but now the brackets are, now I have the reinforcement in place, I have enough clearance in case the engine moves.
One interesting thing about this master cylinder is that it has outlets on this side and on this side I'm pulling the pedal. back all the way, but this arm is too long, there's an adjustment on it, but it's already all the way in, they'll still have about an inch of thread compromise, so they won't have any issues with strength and we'll do it . I still have a lot of length adjustment. I have a rubber boot with CJ5 parts to seal a firewall. Let's see if they fit well here. I need to put some accessories in there, so I opened my jar of flared accessories and found. one that fits in there and these ports are different sizes.
Luckily I found one of those too so now I got a fitting for the front and rear and I found a brake line left over from another project because previously all four wheels ran on this line and they all have to connect differently so that I cannot supply them in the same way. This line is the quarin line that fed the brakes before my fittings went to the 3/16 line. The smaller line flows less but there will be two so we should still be able to flow enough to make the brakes work well now this is my original junction block for the line and this here is a switch that turns on the lights brake when pressure is applied normally, it's not tied up with cables and there are usually no cables nuts involved, looks like someone found a new positive here right next to the rim where it's easy to snag, well there's a good sized nest , this is where it goes against the sharp metal edge of the inner fender and reaches this connection.
I might be checking this wiring a bit. I took an old switch bracket from a pedal group and welded it to the end of a muffler clamp. The connector for this brake light switch is ridiculously expensive, so we won't be using it regularly now. Spade connectors fit, they are much cheaper. I put the muffler clamp on the steering column so I can twist and adjust this. I held it so the dip would hit the brake pedal arm so before the brake fluid pressure would turn on the lights. Now I only touch the brake pedal, so what I have to do is connect it to the OR wiring and I'm done.
I forgot how terrible the original wiring was. What I meant was that I'm going to run a replacement power switch terminal. an inline fuse holder and a new wire to this new switch, so we are sure we have good power. There's the old brake switch connector hooked up, a test lead, I set it up for continuity because I noticed a bunch of wires going to the turn signal switch and I bet this is one of those wires. I'm looking at a nude one that's red. What are the chances that it's the one I need? Yeah, that's the one I have to do is connect this wire to that switch that's easy to hit the brakes and let out new lines.
The operating cylinder has liquid. Normally you do the initial bleeding without the lines, but this one had lines on both sides, so I can remove these plugs and bleed them while I bleed the brakes. I found a problem with the rear. brake hose, let's look in the pile of miscellaneous brake things. I know there are some hoses in here. This new hose I found looks like the ends are the same. It's a little long, but that's not a problem. It's better than Too short. The new hose is inside. It's a little. long, but at least it's not hanging below the axle and we might have brakes now.
I bought a few bags of hardware to make these brake lines but I only used a few so the rest goes in the bucket for a later project on my In the last video of this Jeep I put partial supply tires on that side thanks to comments from his boys. I found out that this really is a Kmart tire. I even received a copy of the ad for him. Those were the days when I like this tire the most. I only have one but don't worry I'm going to put it to good use which led me to do something that I had never done before in my life even for my wife's car I bought a set of five identical tires 1 2 3 four five, in They are actually all the same, even from the same year and all that had these on a Willies truck decided to go for a larger diameter mud terrain and one of them still has the Nubs, never been on the road now.
They wanted 550 for them. I wanted to pay 400 and ended up paying $440 for the set of five, so for less than 100 dollars per tire I found out that some of the wheels here are for Jeep and fit all the hubs and some of them are for Ford. and it has a smaller diameter in the center, there is no way for this tire to fit over that hub, so the two rear tires only fit in the rear. Fortunately, I know how to fix that. Here I have a Ford tire with a small center hole. that doesn't fit my hubs and here I have a wheel spacer for a Jeep with a four to qu center hole that fits over the hubs.
We're just going to screw that spacer into place now I add a 4 A4 hole saw. The single speed drill started to smoke so I went for one with a low speed, the added torque was helpful, it's most of the way, just help it the rest of the way, now a word of caution, considering that the center section weakens the rims slightly, but the way I see it, your load on the tire is here in the bead area, your restriction where all those lug nuts are is right here, so the only stresses on this wheel are between this hole and that area of the heel that the center is not really working.
Basically, it's about getting situated faster and happier than driving somewhere and having someone else do it now. This is a 30 by 950 by 5 Trin tire, everything should be totally fine on the street and still fine off road, and that fits my plan for This is fine. I have a cotter pin over here. It just goes through one of the slots, so I'm going to tighten to the next one and there will probably be enough torque. Here we go. This is totally unnecessary, but I bought it. I didn't like that, so I've had them sitting ever since. I like it.
I think it works for some reason. I feel like these leftover Baby Moon hubcaps are right for this Jeep. and it's probably not just because I've been itching to wear something since I bought them in the last project. I don't like anything to be wasted, they fit well in the back, there will be a problem in the front. Because there will be a center here, so I have to take out the center. I could use the same hole saw that I used to open the wheels because I already know it will work fine, but hole saws aren't particularly useful. fun.
First I have a better idea. I need a way to hold the hubcap, here we go, then I want the hubc to be able to rotate, so let's get that tire off the ground, here we go, I don't want to have. to turn this thing by hand, oops, I have some Nerf, let's put it on a flex stand, precise RPM control, here we go, now I need a cutting tool with precise movement up and down, in and outwards, well, that worked. get rid of the burrs while I'm at it, if I had used style bushings like these all you have to do is turn the little dial in the center, I could have gone with a smaller diameter and I think it's the same axle flange that could change. around and use a smaller diameter so I think I'll just make one for now to see if I like it and then decide what I want to do next, that was a lot more fun than using a hole saw to clean up.
This and this head have to go find what looks like the old window crank for the back or what's left of it and a little wind-up walking bunny best seen in days before the tablet era. My parents used to give us little kids wind-up toys like these. to play in restaurants and places where they want to keep us quiet. I might clean this one up and see if I can get it to work better. You have the right idea. want to golike this Jeep, just taking the rear mat and rolling it all up. inside, throwing everything out, there is a bilge wire that holds almost everything in this thing, this little radiator worked well in the garden, but when it hits the road it will be too small, this thing will overheat in no time, flat flanges are off and This is out of here.
I need a radiator that is narrow enough to fit in here but big enough to cool a 6 cylinder AMC and a modern Wrangler radiator looks narrow enough to fit and cools a 6 cylinder 4L and that 4L is basically Same engine as this one just makes more power so it should be fine and they are cheap. You can buy them for less than $50. I ended up spending more than double the money on this one. This is a three core all aluminum brazed radiator and it was $105. I didn't need to spend that much to make it look great but I think this will be better now we just have to make it fit.
Now I said this was going to fit. I should have added the word eventually because it actually is too. wide to go straight in, but the reason it's too wide is this big flat flange here and I know how to fix that. I have a saw. I'm sure this is the recommended way to trim the radiator. Clean the edge a little. There you have the rounded Conners, kind of like Factory. It looks like this Jeep is also bent in this direction, so the entire bottom has been squeezed in a bit. Maybe I'll straighten it out first.
Here's more bailing wire. I wonder what used to do this. Maybe this is an old radiator support. I had to trim a little more, particularly the fan shroud bracket, but now it fits perfectly and as I did so I realized that it has a fan shroud bracket. I'm going to buy a Wrangler fan shroud. and let's see if that bolts in here, but for now we need to drill some mounting holes in this radiator. I drew a line from the factory holes so I can transfer them to this new flange that will be there and then.
I realized that I can go right through this grill and that's where my mounting holes are. I can mark them right where I need them. I also noticed that an aluminum radiator looks terrible behind this grill. Fortunately, I tested that this cap will hit the bracket under the hood. which means the radiator needs to go down a bit. Now we have a lot of space between the radiator and the fan blades and there is a crossbar down there that prevented it from going any lower. I can go behind that and that drops the lid a little bit.
I have to stack old aluminum coupler nuts and use them as spacers, so I'm just going to take a long 3/8 bolt and then I'm going to put my coupler nut on, which is hard to do while you're holding a camera, here we go and We now have mounting locations for our radiator. The location of my new hole is so close to this edge that I can't make a full hole, so I'm going to make a cut to make the bolt fit more. It's always a bad idea to just take a drill and put a side cutter on it, here we go, easy to pick up the shine, the radiator is dry and in place and a normal lower hose for this type of AMC engine and a Cherokee truck .
The ear fit fine, but the upper one had a larger hose for the radiator side and the Wrangler's upper hose had a smaller end for the engine size, so we have to come up with something here. It's time to go to the pile of miscellaneous radiator hoses. I found two. hose pieces this one is new this one looked great that end fits there that end fits here I'm going to cut these two so they overlap I also cut a piece of metal tubing that is about the length of the overlap now I made a couple of marks on the smaller hose.
I have a mark of where I'm going to cut it, then there's a mark of how the part will overlap and an alignment mark, so I'm going to place the sleeve on the small tube. the overlap section, so now there is reinforced metal, that whole section cut the top tube at the alignment mark. This is a case where, if you're really sure what you're doing, you can use rubber cement to glue them right at this point, but I'm not sure if this is my exact setup, so I'm going to stick with this one, since I'll make sure everything fits into the larger end clipped right now in the trash.
I put another hose clamp on and you can see that's right where that section where that steel sleeve is that allows me to turn that clamp and it holds everything nice and the top hose fits right there we have a complete cooling system, it looks like the coolant is right where should be, time to do it Something about this shackle is bent quite a bit like that, causing the spring to take on a strange shape and the leaf spring bumping into the tie rod, so none of that is good. There's the crossbow I removed and here's the one that was in the back. the package that came out has five blades the one I found in the back has four this is the other side of the front there are seven blades in this one these blade packs are held together primarily with a center bolt that just pops out to the right So these clips are to keep everything in line and they just unfold, so now we have a bunch of leaves, all we do is make a nice spring out of them.
I don't want this main sheet because it is the one that is all folded. an additional one that definitely came from this spring guy seems good so I'll put it up next. These are supposed to go in descending size, but I think I'm going to double this one here because I have two and I like the leaves to extend as far as possible toward the eyes of the spring, that way most of the flex occurs at the medium, it doesn't twist too much at the end five six seven here we go seven leaf springs I got almost $3 for a new center bolt.
I'm reinstalling the clips on each side to keep everything in line. I'm gathering the end of the bolt so the nut can't come loose. We have a spring ready to install now. I'm going to go ahead and install the shackle that was on the spring because it's already on the spring and that makes things easier. I have no idea how this will turn out so we'll try it first and then see if I want to change it I'm going to use a ratchet strap to put the two springs together hopefully secure them to align there we go we have a new spring pack we have room free between the steering arms on the spring.
I think these leaves are a little thicker than the ones on the other side, so I don't really think I need this auxiliary spring and I don't really like it, so I'm going to remove it while I'm here. I'm going to go ahead and grease it all up. the accessories I see, there should be a grease nipple somewhere, there it is. I finally got my new $29 fuel pump because the old one was terrible, it was a new pump that was made completely wrong and would have never worked right because the spring was too heavy now let me show you what happens here the camshaft pushes this lever there's a diaphragm here and then there's a spring when the camshaft pushes here it rotates it pulls the diaphragm back and then when the camshaft pulls away the spring pushes the fuel forward there's one way valves here so it just goes in on one side and comes out the other, and you can see this, look at the meter there.
I'm going to press it, nothing happens. I released the fuel pump spring by tightening it. Put it back in, let it go every time you release it, the spring is what creates that pressure. Now this is how these pumps regulate themselves. This is very overpressurized. That spring should never move the diaphragm back to push more fuel, they should just stay there. in rest position until the carburetor runs out of fuel, the pressure drops and then the spring will push more. In this case the spring is too heavy pushing too much fuel so this pump would never regulate like it's supposed to so thanks people.
At Deli you did something that was absolutely and totally wrong. I checked the four-party warehouse chains in the city, each of them sold this Deli bomb. Fortunately, Nappa sold two different ones and one of them was not this one. Here is my new fuel pump. Look how. It's easy for the lever to move now that I have my new pump installed, let's try the same thing now as I push in, the release pressure goes up, let's see how much it does, it's maxing out at 7 PSI now that I can live without any more overflow. To deal with this throttle cable because right now it doesn't do anything useful at all, obviously I can't put it back where it was because a brake booster here has to find a new location for it, so let's remove it and see where. we can move it to the return spring that was hooked to an old alternator adjusting bracket on the intake manifold and that works totally fine, so we'll leave it as is, the wire was in this hole.
I think we're going to move it. to one of these and that way I can give it kind of a downward angled pull. I still have the two mounting bolts that the original bracket went to and I have the original bracket. I took the original bracket, flattened this curve here, added a new cut end here. The whole end flipped over and welded back together at a new angle and now we have a throttle cable that goes under the brake booster. I found a double spring in my parts bin. There are actually two springs wound together and that provides safety if one fails the other works so now we're going to be in a safe place see how this works we have brakes I'm going to see if this part of the rear window handle actually does anything here it's moving up it's spinning freely I lift while I turn it's working then it's spinning then it's working it's definitely a problem there that I have to deal with at some point as of now we have a rear window save it for later , this windshield will need a little attention, there is a little visibility. problem here and when you drive it's important to see where you're going especially when it's in front of you the windshield problem was fixed actually windshields were sold out in price and it would be over $300 to get me a windshield.
I found a local place to get the glass and install it for under 300 so this was cheaper and easier. I like that now in my previous video I suspected there was a problem with the transmission because of the sound it's making, there's a knocking sound coming from this. Area I'm hoping there may be a problem with the transmission, but so far it works so I'm just ignoring it. Some people commented that that was the discarded bearing, not the transmission. Now I have no problem being wrong and I would appreciate it if you would call me if I am, but that is why I think it is a broadcast.
The launch bearing on these vehicles is supposed to be 50 mil away from the pressure plate. In theory, that launch bearing shouldn't spin, it should be on its own. sitting in the air, so we press it a little bit, we still have the sound. I press it to the ground now the sound disappears. The bearing is holding the pressure plate open and is rotating at this time and as it is silent. I'm thinking that means the lift bearing is fine, but when I release it and the input shaft starts to turn, it does, so I really suspect it's the transmission.
It's okay to be wrong, but let me know in the comments what you think because By thinking about it, we all learned something: The first step is to make sure there is oil in the transmission which will be needed no matter what this Jeep is still loaded in the trailer. When I installed the windshield we got some room underneath so I armed myself with an adjustable wrench, a gallon of gear oil with a pump and a gallon of backup gear oil just in case, let's start with the rear axle, nothing is It's leaking, worn out, I don't feel anything there, I'm going to go ahead and add a little, the rear axle took a little, not too much, the transfer case took a little, not too much, in the transmission, well, it's not too full, It's a little low, but it's not that bad, we just fill it up, let's try this.
Now it has a seat belt, I don't know if it works, it grips a little, we'll call it good enough for the first time on the road since 1996, see how it goes, hey, the speedometer works, I never tried anything, but first, oh, there's a second, a third. I have all three gears definitely some knocking sounds the brakes are really good, nice and straight, it stops from time to time the speed bumps are fine, notice the squealing noise goes away when I put it in third, we only have the intermittent knocking sound In addition to the transmission squealing and knocking they also seem to have a problem with the synchronizers in both second and third gear.
I'm going to add some fuel that is less brown, see if that helps with the stalling problem. Oh yes, it starts normally with a few fuels. years old, you would actually want to drain it, but the fuel in this tank is from the 90's and they had better fuel, so wow, I have a problem. I may have a problemwith the fuel filler tube, we're just going to stop here. right there and call it right there will be some things to figure out here we're just going to shorten this test drive a little bit the steering the brakes work great it drives down the road Ro pretty well but those sounds coming out of the transmission had me a little worried come on to stop here before we cause real damage.
I call this a victory. The brakes worked better than ever from the factory, they were really good, the only real problem was the screeching, metallic sound that sounded like the transmission was about to fall out of the vehicle, other than that it worked great. I'm going to have to dig into that stream and sort through all those sounds, but that will be for a different video. There will be future updates on this, but that's the end of this video. My original budget of $200 got out of control. I have more than $1,000. on this now and the math is a little confusing too because I used some new pieces that were left over from other projects that I didn't count, but I have pieces that I bought for this that I did count and that I saved for other projects, but that's my actual out-of-pocket cost for this vehicle and in the world of Project Car that's not so bad, but the most important part was that it was a lot of fun, even small changes make big improvements when you start with the bar so low, I hope you do.
They're having fun too, see you next time.
If you have any copyright issue, please Contact