Squishy Makeovers: Fixing YOUR Squishies! *READ DESCRIPTION*
May 30, 2021*Intro music* and subtitles by Aine and Cocogirl61 Hey guys, today I'm going to do
squishy
makeovers
, but this isn't just any makeover because I'm going to use Squishies that you guys sent to my shell box. Oh my god, this is amazing. You are awesome. Thank you so much. This is going to be so much fun If you have a used, ugly or very cheap Squishy that you no longer want and would like me to remake it You can send it to my PO Box All I ask is that you write somewhere on the outside of the package, as that these lovely people have done it.
This is specifically for soft
makeovers
so you know ahead of time. Disclaimer if you want to send me softies. Wait until the end of the video for more information.squishies
may be subject to light toasting. Well, I'll just show you what I have. I received this from Emma and she sent me a large strawberrysquishy
and a hamburger squishy. Also a note, so thanks for that emma. I bought this one from Desiree. It's an extremely dirty slice of panda bread
, a great candidate. Thank you. Here's this one from Natalie, which is an old panda bun. I bought this one that's in a bag because apparently the box was opened or damaged or something because that's how they put it in my PO box.
More Interesting Facts About,
squishy makeovers fixing your squishies read description...
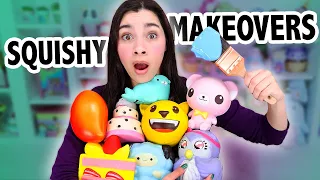
These are from Olivia. She sent me three huge
squishies
. We have this ice cream cone and a peach. She had never eaten a peach before, so Wow! And this big cake? She also made me these bracelets. How kind of you, thank you. And the last one is from Cory. Check it out. We have a sushi, a penguin and this ice cream cone. Yeah, that's not an ice cream cone. They also sent me these amazing light up tumblers, like what? Thank you. Thank you. Thank you all. I'm going to choose this one is just saying my name like I don't know what it is, but I'm going to choose this one.
What else do you know? I'm going to use this little palette too because it's super cute. I think I have to do something with this extremely dirty slice of b
read
and the last few places. Oh, it's such a difficult choice. I'm going to choose this big strawberry. Don't worry about these guys. They will eventually run out. I'll pull them out next time I make one of these videos and if I have more at that time I'll add them. I've received four more packages since I filmed this. Yes. Yes. These are saved for later. These are today's victims.
Let's get into the makeovers So it's that time when a lot of you seem to like swishy toast. I can say that this was once a very nice squishy, but after being well loved, there are some small problems. First of all, a large portion has been taken. off the top. That is also a big mistake. The SEM is completely missing. I do not know what happened. There's a big tear right here. But the rest is in pretty decent condition. I'll focus on repairs first, so I grab my bag of waste foam. Yes. I have a bag of waste foam.
That's weird? I found this little makeup sponge. So I'm going to cut it to make a little piece that fits in that hole. I couldn't get it exact, but close enough will work. What to do with the missing stem. I decided to create a new one using some scrap metal. memory foam. Perfect. Just kidding, I'm obviously going to cut this up and try it on the strawberry from time to time to see how it looks. Get it to the right size and once I'm happy, I'll take some fabric glue to attach it. The nice thing about fabric glue is that it dries soft and flexible so you don't end up with weird hard spots on
your
squishy.But the bad thing is that it takes much longer to dry. If you enjoy extremely boring activities, then you can sit there and hold it for 30 to 45 minutes, but what I usually do is use a rubber band to hold the pieces together and let it dry. That way. Once it is dry. You can remove the elastic band. And I mean you probably don't want to pull it. It should be pretty secure, so now I'm going to use some white fabric paint to further secure the stem and also that little piece of foam that I just stuck in there.
It's not even glued or anything. So cover it and paint it and it will make this a little bit fancy. I'm going to use a pearlescent fabric paint. I mix the pink and green with the white pearl to make the colors a little lighter because you know I love pastel. So now I'm going to start painting the green on the green part. Brilliant, I've never used this pearlescent paint before but I quite like it. It looks really good, I have to say once it's dry. I'm going to start with the strawberry part with the pearl pink paint.
I know strawberries aren't actually pink, but you know soft ones aren't the most realistic things out there. It's just to be cute. Then it's okay. Alright. Once it's dry, I'll turn it over and paint the top half too because you know, we can't forget about that. This ended up getting really messed up because while she had him drying off, OB decided it was a good idea to keep dancing the waltz. and knock him down. It was totally on purpose. I don't know what his problem is if that happens. The best thing you can do is just scrape off the ruined paint and try to smooth it out a bit.
But don't try to paint over it. until completely dry. There we go Looking a little better But now I have to go back over all that green after a little adventure to fix it again and once everything has an even coat of paint, I'll paint the seeds using the pearl white paint on each and every one. they. This took a little time, but I think it adds something, something that makes it look a little more finished. You know, so here's the last squishy. I'm very happy. With this not only because it is a new paint job?
But I had to reconstruct parts of it and I was worried it would look super wacky. But I actually think it turned out very well. I literally can't tell you where the missing piece was. It mixed really well so I can't even find it anymore. And I love the pearlescent effect. I think it looks really cool. Okay, next I'm going to renew this little palette. This one looks pretty perfect at first and then you see it. Oh, okay, yeah. It has a big tear running all over it, but other than being split in half, the rest is practically in perfect condition.
It's really soft and has a super cute shape. So this shouldn't be too difficult. I'm going to start with my white fabric paint and just apply it all over the bottom making sure to seal that tear. And just like that, the soft one has healed. Now I'm also going to pour a little bit of paint on the popsicle stick just so it doesn't break like the rest did, but I'm basically using the same color so no major changes now. I'm going to paint the top half and I'm going to use the rainbow for this, so I'm applying each color of the rainbow moving down and you might be thinking, "This looks like a mess." Yes.
Yes, you are right. It does So I'm going to use a toothpick to start mixing the colors and hopefully make it look a little less egregious. I am not going to lie. This part is really tricky, especially trying to smooth out the paint and mix it at the same time. But I did my best And once it's dry, I'll use a brush if you watch my latest makeover video. You may remember me talking about why I don't like using soft paint brushes. Well, I lied. It was all a lie. No, I'm just kidding. Brushes don't work well for thick layers of paint, but they are useful if you want to apply very, very small, thin, thin layers of paint to blend colors like you see me. doing here For the finishing touch.
I'm going to add a smiley because I felt like this palette just needed something. So yeah, I added a face and here's the final squishy. I think the new one has much more life and personality. That's always good. I'm happy with it, although I wish I had gotten the paint a little smoother. But hey, that gives it character, right? I mean, who wants a perfect paint job? Not me, right guys, right? No, it's not that bad. It doesn't bother me much to be honest. But the ideal would have been a little softer. Next up is this little ice cream cone creature.
I've been looking at it for the past week and I still don't know what it's supposed to be. I will say that it is super soft and squishy. So that's an advantage. The face is kind of cute Although I'm not sure why the inside of the mouth is brown, kind of weird I'm just saying the ears are a unique shape and they're also falling off and he has what looks like a chocolate chip cookie melted in his The head is missing a little paint here and there, but nothing too scandalous. I see great things for his future.
Let's start by doing something with those ears, shoes,
your
weapon. Goodbye ears. I'm cutting them with very small cuts at a time because I don't want any scars. Yeah, this guy lost his ears today, but I'm going to build him a new pair. So it's okay to use some memory foam. I'm cutting a triangle and then I cut it in half. My plan is to turn this into an icy cat, so I'm making some cat ears and cutting out the foam. Rounding it until it has the shape I want. . Now that I have two ears that are more or less the same, I will attach them to his little head with the same fabric melt glue elastic band that those babies used and wait 30 minutes once it is dry.Finally we can get to the painting. I'm actually sticking with a very similar color scheme to the original, so I choose white for the head and had to use several thick coats of paint on the memory foam parts to make them look at least somewhat smooth. , but surprisingly the hardest thing to cover was those little slits in his eyes. They just kept coming back. I was like what? Why did they keep coming back? I don't want to be able to see them because I wanted to change the eyes. So eventually I built up enough paint that you couldn't see them anymore.
And now I'm going to take a head break and paint the cone which was pretty quick and painless. So yeah, yeah, painted the color of the cone. Okay, and then I'll paint over the melted cookie. I'll use some brown paint to make it look like hot chocolate or something. And of course we must add sprinkles to that. So while the paint is still wet? I'm going to throw in some sprinkles to give this squishy a pop of fun and color, then I'm going to turn it over and paint over that little ruffle. I don't know why I waited so long to paint what I was avoiding. for some reason But it's time and now it's time for the face.
Ah ha ha, I liked that the original had these little rosy cheeks. So I'm going to recreate it using a small piece of foam and then I'm going to use the same pink color for the tongue, which I didn't have before. You're welcome and the inside of your ears too. I made the eyes like laughing eyes because I felt it looked a little strange to have the eyes wide open when the mouth was laughing, then I added some whiskers and touched up a little bit there. That's a bit complicated. I touched it up later and here is my cat ice cream cone.
This may be my favorite makeover for this episode. I loved how it turned out. I was nervous about having ear replacement surgery. I didn't know if it was up to the task, but I think it turned out really good, actually, and I liked the changes I made to the eyes. . I think that helped a little too. Well, and the last victim is dirty bread. I laugh every time I see this one because it's so dirty I'm not sure if it was much loved or very hated. No, I'm just kidding. I know that white Squishies get dirty very easily, especially if you use them a lot.
I think it's funny how dirty it is other than the dirt. This one is in surprisingly good condition. There are no rips or tears or anything like that. I'm going to break out the memory foam one more time. Because? Because I really want to turn this into an egg on toast and I want the yolk of the egg to be like 3D. So I shaped that with memory foam and painted it with a generous amount of yellow paint And I painted the bread a tan type color I didn't paint the center of the top of the bread because I'm going to cover it anyway And once As it dried I added a second coat to cover everything nicely I did the color of the cross using a mix of my old crunchy paint crunchy paint bark anyway remove the toothpick I was using to hold it and hold it while it dried and then I'm painting over that crust to make it look more like bread and now say goodbye Panda because I'm going to add the egg with some white paint of course since I made the egg yolk so big that I made the white look like it was I was pouring it over the edge of the toast so it looks a little bigger once the white is dry.
I can finally stick that big egg yolk in and that's it. Here is my sunny side up toasted egg. I think this looks much better now. The egg yolk is a little big like I've been talking about all this time. But to be honest, I like it that way. It's so much fun to smash it and I don't know. It looks cute like that. But yeah, it's a huge egg yolk. So I casually threw this idea out at my last makeover like, oh, maybe you could send me some old, nasty Squishies and I could make them again and it would be fun, but I honestly didn't.
I don't think anyone would do it. I was pleasantly surprised that you guys are so kind and generous and said I have four more packages of squishies that arrived afterI started filming. So this series will continue as long as you want too. I want to clarify that I received a few messages asking me if you send a squishy, will you get it back? I wish I could send them all back, but not you. I will not receive the squishy back. I've already received about ten packages, and I don't know, I mean I could get more, so it could end up being a big shipping cost to pay.
And keep track, please send only squishies. that you no longer want and you agree not to get them back. Please do not send me money for shipping so I can return them. I don't want this to get too complicated and I have to keep track of everyone. stuff. So this is for people who just want the fun of seeing their Squishy get a makeover and not a free Squishy repair service. Well, just making that clear. I hope they understand it. Thank you so much for watching and thanks again to the wonderful people who sent me some victims, and I'll see you soon.
Bye
If you have any copyright issue, please Contact