Full 365 days in 35 min. Building a Cyber Van using the Wattsan CNC machine. BIG part 1. Homemade.
Mar 05, 2024this video sponsored by Squarespace this story began with a search for a donor. I was looking for it for a long time and in the end I had to turn to the official germatrans representative in our city. appearance and status didn't really matter. paper since only the platform of the car will remain and everything else will be done from scratch, so after long negotiations in the company's office we agreed on the price, after which we issued the documents and, by the way, I called a tow truck Andre Manley. he will
part
icipate in this project he has exactly the same car but slightly modified, you see it on the frame, this is an Isuzu MIDI, as a result we started the car and drove it to Andre's workshop, here it will be built after a quick inspection, it turned out. that the previous owner had forgotten some things so we returned them and we decided to do a small detail of the Interior before disassembling it and thus the living room was washed and even the smell of the previous owner was gone now you can do the dismantling while Andre does this Les I will tell a little about the project once on the network I came across such an illustration according to the Legend This is the Volkswagen transporter of the future we will build an exact copy of such a car.
I found and contacted the author of this project his name is artem Smirnoff here is his Instagram it turned out that only this image exists there and we will design the back ourselves and everything that can be seen in this illustration artem was allowed to copy and give him life thanks to him foreign, the next step after the salon is to dismantle all the windows and the windshield as well, the glass suction cups did not work at all and Andre took a universal suction cup to dismantle and then started before cutting the body, we removed everything I really don't regret it, since the optical lights and other elements will be made from scratch on our own.

More Interesting Facts About,
full 365 days in 35 min building a cyber van using the wattsan cnc machine big part 1 homemade...
The dimensions of the drawn model, of course, do not exist, so we decided to base it on the wheels and build the car around them. We estimated the 18. discs and realized that this was not enough, we took measurements and came to the conclusion that we need two-piece discs of 20 seconds in any condition, then we need to cut the body completely, since it does not fit into our dimensions at all and We will make a new frame and the body itself will be completely transparent in a circle, we decided to cut the body piece by piece so that it would be easier to transport the scrap metal long after the roof racks, fenders, in general, everything up to base. go to the waist strange necessary we have such a platform after several
days
of wandering around the car with a tape measure it became clear that the steering rack did not fit the dimensions at all and the proportion is very important only if you follow it It will turn out to make a living copy as similar as possible to the concept of the image, that is why it was decided to move the steering rack and put it in place after the frame is ready.
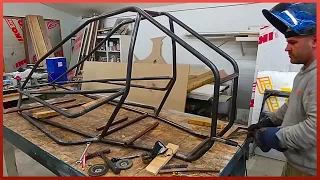
Accordingly, we will transfer it inside. There was even a The idea of making the steering wheel not on the left side but in the center will be from a metal profile and you will have to cut it very decently, that's why such a band saw was bought, it cuts like a clock, We can't get enough. From it, the main power frame will be made of a metal profile and we will cut it into the required size as needed, given that everything will be remade a couple of times in the process, then we will cut it into some size so that we cannot get a greenhouse on wheels, the sides should be made a little oval, which will definitely give the overall appearance and in general the car will look like a car, as you understand, we do not have a pipe bender yet, but we have ingenuity and with the aid. of hydraulic system and two supports we have a folded profile scheme and all the elements are exactly the same these will be our racks now you need to make a table with the racks for this we cut the triangles or pyramids that you want with their help We will make a curve just a little Patience and you will understand what I mean after the triangle has taken its place Mark the shape with a template and cut along the line so we make a curve of a rectangular profile so that everything is in accordance for feng shui it is necessary to close the end a clamp a sheet of metal and 20 minutes of work thank you as a result we have a structure that must be placed according to the level and fixed directly to the platform to do this we clean the frame of our donor as we will weld the frame to it hello The next step
using
a laser level is to expose the base of the board probably this element can be called a threshold and we weld it, we do exactly the same procedure on the other side and our thresholds look like this when we have ideally established thresholds in terms of symmetry and level, we can put them on the side frame, which is what Andre is doing, we do control measurements and in the end everything really came out perfectly blurred for the laser. level and a little to Andre now you can connect the two side frames with each other since the roof will be completely transparent we make minimal screens at the top we also made them slightly curved to be able to give volume to the roof when we already have clear limits of the body , it's time to place the wheels so that the overall arches get a finished outline around the entire perimeter, as I said, the entire car is built around the wheels since the 3D model of this project does not exist. and the only exact size we could calculate is the size of the wheels and based on them we designed the dimensions of the body, as a result we took 22 two-piece wheels in most tire mounting locations because of the way the Workers refused to put them on, but there were boys who do not believe in impossible tasks and they did it in 15 minutes.
As a result, we have shoes of this type that we will perfect in the future and they will look completely different, of course these wheels do not fit standard hub therefore we go to the secret foreman for the manufacture of spacers. This is a temporary solution in the future everything will be redone but to continue with the body we need to put the wheels in their places an old tube of a suitable diameter. It will serve as a spacer, we cut it as evenly as we can and level it on a lathe. The next step is to take these pancakes that we ordered in advance and weld them to the tube
using
such a simple device that makes the positioning process much easier for us. insert and understand that someone made a mistake with the dimensions of the strange pattern on one side that fits the discs and fits the hub on the other and after a day of work and a handful of Nano rods we have four spacers of this type that You still have to manage to get them in place, thank you and so that the wheels of the correct size and with the correct offset are in place, now you can take care of the wheel arches and make sure that you do not have to redo them, although in such a matter We can never be sure of this based on previous experiences.When we bent the racks and got an excellent result, we decided to bend the arches ourselves and also cut the profile of the desired section and with the help of such devices we tried to bend. the bow in general a day of work a lot of spoiled profile and we find ourselves in a workshop where they have been doing it professionally and for a long time 15 minutes and we have rings of this type that turn into bows with a slight wave of the angle Grinder many You know that in addition to creating unusual Karzar Workshop also creates smart tables, we finally decided to put it up for sale, of course, no business can be successful without a working and usable website.
It is possible to create such a website in about 10 minutes on the platform. Squarespace, the sponsor of this video, for this you need to choose a template and customize it with a few clicks. You can customize your site. What I like about Squarespace is the ability to see how the site will look on different platforms. It's easy to make changes. and you don't need to be a programmer to set something up on your website. There are more than 100 ready-to-use templates. All of them are free and available in a variety of options. Additionally, all of these templates have a responsive design.
They are all qualitatively made and displayed correctly on all. different types of devices no problems with site editing everything is clear even for novice users content editing can be done by a person who is not familiar with web page design and programming Squarespace space has many controls animation fonts all this you can customize yourself To create an individual style that no one has, you can save 10 percent by using Code Access Garage. When ordering the next day we decided to move the car outside to observe the proportions and scale in an open area, as it is difficult to evaluate the scale in the workshop objectively as planned the windshield will be completely panoramic to the floor so we will remove the
part
ition you see that was necessary to place the two sides and here you can clearly see that the side has a slightly curved shape as I mentioned before and As you can see, ideally all the racks have the same shape, which is very important to continue working In the next step, we decided to remove the floor to be able to access the frame from all sides and prepare the platforms that will accommodate all the components. of the electric car and so centimeter by centimeter after twodays
of work we reach the engine compartment and since we are planning to build an electric train we have to dismantle the internal combustion engine and here again the things forgotten by the previous owner.I don't know if we did the right thing since this chip tuning assured us that we would lose at least 100 forces in power, but we still insisted on our thing and sent it to the previous owner and started dismantling, it remains to disconnect all the draining fasteners the oil and remove the engine with the transmission to the distant garage this is what we are doing thanks in the meantime we have access to the frame so that all this does not rust it is necessary to prime the metal first, of course, after having cleaned the frame this is what Valera did overall, the laundry rooms and reinforcements are in good condition with just a few corroded holes, we will get to those a little later, as I said, the long run is in good condition, there are only two critical points that should be solved. be patched that is what we are doing when everything is sanded patched we proceed to the primer having previously, of course, thoroughly degreased the entire surface since the body was cleaned by hand and without using sandblasting it is impossible to be 100 sure of the result , therefore use zinc soil to level out our possible deficiencies and the body will last a long time, as a result, the body will be a little shorter than the one in the picture, this is due to the wheelbase, let's say we don't have a version. long but in terms of harmony everything is fine first the camera distorts the real image a lot second so far we have a thin outline after making white overlays and arcs around the perimeter everything will fall into place we will demonstrate it in the near future yes indeed we made a mistake with the proportions, the main thing is to admit the mistake and try to correct it, to correct the mistake we need to cut the car in half and lengthen it, but first we must weld the struts so that the geometry is preserved this is what we are doing in the foreigner at the moment when the last strut was welded you can see real teamwork.
It's a pity that the guys have only one mask for both, as well as intelligence, given that the following shots were welded supports along the entire perimeter. in the end after disconnecting the two parts they must remain in the same place we do like this from all sides four pieces per side after the car has become an eight-legged car we can do the dismemberment first of all we drill the welding points pay attention to how the frame is connected at the factory as we will try to repeat everything exactly this way but with an extension of 60 centimeters after cutting The Spar in half we cut all the other elements, yes now it's time to fix this . error because with each new element it would be less and less possible at this stage we can say that it was easy for us to lengthen the frame we ask for two blank spaces that repeat the profile of this bar with your help we will lengthen the frame that I saw them along to repeat the factory execution and we repeat it.
Yes, there will probably be a lot of questions about the placement, but it was made exactly this way at the factory. On one side it is inward and on the other it is with an overlap, that's what we do, we weld the points in exactly the same way as in the factory, the next step is to cut off everything unnecessary and we already have an almost factory execution , then we lengthen the sights, everything is simple and clear after two days of work we have a body 60 centimeters longer and the proportion that looks like it should after all the spacers have been removed it remains to primeall the implants now that we have the exact dimensions we can take care of the overlap that frames the body along the Contour first we make a 3D model that looks like this and with the help of CNC and two sheets of pentaplex we transfer them from the computer to offline of course these elements will not be made of pentaplex in this way we simply make the desired shape in order to mold them and manufacture these elements from fiberglass was ready the batch of foreign Liners we made all the necessary measurements and we We realized how much we needed to make the bases on which the Plexiglas will be placed while the CNC cut the next batch of Liners.
We started. To make the bases, we first welded said structure, since in the corner of the body we have nothing to fix the profile on which the plexiglass will be placed. This reinforcement perfectly solves the problem, and so on we weld the structure. the entire board protruding exactly from the thickness of the cladding -8millimeters, since the sides will be sheathed with eight-millimeter plexiglass, we are engaged in the door frames, since we already have a ready-made door, we decided not to invent a bicycle and rely on she with a band, that's why we make a lot of cuts.
In the places where the profile will be folded and we go to the body to obtain the same space throughout the perimeter, we weld said limiters then we apply the profile and give it the desired shape starting with the shape of the opening and then a few hours of welding, as you will remember. side grilles are slightly curved to give it volume and a more regular shape so the door must repeat the same profile therefore the adjacent side was also sewn and given a similar shape which is what you see on the screen and after On the day of welding and fitting, we have a finished frame that still needs to be freed from the limiters.
We decided to use these loops. They worked perfectly for us. As a result, we also worked on the door to cover it in the future and build it. these hinges here is the result, it remains to clean the metal and Prime, of course, the doors must be in contact with the rubber of the roof, to do this we weld an edge on the door in which the rubber of the roof fits perfectly and in the end we have the next result we made very dubious spacers, we said it was a temporary solution and now the time has come, Valero will remove the wheel and we can admire our invention again, of course you won't get very far with such spacers.
In general, the ideal is that we do not need spacers and the most correct solution would be to put an axle of the most suitable size since we have already finished the body frame and we know the dimensions exactly while the guys removed the rear axle and the suspension and We went in search for the perfect axle, as a result, it took us half a day to travel and there is a new axle in our workshop and here the difference is clearly visible. We remove the Panhard rod and cut all the fasteners. We cut these cups. fasteners for the springs and transfer them to the reverse side the next step is to place the springs in their places we drag the shaft to them and thus clearly expose their future location and connect it by welding then we disassemble everything again we solder the Fasteners and move on, it was already clear that the shaft fits perfectly and this means that the detail fits into the project permanently and we must give it a more decent look, first we remove the rust and dirt with a brush roughly. and the next stage we get to the most inaccessible places with the help of sandblasting, after everything is finished, we urgently need to prime and paint the part, since the polished surface very quickly begins to rust and decompose again, that It's what we did. foreign turned out new bushings fingers that were worn we also replaced the Springs painted on all the spring fasteners the platforms for the Springs that's all and the Springs were also painted I don't know if it was necessary or not but at least it looks pretty nice Now and Our next moves are the installation of all this kit that we have prepared for this foreign place, as a result, it took several hours to install and in the end we have this result.
The next step we need to expand the beam we will expand it. the beam again with any of our tools this is a circular saw and we connect all this with strange solder on this we need to clean it of the rust so we can move on we are going to get a grinder, a plane and several hours of Valero, so what do we do? We have cleaned this beam, we have cleaned the donor beam and unfortunately everything has completely rotted, so this is not our main and we will rule it out immediately as for this beam, if it happened that it is now alone, what can we do with she?
What I can think of is to cut it in half and enlarge the central part of the beam and we will make the central part of the beam ourselves, unfortunately we don't see other options yet, so let's go first to enlarge the beam. of everything, we cut the profile into the desired size, then we mark the core and drill the fixing points, then we measure the holes, we take a larger step drill and drill more, the next step is to make inserts, we file a tube of a diameter suitable and we adjust the holes for it and weld it this is done to add strength and after connecting the profile with screws it will not deform so much so that we can then expand it and assemble it preserving the correct geometry for this in fact these two complicated profiles were made, the The next step is to prepare the mounting spaces that we mark, we cut off the excess, as a result the profile will be attached to these holes and to place it exactly on both sides and preserve the geometry we make a flat platform.
When the platforms are ready we mark the beam exactly in the center and then cut it by inserting a piece of a donor beam is not an option so we make it to size, first we unstitch the metal, the next step is to fasten the profile to the beam for now with bolts and then we try it on the frame in place, then sheet by sheet, little by little, see my seam, the bottom will be welded with a solid sheet, so we remove the temporary profile and weld a permanent sheet foreigner the next. The step is to first paint an anti-corrosion primer then a hammer effect paint.
In the same way we painted the rear axle, it turned out nice so we decided to repeat it here the next day the paint has dried and you can do the installation as a result. I have a bunch of spare parts and two bewildered people, but for a day of Andre and several hours of Valero, everything is slowly coming together and, as a result, the beam and suspension are in their places, as you remember initially, we bought these three-part discs. This is not random. choice because before I wanted to update the standard discs on a car of the future, in my opinion they do not match and also it has already become clear that we will not be allowed to drive this car on public roads and it is probably for the best because we can afford to implement the crazier ideas in this project, for example, like joystick control and wheels with Infinity effect, in fact, that's what we did, after all, we are on YouTube, first of all, we disassembled the disk, this was done by Andre like result.
After unscrewing 39 bolts, we remove the central part, we will not need it in the future. In the meantime, we took measurements and decided to cut the probes from the layer first. Let me remind you that initially our specialty is Carpentry and we have a
full
y equipped carpentry workshop at hand before ordering expensive metal parts that we cannot yet make ourselves we tested a wooden prototype that we can make ourselves practically for free here everything is clear wooden disc 39 volt plywood and half an hour of work So what did this wooden spacer give us? We understood what the album would look like.While we wait for the precious metal blanks, we can prepare the disks or rather what remains of them, specifically an area consisting of two parts, as you can see, the old Chrome has decided to leave the chat and is only good for baking potatoes . This often happens over time, when the metal rusts and the chrome comes off the disc, but in our case it is even an advantage: firstly, these discs are much cheaper, and secondly, polishing the chrome. it's a troublesome matter, it's much easier to remove it like aluminum foil after removing most of the chrome foil, we polished the edge, we couldn't save the chrome, so we'll take advantage of this moment and paint these wonderful Chrome things, degrease with blown and taped by the This way we had the idea to make these transparent inserts made of polycarbonate, but when googling this question it became clear that these discs have already been made more than once at both West Coast Customs and Garage 54 So we decided to go a little further and while we went a little further, we had metal parts cut due to the limitations of the
machine
.I had to make two discs of eight millimeters thick each, as a result we get a round piece 16 millimeters thick, but first they have to be painted, which means that first they have to be prepared as you can see one of the discs says cutouts and the second is whole this is done to facilitate the design after sanding everything we degrease the blanks the next step is primer we use black soil and go and so that the painted pieces dry faster and the work does not stop we use this box of
homemade
drying it is always dry and pleasantly hot there after all the elements have dried we proceed to assemble as you will remember the discs are in three parts and the rim consists of two parts and this union must be reinforced so that the wheel is sealed and does not let strange air out, paint them black and we are already starting to assemble the wheels as a base we will take two metal discs eight millimeters thick, one light and the other basic, the total thickness of the center will be 16 millimeters, I think it will be enough for the discs , we already have the looseness that is necessary for us, so we got rid of the spacers, turning, turning, assembling, the next step we put all the pieces together and sew four. more times with 39 bolts so that the discs are ready, as I said, as I understand it, standard discs do not quite fit into the concept of a car of the future, which is exactly what we arebuilding
, so I decided to quickly make a prototype great to be able to see what it will look like and organize the ship, whether it is worth making those disks or not, and in general we decided to come up with the concept ofbuilding
a car together with you, that is, we put those things on the ship and make decisions depending from the results of the boat first we separate the polycarbonate sheet we put it on a lasermachine
and cut a circle in the future I plan to insert this part into the disk something like a hood we cut this Builder from foreign plywood how does it work?The upper frame presses the plexiglass against the lower one through a wooden lens. First we simply attached the bolts and tossed the sandwich into the drying cabinet. At that time Valera had just left an hour later, the workpiece was completely heated and we tensioned the structure and let it cool after the workpiece has cooled it has taken the desired shape and we put it back into the machine laser to cut it to the correct size since we initially made a good stock the next step is to take eight millimeter thick plexiglass and make an engraving on it, we don't bother much because this is a prototype made for fun, everything is crooked and wrong here, but We will understand it and, most importantly, show you what it would look like.
The principle of infinite mirrors is used here. The technology is extremely simple and old, but I haven't seen it used in automotive discs. The next step at the end of this plexiglass we fix the LED strip with the help of insulating tape and then we put a conditional mirror on the disk it has plexiglass with etching and lighting and the top cover in the form of a lens is glued with a transparent mirror film and we close the sandwich as a result we have this, so in the end here is our draft prototype As you understand, we made it with garbage and sticks, we used the simplest and cheapest materials in order to understand and show you how it will roughly look, but of course , the quality of this light tunnel suffers a lot due to the fact that we use the wrong material. movie that does not take this spherical shape, therefore we must decide now if we are doing that concept or if it is still childish with these lights and this can only be decided by you, so be sure to write comments if we do them or not.
We have already discovered everything and how to do it. Everything is thought out, therefore, we are able to implement it very well so that everything is beautiful. The question is whether it is necessary or not, so do not forget to write in the comments. It's in your hands. The best way to help promote a video is to share it anywhere. Finally we decided to put a sheet of plexiglass roughly to understand how close we are to the image we are trying to copy. We tint the plastic with a similar film. It is a temporary option to see that we are getting there in the future, everything iswill cover with another film and, on the part of the specialists, let me remind you that this type of projects are possible only thanks to your support and a couple of long comments and most importantly share this video anywhere all this helps a lot in the promotion of the video you always help in the promotion thank you very much and best wishes from the ax let's go abroad
If you have any copyright issue, please Contact