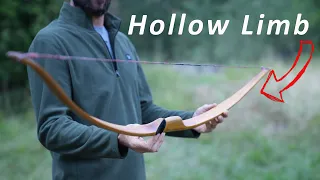
Building a Hollow Limb Self Bow, Part 1
Mar 13, 2024Hello everyone, this is Wayland from Swiftwood Bows and I want to show you a really cool design that I enjoy making called hololens design. It was something I came across a few years ago on the primitive archer forums. There's a gentleman named Simon from Germany who started posting these
hollow
limb
os that he made and it really caught my attention. I spent some time talking to him and examining photographs of his work and started making my own and I've made quite a few over the years and I'd like to share with you what I learned. I want to start by saying that this is not a design for beginners if you are making your first bow or have only made a couple.
I don't recommend following this video yet. and do some builds from some of my other series that are more beginner oriented, really learn how to tiller and get a good understanding of the basic bow design and when you feel comfortable with that, come back to this and give it a try if you're interested in getting more details about the theory behind this design and why we think it works. Go to Simon's website. I'll put a link below in the comments. Stonehill Primitive is the name of his website and he has a page dedicated to hololens design with many interesting ideas and theories.

More Interesting Facts About,
building a hollow limb self bow part 1...
Check it out if you want to learn more. I'm going to go over the basics of my experience with it and my thoughts on it before I get started on this so that the Hollow Branch Design starts with a narrow diameter stave, whether it's a young tree or a branch from a larger tree. , the diameter will probably be around an inch and a half to three inches. The wider the diameter, the less pronounced the crown will be. You'll have on the back, um, and the smaller the gap limit, I mean you could certainly make very slight
hollow
limb
s, plus, this cane is two inches in diameter, it's a peaceful U-shaped cane, this design can work with a There is a wide variety of woods, it is not specific to anypart
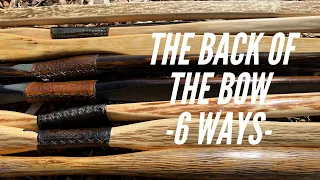
icular species, but the main component of a hololens design is a high crown on the back and that means that when you look at the end of the staff it will have a rounded back pronounced.
The Bow Now People have been making bows with narrow diameter staves for thousands of years, probably most bows made throughout history have been made from saplings or branches. It was a really efficient way for people with limited tools to make a good bow quickly. and most of those bows were made with a flat belly and a high back crown and you can certainly make a good bow using that design but there are some limiting factors when you have a high back crown and a flat belly then the The stress when the bow bends is concentrated along a narrow strip that runs down the center of that bow and is not distributed efficiently across the width of the bow as it would be with a flat bow that has a flat back and a flat belly. and so what?

What ends up happening is that you need to build that bow a little longer to accommodate the same given weight and draw link that you could get from a flat bow because the flat bow is more efficient at storing that energy in a safe way. on the limbs, so you end up with what is essentially an overloaded bow with too much mass on the limbs, so you're losing some arrow speed and, well, you can make a perfectly good bow that way you don't get all the One way people can possibly avoid that high crown is by de-crowning the arch, which means cutting the grain to remove that high crown, making it a flat-bellied arch with a flat back but without a continuous growth ring on it. he. back and sometimes back it with rawhide or sinew to reinforce it.
Some woods don't need that and can be perfectly functional with that ginning. There are many examples of that throughout history and archaeological finds not everyone paid attention to. Pay attention to the grain on the back of the bow, but what we're going to try to do is get the best of both worlds. We're going to preserve that growth ring intact at the back of the bow and, bringing out the belly to match the contour of the back of the bow on the belly so that we have that consistent thickness going from one edge to the other through the middle of the bun, we're removing a lot of that extra dough that wasn't really complete. a lot to help us store energy and we are redistributing that tension across the width of the arch instead of concentrating it in that narrow strip along the back of the high crown and therefore we are regaining the performance and durability that we had .
Give up having that flat stomach. I hope that makes sense. I'm not going to go into much more because I'm sure you don't want to listen to me. Keep talking. Let's get into the construction and we can talk. a little bit more as we go, I want to make a quick note about tools before we continue so you can be prepared for what you may need to do this project which will be different from a typical autobow project, so we've got our stave here. narrow diameter, two-inch diameter Pacific u stave. We're going to need a few things to accommodate this concave belly.
We're going to need some other tools, so one thing I like to start with is a curved gouge that can help us get the rough shape of what we want. I like these bowl carving tools. These curved knives can be really cool. I dig in certain areas and hollow it out and then I also do a lot of my final tillering with this gooseneck scraper, so consider getting some or all of those tools if you're going to take on this project that you're going to need. something to get that belly down and you'll see why now I'm going to go through some of these stages pretty quickly.
I'm going to assume that you've already designed and worked on at least several bows before I'm not going to be too picky step by step, I want to focus on what makes designing a hollow limb different from the things you'll need to keep in mind. The finer points that will otherwise be identical to
building
a normal bow and there are many similarities, so the first thing we will do is design the bow and we will draw the design on the back. For the bow, I'm going to use a fairly typical American flat bow design where we're going to use as much width as we can on this stave up to about the middle of the limb and then we're going to taper it down to our narrow tips.I'm going to draw my line, my center line at the top of the wreath. I have chosen the side of this bow to be the back, to be cleaner and straighter, and to be freer of knots. There will be a couple of small knots. Here at the end, when you consider length and width, you're going to use a pretty standard method depending on the length of the draw and the draw you want or the weight and length of the draw you're looking for, so this
part
icular bow is going to have a length of draw slightly shorter than 26 inches, so I'm going to have a stiff shaft on this bow, so I'm going to make the length of the bow from stroke to stroke 62 inches, so the total length of the bow will be 64.Mark the center point. I'm going to put a standard four inch handle here. I'm going to make the fades a little longer. I tend to like longer, more gradual fades in a hollow arc. I think it looks better rather than having them so abrupt that it helps everything flow together, but that's more of an aesthetic choice than a practical one. Now that it comes to the width of the arch, we have some limiting factors here. Well, our floor is so wide. One nice thing about the holographic lens design is that it allows us to maintain more of that width if we had this tall crown with a flat belly.
As we get closer to removing enough wood to get the draw weight that we want it's going to create these really sharp edges that we want to get rid of and we're going to go past that maximum width center line and we're going to get closer and closer to the back losing that width. as we move forward to get to the thickness we need to have the draw weight we want. With the hollow limb we are going to remove a lot of that meat and this will allow it to wrap more and more. give us more width, so basically we're going to try to get as much width as possible from this particular staff.
Now, if you're working with a larger diameter staff, you may end up making a decision on what width you want. I want it because you will have more width to work with and there will be less curvature, so you can decide to use an inch and a half wide or an inch and three quarters wide, it will all depend on the drawing weight you want. and the species of wood that you're working with, so I can't answer that question specifically in this video, you're going to have to use your experience that you have at your disposal to choose the target and choose the right one. width for your staff.
I'm measuring one inch on either side of this line, which tells me that if I could wrap the ruler around here it would be about two inches. I may not end up using all of that, but that's what I'm going to start with to get in the ballpark on this particular cane, 15 inches here is about half the limb for me, so I'll measure that same inch to each side like I said, giving us kind of American longbow style dimensions from At this halfway point, we're just going to taper down to our normal half-inch wide tip. I'm going to rotate my staff and place it the same way on the other side, so I have my basic American flat bow design here. 64 inches long overall, it will be 62 inches from blow to blow, four inch handle, three inch fades at this time, it will be about two inches wide, we'll see what happens as it starts to tiller, but that's my goal here.
So the roughing part ends up being very similar to a typical bow. You take a knife or a rasp. I'm going to remove the wood outside of my lines. There's not much here on this staff. I want them to be kind. parallel to each other, I don't want them to widen towards the belly or get too narrow at this point and then just rough out the back. Sorry, I didn't rough the back, I'm going to rough it out. the belly to the point where maybe it can start to have a little bit of flex now, just a quick warning, um, when you're roughing out the bow, um, if you were
building
a standard flat-belted type of bow with a flat back, We're just going to rough it down to a uniform thickness that will get you to the stage of starting the floor cultivator.Well, you know, it usually depends on the type of wood about three-quarters and a half inches. Whatever, it's a little more complicated with a hollow limb each piece of wood will be very different depending on the diameter and type of wood, so I can't give you any numbers. You will have to use your experience at your discretion. You're going to start with a take out a knife and a rasp and flatten out the belly and it's going to look very thick and it's going to look like you know it's probably not going to bend much, you're just getting it to the point where it makes sense to start sticking out the belly and for quite a while the bow will feel quite bulky, but as we get that belly out, it will line up, but if my word of warning is don't take it down too much or you'll be really It's like reducing the walls of our hololen bow and really limiting our options with this design, so keep in mind I'm going to go ahead and dig into this with my knife and show you what the bow looks like in this case.
The case of this bow, what it's going to look like before I start the gouge, so I grabbed my knife and the stave scraper. I roughed it out along the wide profile first and then started working on the belly. I lowered it. to my desired thickness profile, so like I said, I didn't want to be too aggressive here at first, it seems very thick and I'm flexing a little on the cultivator. I don't want to go further. That's still, because I want to maintain the height of these side walls here for our hollow limb, once we start to push out the belly, the weight will start to drop quickly and if we made it too thin to start, we're not going to be able to get the full outline and still have the drawing weight that we want to have, so keep in mind that when you're roughing it out now, one thing you may find on your hololens staff is that when you have these narrow diameter staves, you often have a side of the stave that is noticeably larger than the other side that was probably the end of the tree growing from the ground or you know the end of the branch that was growing from the tree, you know and it gets smaller as it comes out so it's just a feature that you're going to have to adapt and work with, that's why we drew those width profile lines and you'll probably notice that there was more meat outside of those lines on one side than the and that's okay, just bring it down to the lines so that each limb is consistent with the other and it is possible that one limb will end up having a more pronounced crown than the other and therefore will have a deeper socket. limb and that's fine, so when we build these hollow limbs, our rule is that we're going to follow the back and that's really just a rule of thumbfor bow making in general, but it is especially important for the hollow limb in our outline.
Our belly will align as closely as possible with the contour of the back. And if there is an area where the crown is more or less pronounced, then the hollow area will be more or less pronounced in that area to correspond with the back, so you will have I'm talking about one thing that you may have noticed about my cane here and I don't want to lead you astray, it's just a quirk that I'm working with on this particular cane at the bottom end of the tree there was a little bit. of natural reflection here, um, probably where the tree is growing on a hillside or something and at the other end it's flat, maybe even slightly flexed, so my plan is that at some point, when I bend more, I'm going to vaporize or I'm going to boil this end and I'm going to match the reflex on the other side, don't worry, you can feel free to do any kind of profile you want, you can do reflex, you can do recurve, you can do a straight Limbo, you know , that depends on you, your own cane, and your own comfort with those different designs, so don't get hung up on the fact that the hollow tip design is quite versatile; you can make many different profiles with it if you want.
If you're doing it for the first time, I'd probably recommend sticking with a straight, straight limb profile just so you have less to work with. I just wanted to point it out so you don't get hung up on it. We have this outlined. As far as we dare to go with flat tools like a knife or rasp, so now is the time to start sharing this belly. I like to start with the curved gouge, I mean the first one, the first time I did this design. I don't have a curved gouge or any of those hook knives or anything like that.
All I had was this gooseneck scraper and I started scraping here and it works but man it takes a while so you're setting your
self
up for less. frustration and a more efficient build if you can have a more aggressive tool like this to start with you just need to be careful not to remove too much wood in any one place it still needs to be a gradual and thoughtful process now our basic goal is to get a consistent thickness from one end of this or one side of this branch to the other. Right now it's thin on the edges and very thick in the middle, so let's start removing wood from the middle here. but we are going to feel this constantly with our fingers so that we get closer and closer to a consistent thickness.Try to keep it as consistent as possible and take into account not only the thickness from side to side but also keeping your base thickness decreasing from thickest to thinnest. All of those tillering principles will still apply here. The only thing that's different is that our limbs will be cup-shaped instead of flat, so don't lose sight of the other basics. When working a bow when you're concentrating on cupping the limb, you have to take all of those things into account and you have to pay attention to this thickness from side to side, so keep digging, don't go too far until you've checked to see how the progress you're making. what you've done is affecting the stiffness of the bow, so take it out, check the stiffness, you know, do a little bit on one limb, even it on the other limb and then check it, that's where I am.
I'm going to get to that point, I'm going to take it out a little bit on this limb, a little bit on that limb, I'll probably smooth it out a little bit with one of these hook knives here and then I'll check it again. I am with you and I show you where I am. I've got my hollow shape sketched out here, it's not pretty yet, it's not even super consistent yet, but what I'm going for at this point is just the beginning of the shape. I'm going to take a lot of wood out of here with the gouge just to bend the bow a little more and even this small amount that I've done so far has taken a lot of weight off the bow, you can see how much Also, it's bending at the rudder and now it gets a decent amount of bend, so from here I'll follow the same basic steps as I would if I were just growing a normal bow.
I will carefully feel the sensation of taper. thick spots working those and now I can choose which tool seems best suited for the job if I know I can confidently dig a big thick spot with the gouge and be sure, I will if I want to use the hook knife to be a little bit more accurate, then I'll stick with it, if it's just a little, I may even start switching to the gooseneck scraper soon you'll have to decide on your own there is no set answer on when to switch to Another Tool - you'll have to use your judgment and make sure you don't remove too much because it's a little harder, at least in my experience with the hollow limbos I've created to predict exactly you.
Know when the bow will really start to turn and start to bend and be ready to string and you can sneak up on it so go as slow as you need to and be careful, for now just keep digging strategically so you can. We're getting a nice uniform thickness from thick to thin and we're constantly paying attention to the thickness from one end of the limb to the other, trying to get it as consistent as possible, so for now it'll probably be that way. It means you're digging a lot right in the center and you're careful to leave these edges alone because they started out thinner, but don't forget that and go too far and do the middle part. too thin and leave the edges too thick, you want it to be consistent and once you reach that consistency you want to try to maintain it until the bun is finished, so I'm going to continue this a little bit more with the gouge, the knife and the scraper, I'm just looking for those thick spots so it bends a little bit more when I get to the point where I feel like I could probably hold it, so I'm probably going to boil this tip. and combine it with the other and then we will meet again.
I'll show you what I did and then we'll work on propping up our bow for the first time.
If you have any copyright issue, please Contact