544 Day Project
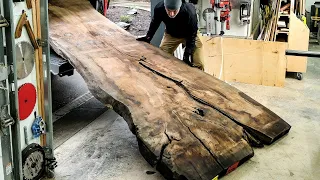
Mar 15, 2024Hello, this is the camera with Blacktail Studio in this video, what begins as one of my largest orders continually escalates into a series of increasingly larger disasters. This is not going very well. I'm panicking at this point. I do not know what I'm going to do. I do and I feel like I might throw up what I'm trying to do here is a package of three tables, the three tables will go to the same customers who ordered a dining table, a desk and a sofa table, all with their specific measurements and Since they are all going to the same customer, I thought it was important that all three slabs came from the same tree so that they matched closely.

The total cost of the three tables is thirty thousand US dollars. The cost of these three slabs here was approximately four thousand five hundred foreign dollars. The customers who ordered these tables live in Europe and they will be delivered to their home in Italy, so needless to say, returns or alterations would be a problem, so I want to have the best chance of success when they leave my store and that starts with choosing a design. I never want to just pick a design that I like, show it to a client and they hate the design, so the first thing I did was take them outside where I had a little more space, I made a series of templates and then I had a video call with the clients and we chose the design together and then I marked it with chalk in my virtual epoxy workshop.

More Interesting Facts About,
544 day project...
We have a pretty detailed chapter on how to choose a layout we talk about what makes a good layout and I think the most important thing is what makes a bad layout and one of the things that makes a bad layout is straight edges. I always want to have that natural edge touching the epoxy. You see a bunch of horrible epoxy. tables out there where they just cut out a section and put it right in the middle of River's quote part and I think that looks ridiculous and it really is one of the things that can separate you from making an average table from a really really nice table. .

Normally at this stage of the process when I'm cutting the slab I was about one to two inches from the total size, so when it comes time to cut the final shape of the table I can guarantee the customer the exact size of the table. We expect these slabs to be a little different since I'm mixing all these different pieces from different slabs. I still added those two inches, but right after I did I got really nervous because it wasn't going to be enough of a buffer. and I don't know what I would do if I made a table that was too small.

I've never had to go to a customer and say "hey, I ruined your table, it's too small, so I hope I have enough buffer built into these." The slabs may be strange. I prefer to wait for these slabs to surface until I have cut them into smaller pieces, as I am showing here, and this really minimizes the amount you will have to remove from the slabs and maximizes the thickness of the finish. of your table and at this point all I'm doing is skipping the planning which means just removing a little bit of material and this will allow it to sit nice and flat in that epoxy mold when you first place these slabs you'll get a very good I have an idea of what the grain and color will look like and these had some amazing light streaks that really reminded me of a round table I made a few months ago but that table didn't actually turn out very well so I hope they come out better.
Something that one of the best investments I've made in the last two years is a real forklift and by real forklift I mean the nicest forklift I could afford, which is a 1994 Yale forklift with no side shift and a surprisingly low capacity of 3000 lbs, however I added some dangerously long 62 inch forks which at least make a really good work table. If you're considering building an epoxy table, this is a step you really don't want to skip, and unfortunately, it's a step I see a lot of people skip. Either they leave the bark on intentionally or they just do a bad job at this cleaning because it's not a very fun part of the process, but if you don't get a perfectly clean solid wood edge, your slab could delaminate in the future and I know people who I have had this happen to them and some people say they have done it and it turned out well, but that doesn't mean everyone will do well as I have never had an Edge D laminate off the market so far.
I don't know about 50-80 of these tables I've built, so I spent a lot of time cleaning them up as much as possible. I know I said removing the bark isn't much fun, but I admit it. The piece was quite satisfying, but they never come off that easily and the rest is absolute agony. I hate this, it's worse than sanding which is saying a lot, there's only one good thing that comes out of this whole process and that is after I'm done I have a big dusty mess. I can take the leaf blower out from under me into the neighborhood, which inevitably upsets a lot of people in the comments who feel bad for my neighbors, they let me know in the comments, which in turn helps my video. that's the positive that comes out of all this if that last comment left you a little paralyzed on your keyboard because you want to tell me how much you don't like me but you also don't want to help with my video you can Always reject this video, but YouTube also sees it as a form of interaction, which in turn helps my video, so the best you can do is probably watch 20 of my videos, but leave after 10 seconds, that's the worst. what can you do when it comes to telling YouTube that I don't like content like this and if you fall into the other camp and find this content mildly interesting and wouldn't mind watching more, I would really appreciate it.
If you hit the subscribe button, this grain orientation here is one of my all-time favorites. I've been lucky enough to have similar designs on previous tables and this really slight linear movement along the edge looks amazing next to this black epoxy. I hate that something happens to this table and renders it unusable before it even gets to the customer. Some table designs really just fit together like that console table I just showed you; otherwise they have to refine a little more and this slab was just a little. too small. I didn't want a full edge of epoxy on that left side, so I found this other cutout and spent a lot of time just to get this little piece that maybe I don't know six inches by eight. inches and to make it fit a little bit better, I cleaned that edge down and then cut it a little bit bigger and I think this will look great, but it wasn't as clean as that foreign console table if you've seen my videos before, You most likely know that I am known for these epoxy tables.
That's how I started on YouTube and I certainly wasn't the first person to make an epoxy table, but I've been making them longer than most people. I think my first table was in 2016 or so and in all those years I have had many successes and many failures and it is through all those successes, but more so. With all those failures I was able to create a virtual epoxy workshop that has a master class format lasting approximately three and a half hours in which I guide you through each step to make a wood and epoxy table in your home workshop or garage. and all that.
I hope that the failures have allowed me to teach you something to avoid having the same disasters that I had, it is something that I am incredibly proud of and in those 12 months I have sold thousands of these and I am constantly impressed and flattered by the comments people give me. He says they would never have been able to make an epoxy table in their shop without this course, which I don't entirely believe, but I do think they would have had some of those same disasters as me. If you have already taken the workshop or maybe watched this video, then you decide to sign up.
You will notice that some aspects of this video are different from that course and that is because I am continually trying to find a better and faster course. most economical way to obtain the best possible result. I don't want to just rely on my system being good enough. I feel like there is always a better way or room for improvement and once I find that better, faster and cheaper way, I continue to update that virtual course. so you always have access to the latest information. I will never launch a Virtual Epoxy Workshop 2.0, there is only one workshop and I will continue to evolve as the years go by.
Here is a good example of something I could improve as these slabs are just a rough cut, they are not perfectly square and apparently I forgot because when I measured the length I only measured from one side and it was a bit tapered so my overall shape was too small so normally I'll put this wall directly on top of the form and now I had to mount it on the side that is inherently weaker and could leak, but luckily I know how to stop a leak and a spoiler. I'll show you in a little bit on how to do that foreign I just realized that I forgot to put mold release on this piece before I attached it and nailed it.
I should probably take it off, put the mold release on it and put it back on, but there's already a lot of sealant in there. Nails and more importantly I don't really want to do it so we'll see how hard it is to remove later and you can just say I told you so. So if it's a nightmare, here's something else I've never done before. The little corner piece was not as thick as the rest of the wood slab which had a natural edge on the bottom so I wanted it to be exactly level with the other piece so what I did was add a little of that CA glue. or super glue made a little bridge there and it will basically float until the epoxy fixes it in place.
One of the things I did on this build that was a little different than what I normally do is that I sealed all the edges with a table. top epoxy that is very thick I usually seal the edges with a deep pore epoxy and if I want a little more stain protection I will seal it with a marine epoxy and since this tabletop epoxy was much thicker than that marine epoxy or the deeper epoxy, it created a lot of problems that you'll see here, okay, this is actually really bad when I sealed those raw edges. I didn't really pay attention to the little microbubbles and apparently didn't pop almost any of them.
It basically looks white just under the surface, like I'm panicking right now because I have to make a decision basically right away, so the decision that occurred to me is that I'm going to add a little bit more to fill it out. super dark epoxy, the risk is that it won't mix with the other epoxy I had carefully measured and you will see the difference in the blacks between them, but I think this is my best option if you didn't understand what My sweaty, panicked face was dealing with to tell you that basically I put that epoxy for the table on the edges too thick and didn't pop the bubbles, so just under the surface of the epoxy the wood looks almost white, so my possible solution for that is to mix a mixture very hyper black from just a few quarts of epoxy, top off and hope it darkens the entire pore so much that you can't see that white edge, the concern is not to completely blend it into the previous pores and I know it looks like all the black is just black , but I've done it before in the past, where I mixed two different cubes, two different mixes of black and you can see it in certain lights, so I want to make sure I have it. completely mixed and I hope that solves the problem if you are one of those people with a thirst for excitement, if you like base jumping, shark diving, ice climbing and meeting people over the Internet, I recommend trying three pores of epoxy at a time, it's incredibly exciting, however, if you're not one of those people and I'm not one of those people, I highly recommend sticking with just one epoxy pool at a time, it's probably best, it's well, big surprise, we had a leak here, it doesn't look very good, but hopefully. we can stop it.
I've had good luck during the flexible paste infomercial method in the past. Oh well, this is completely difficult, but I was able to get to the core, so there may be enough of it to work. Okay, you want to dry it out as best you can and then glue it, screw it, put another one down here, this isn't going very well after I had a tourniquet done on that leak, I started to doubt that black mix again, so I got my cabinet , I got my last container of hyper-concentrated black dye and just gave it a try.
I squeezed out every last drop. I think I feel good about adding the black dye there late, we're not totally out of the woods yet. We have to see one if it will end up staining the wood or if there are some sort of unmixed swirly black portions and unfortunately we won't know until we are ready to finish it so wish me luck. When it comes time to take these tables out of the mold, I don't like taking them in to be refaced and then leaving the bare wood in my workshop for weeks while I prepare them for finishing, so I already have three.
Of these tables, what I'm going to do is take two of them to surface, give them the first coat of finish before I bring in the third table to be surfaced, that way I don't get in my head and have too many. tables placed around bare wood exposed to the air, which really increases thepossibility of these slabs warping or hollowing. This is a pre-made form of concept 13 where most of the pieces I make are custom sizes. I make a lot of desks and they are almost always 30 by 60 inches so this form is a little over 30 by 60 inches and I will include a link to their stuff below if you feel intimidated creating forms if you are afraid of getting a form leak Prefab could be a great way to do it, especially if you do a lot of repeatable
project
s like charcuterie boards, which I don't think I'm saying right, they're called serving boards or something like that.I have talked about this. in previous videos, but people keep asking me where they can find an industrial Shopper, where they can find a small, medium or large store near them that will rent them their Shopper tools by the hour and about a year and a half ago I just went. and I created this website called makerbook.io and believe it or not, this is not an advertisement because the Maker book does not make me any money, it is free for everyone, it has no ads and maybe in time it will become popular enough like for I can't pay hundreds of dollars a month and Google API fees, which I don't even know what it is, but that's what it costs me every month just to operate, but it's a small way that I can give back to you guys. you've done it for me so makerbook.io, if you're looking to rent shop space or time or just random tools, talking about making stuff for yourselves, I didn't want to talk about this earlier in the video because I wanted to eliminate part of the riffraff who might just tune in, see if I'm giving something away and then leave, but that's exactly what I'm going to do in my next video.
I'm building a huge coffee table for a client, so as part of that video I thought it would be cool to build a scaled-down version of the same table and then give it to one of you. It's a really beautiful table and it's not that small, it's still about 30 inches by 30 inches square. This is a burl with a custom walnut base and I would probably charge around nine to eleven thousand dollars if a client commissioned me for this table and don't worry I won't say it's worth eleven thousand dollars in case it gets audited but it is a legit beautiful table, as pretty as anything that comes out of my store.
Admission is free for everyone. Shipping is included worldwide and there is a link to that giveaway in the video description below. I refuse to believe that. I actually have some quotes from hardcore fans, but I may have some very observant viewers who have seen my previous videos and you may notice that I no longer have the sliding table saw, so remember this was taken before I will remove this sliding table saw. some of this stopped and yeah, it's a very good eye, this video is actually several months old and it will all make sense why I'll post it now in just a couple of minutes, but I wanted to point out that it doesn't have that slide anymore.
I saw the attachment on my table too, some of you probably know that I have a big piece of Redwood on my wall instead of that round epoxy table, so there are some things that are a little out of order chronologically, but again, everything will make sense here. pretty quick. I used to cut the chamfers on the side of my tables with just a chain saw and the problem with that is that it's actually really hard to line up the corners to match up absolutely perfectly, so I bought this oversized router bit that It should never be used on a portable router but I really have no choice here and I'm going to use this router bit because it will be more precise however it's a lot messier it's a lot more dangerous like me.
I said this big bit shouldn't be used in a portable router since then I came up with a slightly better way. I combine the two methods. I use my chain saw to remove most of it and then just use this router bit. Going back and making one or two shallow passes so the corners line up perfectly and I don't completely jam this router by removing it all with the router bit after my shop is relatively back in service. up and running I was ready to try a new challenge this is something I had never tried before these pins are left when checking the moisture content of the slab, drill holes They hammer this into the middle of the wood and this gives them a very Accurate reading of the moisture content in the center of the slab, but they look pretty ugly, so I wanted to try to match that wood as much as possible.
I didn't want to just put some wood dust and glue on it or put epoxy on it. I wanted to try to make them invisible so I cut a few different fillets from this cut so I could have a few different colors to choose from and then I just cut two thick pieces and this is what I'm going to do. try using it to fill those holes probably the hardest part about this is that they are actually different than a toothpick in terms of the toothpick has the green running along it so it is very strong these actually have the grain running in the other direction, so that way.
It will look more like the grain on the top of the slab. The problem is that it makes them extremely brittle, so I have to hit them there without breaking them, let the glue set, and hope I've done a good job. What do you think? Will I have to drill more holes and try this again or did I do an acceptable job? It's actually a lot better than I expected, so at least one thing went right in this build, although hardly anyone will notice. I still think these table bases are worth recessing and yes, maybe only small children and people who spend a lot of time with their heads under the desk will notice, but I think it's worth it for the IT guy to respect the craftsmanship of this desk.
I don't know who you were thinking might have their head under the desk, but my desk would only be professional to do that. I like to use that thin black melamine. I simply butt it up to the base of the table, allowing just enough. room for a little bit of wood movement, I use a half inch twist router bit and a brass bushing and then I make a pretty big mess and it's not always that bad if I have a vacuum attached, but it throws up a lot of splinters around one tip. I can offer you if you're going to try this same process is before you remove your melamine or your acrylic or whatever you're using as a guide, test it to fit your legs because sometimes you'll need to make a small adjustment and you don't have to replace them all exactly. as they were and repeat the same process on the console table here, but this part makes me a little nervous.
I hate drilling epoxy and I guess not so much drilling epoxy but putting threaded inserts in epoxy, but as you can see here I have no choice in the matter, the reason I hate putting threaded inserts in epoxy is because I'm always terrified, one day of these I will break the epoxy when doing so. I will do it too. A little hole I'm going to force in there and that epoxy is just going to split on me and to help avoid that or hopefully prevent it in this case, I added a little bit of CA glue and drilled the hole a little bit bigger. and luckily that worked now I was starting to get really excited.
I had been working with these clients for over a year at this point and my original timeline for them was one year and we were going to beat that anyway, but I'm almost done with two of these three tables. I still have the dining room table left, but finishing two of these tables took a big load off of me and I could actually see the finish line in sight and I started to get really excited. There was a bit of sanding, but again. I was excited because I was almost done, so even the sanding didn't seem too bad right before I started this three-table build.
I had the biggest carpentry disaster of my career. I was doing a collaborative build with a friend of mine where he was. He was building the base and I was building the top and I had this amazing 55 inch slab of walnut and I completely finished it. My friend completely finished the base of it and then I found moisture trapped in the slab, which basically made it unusable. and as I was looking at this slab I noticed these yellow stripes which reminded me of the yellow stripes on that slab so I decided to give it a quick review so I posted a video where I built this round table and found out.
In the end it had some moisture trapped in it which essentially made it unusable as a table, almost ready to finish two of the three tables here and I thought maybe I should double check them to be sure so I got out the moisture meter and found pockets. of trapped moisture that basically renders them useless and I have no idea what I'm going to do. I talked to the lumber supplier and he said he was going to come out and see if they could figure something out, but I'm very far along on this
project
and basically I have nothing to show for it and there's no credit they can give me to fix this, so I don't know what I'm going to do and I feel like I might throw up.This is a really tough bad series of lessons I've had. I learned that I said in that Roundtable video that I would never buy slides again without thoroughly inspecting them with a moisture meter which was filmed after I started this project, so I just stressed that particular problem and yeah, I have no idea what to do . The first thing I did after this was call Aaron the owner of Gobi Walnut where I bought this wood, I explained the situation to him and he told me what can I do, and I told him I don't know but come here and talk to me on camera .
At least I can make a video about it and he went right there and I asked him a lot of tough questions. I asked him if I was to blame, if he was to blame. I asked him if these boards could be saved. I asked him how something like this works, leave his store. I asked how they handled this in the past, how common this is and I also asked a bunch of questions that you guys asked me in the last video where I had the slab problem, so if you want to see the whole thing.
The video is on my other YouTube channel, Blacktail Studio, uncut, it's about 10 minutes long and I think it's really interesting, where are we today? Well, right after this happened, I reached out to the clients and explained the situation to them and if you want a little behind the scenes, see what they really thought of all of this. I also have a bonus interview with them on my other channel, but I suggested not trying to reuse these poorly wet slabs and start over with new wood and I found some amazing slabs. however, they cost about three times as much as the slabs we purchased from Aaron at Gobi agreed to replace our faulty wet slabs with these new slabs at no additional cost, although they were going to take a few months to dry and that's where today those slabs are finally dry I'll supposedly go over them thoroughly myself, but I'm almost ready to start working on those slabs, so that's where we are today every week.
I like to give a little credit to those who make it to the end of the video, so this week start your question or comment with the words make again and that way I'll know you made it to the end of the video and I'll do my best to respond. all your questions and comments first.
If you have any copyright issue, please Contact