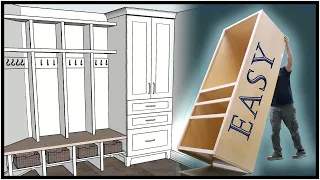
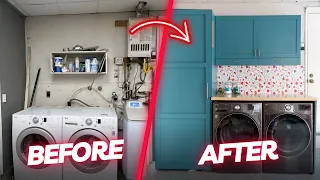
How to Build Your Own Laundry Room Cabinets
Mar 30, 2024In this video I am going to try to improve this
laundry
room
. Now there is no table for these baskets, so they have to sit on the floor. I thought I could use this leftover cabinet from a remodel as a table, but it was too small. I don't want to waste this perfectly good cabinet so I ripped out the countertop and decided tobuild
something myself, so in this video I'm going to show you step by step how I updated thislaundry
room
bybuild
ing my own custom cabinet. table and shelves, come on, the first step was measuring the room and I immediately ran into a problem: there is a water pipe sticking out in the corner.
I made some plans to put a sink in here, but discovered there wasn't enough space between the dryer. and the pipe is too narrow to build shelves behind it against the wall and I don't want to cut it so I'll have to build around it. I redid the plans to include the plumbing, then cleaned the room and got all the measurements and was ready to start building for this project. I bought half inch and three quarter inch birch plywood. I like birch plywood because it is strong enough for shelves and easy to work with. Now to start, the first thing I needed.

More Interesting Facts About,
how to build your own laundry room cabinets...
What I did was build the base of the cabinet, most
cabinets
sit on a three and a half or four inch base and I'm cutting mine down to four inches, essentially the base is a large rectangular box and these two more pieces Long ones will have the length of the base afterwards. I cut them out, double checked that everything fit within four inches and it looked great. Those longer pieces I just cut were for the length of the base. Now I need to cut several support pieces for width. I'll show you how it all fits together later. one corner of the base is going to be visible, so I need to make a 45 degree miter joint.
I made these miter cuts because when I put the corner together it looks like one solid piece. I only need to make a miter joint because this side will sit next to the cabinet and be visible, the other corner will sit against the wall and not be seen so you don't need a miter cut. If you can see both sides of the base, you will want to make a miter cut. I then checked two corners so everything was measured correctly and then marked the inside pieces to fit inside the base as I mentioned. You can see here that the base is just a large rectangular box again, check that everything fits before gluing everything together.

For this corner I put some strong bond wood glue and then used an 18 gauge nailer to seal it. I used a carpenter's square to make sure everything was aligned correctly. I forgot to press record but I put two nails in this. corner, then I use these bessie corner clamps to hold it while the glue dries for all the other corners and pieces. I use this kreg pocket jig to cut holes. Pocket jigs will hide the screws and still add plenty of strength to the base frame. I put all the pieces together and put some glue on it, then made sure everything was square and screwed it all together after the glue was dry.
I sanded it lightly for the next step. I'm going to build this box within the box that I'm going to make. To put up a floating shelf, but I'll get to that step later, I first need to cut out all the pieces and I'm going to start with these two sides. I removed the safety guard so I could make three quarters of an inch. I cut the depth of the box because I will later add a front frame that is three quarters of an inch thick. I removed three quarters of an inch from the sides and the bottom piece here, after making the cuts I gave everything a Light Sanding now for the next step I'm going to make some slot cuts and to do that I need to remove the divider and lower the saw blade to a quarter inch.
I'm lowering the blade because I don't want to split the wood, I just want to create a quarter inch channel. The plywood I'm using is three quarters of an inch, so this will only make a quarter inch cut each time you run the plywood through the blade, it makes a 1 8 inch wide cut. a quarter inch deep, I move the lock gate back 1 8 of an inch each time I pass it until I am left with a half inch wide channel that you can see here. I made the slotted cut on both sides and the bottom pieces. If any of this is confusing to you, just watch as I make the cuts to get an idea of what I'm trying to do after I've made the groove cut, take a second to clean it up so everything is level.
I grabbed this half. one-inch plywood to cut out the back piece. I used a half inch board to remove some weight. I'm done making the slot cut, so now I can put the box together. I made the cut on all the pieces three-quarters of an inch from the edge. I made the cut about half an inch thick so the back panel fits perfectly facing the rear. I wish I had made slot cuts for the side pieces, but this will still work great now. I just mentioned that I made the three-quarter inch groove cut. From the edge later, after the top is attached, I will add a back support that will be three quarters of an inch thick.
Before I put it all together, I made sure to put some glue on the cuts while measuring. To remove the back piece, it is very important that you leave enough room for the slot cut at the top, so in this case I left a quarter of an inch to fit inside the top slot, as it will fit into a slot joint. makes it much easier. Stronger now with the glue. I'm going to use these corner clamps to keep everything square. I also used bar clamps to help prevent warping once the glue dried. I removed all the clamps and was ready to cut the top piece again.
I made a groove cut three-quarters of an inch from the edge for the top piece with the groove cut. Now I'm ready to attach the top piece. I put on some more clamps and while the glue dried I made some pocket hole cuts. on the back bracket, this bracket will hold the back panel and I want to center it where I'm going to place my floating shelf. If you're ever going to build
cabinets
or shelves, you'll definitely want to get one of these Kreg pocket jigs. These allowed me to hide the screws and it looks much better.I'll have all my tools attached underneath with the dried glue. Now I'm ready to build my floating shelf. I had previously decided where I wanted to place the shelf and that is where. I put this rear support. I double checked that everything measured correctly and then cut all the support beams for the shelf to my measurements. I cut all of these beams to be one inch thick. I'm using half-inch birch plywood for the shelf board, so make my shelf an overall thickness of one and a half inches. This will match perfectly with the one and a half inch front panel I will be attaching later for this project.
I've been using these one and a quarter inch cabinet screws. They are perfect for projects that use three-quarters of birch plywood to mount the shelves. I cut these two support boards, then pre-drilled the screws to hang them, repeated the same process and hung the support for the back and the other side. With the straps on, I was ready to put it on the shelf. The shelf is 22 inches deep, so I needed to cut two inches off the end. I cut the remaining two inch piece in half to make some one inch support braces that will be screwed on. the back support behind the cabinet that we placed before before we can hang them I need to cut some pocket holes that are already made with I need to hang the support piece in the front having a notch in the corner like this allows it to slide into place is much easier all the pressure is on the corner so removing it allows you to fit it in a much smaller space.
The box shell is now ready, so now I need to attach the board for the shelf. I'm going to use half inch birch plywood which I need to measure and cut to size before staining it. I'm going to sand it with 120 grit and then go to 220 grit so it's smooth and then I'm going to use this Bear brand water-based pre-stain. I've never used a water-based stain, so I thought it would be a good time to learn. I heard that pre-staining could warp the wood, so to avoid that I added some. weight on it when it dried everything looked great and was ready to stain for the stain.
I'm going to use this water-based Jacobean color from Bear. The stain looks good, so I'm going to seal it with this water-based polyurethane. Now it's very important that if you have a water based stain that you use a water based sealing oil and water are not compatible so make sure they are the same while the top of the shelf was drying. I decided I was going to paint my cabinet. box, I chose this original Kills brand primer, I also took some quick-drying filler, a brush, a roller and some plastic wood filler for the paint. I used this Bear brand urethane alkyd semi-gloss enamel, it works fantastic for cabinets while removing paint.
I also grabbed the cabinet and decided to sand and paint it as well. The closet doors had a lot of holes, so I used this plastic wood to fill them. It really took a long time to fill the cracks when it's dry, sand it. It removed like normal wood. It took me a long time to prepare the closet and cabinet, but it was worth it in the end. All the prep work allowed the paint to sew properly and the holes and knots in the wood to be smoothed out. Now it was ready. To check that everything would fit, walls rarely have perfect 90-degree angles, so it's important to periodically test
your
work.There was a slight angle to the wall, so I'll have to make sure to take that into account when measuring. the countertop, my next step is to measure the faceplate, as I mentioned before, I cut the cabinet three quarters of an inch and that's because the face frame will be three quarters of an inch thick. I cut all the pieces from the poplar. wood and checked everything fit, it looked good so I was ready to put it together to hold the front frame together again. I used the pocket hole jig, be careful when driving screws into a lightweight piece of wood like this because it can move when you screw it in to avoid misalignment.
I held it with a clamp. I'll put the frames together, so now I'm ready to paint it again. I'm going to start by putting a coat of this matte primer. I forgot to do the drawers earlier, so I painted them now with the dried paint. I was ready to put it into account. I added this piece to cross the front of the shelf to support the front frame. I just used a little glue and 18 gauge nails with the face frame on the project really starting to look good and the next step in the project is to cut out the table top for the top.
I'm going to use three-quarter inch birch plywood. I decided I was going to do it. to double the thickness of the table so that it is an inch and a half thick now at this point it is very important that you stop and need a cookie if
your
wife makes you the success of the project depends on it it is also very important that you measure the wall in several places before cutting the table because the walls are never straight, the back of the table could be shorter than the front. I double checked that I had cut everything correctly and it looked great.Next, I screwed the cabinet to the shelf. To give it more stability, my next step was to cut the frame around the table. I originally wanted the table to look like one solid piece, but since the walls weren't straight, there was a larger gap in the back than the front, so I decided I was going to build a frame out of poplar wood. It is much easier to make adjustments to the frame than to the 7 foot tabletop. Now that I have everything measured, it's time to stain the table top that I put on the table and I'm going to check it out.
Once again, I got the frame measurements correct for all the corners. I decided to use a 45 degree miter joint. I have it all cut and measured, so now I need to paint it while the paint was drying. I went to put together my cabinets. and I noticed there was a big gap in the wall to solve, so I cut a piece of my birch plywood and used it as a filler piece. I wish I had realized this sooner because it would have been much easier to fix. I was able to fit the filler piece in and it worked great after a short delay, I finally had my cabinet hardware delivered but after installing the doors I decided I wanted to replace them with a longer handle and using this cabinet tool I was able to easily mark where I needed to drill the holes when the paint finally dried I was able to attach the frame and putting it in really made everything fit.
Also at the beginning of the video I mentioned that I had this pipe that I had to build around and you. You can see how I did it here. I didn't want to remove the pipe soI extended the table so that nothing would fall between that space. Then I can add shelves or build a cover for the pipes and that finishes the cabinets here. They are very strong and are perfect for what we need. At first I was worried about the dark contrast between the frame and the shelves but in the end I really liked the colors.
This was a really fun project and I hope it gave you the confidence to go out there. and try it yourself. It is a great satisfaction to see something so broken and fix it yourself. If you found this helpful, check out my other home repair videos. Thanks for looking and have a great day.
If you have any copyright issue, please Contact