Office Course free video - How to Calculate UGR in an Open Office
Apr 26, 2024Okay, now we are done with a single
, let's now move on to the Open Office. Okay, now let's go to our construction tab and create our Open Office so you can see here in this area where all the tables are. a room is called
because there is no division between when tables or coworkers are ok so how are we going to do the layout or walls for this one because it is connected to the reception and the hallway and the corridor also in this one, so let's go now and start building the walls, let's go back to the story and the building construction tab and then draw a new room and then detect where this
office
, let's now move on to the Open Office. Okay, now let's go to our construction tab and create our Open Office so you can see here in this area where all the tables are. a room is called open
office
because there is no division between when tables or coworkers are ok so how are we going to do the layout or walls for this one because it is connected to the reception and the hallway and the corridor also in this one, so let's go now and start building the walls, let's go back to the story and the building construction tab and then draw a new room and then detect where this open
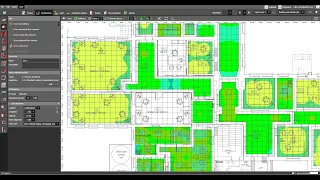
office is, it'll be fine, so I think these are these. they're printers so maybe we can include this one okay so let's include this one and then this is the wall and another wall here okay so there's a little hallway here maybe we can't include this one because maybe We can put a low light in its place. of 60x 60 here, so if you made a mistake, just press undo here and then go and detect directly here and then go directly to this side and check where the end of the wall is.
Well, I'll assume that for now and then here and up to here also here and this side yeah and there's a little wall here okay we can adjust it later and then we're going to close the polygon and this one we have to adjust it from this and um yeah here too okay because now it's connecting well with the other walls so now we have our Open Office and then we're going to go to these spaces and then we're going to label this one as Open Office and then we're going to go to edit and then we're going to select the office and then we're going to file the writing. writing typography writing reading and processing data again the requirements are 500 LS and the overall uniformity is 6 and ugr is 19 I think this time we need to run ugr now okay and um yeah so we have it here from time to time, uh I'm planning on using a 60 by 60 on this one because in the previous rooms we have a lot of specialty fixtures so let's simplify this one a little bit okay I'll go to the lighting tab and select a 60x60 panel if it has an isolation plane mirrored, it follows the grid, but if you don't have it, you can make it random or you can create your own ceiling grid.

More Interesting Facts About,
office course free video how to calculate ugr in an open office...
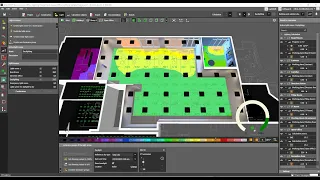
I'll show it to you later, let's find the 60x 60 luminator first. Okay, I can just write the panel. look at the photomatic here also go and check one make it wider it's 33 33 37 okay I'll try 37 this looks wider okay I'll go and place press this Auto Fix and then click on there now the grid It looks good, yes. so you can adjust this one as well. Let's do a calculation first, so let's go to this and select Open Office and then activate the CAD file here and let's go okay, so we have 548 LS very good and let's go to the calculation object and select it and open the false color, maybe we need to delete the diagram.

False color and valid graph alone are okay, but our overall uniformity is not good because it's only 21 21, so you can see there's a green area here in the corner, so we can offset these calculation surfaces by 0.5 because it's okay and maybe we can add some lowlights in these areas of the printer, so let's go now and offset 0.5 and say yes and then maybe, okay, let's
calculate
it first, okay? I got 33 or 30%, 32% or 33, so we still need to have 6 for open space or open Office. You can see here on this side that it's still green and maybe we can adjust this one or maybe we can turn off the lights here. because this is a wall and maybe there they have art again in this area and it's perfect to have low lights there and this is also another area that is very dark and maybe we can again add low lights here because this is also a wall and maybe They have the corporate identity logos or any images there, so let's go and select the downlights that we use in this part, so I'll go to the light tab and then X and then select this one and then I'll add downlights in this area, okay, I'll do three, yeah, and I can also adjust them if I want, but yeah, the downlight is fine for now and then I'll follow this just as a guide and then I'll move it like uh, I think 0 five.
I'll just use this grid. H uh, no, the wall scroll and as a guide, and yeah, let's go and check if it's okay or not, so perfect, we're 69, this is amazing. Alright, okay and then we got the LAX value and the general uniformity requirements, so this time we will run an ugr calculation to make sure that the employees do not get a headache due to the glare of the lights on the ceiling, how are we? ? What we're going to do is go to the calculation object, okay, just go and click on this calculation object and then click on calculation surface and then click on this calculation object tab here and then go to the parameters of calculation and then press this unified glare index or ugr so that this The calculation surface will
calculate
the LAX value and the overall uniformity at the same time the ugr, so just use this default step width of 15° and then 360 and then the height of the whole is let's say 1 M, which is the sitting position the person can do. it's one .2 if you want because maybe they're tall or it's usually 1 meter okay so let's go now and calculate if the glare we should achieve uh uh 19 for the glare ugr okay so let's check that one out like this that we are going to discard it. the result first and then calculate it again, okay, so I think this is now fine and we go to the open office and still the glow is not included here, so I will go to the documentation and check if this glow is now. included in the report it says 490 just overall uniformity ok glare rating look at this see it's 26 instead of 19 so we didn't get the glare so what we're going to do is change my setting to a lower one . wattage compared to this higher wattage with less amount okay so I'm going to go back to this Phillips and try to get the lowest wattage so you have more fixtures instead of just a few but very dazzling so I'm going to select again uh type again. the panel is ok let's use this Omega Pro but this one has higher power and I'm not sure if it's good because the lower the setting on the grid line it produces more brightness but let's see ok let's try this Omega Pro and apply it there and then remove this Phillips and yeah, we'll keep those highlights low and then let's calculate okay, so we have 445 oh, I love it, look at this, this is 65 overall uniformity and ah, I love this, okay, look at this optics, it's very wide, that's why it's Okay, okay, the problem is that we need to add more luminaires because we only have 445, but we got a very good overall uniformity which is 65, so what we're going to do is add in some vertical or horizontal place, so let's try.I'd rather have the horizontal, so let's make this eight by five and maybe adjust it a little bit there and then calculate perfect. I love this proper aspect of this one so we got 524 LS and 63 overall uniformity and how about the glare so let's go check it out we still have 26 and I don't know why okay so utilization blah blah , blah, we still have 26 and the ugr HM, okay, so we need to check the height of our glare points, so I'm going to go to This calculation object tab again and click and double check the height of the set.
Oh, okay, because our calculation surface is already 8 from the floor and then our glare parameters should be, let's say, 2 to the left. Let's see if it changes due to our calculation. surface, let's go to the 3D view it's already 8 from the ground so if you offset it to 1.2 for the glow now it becomes 2m so that's really wrong so I just marked here as the height of the scroll and let's go Look how it goes so let's calculate again okay let's go to the documentation and it still hasn't changed so how do you think we need to do it?
How do you think we can change this glow? If we say, for example, go and select this. Point instead of because there is a calculation point for a glow also instead of ugr, okay, let's try a point, let's select a calculation point and then put a calculation point here, let's say one there and then say this is ugr and then I'll say step equal, okay, I'll add one more somewhere here sitting in this place and then I'll select the ugr and uncheck this one also the other one. I need to uncheck it click and check this uh horizontal and then let's calculate and see the The value of those okay so for the oh look at this one so for the calculation point it's just 17.6 and 18 so the glow It's very good because the requirement is 19 and we only got 18 and for the other one it's uh 17 and the goal is. 19 Well, I don't know what's going on with this calculation for the ugr, but it looks like we nailed the glare value calculation for some of the points we selected and that's pretty cool, so let's keep this one.
For now, I'll double check what happened with the diux Evo uh ugr glare calculation and so okay we're done with the ugr and the luminaire selection okay so the next lecture will create a line grid, okay? See you again at the next conference.
If you have any copyright issue, please Contact