How I saved $1017 on the latest Samsung by fixing a broken one - Note10+ Restoration
May 31, 2021Hey guys, welcome back to Chanel, Hugh Jeffries' video in this video. I'm going to see how much money I can save by repairing this
broken
Samsung Galaxy Note 10.1, new, this is Samsung'slatest
Note phone at the time of making this video, which sells for seventeen hundred dollars here in Australia I bought thisbroken
one for only three hundred and fifty and $8 the only thing that looks broken is the front screen which has broken glass and a damaged OLED panel. In its current state the phone cannot be used as you can only see about 10 percent of that screen.
I bought this phone on eBay and took it out of the bubble wrap. I kept the phone itself and no accessories or charger are included. There is also some sort of magnetic phone holder attached to the back which I will have to remove now, the title screen touch still works so I was able to set up the phone and after navigating to settings I was able to confirm that this is a Galaxy Note 10 and that the broken part of the screen is very difficult to see since it is incredibly bright. Now we can turn off the device and start our work.

More Interesting Facts About,
how i saved 1017 on the latest samsung by fixing a broken one note10 restoration...
The first thing I'm going to have to do is remove this cell phone holder on the back. I think this is one of those magnetic ones. type devices that clip onto a car phone holder or something similar. I really don't like these and especially when people decide to stick them on the back of their almost $2,000 smartphone, removing them is a huge pain and I had to use a lot of heat. To remove this and even when I ripped off the main plastic piece there was still dirty residue left that I had to go back and remove with my finger without that horrible support.

I placed the phone in the preheating station. Some people recommended me. I got something like this so I thought I would try this by letting the phone warm up for a few minutes. I could try removing the back panel now, since I didn't have heat resistant gloves, I couldn't get the phone to be too hot, so unfortunately this method didn't work. I resorted to my old method of using this hot air station at around 200 degrees to heat the section I was working on after heating, a standard suction cup could be applied although it was not strong. enough to lift the back panel of this phone as the adhesive is incredibly strong so I used a suction cup remover which was effective in creating a gap between the back panel and the frame of the phone as I don't want to break the back panel.

When removing it I will continue to heat the back to further soften the adhesive before removing the suction cup as I did not want to create any pressure points on the glass with an image inserted at the bottom. You could heat both sides of the phone this way. I'll make sure that when I move the image to the edge, the side of the phone really starts to separate by adding a little more heat to the mix. I can slide a lift up the side of the phone creating a gap as you can see in On this phone the glass is almost at a completely right angle which makes it very difficult considering how thin this panel really is.
If the back panel is damaged, you don't need to be as careful with this process, although I wanted to save mine. It took me quite a bit of time and a lot of care; However, with some careful prying I was able to successfully remove the back panel without cracking it. With the most difficult part of this repair, it's time to remove the several screws holding the wireless system in place. The charging coil now, unlike previous generations of Samsung, there is actually a cable that connects underneath, so after unscrewing the screws and lifting the bracket, I will disconnect the battery first and then disconnect the wireless charging coil before to carefully remove the entire assembly; however, there is still one piece left. plastic that is at the top of the phone and that will need to be removed so that we can have full access to the mother bullet that goes down to the bottom of the phone.
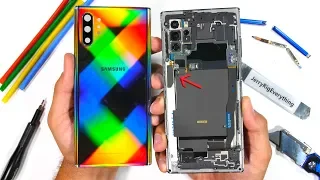
We can also remove the speaker assembly by removing the several screws and carefully trimming. With all that plastic out of the way, we get a good first look inside the Note 10 and you can also see the all-new design with the double-stacked motherboard on top and the battery in the middle section. . This thing has four. cameras on the back, including the depth sensor, the green part of the motherboard is the daughter board stacked on top. Hopefully these phones won't have any of the board separation issues we've seen on newer iPhone models, which is causing issues with touch and baseband after severe drops when returning for repair, although I will have You have to remove the SIM card tray and disconnect the series of flexible cables that connect to the motherboard, removing the front camera.
I can simply lift the entire plate. Instead of snapping it in, there are no screws holding it in place like on many other Samsung generations. We can take a closer look at that board before setting it aside and turning our attention to the bottom of the phone by removing the connector cables between the two. halves I can unscrew and remove the USBC connector. I'm happy to report that Samsung has reinstated the replaceable USBC connector that was previously soldered on the s10 and s10, also the next thing you just have to take out is this square vibration motor, the last thing I'll have to take out is this battery and , unlike previous generations, takes up the entire width of the phone, making it much more difficult to remove.
I tried some alcohol, however I still couldn't get this battery out and needed to use it. Again, not wanting to damage it, I placed the phone on this heating pad we were using earlier and sure enough, this heat helped soften the adhesive along with the alcohol we applied earlier. With enough persuasion, the battery was freed and undamaged. Now it's time to install the components on our new screen. This came with an attached frame for a total of AU$325. It's surprising how expensive phone screens have become since the switch to OLED technology. You can see that the earpiece and fingerprint sensor are integrated into the display. screen, which is a pretty amazing piece of engineering, we can start by installing the vibration motor and the USBC daughterboard, screwing it into place with the three Phillips head screws, we can check the port by connecting an adapter or cable, next is the motherboard We can put it back in place, which is quite easy, no screws or clips required and then we connect all the cables and prepare the battery for installation by applying two new pieces of adhesive.
This is not the original factory type, however, it will do. Let's hold the battery in place, then we can put it in place by pressing it firmly into position. I can reinstall the front camera and the two flexible cables that connect the two halves of the phone, connecting the new OLED screen, we can install the speaker assembly and these screws that hold it in place, now we have the phone assembled enough that We can test it by connecting the battery. I can hold down the power button and sure enough the phone continued to boot up, however there were a couple of small issues, the speaker sounded very muffled and distorted and the vibration motor didn't work at all, so clearly something was happening that needed to fix after investigating the issues I discovered that unfortunately I damaged the vibration motor when I removed it so I replaced it with an older model from a Galaxy s8, although being round it fits and is held firmly in place by the adhesive and the charging port, as for the distorted speaker, it turns out that the mesh installed on the new frame was full of glue, so I removed it and we will change the one on the old frame.
I would like to mention it at this point. If you perform a procedure like this, it is highly unlikely that the phone will remain waterproof; It could stop the water a little. but it's not something that definitely guarantees that once those issues are fixed, I can reinstall the screws holding the speaker assembly in place, reconnect the wireless charging coil and battery, and put this piece of plastic back on. Then I can reinstall these several screws that hold everything in place. I can then use a microfiber cloth and some alcohol to remove any fingerprints or dirt left on the phone.
I will also have to remove the adhesive that was left on the old back panel when removing it. I will boot the phone once again and start Samsung diagnostic mode using the phone dialer. Here I can test all the features of the phone, including the vibration motor from a previous generation of Samsung, sure enough, it works perfectly well and I compared it with my Galaxy S. 10 which has the same round style vibration motor and I did not notice any difference between the two phones, the touch and the s-pen also work, so it is clear to say that on this Galaxy Note 10.1 what I will have to do is reinstall the back panel now to do this because I am reusing the old one.
I'll have to remove as much of the old adhesive as possible. Now this material is incredibly strong, so it's unlikely you'll be able to remove every bit of adhesive, so I'm going to do the best I can using a little rubbing alcohol and a microfiber cloth. We can loop through and try to remove as much as possible. We can then align the new piece of adhesive and press it into place with a spudger making sure it is aligned correctly on all four sides by removing all the protective films Can I reinstall the old back panel on the repaired phone by pressing it firmly into place you still see a little dirty on that back panel for the memory remove the phone holder at the beginning of the video, so going in with a little alcohol and a microfiber cloth we can polish it as if it were new, finally we can remove the protective film from the new screen and that's it, so this is my black Galaxy Note 10.1 now fully functional.
The question is how much did all this cost? I spent a total of $683 which includes the phone and the replacement screen which is an incredible savings of one thousand and seventeen dollars, if you're wondering Samsung charges four hundred and forty dollars for the same screen replacement which to be honest , not a bad option if repairing one of these is not for you, this particular Galaxy Note 10, Android nine and a UI version 1.5, given that it is running such an early version of an update, I think this phone It wasn't used much as the security patch is from November 2019, of course being Samsung's
latest
flagship it is capable of doing almost anything you can throw at it.I'm not a big fan of the punch-hole and lack of headphone jack, but overall it's not a bad phone, but what about that vibration motor we changed? It works well? Listen, it works fine even though it's an older model and a different size. It's attached with adhesive, the charging port, and the speaker assembly, so it's not going anywhere. that note, this has been a great video from EFI, if you liked what you saw, hit the subscribe button and consider checking out the phone restore playlist for more videos like this and if you're looking for some helpful tips or what tools used to repair devices, be sure to check out my website link found in the description.
That's it for this video and I'll see you guys next time.
If you have any copyright issue, please Contact