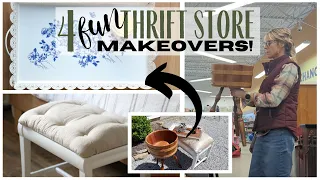
4 *NEW* IMPRESSIVE DOLLAR TREE VALENTINES DAY DIYS 2022 | VALENTINES DAY DIYS 2022 | VALENTINES DAY
Mar 24, 2024Hello guys, welcome back to unicorn desktop designs. If you are new to this channel, my name is sammy and we do DIY, we make wooden signs and there are always tons of laughs so if you think that's something you would enjoy then make sure to stick with DIY and if you like what you're saying, make sure you hit that subscribe button and make sure you like it because it really helps me, okay, let's go ahead and get back on topic. On to the DIY, okay my friends, so let's start with two of the Dollar Tree planters, this vintage mod podge, yes, vintage mod podge, I didn't even know what that was.

Plaid sent it to me and I thought, come on. Try this so that when you see me pour the mod podge you can see that it is cream colored and not that white color. I've seen this paper towel method used before, but recently I saw it used in our upcycled life with deidra and I thought, "You know this is a great opportunity to try this, since I'm doing this shabby chic look, so basically everything "What you have to do is dip your paper towel in the mod podge and then use your fingers to just scoop." you don't want the excess like you're drowning in it, but you do want it definitely saturated in the mod podge, don't ask why I'm not wearing gloves guys, just know I'm messy, it is what it is.

More Interesting Facts About,
4 new impressive dollar tree valentines day diys 2022 valentines day diys 2022 valentines day...
As you can see, I'm smoothing it out, but I'm not trying to make it look like every wrinkle, I'm just trying to get the air bubbles out. Personally, I love the texture and wrinkles, so I'm all for it. and you're going to go ahead and you'd like to do layer after layer depending on how much depth you want to add to your piece and I'll continue doing this in a second one, this is like the shorter, wider version and then I just removed the twine from the top of these and spring will be here before we know it and they will be selling them again so definitely get on them so I do the same thing I just have to.

I think like one and a half paper towels on this one because I have like rolls of paper towels that are like half a sheet of paper towel? You pick up what I'm putting down, so I go ahead and finish this. let it dry and then oh sorry I didn't let it dry, I set it aside and then I got this lace fabric. You have asked me many times where I got this from. It's from Joann's, but I got it like a million years ago. It's been so I don't know what it's called and I don't know if it's still there, but as you can see, while that paper towel is still wet, I'm taking this lace, I'll just say like applique and I'm putting it on.

It's finished and then I take the mod podge and I dot it anywhere that has lace that way, it sticks to the paper towels and everything will dry together so you can see any places that have lace that I like. between like the flower petals I tried to get it really nice and I will say wetting the paper towels instead of waiting for them to dry, which I thought was what I was going to do, it made it a lot easier because then the lace didn't No it moved on me, stuck to the wet paper towel and that made it much easier to work with.
Now I finally saw this dried and at first I thought it would stay like this as a creamy color, but it actually dries down to be as it says, like antiques, it looks like a brownish yellow, almost golden, when you see it in person and I personally think it's beautiful , you guys have to let me know what you think after seeing this final reconstruction and if you're going. I'm tempted to try it, so check it out, this is how they turned out. Personally, I think they are awesome. I love the antique look. Even the paper towel looks like lace wrapped around these pots, so let me know in the comments.
This is something you guys are going to try, that was the first DIY as you can see I've been doing a lot of shabby chic because I like doing that type of decor for Valentine's Day because I feel like it's very transitional. in my spring decor um instead of doing like red white pink and like you know what I'm saying I feel like it's more transitional for my home decor um if you want to look like red white pink traditional uh Valentine's Day decor then make sure to leave me a heart in the comments so I know and if you guys like shabby chic let me know too so I appreciate you being here with me today if you actually watch this part of the video and don't skip, will you let me a happy face emoji in the comments?
Okay, guys, you know the drill. Yes they are interesting me. If you are investigating DIY. If you are investigating this channel, then make sure to do so. Make sure you subscribe because it's a free way you could help me out here on YouTube and with that being said, let's go ahead and get back to these really cool DIYs so for these little beauties, watch this real quick, but you know the
dollar
. Getting the paper off of thetree
stuff isn't that easy but it was these that I bought last year at Dollar Tree, I don't know if they'll have them again this year and you know the back of these weren't even ugly, I don't know .I know why I felt the need to cover them with paper, maybe it's just a matter of habit, but I covered the back with paper like I normally do, but it's not necessary if you can remove the paper like it's nice and clean, but everyone knows which I love finished products so I went ahead and made this and then I took my craft knife and we're going to cut them out, we come back covered and then I'm going to paint the edges with cheesecloth, they were a bright white. which really wasn't my vibe and I really wish I had done this before gluing the paper to the back because then it got paint on the paper, but it's fine so after they dry I'm going to buy an album of cuts. paper and I bought all my scrapbook paper at Hobby lobby when it's like 50 percent off.
Now I'm going to trace my heart every time I cut something to modify podge, I always cut around the line that I drew just to give me a little wiggle room with my placement because if I have too much I can always sand off the excess so I'm going to apply some mod podge. I have found that when I apply the mod podge directly to the paper and then just put the smallest amount on the item I am going to stick it to. I have the least amount of bubbles and air pockets so I apply it and then I'm going to get my little skewey g of mod podge and I'm going to scoop out all the excess mod podge to make sure there are no bubbles and then I sand the edges.
Now I was inspired by my friend Jessica, she recently got into junk journaling and has been showing me all this really cool stuff. That's why I was inspired to do this, so I just ripped off some more scrapbook paper and applied more of that mod podge and then I'm going to apply it directly on there, so I'm going to set it aside and then I'm going to make another heart. I'm not going to show you this process because I already showed you the first one. After you finish doing that, we're going to start our favorite part, the accessories, so I'm going to take this cream.
This thread is from Wally World and I highly suggest that as you place it around the heart that you hot glue it because since the edges are curved the thread will move on you if you don't secure it so that's what I made while I was going around, so remove it there, I'm going to bring it back one more time, there you have to find the right location, you know, cut that excess off and then you, I think you're supposed to do it. be roses, I found this stem at Dollar Tree, seriously, it's the best quality I've ever seen and I only found one of them, so you know, I grabbed it, so I'm just going to grab some of that hot glue green that I will take later.
That rose, I made sure to cut the stem as close to the flower as possible so it would lay flat below. I'm going to take some of the wooden flowers and put them there. Oh, so, they both turned out so beautiful. I can't wait to decorate my house with these, and for this one I'm now going to make some lace flowers. I know there are different ways to do it, but for me what I did was do it directly on the heart, so made like a little ball of lace, I hot glued it to the heart and then I'm on the heart, I'm twisting and hot gluing it to as I progress.
You can definitely do this by cutting like a piece of felt in a circle and doing it the same way, but for me I thought, well, why do that? I could do it right on the heart, so it was a lace ribbon and now I'm going to take a little bit. I took a gem, now I'm taking so you can Look how I started that little knot right in the middle, this is actually my veil, my wedding veil, it was too long when I bought it and the seamstress cut it off and I saved all the excess for that you could see how I am.
When I twist it, I'm twisting the tulle, putting that hot glue directly over my heart and then just following it until I get the size I want and I thought this was a lot easier because I was trying to make it like off the heart and it just wasn't turning. as flat as I wanted, so okay, get out of there, okay, and then in this bag of jewelry that I bought at the garage sale this summer, I found this little piece that looked like a brooch and I was like, yeah, that. it's so beautiful so I'm going to hot glue it on there and then I'm also going to take some pearls from the costume jewelry and hot glue them to the side and then we'll finish personalizing these ladies and see how they turned out love them love the paper from the scrapbook i love the torn edges and look at this one with that red rose oh my gosh girl yes let me know which one is your favorite the one on the left or the one on the right ok so here's another new thing i've never seen before I had tried it before, so we are trying it together.
I'm going to bring some bowls, some mats, this rigid mod podge. I've never used this stuff before you guys. I saw something on Pinterest and was I want to try that, so I immediately ordered it on Amazon. Well, I put on some gloves for this because I didn't really know what I was working with. I'm taking these beautiful mats that one of my subscribers sent me and First I start with a little bit and then I'm like, oh, I'm going to need a lot more because you have to completely immerse whatever you're making in the product and now I'm working the product through the mat to make sure it's on every inch of this piece so as you can see, I'm looking to make sure there are no dry spots.
I play it now, I don't know if I was supposed to, I didn't specify it. I didn't see any videos about this I just saw a post that said rigid and then mats and I was like I was doing that so I put this upside down in this really cool bowl from Dollar Tree and then I'm making a little a little mat and now I'm going to use a glass container. I think I read that it works better if there is plastic wrap, but I didn't really have any problems getting them out of the containers, so I wanted to try a thin lace material just to see later. they dried what would be the difference and you guys this is all you had to do for this DIY and you make the most beautiful bowls little trinkets uh plates I mean I was blown away when I took them off after they dried.
I let them dry overnight and then with the pink lace I just cut off the excess and look at these, look at these ladies and gentlemen, look at this, do you see anything kind of bristling around the edges? It is so rigid that pink is not. It's as stiff as the mats and you'll see it's super flexible and then this little guy is like a trinket dish, oh my gosh, let me know if you're going to try this. It's okay, because they shook me good for this one. It's one of the wooden hearts from Dollar Tree.
I know they will wear them this year. This was dyed from last year and I never used it. Then I'm going to take this fabric paint. In fact, you can get puff paint at Dollar Tree. and I'm going to make these swirls around this heart now, if you've been with me since last year, I actually made these on Easter eggs and they were absolutely beautiful, so I won't force you to watch me put this all over the heart. heart, but I'm going to put it all over the heart and then after it dries, I'm going to take our Rust-oleum pink blush and cover it all over.
If you guys are like that, you did all that and then I'm just going to cover it up, you see, we'll take it out again, don't worry, so I give it a thin coat of that one coat. Now I'm taking my old wax and I'm putting the The lightest amount on my brush, the lightest amount. You can see I'm dipping into the lid and then dipping to the side and removing the excess and you can see it brings out all those details again. Is awesome. This is a great way to put designs on a flat surface, so I let it dry and then you know, it's time to personalize the accessories, so I'm going to grab this lace.
It's actually like elastic lace. I used to use it for baby headbands and I'm going to squeeze it like this, this spatula is from the makeup section at Dollar Tree, it's like a silicone spatula, so I'm going to pull that and then I'm going to hot glue momo, uh , pull this tight, cut off the excess lace and then let's wrap it or I'm sorry, I'm sorry, I'm distracted, I have a little boy sleeping next to me and then the dog trying to lick him and I'm like, oh my God, he's good,so now, once again, I take costume jewelry. part of this pearl necklace I'm going to place the center bead first that way you could just pick up the right and left side and put a drop of hot glue in a straight line and just place it down now let me tell you if you are using Like the pearl Put the
dollar
tree
beads on a string first.Instead of trying to place them one by one and it will save you a lot of time, so I'm going to glue this other side down with hot glue. Now I'm taking this little piece of triangular lace and I'm going to cut it out. all the way to the top I don't cut it all the way, I just cut it all the way to the top, leave about a half inch up there and then I bunch it up and almost basically make it like a tassel, that's basically what I did. except I didn't cut it strand by strand, so I'm going to tie it and then I'm going to hot glue it on my left side, it's very easy there and then I'm going to add some flowers and you.
If shabby chic colors are not your thing, you can completely turn them into traditional colors like a red heart with a piece of white lace, I mean the options are really endless when it comes to this type of decoration, I just like it. It's because the pinks, the florals, all of this transitions nicely into spring, so I don't have to take it all off when that time comes, so I embellished it with some of these little rhinestones here. I just felt like the lace needed something because it was so wide and then I'm going to thread the thread again.
These are the largest dollar tree pearls and what's amazing is that this thread has that hard plastic at the end so it was very easy to string these. Pearls, guys, that's it for this one I just finished. I did, if you see on the left, I left a little bit of space so that the beads weren't on top of the heart, but rather on top of it, I hope you're catching what I'm leaving and this is what it looks like. I love it. It's already hanging on my carry tree just as they walk in the front door.
I love how it turned out. I love all that texture. Are. feminine and beautiful I love it guys please let me know what you think about this video below and I'm so excited to post every Tuesday and Saturday again and I'll talk to you soon bye oh I'm a mess ok anyone ? watch the crybaby pop your face or she doesn't like it oh im talking to myself ok real talk i ordered an embarrassing amount of food from taco bell the other day and there was a part of me that said you shouldn't be embarrassed because you're eating for two but then I thought this is a lot of taco bell you know what I'm saying and I ended up only eating two of the six things I ordered which I thought I was like oh that looks good but then it looks good and then it looks good, but I'll tell you if you have a chat about the two dollar chipotle chicken burrito that was mom that was mom I liked it I liked it you should try it okay?
Alright guys, to my friends who stay until the end, you are literally like my writer died for sure and I appreciate you being there until the end because it makes me feel like you want to spend more time with me, but I wanted to do something special because I wish it could be all of you, but one of you will win a little. I don't know if I want to make a gift box or something, but I'm sure I'm going to put In one of these rigid mod podge bottles I ordered one for some reason, three came, but I mean you use a lot, so one of these I'm going to Cut some of this lace fabric I have and I will send that too.
Then I'll also send a dollar tree calendar or maybe a couple things from last year. I don't know if I have any from this year, but I'll check it out and then probably some other things, so that's all you have to do. To enter you must be a US resident 18 years or older. One day you guys, when I'm rich and famous, I'll definitely ship to Canada and stuff when I can afford it, but then, 18+ US residents and you guys in the comments don't comment, I'm entering the giveaway, okay all I want you to do is put your usual comment and then put three emojis, three emojis for those of you who don't know what emojis those are if you open up your keyboard and the smiley face, click on that and then a bunch will appear of faces, put three of them, three of them and then I will know that you have come this far and that you want to participate in the drawing.
I will comment on your comment, so If you see an email pop up, don't just delete it from YouTube, it's probably me and then I'll have you email me. I will also have you send me a photo of your ID card. Yes, people spam and like it. Try to get it. these little giveaways all the time so it's just extra protection so yeah I'll do it next Tuesday I'll pick a winner and comment and then I'll also put it on my community tab okay now I should probably record. this introduction
If you have any copyright issue, please Contact