Surprise Kids' Bedroom Makeover| DIY TRIPLE BUNK BED| *FUN SURPRISE REVEAL*
Apr 03, 2024Well, what am I saying? What am I doing? Hey, during the three weeks I was at my brother's house, I decided to make my life a little harder and tackle a completely different
makeover
, but all the extra stress was definitely worth it because it was a very specialmakeover
experience for some of my favorite people and of course I was trying to claim my ant of the year title, okay little goober you ready to go see your new room. Hey guys, what's up? Welcome to my channel if you saw my last video. Guys, you know I'm in Washington DC helping my brother clean and renovate his kitchen.
Well, this week we're going to take a little break from the kitchen renovation because while I'm here I talked to my brother and sister. -law allowed me to do a fun makeover in the
kids
bedroom
and since my brother lives in a city he has a classic city townhouse and most townhouses have threebedroom
s and my brother has fourkids
, which means three children share this bedroom. So this is going to be a fun and challenging makeover to make sure that this room is as functional as possible but also so that each child feels represented through the design and I don't know if you can tell by the There's a sound with a lot echo here, but this room is already clean because we had to clean it so the floors could be sanded and re-stained, so all I have to do is remove the shelves behind me and I can start painting to begin with.
More Interesting Facts About,
surprise kids bedroom makeover diy triple bunk bed fun surprise reveal...
This makeover was done on time and I also had time for all the projects I had in the kitchen. There was a lot of multitasking that had to be done and I'm pretty sure this is the hardest I've ever been juggling all of these projects, so it was a lot of back and forth jumping between the two spaces working on a project in the kitchen and then running up stairs upstairs to work on a project in the kids' room and if I could work on a project for the kids' room in the kitchen, I definitely did that because it made it easier to jump back and forth between two projects, so when I sat down to design this space I had a lot to consider.

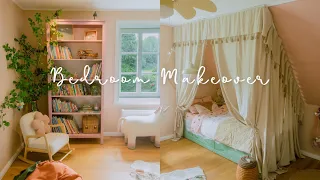
I wanted this room to be as functional as possible with three kids sharing a room. Functionality was key, I also wanted to make this a really cool space, it's a townhouse and the rest of the house was getting a really cool makeover so I wanted this room to play with some of the other design elements that They were happening throughout the house and in the largest part. The most important thing I had to consider was that everything I chose to do had to have a big impact but not take too much time, so I basically broke this makeover into a bunch of small projects that I spread throughout my life. other kitchen projects and my niece and two nephews share this room, so this design couldn't be too feminine but also not too youthful, it had to be a mix in the middle and also they are not like little children.

They're seven, five, and three, so I wanted them to be able to grow in this space so that years from now they'd still think this room is cool, and since this room really isn't that big, I wanted to make sure it felt cool. as big as possible, so what do we do when we want to make a room feel as big as possible? We keep or paint the walls white, but of course I always like to do something, so I chose two walls that I worked on the design and layout and painted them black. Well I only painted half the wall black and adding this little half L shape of black did a lot to the room, it definitely added dimension and I also think it made the ceilings feel higher because the black really enhances the space , while the white above really catches the eye and also because I was planning on putting a lot of colorful things in the room, it's a kids room, I wanted it to feel colorful.
I also thought that if I kept the walls completely white two things might happen: one, I think it would feel too childish, so in a few years they would definitely have outgrown the space, so I think the black aged the room and two, I think if If the room was completely white with all these colorful elements, it would also feel too feminine and one of the main colorful elements I was putting in the room were three dressers, each a different color, so I thought that these dressers would go out of the black of a much cooler way that fits the vibe I was going for compared to if I just kept the walls white, yeah okay, so I have another coat of paint that I'm going to have to apply on these two black areas, but I have to let it sit for a while, so I'm going to start painting the three dressers I bought.
Kids definitely need space to store their clothes, but I also didn't want to take up a lot of space with a very large dresser, so I went to Ikea and bought three of the rast dressers. It's a cute little three drawer dresser and I'm going to paint each one a different color to bring a fun and colorful element to the room, but since it's small it will be perfect. for kids, but they don't take up much space, so it's okay guys, these two projects working on them simultaneously right now is kicking my butt. I'm really sleepy today, okay, so I thought I'd at least start painting the dressers yesterday.
It didn't happen that my brother came home from work. He helped me finish the painting. There are a few areas I need to touch up on the walls, but all I did was put the dressers together and then I left, went downstairs and started on the beautiful project. is the kitchen renovation that you guys will see in part two, so now that the dressers are together, I'm going to start painting, so I talked a little bit about this in part one of the kitchen renovation, but about a month before we finished. I started the kitchen renovation, I drove to my brother's house to help him and my sister-in-law plan some final details in their kitchen design and that's when I saw my niece and nephew's room and instantly wanted make a bedroom makeover and one of the things I saw that my niece and nephews needed was some storage.
Originally, the three of them shared the only closet in the room and that wasn't enough space, so I knew I needed to find a solution for their clothes. and I thought that if I had just one large dresser, that would create some problems: two children might have to share a drawer, so it wouldn't be easy to organize, and at the same time, a large dresser would be quite bulky and take up a lot of space. Lots of space and something my sister-in-law was hoping to get with this makeover was enough space in the room for the kids to play in there.
They have a game room in the basement, but she was hoping for a secondary space. where they could play was not the living room on the main level, so when I saw these cute dressers at Ikea I knew they would be perfect if each child had their own and since these dressers were untreated pine, they were very easy to paint at Ikea . They even advertise them as a piece of furniture that needs to be painted or that they encourage you to paint and since each dresser is a different color, each child would know exactly which one is theirs, so this would not cause confusion when organizing their things. and this also gave me the opportunity to get some things to display on each dresser that uniquely represent each child and some of the things they like and after two coats of paint I finished these dressers with a top coat of polyacrylic and added these leather handles that I bought on Amazon so now comes the fun project and I think the project that changed this room the most and also made it as functional as possible so as you know there are three kids sharing this room.
That means that there have to be three beds in the room and, being a small space and wanting to leave as much space as possible so that the children could still play in the room, there was only one logical solution: a
triple
bunk
bed and This is what it will give us a lot of extra space in our room for activities, so of course this was the smallest little project I did for this room, so my brother and I tackled the first part of this build together. to make it faster and two, there are parts of this project where you definitely need two people and also one of those people had to be much stronger than me and this had to be very well constructed because there would be children. climbing everywhere, so it also made me feel better to have my brother there and have his eyes on this project, so if he was comfortable with his kids climbing all over this bed, I was comfortable with his children will climb all over this bed.I also have images. he was there, so if something happens, no one can blame me. I started outside, cutting a bunch of two-by-sixes down to size and the two-by-sixes are what we used to build the frames that the mattress sits on and then we took two two-by-fours. I tore them in half and then cut them to size. These are the pieces that we attached to the inside of two of the frames so we could add slats on top to hold the mattress up and once I cut all of this out. I moved inside and started putting these frames together using pocket holes and the
bunk
bed my brother and I had designed was not the typicaltriple
bunk bed where I personally only have three bunk beds stacked on top of each other if I had to sleep. something like that would make me feel quite claustrophobic and I didn't want this bunk to have that feeling, so the bunk we had designed had more of a zigzag pattern and this was going to give the child in the bottom and middle bunk more space above their heads and Once these three frames were built, it was time to start lifting and placing the middle and top bunk, so I went out and cut five two-by-fours to seven feet.Originally, my brother and I weren't sure exactly how tall we wanted to make this bunk bed, so by cutting it down to seven feet we were able to figure out how tall we wanted it to be while putting this all together, so we started by putting a 2x4 in the corner of the bunk bed. frame that was going to stay on the ground and we used a bunch of three inch long screws and then at each corner we also made sure to use at least one five inch long self tapping screw and then we took that fifth two by four that we attached that on the front left side of this frame that remained on the floor and this would not only add more support for the middle and top bunk, but these two left front pieces were going to be the ladder to the bunk, so we pushed the frame bottom towards the corner where it was going to stay and then we took a second frame, placed it on top and then pushed it so it was touching the other wall so we could start creating this zigzag pattern.
I quickly determined how high off the ground we wanted this middle bunk to be marked and this is the construction part. Two people were definitely a big help so my brother lifted the frame up to where we wanted it to be and also watched the level at the same time to make sure this frame stayed level and I quickly screwed it into place and at first added just one screw to each 2x4 to get this frame in place and level and then I went back and added more support with more screws and then we basically repeated the process: the top bunk went directly on top of the bottom bunk so we put it in place and, Of course, my brother then had to lift it closer to his head, hold it in place, and make sure it was level while he quickly screwed it into place, so with the frames all together and in place, my brother simply told me let me work on this project alone and if you're a little squeamish, I could skip ahead by like 30 seconds, maybe a minute. so bad there's blood everywhere the face was a terrible idea why don't you let us do that so my brother left me alone because he had to go to the doctor we were working on a kitchen project and he went out to destroy a two by four and Without going into too much detail, let's just say the day ended with six stitches and a broken finger, so this is a warning.
Be careful when using saws, especially table saws, use earpro, use ipro, wear gloves, take your time. so you don't get hurt and leave your sister to do all these projects alone, right, bonnie? So now let's build this bed again, so the middle and top bunk definitely needed more support, so I started taking a whole bed. a ton of measurements taking those measurements outside and cutting a bunch of two by fours to the right size so my brother would get home just in time to help finish this bed we added a few last two by four support pieces and then anchored too the upper bunk. to the wall and once this thing was anchored, this thing was going nowhere and my brother and I felt very confident that his kids could climb all over this thingand it wasn't going anywhere.
Look at that, it looks like what you would buy. from a store and the last thing I did to finish this first day of building this bunk bed was to add the slat boards on the middle and top bunk. We were originally going to cut a bunch of two-by-fours and lay them out. in place to hold the mattress, but on one of the mini trips my brother and I had to take to IKEA, he saw these slats that IKEA sells for their beds, so we ended up buying a package meant for a king size bed and that It ended up being everything we needed for the middle and top bunk, so I hope today is the last day I'm working on this room because it has to be because I only have three and a half days to finish this room and all of my projects. that I have in the kitchen, so I'll start by sanding this bunk bed very well.
Yes, I probably should have sanded all the boards before putting anything together, but I was trying to make the most of my time with my brother because building these bunk beds without him would have been nearly impossible or I would have just had to get very creative with how I put them together. I built it and then sanded it, I'm going to paint all the stair components and put them together and then I have a wall to touch up and then I'm going to move on to all the fun projects I still have planned. Spoiler alert for my niece and nephews.
I didn't finish the room that day. I tried my best. I worked long hours, but there was too much to do and honestly, these two days were a blur. I was basically on a tornado project. I just worked and worked and worked in this kitchen room until everything was done and honestly I'm not even sure what order I did things in so I'm just going to take this section of the room at a time. If you see me jumping back and forth between two different sets, that's why I wanted to leave most of the bed in this natural wood because it played with the design and color scheme that was happening throughout the house and I wanted This bed had a bit of an industrial feel and I also wanted the ladder to stand out from the rest of the bed, so after sanding everything, I taped the wood together and only painted the pieces that make up the ladder and just used a little bit of paint. what was left over black paint off the wall and my brother only had these inch thick oak dowels that I used for the last few steps so I wanted to add a personal and cozy touch to each bunk bed so I started by getting these three wall sconces and adding a light in each bunk.
My brother was against this idea because he thought his kids were going to keep playing with the lights when they were supposed to be sleeping, so I told him I would find a solution, so what I did was get a pack of these lights from LED disk and using a command tape, I put them up to the sconces and they are operated remotely, so at the end of the day when the kids are supposed to be sleeping, my brother can grab the remote and they can't. I turned the lights on and off so when I turned on the lights and a few other things on the wall in the room the ladder components were dry so using some one inch pipe straps I used them to attach the pegs to the posts of ladder and I really love the way this ladder turned out, it gave this bed a really cool industrial look and then the next day or at least I guess it's the next day because my clothes are different, I sealed this unpainted bed and painted the areas using some polyacrylic and then I got to work finishing up adding some more cozy and personal touches to each bunk bed.
Oh, okay, now let's come back one day to work on the wall above the dressers, so something, my sister. -What I really wanted was a fun gallery wall built into the room and something I wanted to be a part of this gallery wall was for the kids to be able to add their artwork whenever they wanted, especially my niece who is always painting, drawing and sewing. and it's basically a minnie miley, it's definitely a future diy so taking a 1 by 4 I cut it to size and screwed it into place right above the line where the black stopped and then I got a pack of these black clips that I screwed. place it evenly across the board so this was a very quick and easy project and the perfect place for my niece and nephews to display their artwork or whatever they wanted on top of their dressers and in every inspirational photo I saw for the kids rooms there were two things that I saw in each picture so I decided to do both and the first thing I saw in each picture of the kids room was a pennant on the wall so to make this pennant what I did It was measuring and marking the shape and then cutting it out. and using my ipad I figured out what I wanted the pendant to say and it helped me visualize how to make and cut out the letters and once I got to what I wanted the pendant to say I took the shape I had already cut out and placed it on the black felt and I cut out the same shape so I knew the letters I was making would fit the shape, so of course I just drew these letters freehand and cut them out so they were by no means perfect. maybe if you have a cricut or something you could use that and get crisper letters, but at the same time I also like that the letters are perfect and look handmade because I think it fits the vibe of a child's room.
Of the pendants I saw online that were perfect and clearly made by a machine were more elegant looking and looked like maybe they should go as a college dorm room and not a kid's room and there was only one final project I really wanted to do for finish this room. Did I have time for it? No, not really, but I was determined to do it, so in each children's room in the photo, I saw that each room had a velvet pillow with letters on it and when I saw this I just thought they were the cutest.
I wanted to buy a letter pillow for each kid to put on their bunk bed and originally, because of the timing and everything, I was going to buy one and some of these pillows are like 60 plus shipping, so with three pillows I was looking at about 200 or over 200 for these three pillows so that's when I determined we had to make them we have to make them and like everything in the room I started this project one day and finished it on the second day and originally I had no paper or nothing I could use for a pattern, so I just freehand drew a j which is a tongue twister.
I freehand drew a j and then on the second day there are a lot of tongue twisters and then on the second day. The day I bought some cardboard paper that I used as a pattern for an eye pillow and a z pillow and although my niece's pillow turned out well, the pattern for my nephew's pillows definitely helped and made the pillows look great. cleaner and prettier so eventually When I have time I'll probably make a new pillow for my niece and she'll wonder why she has the exact same pillow and I'll tell her because your aunt can do it better so your aunt did better , Yeah.
I started by cutting two of each letter and for the z and j I made sure to turn the pattern over to get the mirror side of the letter and for the eye of course I didn't need to do that because they were both exactly the same and then for each letter I cut a bunch of strips four inches wide and long. These were the pieces I used as the pillow wall to connect the two letters and this is the part that is really important to do so you don't get a pillow with twisted and twisted letters.
I really took my time and attached this four inch long piece along the edge of each letter and at each corner I made sure to mark the corner that formed it with a ruler. So when I went to attach the second letter I knew exactly where the corners needed to meet and the only place I could sew in my brother's house at the time was on the new kitchen island, so pretend you don't see anything on the kitchen, although I'm pretty sure I took very close shots so you couldn't see anything in the background and something I would recommend if you are a new sewer and want to try making one of these leather pillows. is to use a fabric that is not velvety or slippery like the one I used, if you use a cotton fabric or a knit fabric or something like that, it won't slide or slide all over the place and it will be much easier to work with or If you want To make this even easier, you can just cut out two letters and sew them together instead of adding the little wall to give it a more three dimensional look and once all the pillows were sewn I of course left a small hole in each one. pillows so I can fill them with fluff and I never buy the polyfill that you can find in almost any craft store, those things are always very expensive.
What I do is I go to Walmart or Target, get the cheapest pillow there and I opened it up and used the lint inside those pillows, so the two pillows that I was able to fill with the three letter ones were six dollars each and that It took the grand total to make the three pillows to thirty dollars and I am very happy. I took the time to make these pillows because I'm obsessed with how they turned out, except I can do better. Well, guys, today is a great day. I have two
revelations to make.
surprise
revelations to make.I'm going to do the one in the kitchen downstairs and then come here and of course do the one for my niece and nephews, but I need to spend a few hours fixing up this room. I finally have all the pictures and the pillows and the bedding and everything finally arrived so I'm ready to get this room ready and get it ready for them so now okay little fools you're ready to go see your new room, yeah are you ready? Okay, guys, keep going with how, oh, oh my gosh, oh my holy Molly, I'm going crazy, I love those little ones.
Goobers and if that didn't warm your heart I don't know what, I'm really happy with how this room turned out and for it being a pretty quick little makeover I think this is my favorite project I've done so far it's exactly What I was imagining in my head is that it's fun, it's colorful, it's functional and it also has that cool city kids' room vibe. This bunk bed was a great change for this room. The children now have space in the room to play. My niece has already started hanging up. He collects all of his artwork using those clips and for the most part I think it's also easier for them to keep the room a little cleaner and organized so I know my sister-in-law likes that because I think that's what that moms like.
I'm not sure I'm not a mom so I hope you like this video, as always, thank you very much for watching and I'll see you in the second part of the kitchen renovation, bye guys, amazing, you like it, oh well, they like. 'you are good
If you have any copyright issue, please Contact