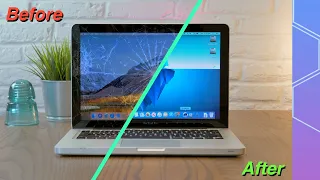
How to fix up an old MacBook to use in 2018!
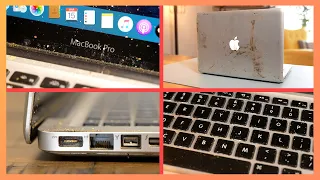
Mar 12, 2024So today we're going to go over these steps I use to breathe new life into an older unibody MacBook. So what I have here are a bunch of unibody MacBooks. A lot of people have these older unibody MacBooks and have stopped using them because they got too slow or too old, but they actually have a lot of life left in them, so with a few simple tricks, a little money, and a little hard work, you can put them running very, very well, so for today. video I'm going to do a demo on this late 2011 13-inch unibody MacBook Pro and we're going to follow these steps that I use whenever I'm restoring or I guess it's not really a restore but whenever I'm fixing up a MacBook to use it in
2018
, so not only will we be updating this machine, but we will be cleaning it and giving it some much-needed attention, so while I turn this machine off, let's talk about what we're going to do.
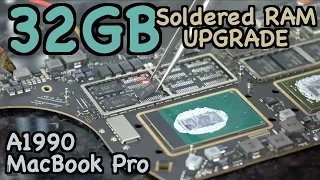
Do it today so the first of many problems that many people have with these older devices is slow mechanical hard drives and smaller amounts of RAM so my machine has the original configuration which at the time was a 500 gigabytes and 4 gigabytes of RAM. Now the hard drive has a lot of storage space, but it's not really that fast, so I'll upgrade to a 120 gigabyte SSD. I bought this on Amazon for about $30 the other day, so it's not an expensive upgrade, but it will do. a lot to increase the speed and performance of this machine, plus I am also going to upgrade the RAM to 8 gigabytes, something that is a little more expensive, around 40 or 50 dollars depending on where you find the RAM, but it will definitely come in handy for machines like this that we want to use with more modern operating systems and tasks, so one of the problems that people have with these older computers is that they get very hot and there are a couple of reasons why this is the case, The first is that there is simply not very good cooling in these unibody MacBooks.

More Interesting Facts About,
how to fix up an old macbook to use in 2018...
There's actually only one vent and it's both the intake and exhaust for this machine, so it's really not that good for that, but the other two reasons are that these machines have really bad thermal paste. applied from the factory and this particular one is seven years old so I can't imagine it's working very well besides and this is something I've already addressed a little bit but this machine probably has a lot of dust inside so if we clean the fan on the heat sink with our compressed air. We should be able to increase the amount of air this computer can pass through it, so without further ado, let's open this device and get started.

I'm going to grab my iFixit tool kit. and I have already removed some of the screws from the bottom case, but you only need a small Phillips head screw to remove this bottom case, so while I remove it I want to point out that this is not It will be a step by step guide where I will show you every detail because this is something I like to do on all unibody MacBooks regardless of screen size or year, so the steps may vary a bit. kinda this is a 2011 like I said but it may be a little different depending on which model you are upgrading so for more detailed tutorials of what you want to do with your computer I definitely recommend going to Fix It for detailed tutorials that will belong to your specific device and it's also where I got this tool kit so that's good too so now that we're in there what I'm going to do is take out the hard drive so this is a mechanical drive and we're going to Lo we will update now.

One thing to keep in mind when doing this is that the hard drive is mounted with these screws that hold it in place and you will want to save those screws to put on the new drive and with those transferred screws. I can put the hard drive back in and screw on the little bracket. Okay, now the next thing I'm going to do is take out the RAM, so if you just want to replace the RAM and you're not worried about doing those things with the thermal printer. Glue or clean the heatsink, you can just insert the new RAM, but for what I'm going to do now, since I'm about to take the motherboard out, I'm not going to put the new RAM in until we have this motherboard.
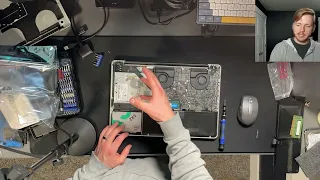
Everything was fixed fine so the next thing I'm going to do is clean this motherboard, remove the dust from the fan and heatsink and replace the thermal paste, so the first thing I'm going to do is take out the fan so we can clean the blades. , so once I take the fan out, I'm just going to take some compressed air and blow it out there, okay, so we're going to put the fan to the side and now I'm going to take out the motherboard okay, now comes the hard part, we're going to take out the motherboard and we will rest it on this microfiber cloth so that the table does not get scratched because it is a somewhat delicate process.
Gotta make sure you're careful, we don't want to damage anything, it might be a little tricky getting these guys out of here, oh god, this board was a little stuck. I'm going to take out the battery real quick. the plate was a little stuck to the top of the keyboard that's weird mmm wow that's dusty holy moly yeah this is definitely going to clean up oh my gosh I say the heatsink sticker was actually glued to the top of the keyboard cover. Whoa, whoa, okay, so let's get this out of the way now. I'm not sure how well you can see this, but this is a dirty, dirty motherboard on the bottom.
Look at that. Wow, no wonder this thing is having trouble cooling down. I can Imagine the thermal paste underneath, there is garbage and look how dusty it is. Wow, okay, so our old friend, compressed air, is back. Wow, it's really amazing how dusty these things become. Now let's work on removing this heat sink. I'm going to use this thermal compound from Hyper Foreman, a cooler maestro, which sounds fancy, but was like six bucks at micro Center. Oh wow, that's amazing. I need to get my phone out again to show you how little thermal paste there is in here.
We see that you can see the brightness of the CPU, which is really surprising. This machine was running very, very hot and the fans were always on. Now I know why you look at that. It's absolutely stunning, so I'll just use a little. Some paper towel here to clean up this really crappy thermal paste in here, it's not too hard to clean up because there's not much in here that really, guys, I've never seen a CPU. I have performed this procedure many times. and I've never seen such a lack of thermal compound, it's really embarrassing to see that little bit there, okay, now we're going to take our thermal paste and we're going to stick it there, then we're going to spread it out a little bit, not too much, okay, now we're going to put it back the heatsink, here we go, so every time I put the heatsink back on I would like to put all the screws in lightly and then tighten them so that we get a nice even pressure across the entire CPU because I don't want to force anything, We're working with delicate components here and you want to be really sure that you don't overtighten, I definitely don't want to overtighten, okay?
So now We have repaired the motherboard and we are going to put it back in this machine and now of course this wouldn't be a technical repair if we didn't have some obstacle, there is a small protrusion on the heatsink and it won't lie flat to Unless you take out the speaker a little. One very important thing to do is that when you have the motherboard seated, make sure you turn around and check that all the connectors are on top of the board because if you get them stuck underneath and have to take the whole board out again, so it's good to make sure they are there before you start screwing the motherboard back on.
Finally we're going to upgrade our RAM here, put in the eight gigabytes, okay? Now we can put the lower pace back finally okay, so now that this machine is reassembled we can test to make sure we set everything correctly. Of course, I already installed Mac OS on this SSD, so we should be ready. Well, when you see that login screen, we should be ready to go. I'm going to log in real quick so as you can see this repair didn't take long. It took me about 40 minutes to complete everything. updates I made here so it would have taken me less time but I ran into a couple of bumps in the road and the logic board got stuck a little but other than that everything went very well and it's really not too difficult. to work on these older machines, so now this machine is very well updated, we have 8 gigs of RAM, 120 gigabyte SSD, nice new application of thermal paste, this machine should be ready to go, of course this one is not It's the last one you're going to do.
Starting this 2011, I will have a video dedicated to this because it is an interesting story, but that will be enough for today's video, so of course be sure to LIKE and SUBSCRIBE and consider following me on Twitter at Loot Vianney and I did not forget it. To join my subreddit, the link is in the description below and with that I'll see you in the next video.
If you have any copyright issue, please Contact